In this day and age, streaming is at the forefront of the new normal so you could do with a streaming server. In this project, you’ll learn the basics on how to set up a private streaming server that will allow you to receive, manage and combine several streams into one to then re-stream to any platform. We’ll be using NGINX, a server application which we’ll configure to run as an RTMP (Real-time Messaging Protocol) streaming server on a Raspberry Pi. We’ll use OBS running on a separate computer to combine a number of streams together and broadcast them to the world.
1. Get your Pi ready
You should start with a Raspberry Pi running the latest Raspbian, connected to screen, mouse and keyboard. If you’re using the OKdo Pi 4 starter kit you can learn how to get it ready here.
The OKdo kit is strongly recommended for this project as it includes heat sinks and a fan which will be very handy to keep your Pi cool as it deals with all the video processing. It is also recommended that you use a network cable for your Pi’s internet connection as this will improve the reliability of your streaming.
2. Install NGINX
- On your Pi, open a Terminal window and enter the following to install NGINX:
sudo apt install nginx- We now need to install the RTMP extension for NGINX by entering:
sudo apt install libnginx-mod-rtmp
3. Enable RTMP
- We will now create the file that contains the RTMP server configuration. To do this enter:
sudo nano rtmp.conf- Add the following to the file and then exit, when prompted type y to save and then return:
rtmp {
  server {
    listen 1935;
    chunk_size 4096;
    application live {
      live on;
      record off;
    }
  }
}- Enable the above configuration when NGINX starts by editing nginx.conf, to do this enter:
sudo nano /etc/nginx/nginx.conf- When the file opens, add the following after “include /etc/nginx/modules-enabled/*.conf;“:
include /etc/nginx/rtmp.conf;- Save and close the file.
4. Start NGINX with RTMP
- In Terminal enter:
sudo systemctl start nginx.service
sudo systemctl status nginx.service
You should now have NGINX up and running. You can check it by opening a browser window on your Pi and pointing it to your Pi’s Ip address.
5. Configure OBS
- On your host computer, download and install OBS.
- In Preferences>Stream, enter the following:
Server: rtmp://YOUR Pi's IP:1935/live
Key: test
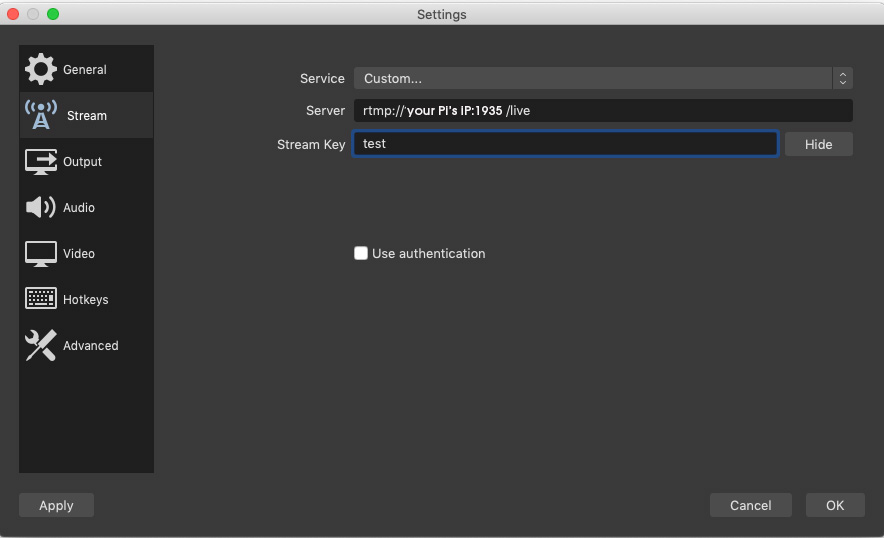
“test” is our unique stream key, we just made it up by entering it in the preferences. You can basically make up any stream key and stream to it. For simple purposes, authentication isn’t necessary in my experience.
- Set up a test source in OBS, this could be a webcam, a video source…
- Press Start Streaming in OBS.
- To see your stream on the Raspberry Pi, open VLC and go to Open Network Stream and enter the RTMP URL that you used for the OBS preferences including the Stream Key at the end:
rtmp://YOUR Pi's IP:1935/live/test
If all is well you should now see whatever you’re streaming from OBS on your PI. It takes a little while to start showing so be patient!
To add more streams to the Pi, you just need to have a different Stream Key for each source, in our case, this could be rtmp://YOUR Pi’s IP:1935/live/test2 for example.
6. Mix streams with OBS
Now that you have your Pi receiving multiple streams, you can mix them live with OBS.
- In OBS add Media Source.
- Uncheck Local File.
- Enter the following:
input: rtmp://your Pi's IP:1935/live/test
Input Format: rtmp
You can add as many different streams as you have, refer to OBS documentation if you need help creating scenes mixing etc…
At this point, you have an NGINX RTMP server receiving streams which you can mix with OBS.
7. Stopping NGINX
To safely stop NGINX running before switching off your Pi in Terminal enter:
sudo systemctl stop nginx.service
8. Accessing the NGINX server remotely
Exposing ports outside of your network opens you up for attack. Ensure that you understand the risks and that you take the necessary security measures.
With the set-up so far, only devices on your local network will be able to access the RTMP server on your PI. To enable streams coming from the outside do the following:
- Refer to your router’s documentation and enable port forwarding of port 1935.
- It is advisable to set up a dynamic DNS
You can find information regarding these procedures here.
Like what you read? Why not show your appreciation by giving some love.
From a quick tap to smashing that love button and show how much you enjoyed this project.

