If you’re looking for a secure online file-sharing platform, the ROCK 4SE is powerful enough to run a low-power file server, allowing you to share files securely of any type, including various documents, audio & video files, and streaming media to multiple devices on Linux, Mac & Windows over the local network using Samba.
This project shows how to set up an Ubuntu Samba server using a ROCK 4 board, paired with an SSD drive for storage.
We show how to add SSD drives to your system, create a Samba configuration for sharing music files between a group of users and how to set up a secure private access to documents for individual users on any device.
What is the Samba server used for?
Although we’ve chosen to show how to share media files such as audio in this project, the Samba server is ideal for sharing any type of content and files to any device on the network. For example, it can even be used for document sharing in an office environment.

Licence: Various – see Ubuntu.
Step 1: Ubuntu Install
We assume that you have installed Ubuntu Server on your ROCK 4 board and that you can connect using SSH from another Windows / Mac / Linux computer. There are step-by-step instructions on how to do this in our Get Started with Ubuntu Server & ROCK 4 guide.
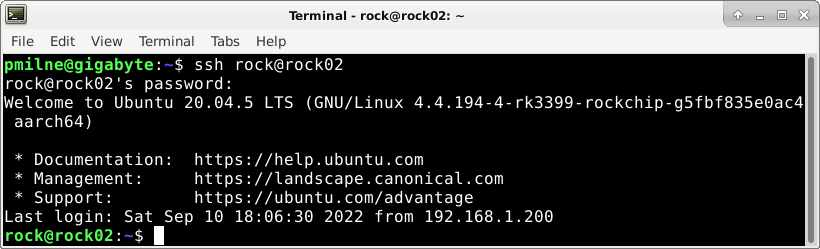
- Boot your ROCK 4 and start an SSH session on your host PC
Tip: We changed our ROCK 4 hostname to ROCK02 – you can name yours what you like.
Step 2: Adding SSD Storage
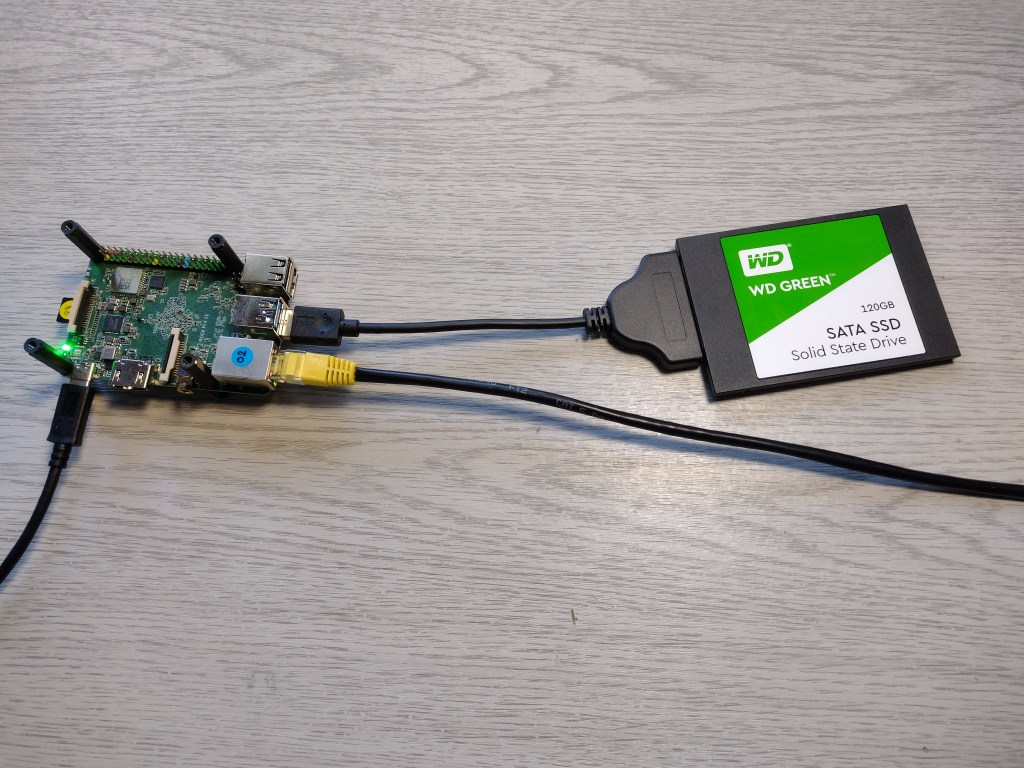
SD card / eMMC storage has limited capacity and throughput compared to dedicated storage media. For this reason, we show how to add a Solid State Drive (SSD) as a storage solution. These drives range in capacity from 100’s GB’s – several TBs and are available in 2.5″/7mm cased and M.2 2280 form factors.
We attached a Western Digital 120GB WD GREEN ™ SATA SSD using an external USB to SATA cable. The drive should be formatted with a Linux ext4 file system to ensure a secure setup.
- Attach your USB drive to the lower USB 3.0 (Blue) socket and wait for it to sync.
Step 3: Mounting Disks
Before the file system can be accessed, it needs to be mounted. Our drive will be permanently attached to the board, so it will be set up so that it mounts automatically when the system boots by making an entry in the fstab file.
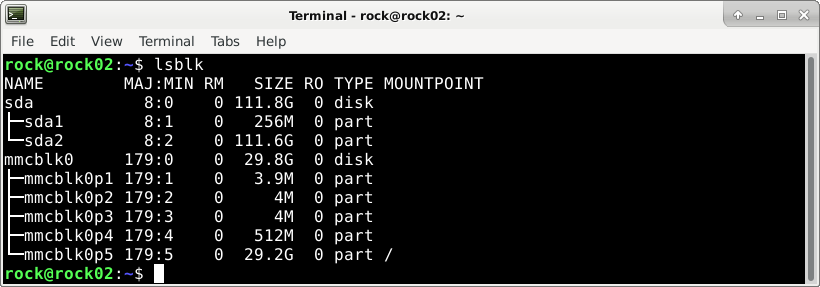
- Use the lsblk command to see all the disks attached to the system
lsblkIn the screenshot below, you can see 2 disks are attached.
- mmcblk0 is the microSD card with the Ubuntu operating system – it is split into 5 partitions
- sda is our SSD drive with 2 partitions – the sda2 partition (111.6G) will be mounted to contain the shared data.
Drive names change according to the order in which they are detected at boot time. To avoid this, the UUID of the drive can be used to identify it uniquely.
- List the UUID string for each disk partition in the /dev directory
ls -l /dev/disk/by-uuid/*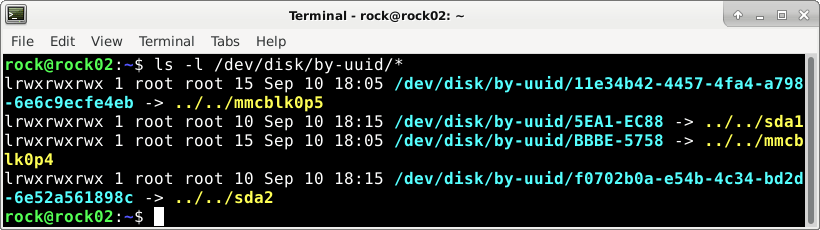
Each partition needs a mount point which is just a directory. The Linux file system has a standard directory called /srv used for serving data, so we will create a sub-directory under that called Samba to mount the SSD drive. Perform the following actions with super user rights provided by prefixing the commands with sudo:
- Create a directory to mount the SSD
sudo mkdir -p /srv/samba- Copy of the original fstab file in case you need a backup that works
sudo cp /etc/fstab /etc/fstab.orig- Open /etc/fstab in vi or nano and add an entry for the SSD drive – entries must be on a single line with the 6 parameters separated by tab’s
sudo vi /etc/fstab- Copy and paste the UUID from the ls command above to get it absolutely right
- The SSD is formatted as a Linux ext4 file system, so it has default settings – the line should look similar to this (your UUID will be different)
UUID=f0702b0a-e54b-4c34-bd2d-6e52a561898c /srv/samba ext4 defaults 0 2- Check the fstab with the cat command to make sure it is as expected
cat /etc/fstab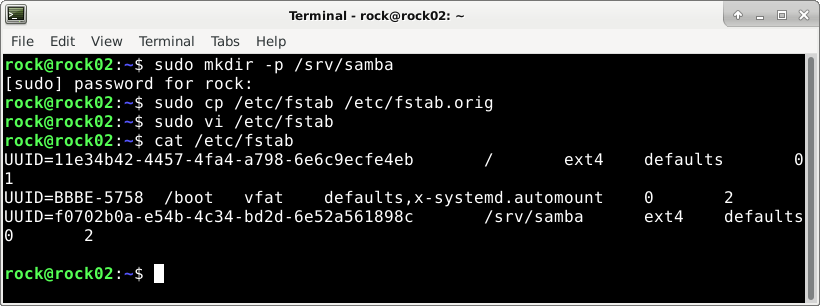
If all is well, reboot the system and ssh back in and check the new disk is mounted on /srv/samba
sudo reboot
ssh rock@rock02
lsblk
Step 4: Shared Directory
Here we set up a shared directory on the Linux filesystem, which will store media files. These will be shared only by authorised users who are members of the samba group. They will not be able to log in to the rock server directly, but they will be able to access the files on their devices using SMB.
This scenario allows anyone set up in the samba group to access media files in the shared directory while keeping everything else on the server secure. They will need to authenticate with a Samba username and password before being granted access which will be illustrated later.
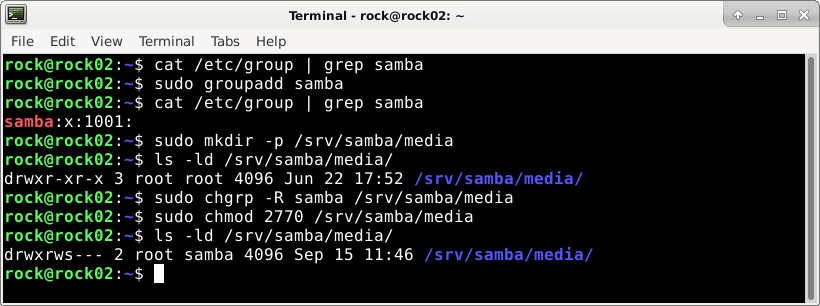
- Add the samba group to the system;
sudo groupadd Samba- Create the media directory:
sudo mkdir -p /srv/samba/media- Change media directory group from root to Samba:
sudo chgrp -R samba /srv/samba/media- Grant RW privileges to the samba group:
sudo chmod 2770 /srv/samba/media- Check the group and permissions on the media directory:
ls -ld /srv/samba/media/They should look similar to this:
drwxrws--- 2 root samba 4096 Sep 15 11:46 /srv/samba/media/Tip: The media directory has the group id bit set so that any new subdirectories created will retain the samba group id.
Step 5: Private Directory
Now, let’s add another directory called private that only the rock user can access. This scenario enables the rock user to access files from various devices on the network but keeping them secure and private.
- Create the private directory:
sudo mkdir -p /srv/samba/private- Change ownership of the private directory from root to rock:
sudo chown -R rock:rock /srv/samba/private- Check the permissions on the private directory:
ls -ld /srv/samba/privateThey should look similar to this:
drwxr-xr-x 2 rock rock 4096 Sep 15 12:36 /srv/samba/private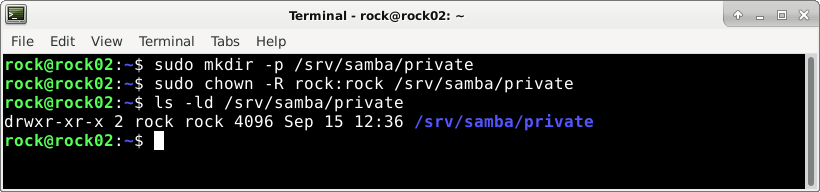
Step 6: SAMBA
Now it’s time to install the Samba package containing the server software.
- Bring the ubuntu repository up to date:
sudo apt update- Install the SAMBA package:
sudo apt install sambaNow the software is setup and running as a service in the background.
Step 7: Samba Users
All Samba users must be set up on the Linux host, but they don’t necessarily require logins on the host system. They also require a separate Samba password to access the share.
We add the rock user to the samba group and create a Samba password so they can access both the private and media shares.
Also, we will add the users poppy and Oscar, who do not have shell logins on the rock server, but they will be able to access the media share from their devices.
- Add the rock user to the samba group so it can access the media directory:
sudo usermod -aG samba rock- Set a separate Samba password for the rock user:
sudo smbpasswd -a rock- Add poppy and oscar to the system without logins and make them members of the samba group:
sudo useradd poppy -s /usr/sbin/nologin -G samba
sudo useradd oscar -s /usr/sbin/nologin -G samba
- Create Samba passwords for poppy and oscar:
sudo smbpasswd -a poppy
sudo smbpasswd -a oscar- Check the list of Samba users:
sudo pdbedit -w -L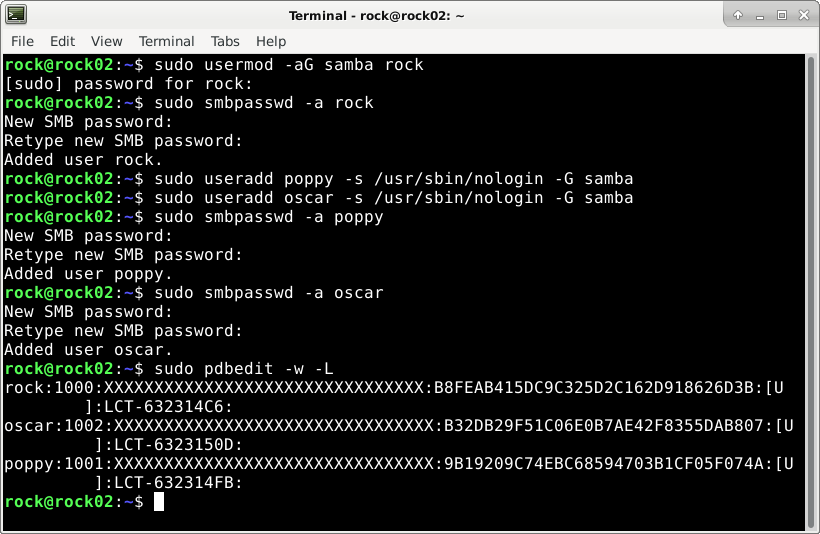
Step 8: Media Share
Now that the system directories and users are all set up, the Samba shares need configuring to make the directories available via SMB.
Samba stores its configuration in /etc/samba/smb.conf, and there are a confusing number of permutations in which this can be set up. Entries should be added at the bottom of smb.conf for each shared directory which are mapped to a name in square brackets. The name = value pairs define the characteristics of each share.
We want to configure the media directory so that any members of the samba group can access it and be able to create their own shared sub-directories and files within it. Access is restricted to users on the same network as the rock server, and the media directory will be visible to file browsers.
- Open /etc/samba/smb.conf in vi or nano as super user:
sudo vi /etc/samba/smb.conf- Add an entry at the end of the file with the following contents and save the file:
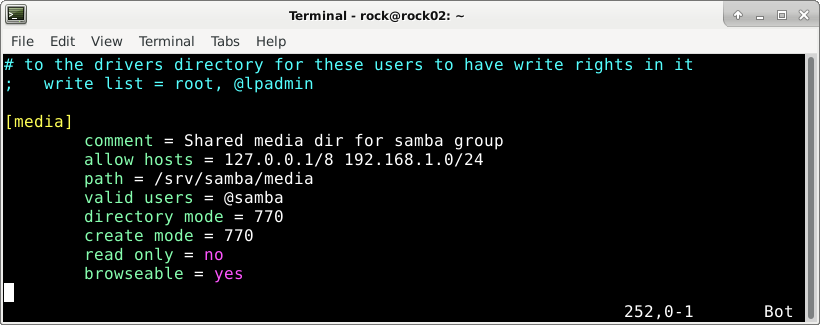
[media]

        comment = Shared media dir for samba group

        allow hosts = 127.0.0.1/8 192.168.1.0/24

        path = /srv/samba/media

        valid users = @samba

        directory mode = 770

        create mode = 770

        read only = no

        browseable = yes
Tip: Our network has private addresses 192.168.1.0/24 – yours may be different; set it accordingly.
Step 9: Private Access
Finally, let’s create a private share for just the rock user. No other users will be able to view or access files in this area.
- Add another entry at the end of smb.conf to allow the rock user access to the private directory:
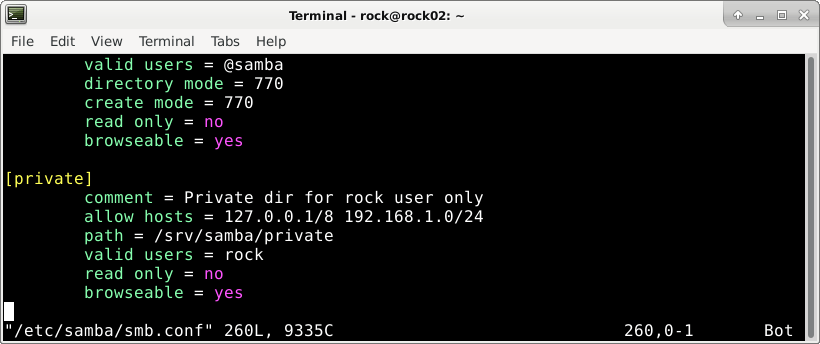
[private]

        comment = Private dir for rock user only

        allow hosts = 127.0.0.1/8 192.168.1.0/24

        path = /srv/samba/private

        valid users = rock

        read only = no

browseable = yes- Now restart Samba, so the changes take effect:
sudo systemctl restart smbd.serviceBoth the shares should now be accessible from any device that supports SMB on the network.
Step 10: Linux Remote Access
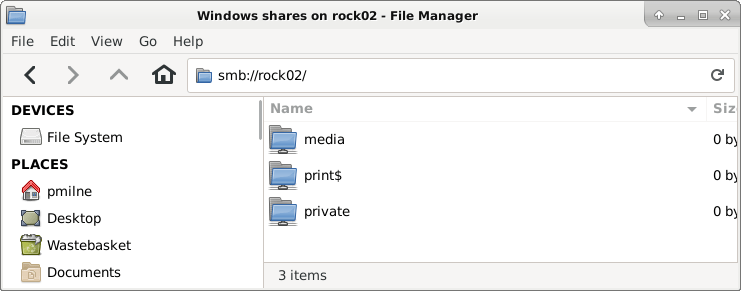
If you have a PC or Laptop running a Linux desktop, for example, a ROCK 4SE running Debian, you can access the shared directories remotely using SMB protocol which is used by Samba.
Open the File Manager and type the following into the address bar, where rock02 is the hostname of our Samba Server – the media and private directories should be visible. Entering either directory will prompt you for a Samba username and password:
smb://rock02Tip: This command should work on a Mac – you may need to add .local to the hostname or use the IP address of your Samba Server.
Step 11: Windows Media Player
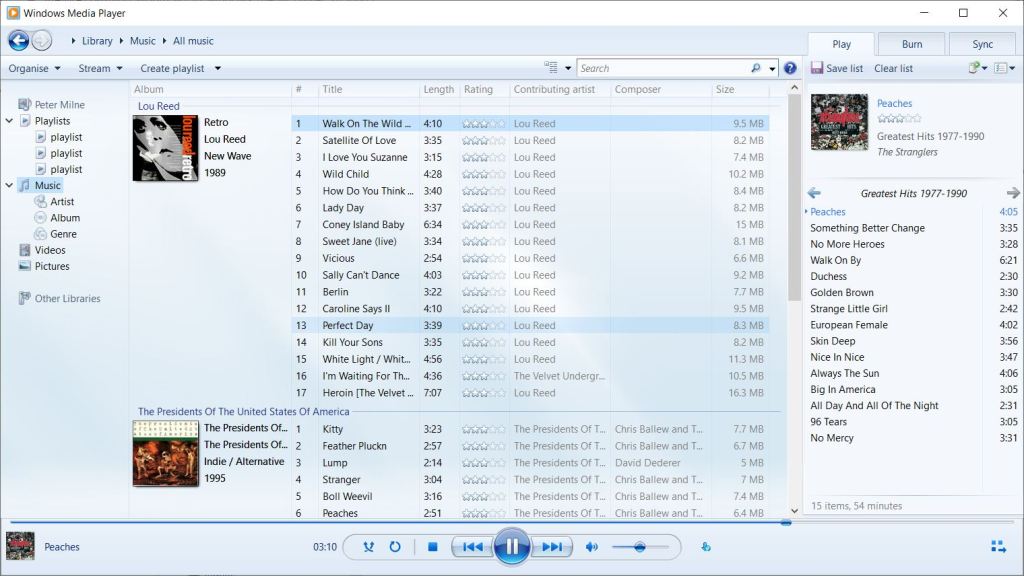
If you have a Windows PC, you can access the shared directories remotely. The path to the media share is like this (note the back slashes):
rock02mediaWe ripped some audio CDs using RipperX on a Linux desktop:
sudo apt install ripperxand copied them to the media directory on the Samba Server. If you tag the metadata carefully, your media player will automatically pull in the Album Art and Track names.
We pointed Windows Media Player at rock02media and added it to the library as a source – now we can listen to the high-quality audio stored on our Samba Server from anywhere on the network.
Step 12: VLC on Android
Android supports SMB shares in its VLC app. These appear in the file browser, which you select as a music source and then scan it to pull in the albums and tracks.
We had to embed the album art in the media files using MusicBrainz Picard on a Linux desktop to get the images to display in VLC on Android:
sudo apt install picardOnce the music is playing on your mobile, just turn on your Bluetooth speaker, and it will play through that if you want a higher-quality sound!
Step 13: Troubleshooting
Configuring a secure server Samba is not trivial and the steps above need to be performed in the correct order for everything to work. If you can’t access the share via SMB, double-check the steps above and try these suggestions.
- Check that the directory and file permissions are correct:
sudo ls -l /srv/samba- Check each user belongs to the samba group:
groups poppy- Check each user has a password setup in Samba:
sudo pdbedit -w -L - Validate /etc/samba/smb.conf and fix any reported errors:
sudo testparm -s- Set the log level in the Globals section of /etc/samba/smb.conf:
[global]
log level = 1- Then restart the server:
sudo systemctl restart smb.service- Now you can check the log file in /var/log/samba/<hostname or ip>:
sudo tail /var/log/samba/log.gigabyteSummary
This guide has shown how to create a useful, low-power, networked file server using the ROCK 4 and Samba. We created secure shares that can be accessed over the local network using the ubiquitous SMB protocol from devices including Linux, Windows, Mac & Android.
Although we demonstrated how to share and stream media files, the same process applies to sharing any kind of file for a small office or home network, giving you full control over who has access to your documents across different operating systems.
Hopefully, you will have picked up some valuable Linux permissions skills along the way and been initiated into the mystical art of Samba configuration.
Even though we have tested this project on the ROCK 4SE so far, it is considered the same setup can be performed using the ROCK 4C+.
ROCK on! 🤘
References
![]()
Ready to ROCK it? Browse our ROCK Shop to find out the range of incredible ROCK single-board computers – the perfect Raspberry Pi alternative, compute modules and accessories that will land in our stock soon! Be one of the first to know:

Are you interested to buy ROCK in bulk? Get in touch with our Sales team to learn more.
Looking for something else? Discover our Blogs, Getting Started Guides and Projects for more inspiration!
Like what you read? Why not show your appreciation by giving some love.
From a quick tap to smashing that love button and show how much you enjoyed this project.

