Summertime equals spending time outside and that’s great, but a too big exposure to UV is not good and hence this wearable UV sensor project which will help you stay safe.
This is not a medical device and is only meant to heighten the awareness of UV exposure.
1. Test the sensor
Before anything else, you should ensure that the sensor and micro:bit are working as expected.
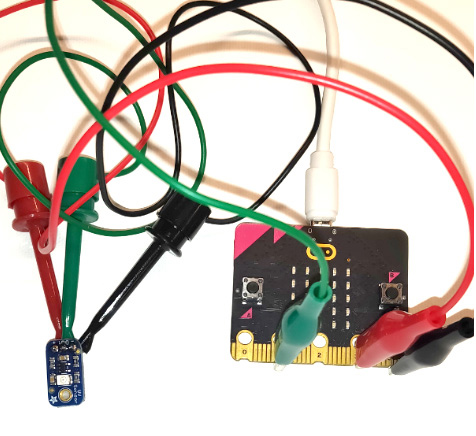
Connect the micro:bit to the UV sensor using some crocodile leads as follows:
- From UV sensor + to micro:bit 3V.
- From UV sensor – to micro:bit GND.
- From UV sensor OUT to micro:bit 1.
On your host computer, go to https://makecode.microbit.org/ if you’re unfamiliar with Makecode and programming the micro:bit, you can refer to this guide.
Create a new project, give it a name and assemble the following code:
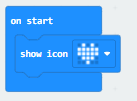
This first block, is only there to make sure the micro:bit is working.
Next, add
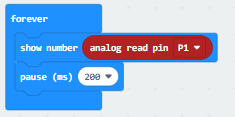
This will read the data coming from the sensor and display it on the micro:bit.
Load the code to the micro:bit.
You should now see the heart displayed on the micro:bit’s matrix briefly, followed by the sensor reading which will be between 0 and 1023.
If you only see a value of 0, the sensor is not being exposed to UV. Try holding it close to a window or outside as some windows have UV filters.
2. Assembly
- Insert the batteries into the BitWear PCB.
- Cut 3 pieces of electrical wire of approximately 3.5cm.
- Solder 3 wires to the GND, 3V3 and P1 connectors of the BitWear’s PCB
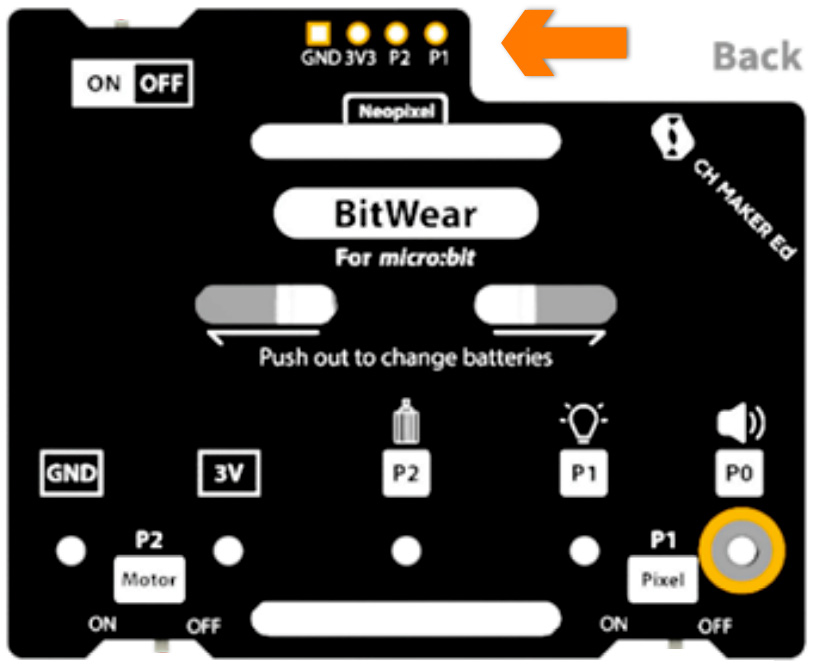
- Mount the BitWear PCB onto the micro:bit and secure it with the 5 provided screws.
- Solder the 3 wires from the wearable PCB to the UV sensor. You can first solder the pin header to the UV sensor or you can solder the wires directly.
- The connections should be GND to GND, 3V3 to + and P1 to 1.
- Attach the UV sensor to the micro:bit. You can use double-sided tape for this. Make sure that you keep the sensor away from the micro:bit’s antenna.
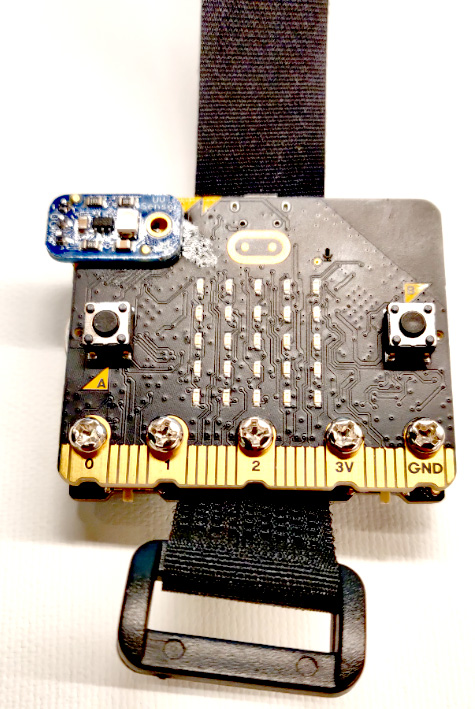
Ensure that:
- ON/OFF switch on the wearable PCB is set to ON.
- Switch P1 is set to OFF.
- Switch P2 is set to ON.
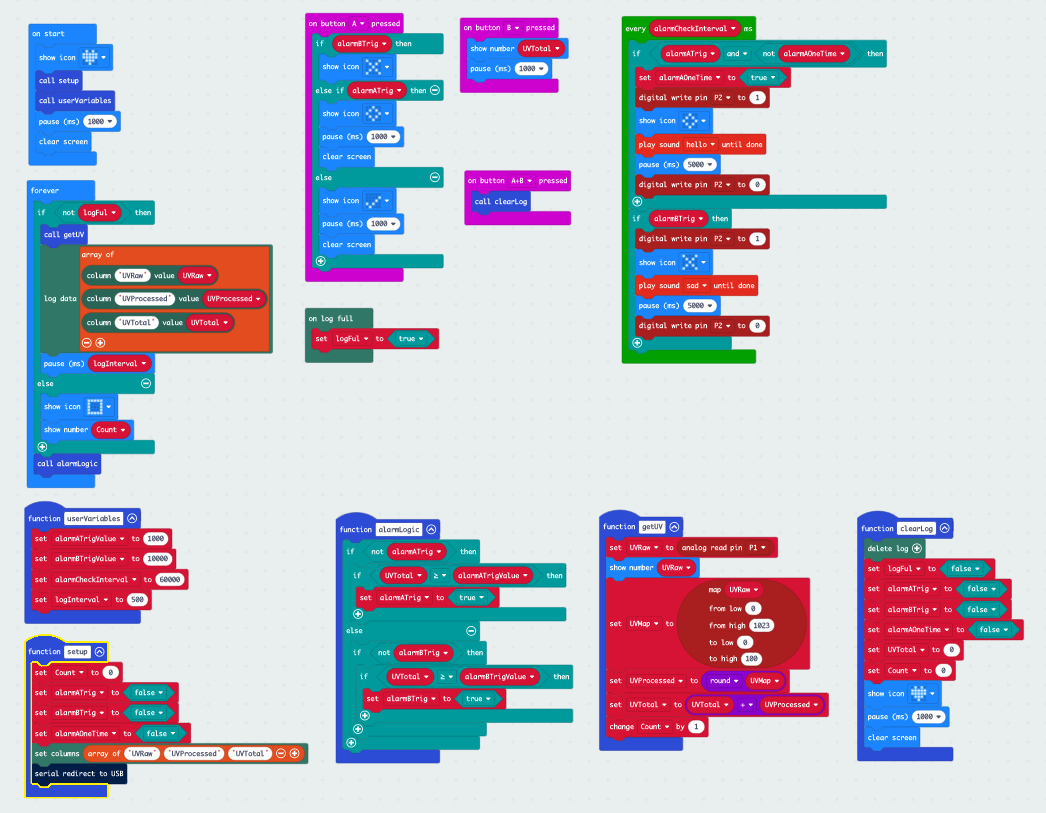
3. Programme the functions
Functions are reusable snippets of code that can be called whenever necessary. The first programming step is to create all the functions needed for the project. Alternatively, you can find the completed Makecode file here.
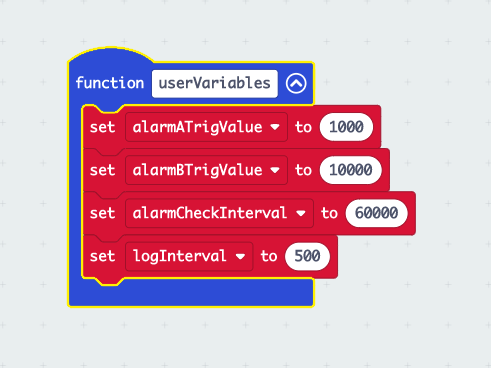
userVariables function
This function defines some of the variables that you’ll be using in the code.
- Go to Makecode and create a new project. By default, you’ll be presented with the on start and forever blocks which we will be programming later.
- In the Makecode menu, click on Advanced>Functions>Make a function and call it userVariables.
- Click done.
- Click on Variables>Make a Variable and name it alarmATrigValue.
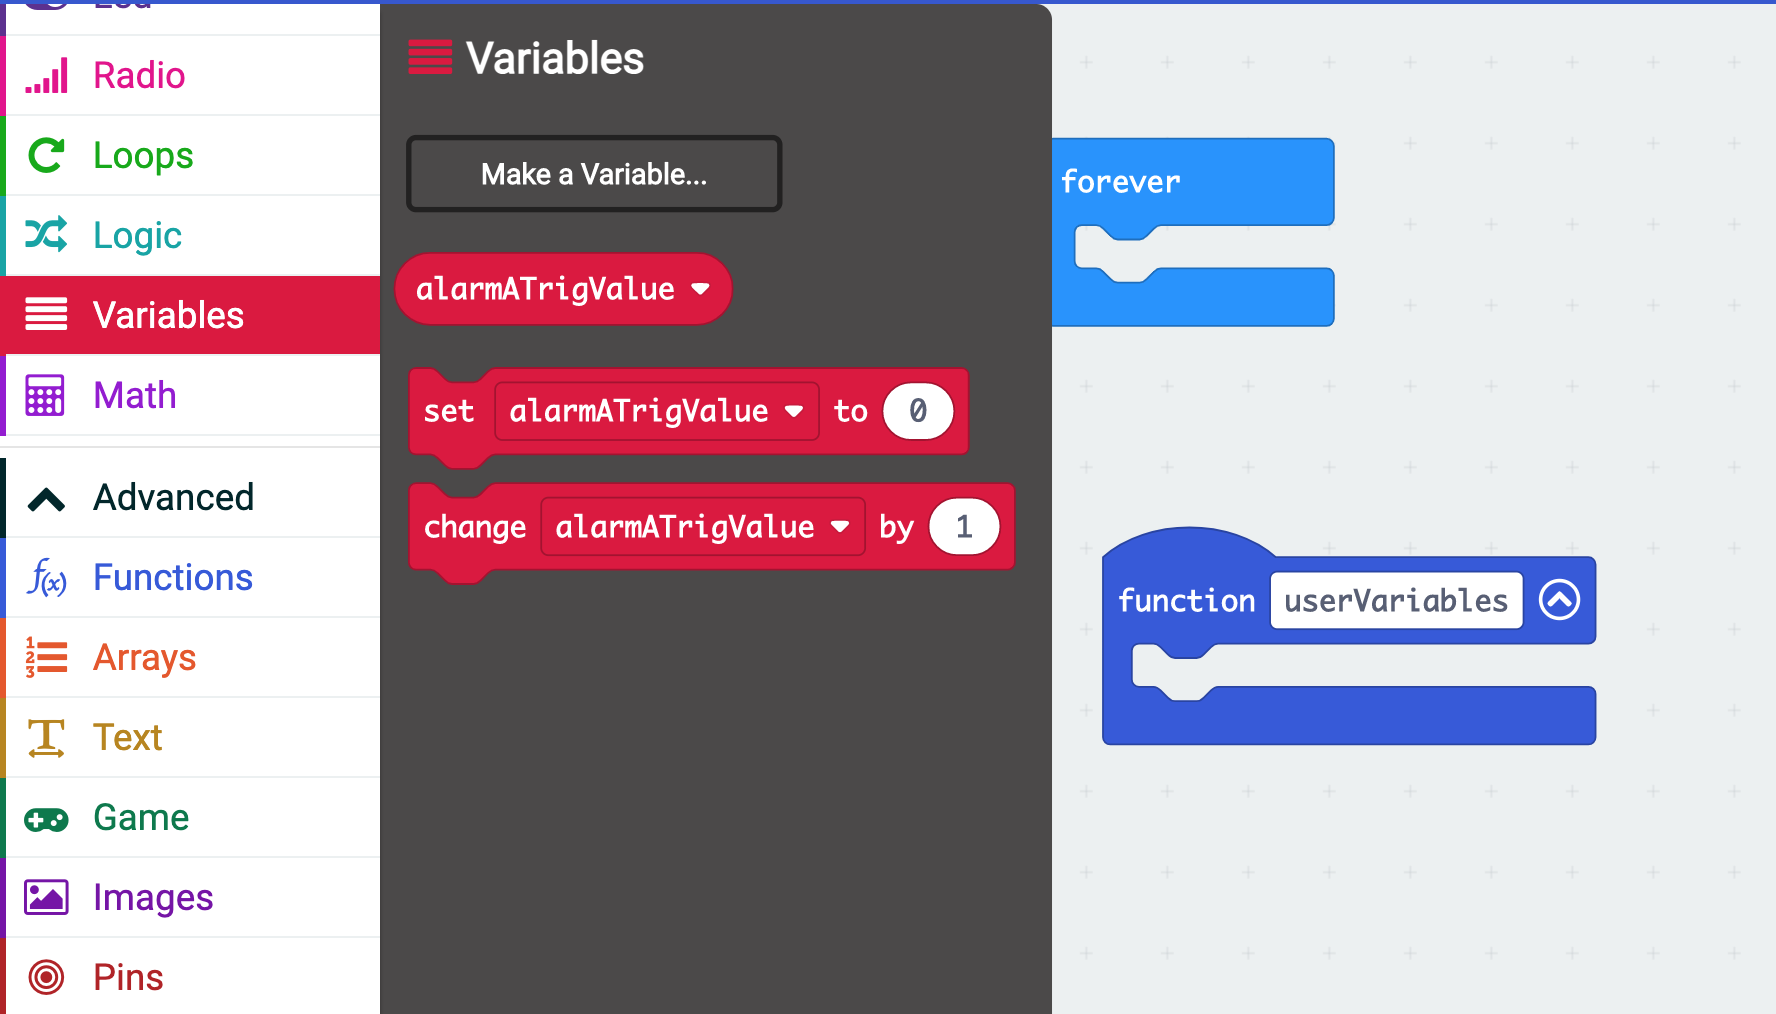
- Drag the set alarmATrigValue block into the userVariables function and set the to value to 1000.
Repeat the process to create 3 more variables:
- alarmBtrigValue set to 10000.
- alarmCheckInterval set to 60000.
- logInterval set to 500.
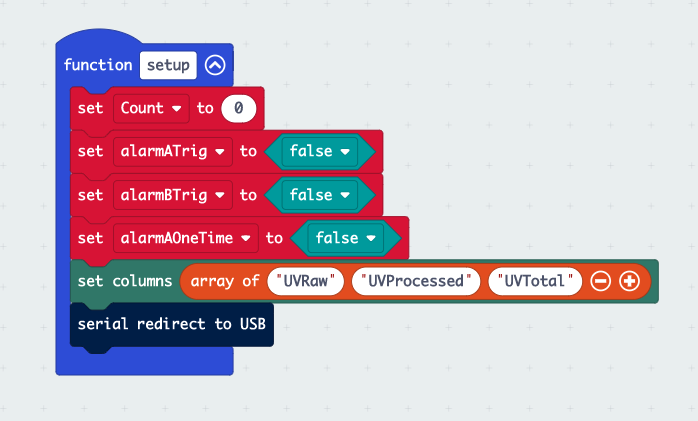
setup function
Setup defines the starting conditions before the programme runs.
- Create all the red blocks by clicking on Variables>Make a Variable and naming each one appropriately:
Count
alarmATrig
alarmBtrig
alarmAOneTime - Set all the to values appropriately as shown below. The green false blocks can be found under Logic.
- Drag set columns from Data Logger and enter UVRaw, UVProcessed and UVTotal in the relevant fields.
- Drag serial redirect to USB from Advanced>Serial.
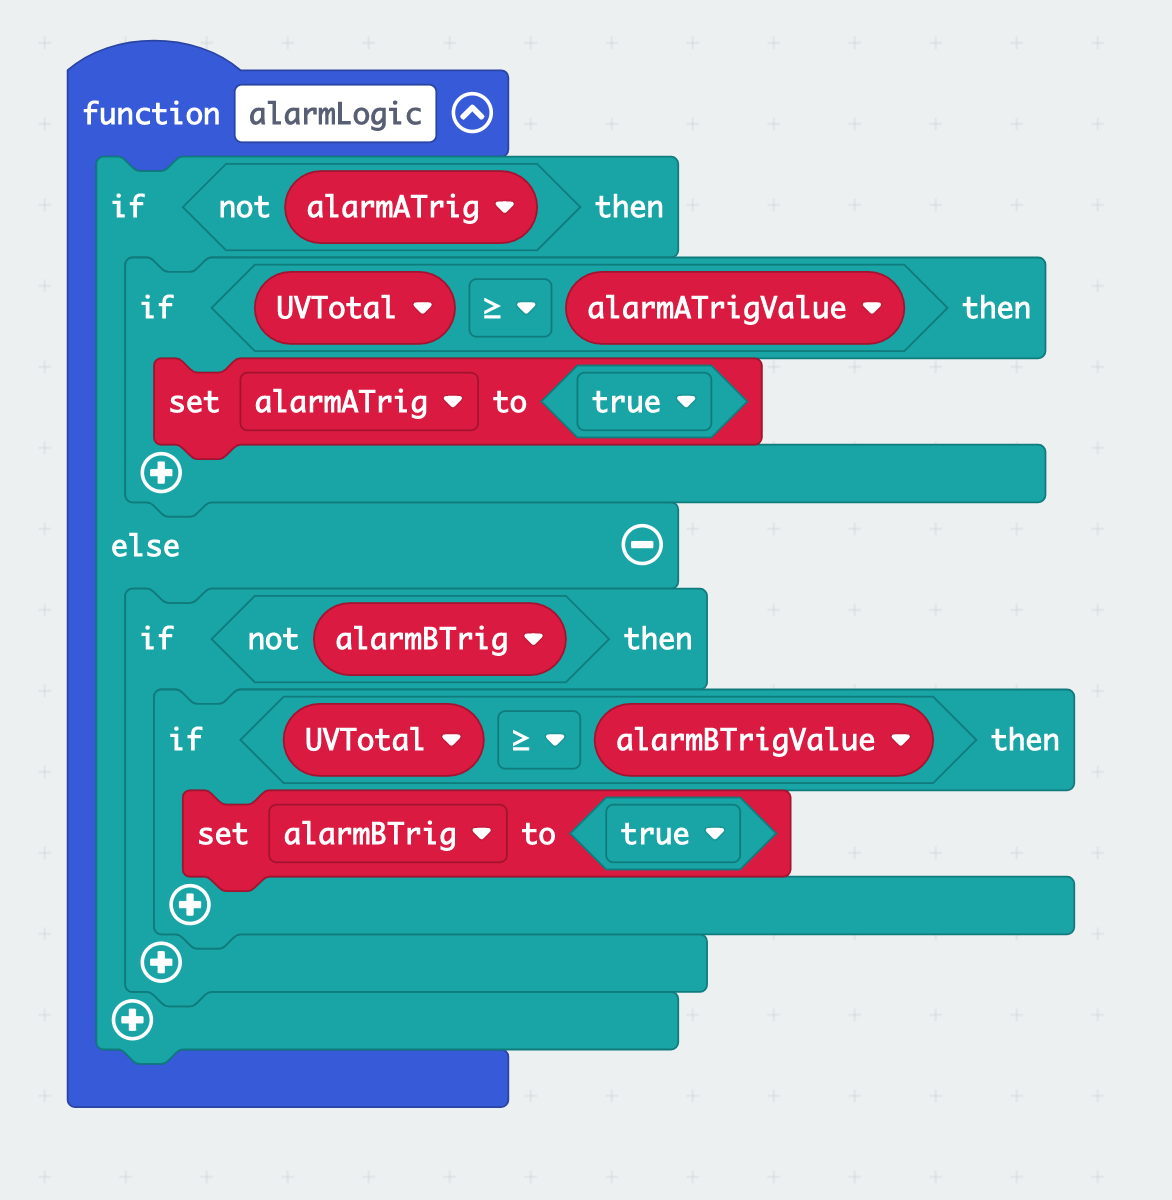
alarmLogic function
This function deals with the alarm triggering.
Assemble the blocks below. All green blocks can be found under Logic.
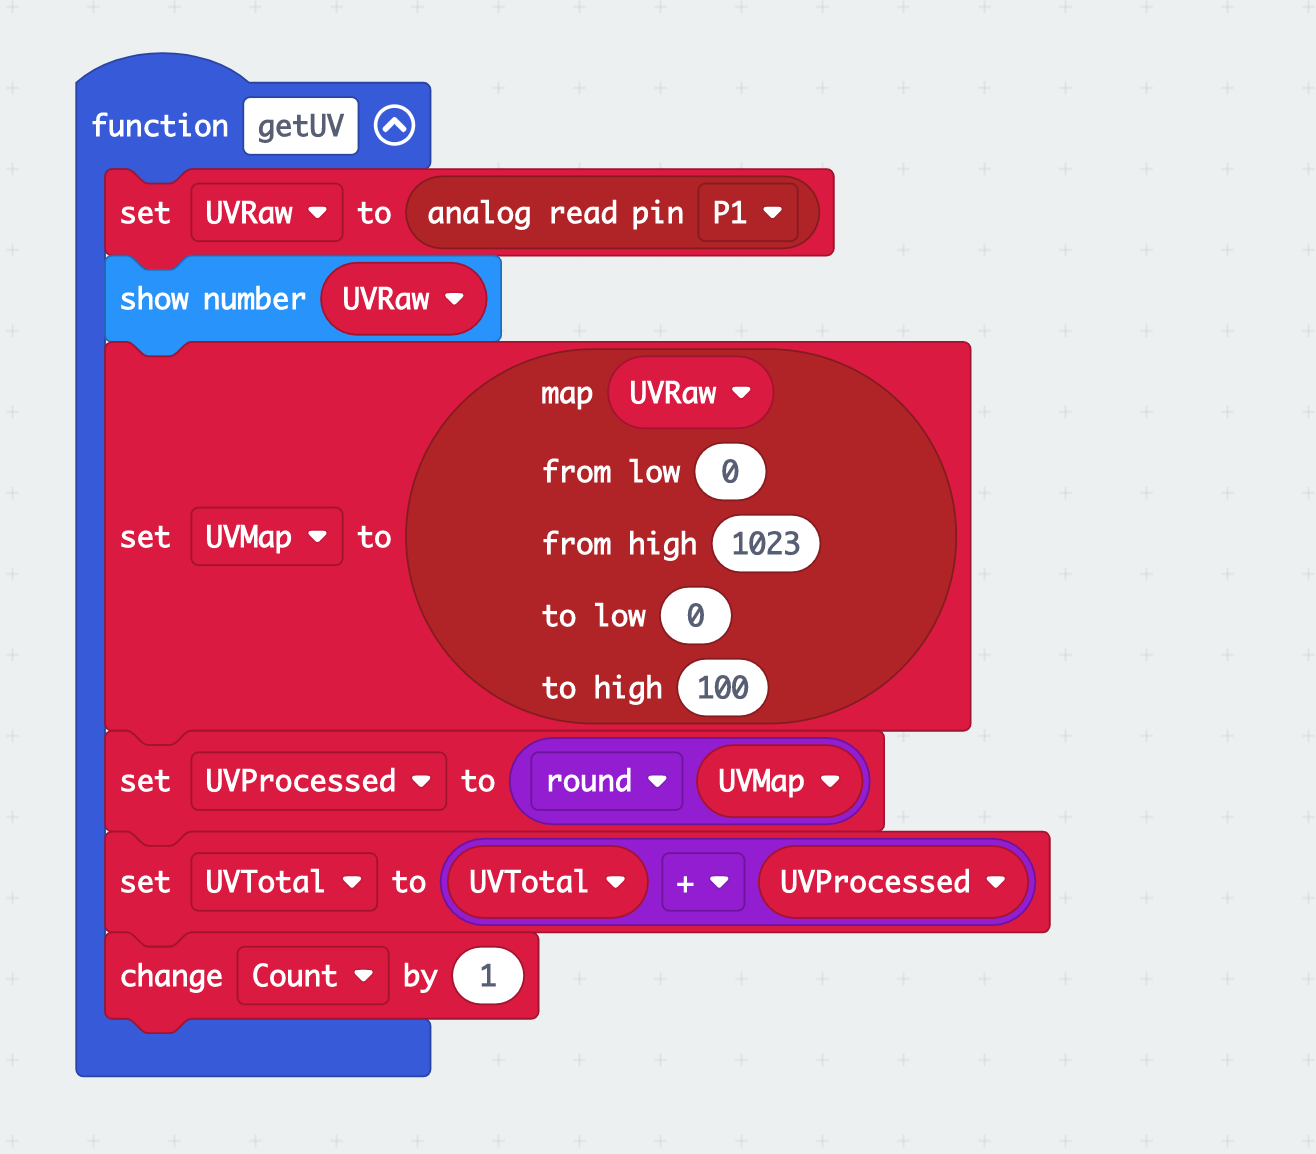
getUV function
This function reads the UV sensor and processes the reading.
clearLog function
This function clears the log and resets the device.

So far your code should look like this:
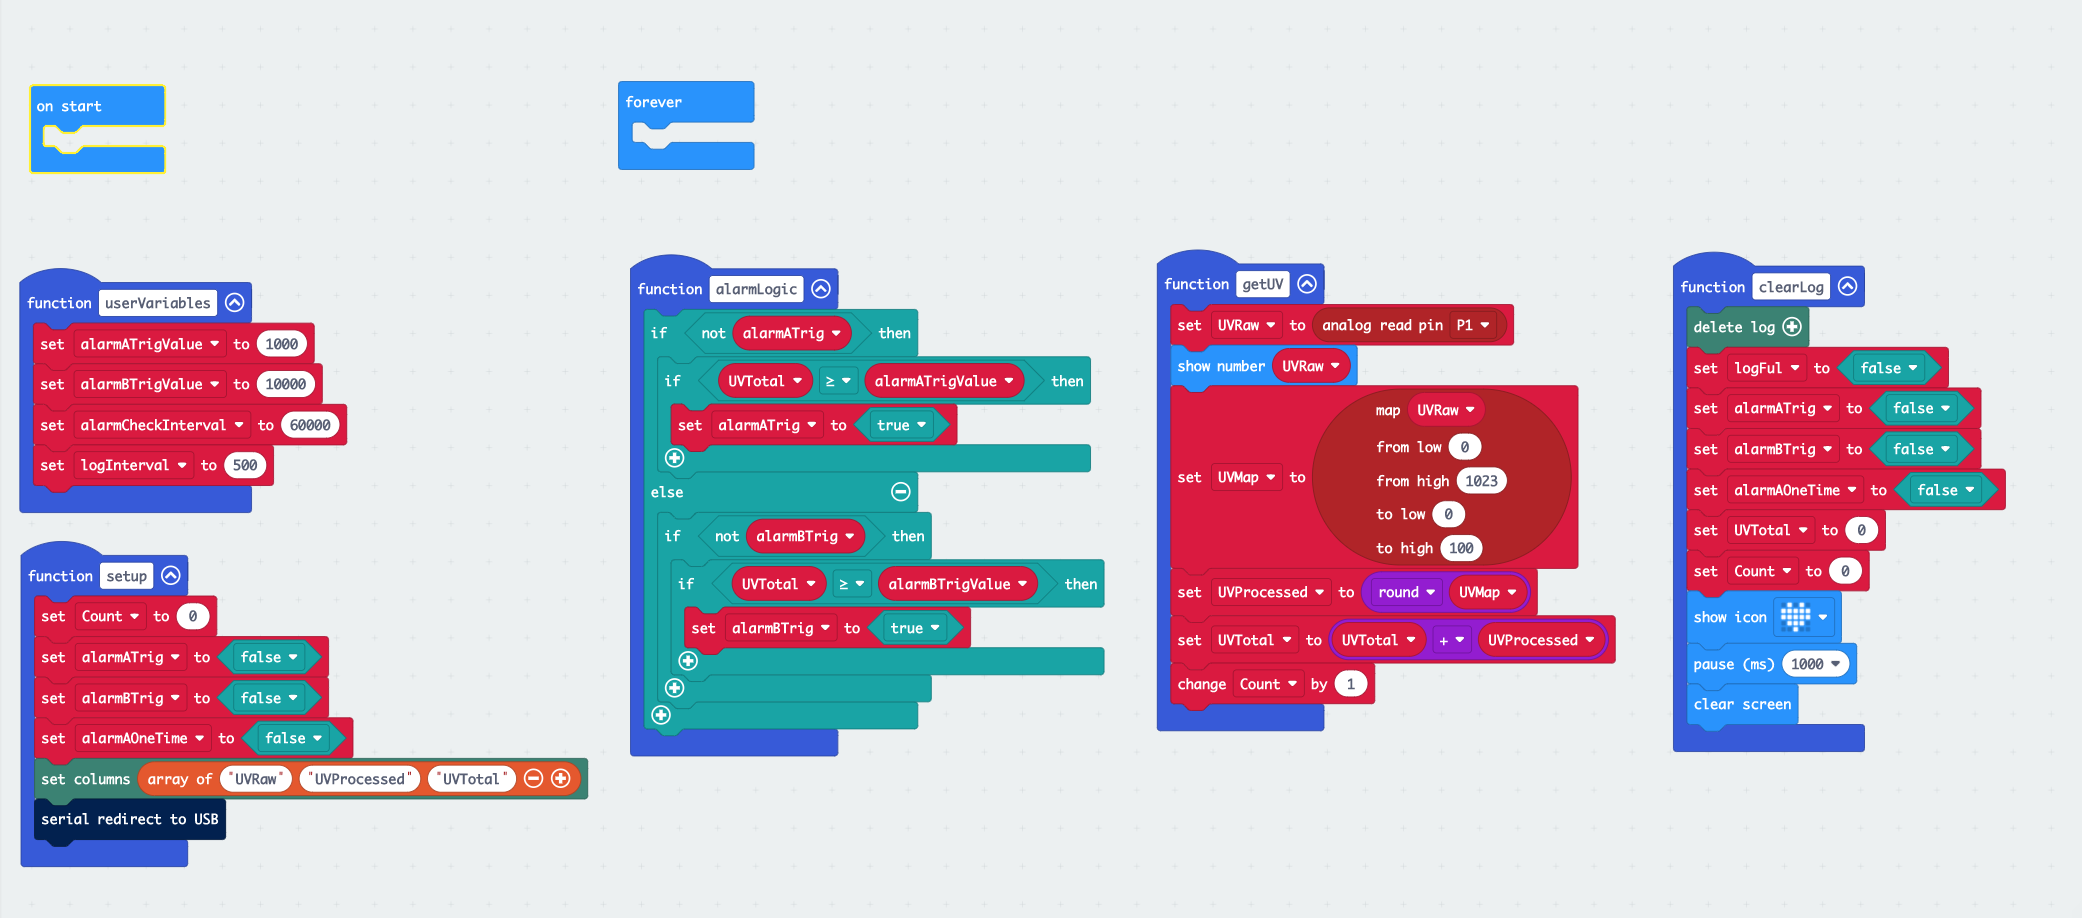
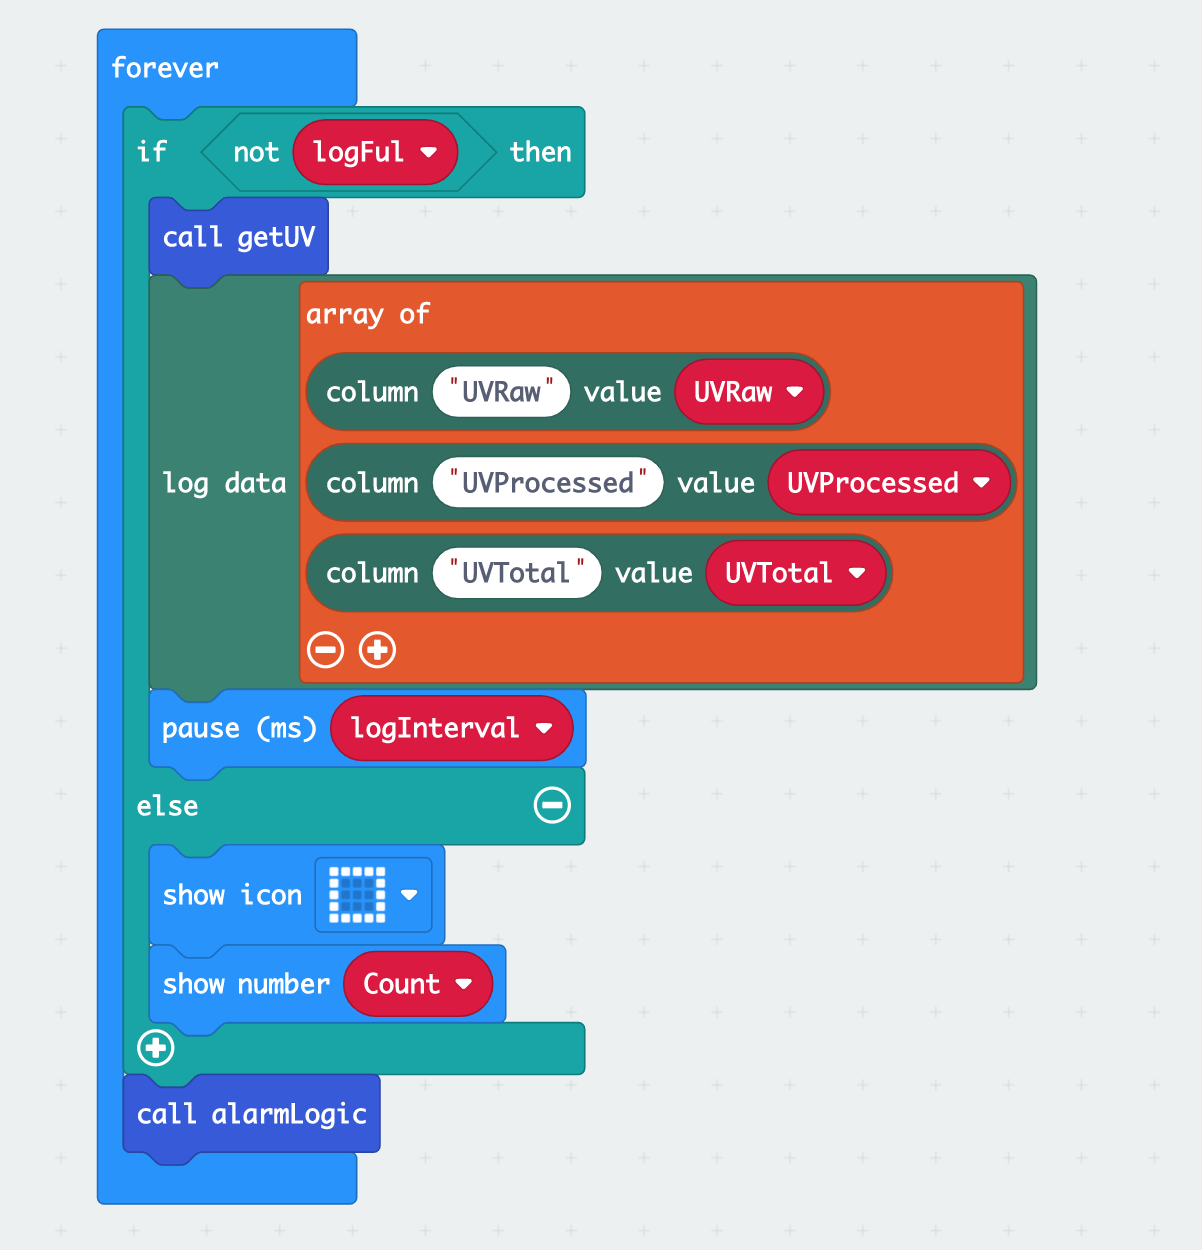
4. On start & forever
On start, gets executed when the programme is first launched, setting everything up to start working. It does this by executing some actions and calling some of the functions that you declared in the previous step.
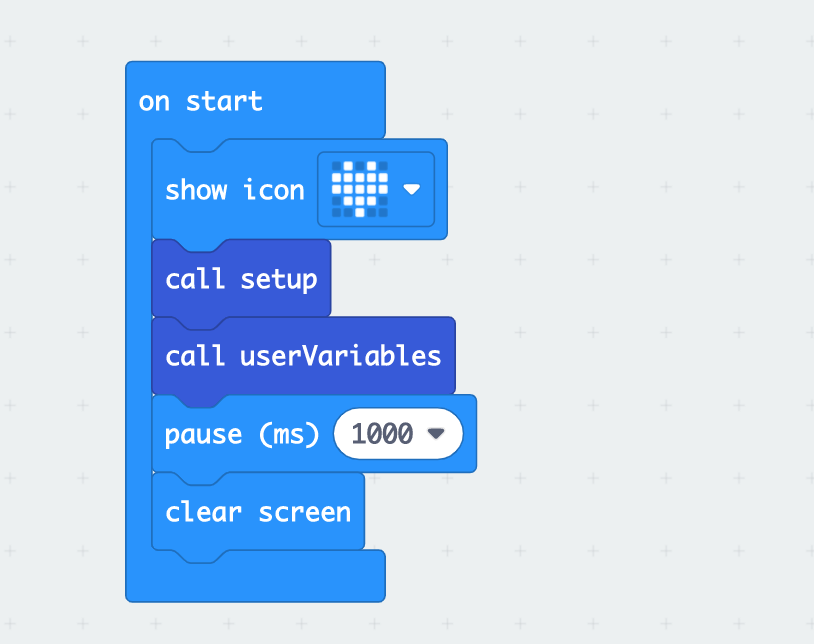
Forever is the main process that operates the project. It runs forever in a loop calling the relevant functions.
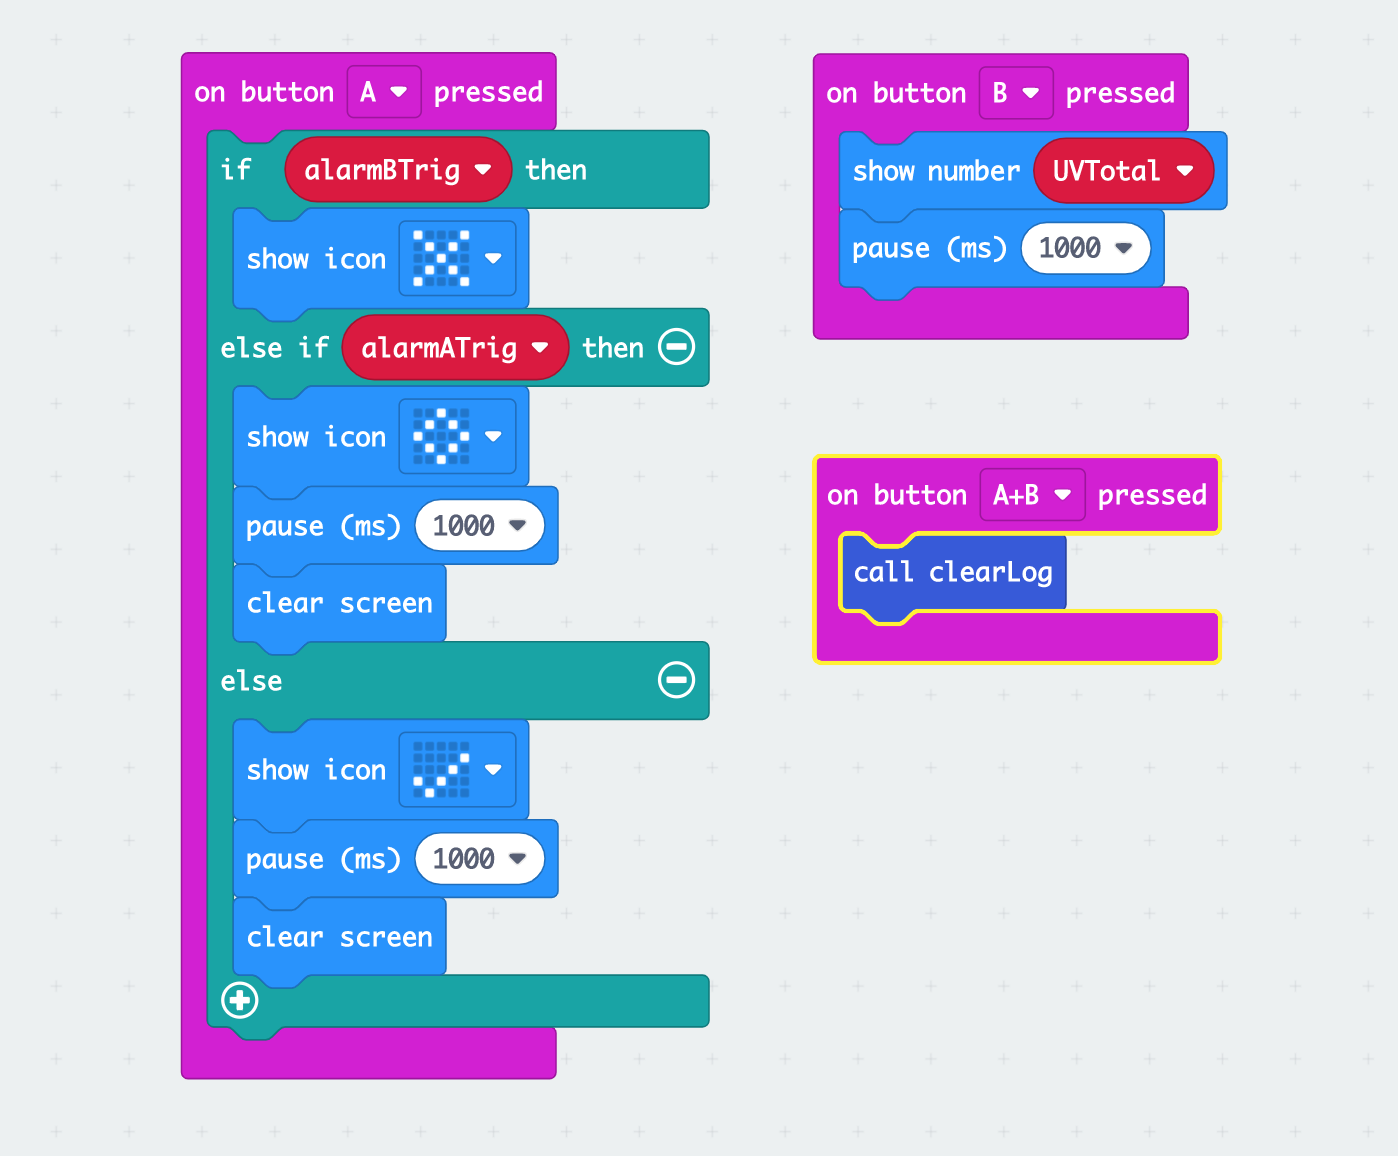
5. On button press
The next step is to program what happens when pressing the buttons.
Pressing button A will display if the UV level is OK.
Pressing button B will display the total UV exposure.
Pressing A+B will clear the log.
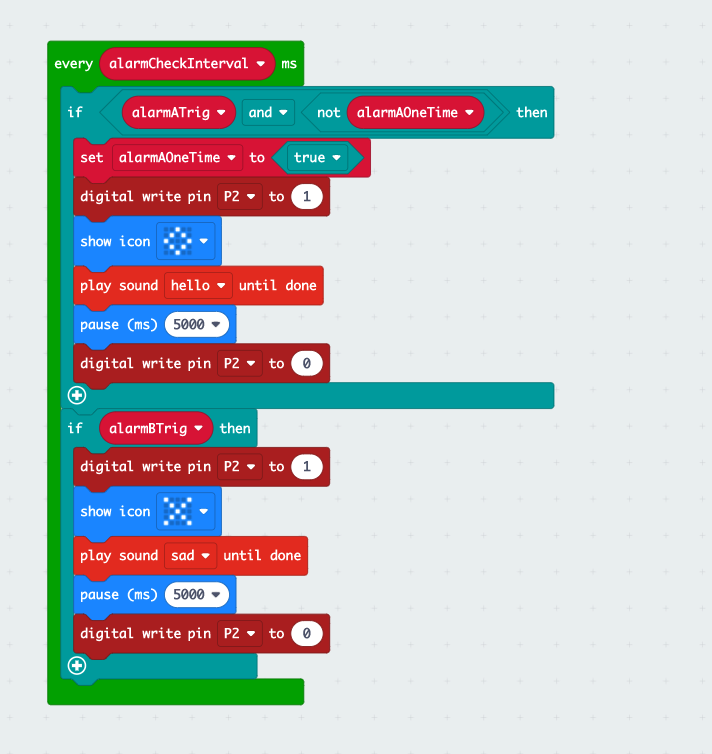
6. Timed loop
Next, create the timed loop that will repeatedly check for UV and trigger the alarm if necessary.
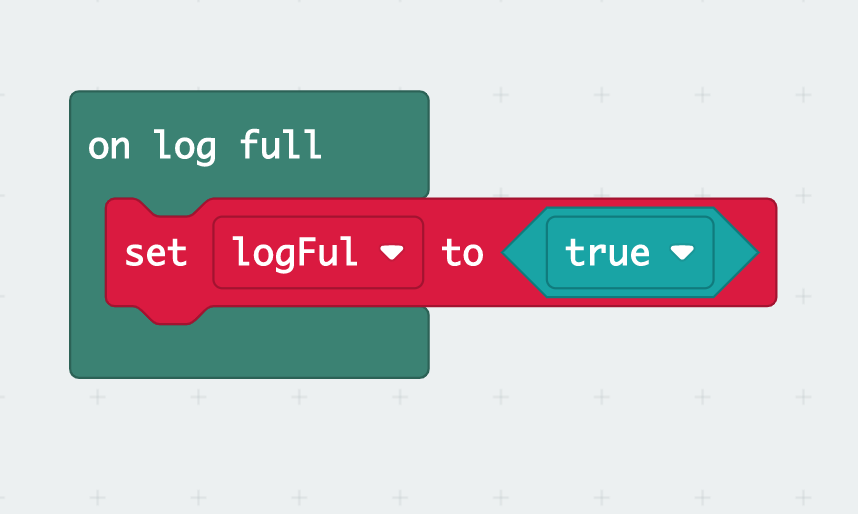
7. Clear the log
This block detects when the log is full.
Your blocks should now look like this:
8. Use it
Now you’re ready to go outside and test it.
- Pressing button A will tell you if the UV level is safe.
- Pressing button B will tell you the total UV exposure since the last reset.
- Pressing A+B will clear the log.
Like what you read? Why not show your appreciation by giving some love.
From a quick tap to smashing that love button and show how much you enjoyed this project.

