Integrate Bluetooth Low Energy sensor networks with an MQTT to BLE gateway based on ROCK 3C
This project continues our series of setting ROCK boards in an industrial context, showcasing innovative IIoT solutions that can integrate into existing industrial automation, smart agriculture, and building management infrastructure or form the building blocks for new solutions.
We build an example gateway capable of connecting Bluetooth Low Energy (BLE) wireless sensors to an MQTT-based network. The gateway code supports scanning, connection, service discovery, reading, and writing sensor data and notifications using commands encoded into the MQTT message packets, allowing remote control of multiple BLE sensors. The number of gateways can also be scaled to meet demands.
Our chosen hardware is the ROCK 3C due to its powerful RK3566 quad-core processor, on-board Bluetooth support, and Ubuntu Jammy server image, but you could use any of the boards in the ROCK range, with the addition of a wireless module in some cases.
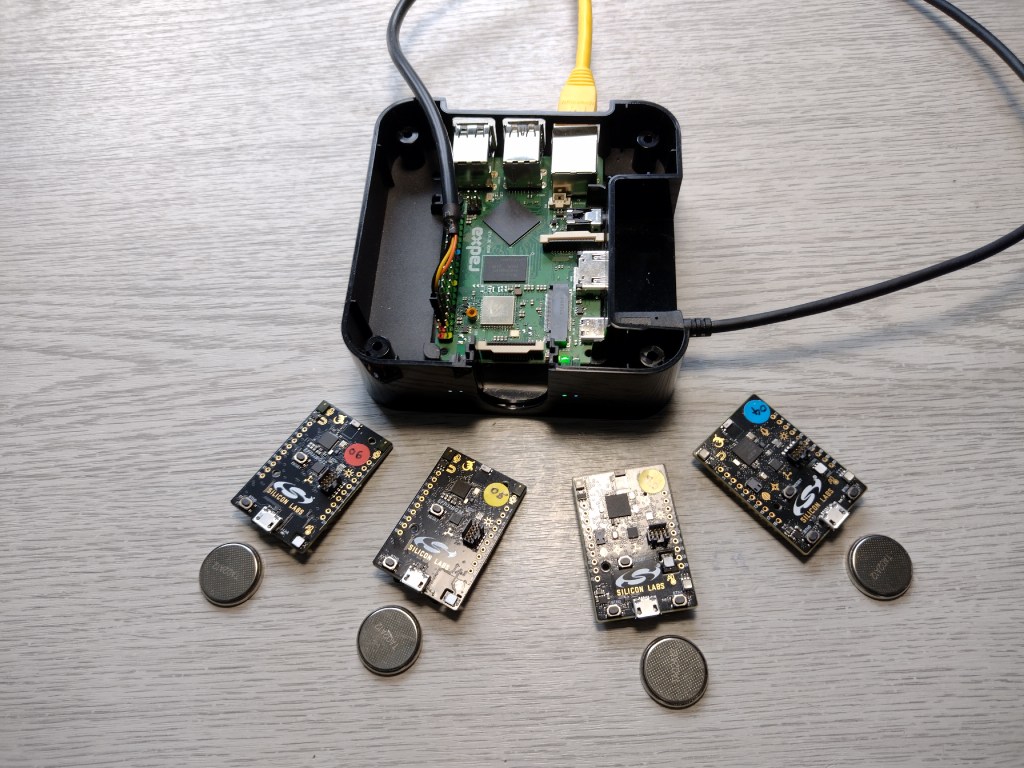
For the sensor network, we are using Silicon Labs Thunderboard development boards. These are packed with different sensors and come pre-programmed as BLE Peripherals, so they are great for testing and development.
The gateway software has been developed in Python based on best practice guidelines published by the Bluetooth SIG, the industry special interests group managing the Bluetooth specification involving leading technology companies.
Full source code is available on the OKdo GitHub.
The diagram below illustrates how the gateway integrates into our demonstration network, in particular with the MQTT gateway covered in this project.
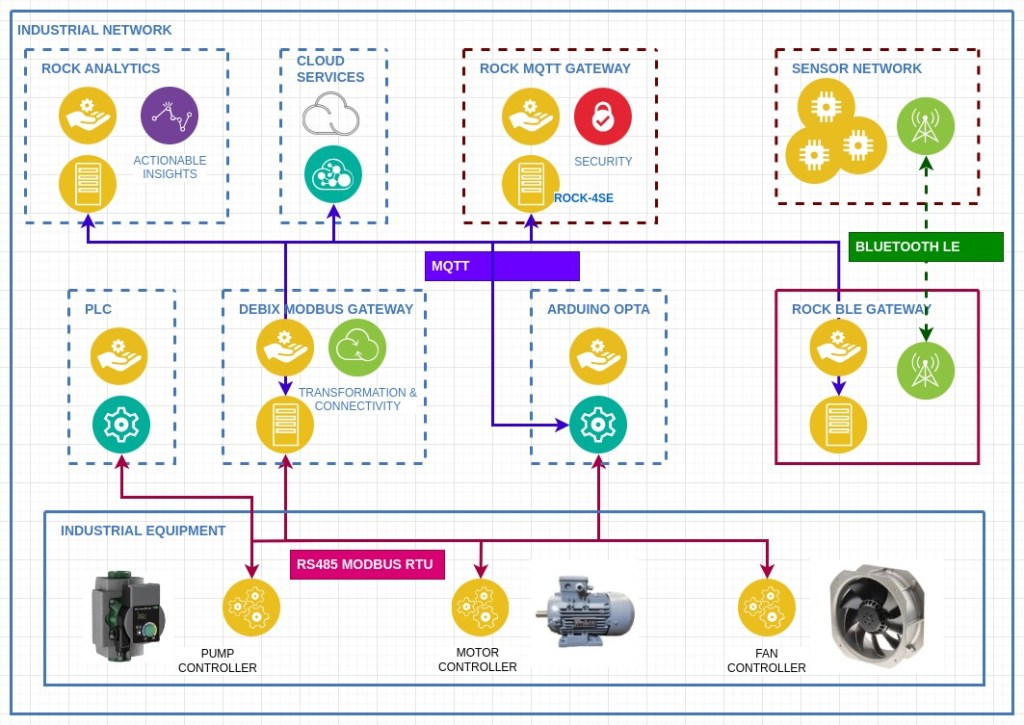
So, for example, it would be possible to read remote wireless sensors on the network and use their readings to alter the parameters of Ladder Logic programs running on a PLC over Modbus.
Use cases include environmental monitoring and controlling HVAC appliances in buildings or condition monitoring using BLE sensors in vending machine cabinets. Wireless sensors can be added to existing industrial hardware without compromising existing wiring, for example, to monitor vibration in motors and equipment for preventative maintenance and advanced failure warning.
The MQTT protocol enables multiple independent applications to subscribe to the same sensor data via the broker so that data can be collected, stored, and processed either locally or by cloud-hosted services for AI analytics and record keeping.
Licence: Eclipse Public License 2.0
Step 1: Gateway Hardware
You could use any of the ROCK boards for this project. Some would require additional wireless modules. I tested it on the ROCK 3C based on the Rockchip RK3566 SoC. This is a 64-bit, quad-core Armv8.2‑A Cortex®‑A55 CPU running at 1.6GHz. The onboard wireless module is compliant with Bluetooth 5.0, and I used the 2MB RAM version. A lower-cost 1 MB version is also available.
The ROCK 3C has a small form factor, great network throughput and more than enough CPU and memory resources for this application. It supports both eMMC and micro SD cards for OS storage, and you can add additional storage with an M.2 NVMe or SATA SSD card.
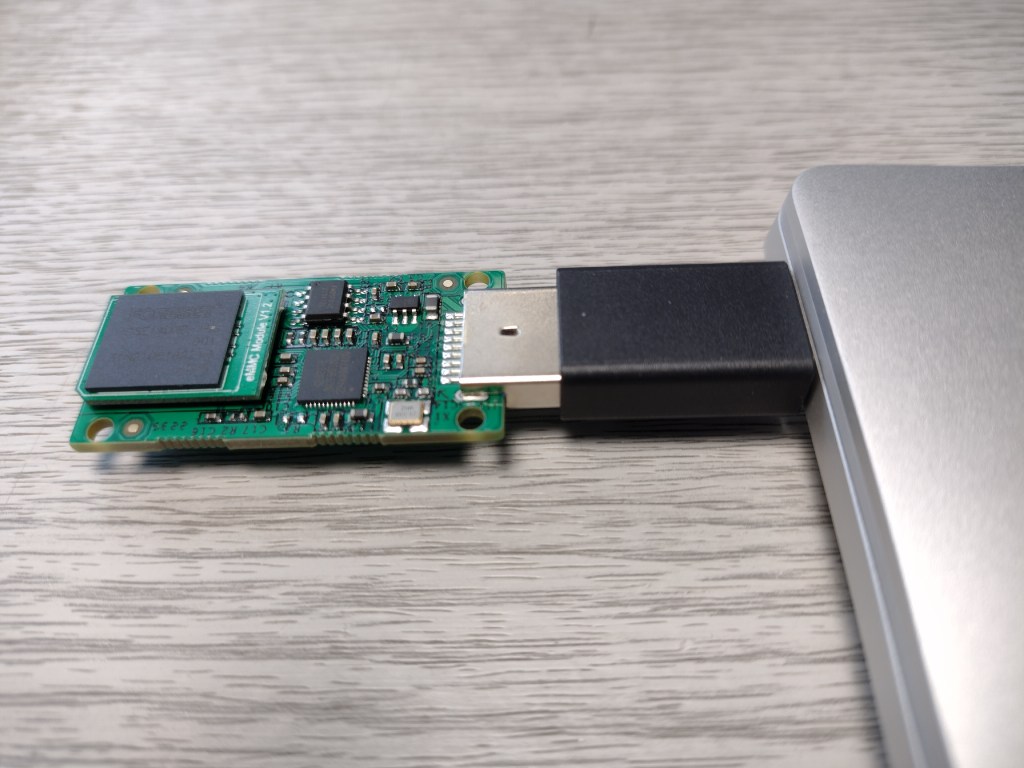
Although SD cards are convenient, I flashed the OS onto a 16MB eMMC module which is on the underside of the board, for higher durability and performance.
The ROCK 3C fits many of the cases designed for Raspberry Pi 3 Model B+.
Step 2: OS
Radxa supplies a 64-bit Ubuntu Server 20.04 (Jammy) image for the ROCK 3C, which is built for this purpose, so I used that and flashed it to a 16GB eMMC module. Currently, this has a 4.19 kernel with a recent version of Python (3.10) and the Linux Bluetooth stack, bluez (5.64).
Visit the OKdo Downloads page and grab the latest version of the Ubuntu server for the ROCK 3C.
- Clip a 16GB eMMC module onto the USB writer and insert it into the development host.
- Flash the downloaded image using your favourite tool – I use BalenaEtcher.
Before unmounting from your host, open the config partition and edit the file before.txt:
- Remove the radxa user stanza so you only have the rock user by default
- Update the locale if you’re not in the US
Now you can unmount the eMMC module, remove it from the host adapter and clip it in place on the ROCK board.
- Optionally attach the USB to Serial cable to the GPIO and open a serial console on your host so you can watch the boot – I use minicom (8/n/1, baud rate 1500000).
- Attach an Ethernet cable to gain remote terminal access over SSH.
- Attach the USB-C power supply, and the board should start booting – once it has completed, the green LED should be solid, and the blue LED will be flashing the heartbeat indicating that the OS is running.
- Log in to the console with rock / rock
You should be able to ping the ROCK from a Terminal session on your host:
ping rock-3cAnd login remotely over SSH from a Terminal with password rock:
ssh rock@rock-3cCheck out Jammy’s minimal configuration (there are a few failed units that don’t affect this project and will be fixed shortly). The wireless module will be detected, and the Bluetooth service should be running:
systemctl statusTip: Don’t be tempted to upgrade the system as you will break it – this is still a development release.
That’s the basic setup done.
Tip: If you need a more recent kernel for some reason, you can build your own ROCK OS images.
The image below shows the eMMC module connected to the USB writer plugged into my Linux notebooks USB adaptor, ready for flashing:
Step 3: SSH
Before going any further, it’s worth locking down SSH access to secure the system.
Change the rock user’s default passwords to a secure version:
passwdSet up SSH for public key authentication and then disable password logins:
- From your host, copy the hosts public key to the ROCK’s authorized_keys file using the utility:
ssh-copy-id rock@rock-3c- Now check you can log in without using a password:
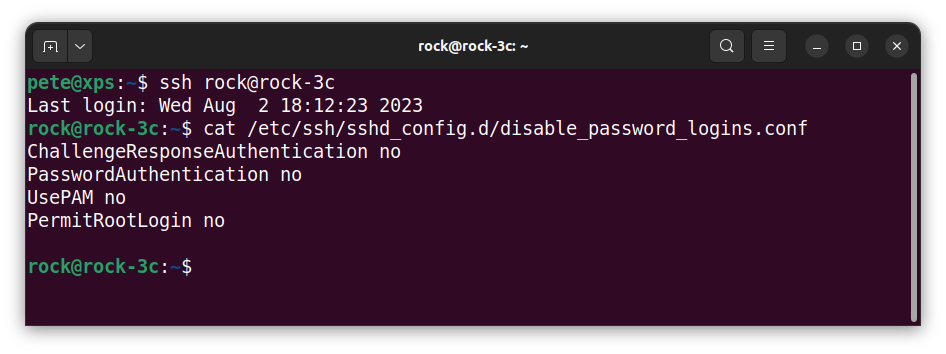
ssh rock@rock-3c- From the remote session on the ROCK, create an extension to the ssh daemon config by adding a config file to the d directory with the following contents:
sudo vi /etc/ssh/sshd_config.d/disable_password_logins.confChallengeResponseAuthentication no
PasswordAuthentication no
UsePAM no
PermitRootLogin no
- Now restart the ROCK’s SSH daemon:
sudo systemctl reload ssh- From the host, check that password logins now fail (both should fail with Permission denied (publickey)):
ssh rock@rock-3c -o PubkeyAuthentication=no
ssh root@rock-3c
That’s the system all set up and secured.
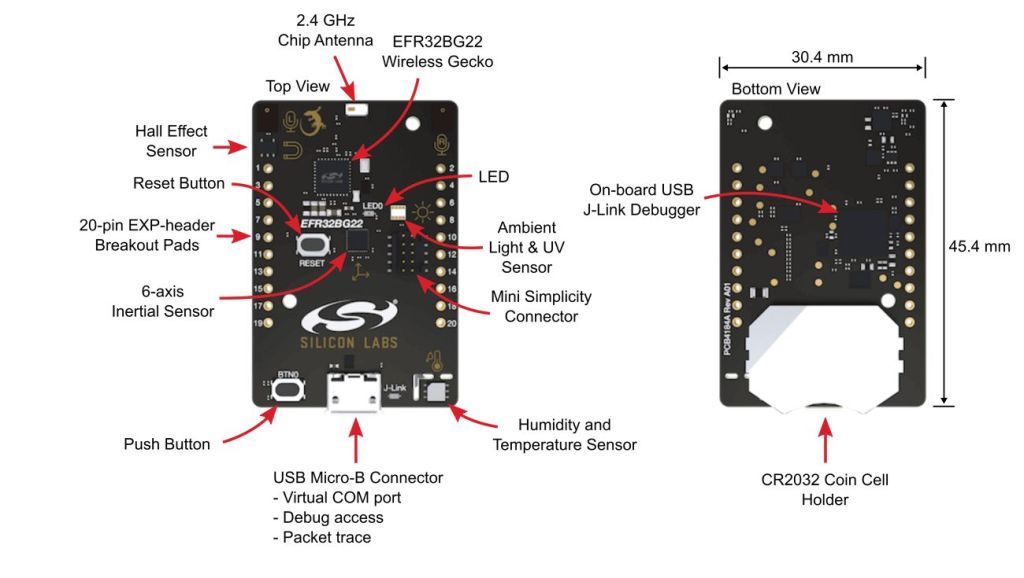
Step 4: Thunderboards
Thunderboards are tiny Bluetooth development boards based on Silicon Labs EFR32BG22 wireless module. They host a number of onboard sensors that can be controlled over BLE. There’s also an LED, push button, hall effect sensor, IMU and dual mems microphones.
In our examples, we will continuously read the Silicon Labs Si7021 relative humidity & temperature sensor.
You can power the boards either using CR2023 coin cells or by attaching them to micro USB cables.
Tip: Heating from the DC/DC voltage regulator affects temperature readings more when connecting with cable.
Out-of-the-box, the boards come pre-flashed as a BLE GAP Peripheral device with a GATT Server exposing the onboard sensor characteristics. There’s also a free-to-use development environment that allows you to program the devices if you want to go down that route. I used them as supplied.
A bit of detective work is needed to obtain the information required to connect and interpret the sensor data. I used the Silicon Labs EFR Connect Mobile App (available from the App Store) to validate the sensor readings and units and the Bluez Bluetoothctl utility on Linux to determine the GATT characteristic handles. See the next step.
Testing was performed with 2 x Thunderboard BG22 and 2 x Thunderboard Sense 2 boards (which have additional pressure sensors but are discontinued). You can connect more devices than this, depending on the wireless module in use. The number of gateways can be scaled to accommodate more sensors and different physical location zones in a network.
The gateway code will work with any BLE device that conforms to the standard.
Step 5: Bluetoothctl
An initial test makes sure that we can connect and communicate with our Thunderboards using Bluetoothctl. This is a very useful utility which comes as part of the Bluez package, and the Ubuntu Jammy image recommended has Bluez installed and configured so the rock user has the correct rights to connect Bluetooth devices.
Very briefly, using BLE terminology, to achieve a BLE connection, the GAP Central (ROCK 3C) must first scan for Advertising Packets from the GAP Peripheral (Thunderboard). The advertising packet contains the Peripheral’s unique 48-bit MAC Address, which the Central can then use to issue a Connection Request to the Peripheral. If the Peripheral accepts the connection, the Peripheral then gives up its GATT Services and Characteristic information to the Central. This information can then be used by the Central to access the sensors.
Tip: If you want a good understanding of Bluetooth LE I recommend reading this excellent resource from the Bluetooth SIG.
- Power on one of the Thunderboards, and the yellow LED in the centre of the board should start blinking, signalling that it is Advertising. This is programmed to only last for 30 seconds to save power.
- From a SSH session on the ROCK, start Bluetoothctl:
bluetoothctl- At the prompt, start the scan:
scan on- Make sure the Thunderboard is still advertising (LED flashing). The address of the Thunderboard should appear in the list of devices discovered in Bluetoothctl. There may be other devices in the area of your scanner that are also advertising, and these will appear also.
Tip: You can put the Thunderboard into advertising mode by pressing the RESET button. If it is connected, it will cause it to disconnect.
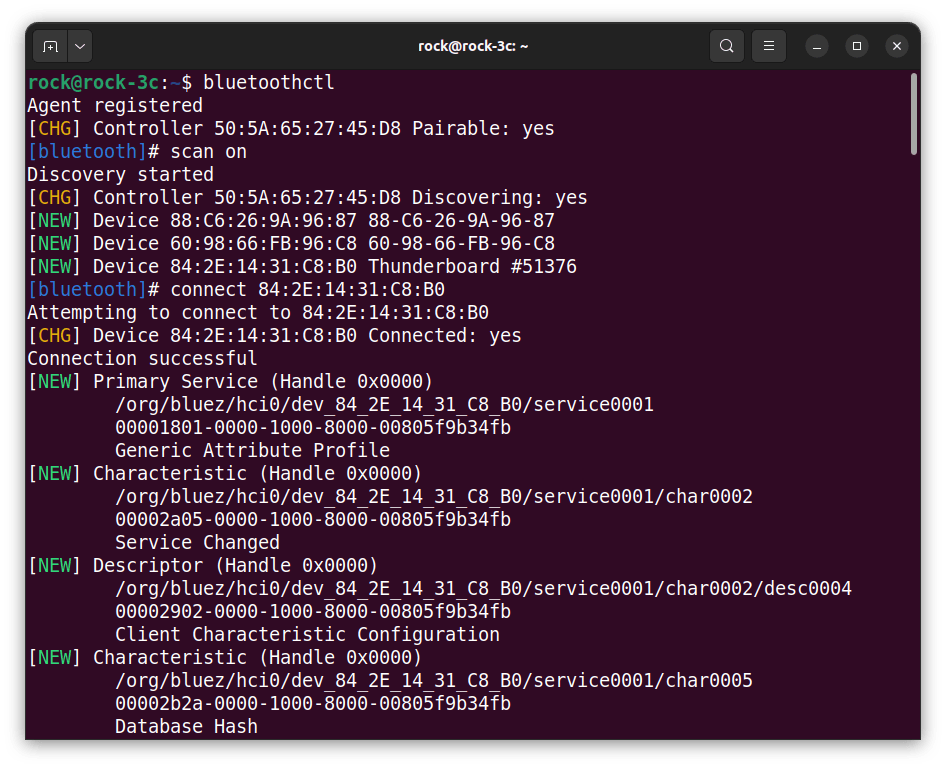
- Then, whilst the Thunderboard is still advertising, issue the connect command at the Bluetoothctl prompt using the address in the scan list. You can use tab completion for this, for example, one of my devices has the address 84:2E:14:31:C8:B0:
connect 84:2E:14:31:C8:B0- After a few seconds, the Thunderboard should connect (the LED will turn off), and all its services and characteristics will be listed in Bluetoothctl.
- Repeat the process for each Thunderboard until they are all connected.
- You can stop scanning with:
scan off- After a few seconds, issue the command to list the connected devices, which should show your Thunderboards which are connected.
- Exit Bluetoothctl by quitting:
quitTip: Type help to get all the commands available in Bluetoothctl and experiment with them.
This screenshot below shows one of my Thunderboards being scanned and connected by Bluetoothctl.
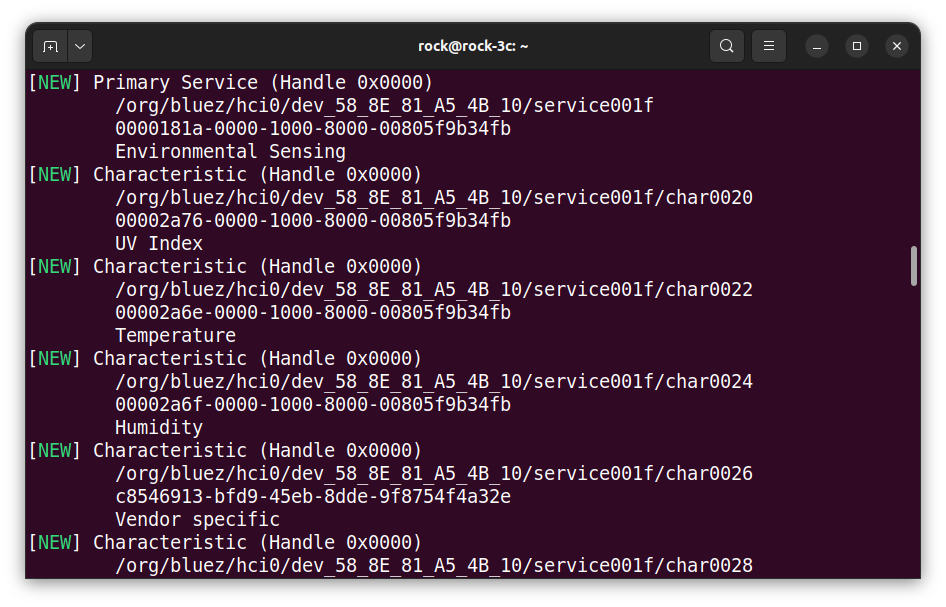
Step 6: GATT Characteristics
The final piece of information we need is the GATT Characteristics Handle that will allow us to read each sensor. This can be seen when each Thunderboard connects using Bluetoothctl.
The Bluetooth standard defines UUIDs for a whole load of characteristics so that Central clients can recognise these characteristics automatically.
We can see in the screenshot below that the Thunderboard is using standard values for Temperature, Humidity etc., as they are identified when the board connects. The unidentified vendor-specific characteristics would need further investigation to determine what they relate to. These are configured in the firmware supplied with the Thunderboard before it was compiled.
The Bluetooth standard UUID for Temperature is:
00002a6e-0000-1000-8000-00805f9b34fb
And the device handle for this on this particular device is:
/org/bluez/hci0/dev_58_8E_81_A5_4B_10/service001f/char0022
Collect all the device handles and make a note of them somewhere safe, as we will use them later.
Step 7: Python Paho
So that we can use the MQTT protocol with Python, we need to install the Python Paho package from the Eclipse project. To get the latest version and install it into the user’s site-packages use PIP.
python -m pip install --user --upgrade pip
pip install --user paho-mqtt
That’s it, the GAP / GATT modules will be provided by the gateway installation next.
Step 8: Gateway Installation
The Bluetooth SIG has produced a guideline for BLE developers containing a working implementation of a BLE gateway over TCP/IP, along with good documentation explaining how it all works. It also includes a Python package providing modules for GAP & GATT functions.
The guideline can be downloaded here.
We will add new Python modules to translate MQTT messages into BLE protocol using an adapted version of the GAP and GATT packages.
The full source code is available on the OKdo GitHub along with the original Bluetooth SIG code, which is redistributable under their EULA:
- Clone the gateway repo to your Host:
git clone https://github.com/LetsOKdo/bluetooth-gateway-study-guide.git- From your HOST, copy just the gateway directory to the ROCK users home dir:
cd bluetooth-gateway-study-guide/implementation/solutions/peripherals/
scp -r gateway_mqtt_no_security/ rock@rock-3c:~/- This will install the MQTT / BLE gateway code into the following location on the ROCK:
/home/rock/gateway/gateway_mqtt_no_security/Step 9: Gateway Testing
To ease testing the Mosquitto broker can be installed onto the gateway. You will need to update the package repo to do this.
Tip: Don’t do a full upgrade of all packages, as this will break your system.
- From a terminal on your Host:
ssh rock@rock-3c
sudo apt update
sudo apt install mosquitto mosquitto-clients- For testing purposes, only unsecured connections are used, so the broker will need to be configured to accept anonymous connections on port 1883. Edit the configuration:
sudo vi /etc/mosquitto/conf.d/broker.conf- Enable anonymous access on the default MQTT port 1883 by adding the following settings:
# Enable settings by listener
per_listener_settings true
# Allow anonymous access on port 1883
listener 1883
allow_anonymous true- Restart mosquitto:
sudo systemctl restart mosquitto.serviceNow run the gateway MQTT client. This listens for incoming MQTT commands and dispatches them to the Thunderboards via BLE. The responses to the commands are captured by the Logging module and displayed in the terminal and published over MQTT.
The client supports device discovery (scanning), connecting, service discovery, reading and writing characteristics and notifications.
I have included mosquitto commands for testing my Thunderboards in the mqtt_client.py docstring. You will need to adapt these to match your boards’ MAC addresses and characteristic handles.
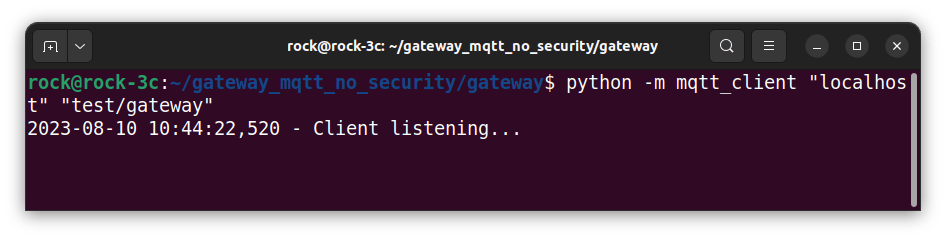
On the ROCK remote session, start the MQTT client as a module, passing the broker hostname and mqtt topic as parameters:
cd gateway_mqtt_no_security/gateway
python -m mqtt_client 'localhost' 'test/gateway'
Here you can see the client has started and is waiting for inbound messages from the broker:
On the HOST, open another terminal session and SSH into the ROCK.
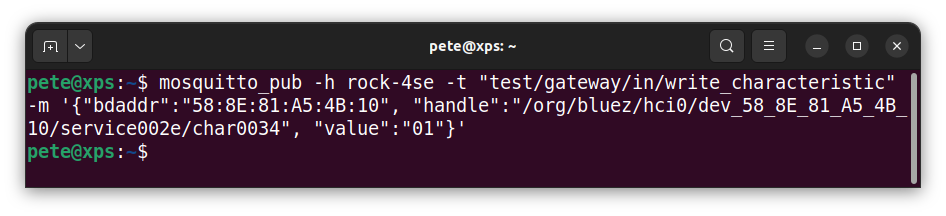
ssh rock@rock-3cCopy and paste a mosquitto command to turn on the Thunderboards LED. For example, on my Thunderboard with address 58:8E:81:A5:4B:10 this would be:
mosquitto_pub -h localhost -t "test/gateway/in/write_characteristic" -m '{"bdaddr":"58:8E:81:A5:4B:10", "handle":"/org/bluez/hci0/dev_58_8E_81_A5_4B_10/service002e/char0034", "value":"01"}'Here I am using the mosquitto_pub client to publish a message to the broker running on host localhost with a topic path test/gateway/in/write_characteristic. The message body contains the command encoded as a json string, containing the MAC address of the Thunderboard, the characteristic handle and the command value as an 8-bit HEX integer as a string. “01” turns the LED on and “00” off.
The LED will turn on, and you should see the MQTT command details and the response in the MQTT client terminal. A result code of 0 indicates a successful command response. The codes are in the bluetooth.bluetooth_constants.py module.
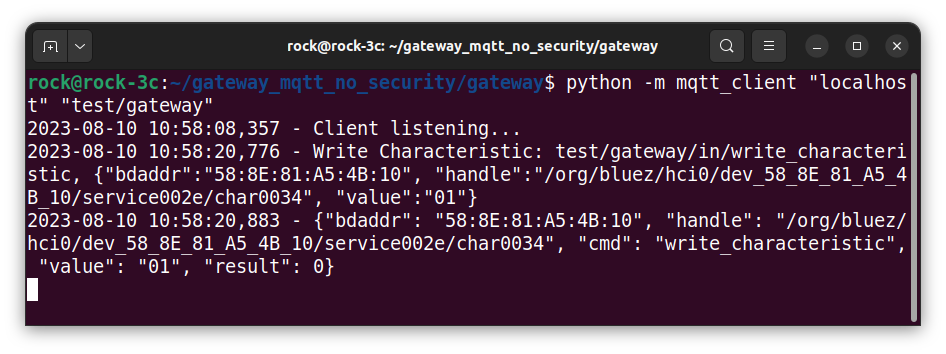
If your output looks similar to the above, congratulations, your gateway is working!
Step 10: Reading sensors
As an example of reading sensors remotely, remote_client.py issues read commands to the various environmental sensors on the Thunderboard and waits asynchronously for the response sent over MQTT, then displays the results. This client also converts and scales the returned values to a human-readable format.
remote_client.py has a hard-coded dictionary structure containing the commands for reading each of the sensors on the Thunderboard. These will need editing for your devices. In a production system, they would be configured and read in externally from a file or data store.
# Dictionary of command strings to read characteristics from BLE sensors
sensors = {
    "temperature_sensors": [
        '{"bdaddr":"90:FD:9F:7B:7E:E0", "handle":"/org/bluez/hci0/dev_90_FD_9F_7B_7E_E0/service001b/char0020"}',
…
    ],
    "pressure_sensors": [
        '{"bdaddr":"90:FD:9F:7B:7E:E0", "handle":"/org/bluez/hci0/dev_90_FD_9F_7B_7E_E0/service001b/char001e"}',
…
    ],
    "humidity_sensors": [
        '{"bdaddr":"90:FD:9F:7B:7E:E0", "handle":"/org/bluez/hci0/dev_90_FD_9F_7B_7E_E0/service001b/char0022"}',
…
    ],
}
The commands are sent to the gateway continuously in a loop, and the returned values are then published by the command objects. For temperature readings, these are 16-bit byte arrays encoded as HEX strings (big endian) which are scaled and converted into human-readable format by the callback function in remote_client.
- Make sure that the mqtt_client is started and the Thunderboards are connected.
- Start the remote client from another SSH session on the ROCK and attach it to localhost with the same topic route as mqtt_client:
ssh rock@rock-3c
cd gateway_mqtt_no_security/gateway
python -m remote_client "localhost" "test/gateway"
In the MQTT client session, you should see the MQTT commands being received from the remote client; showing the device MAC, characteristic handle, command, 16-bit HEX value (big-endian) returned and command result code:
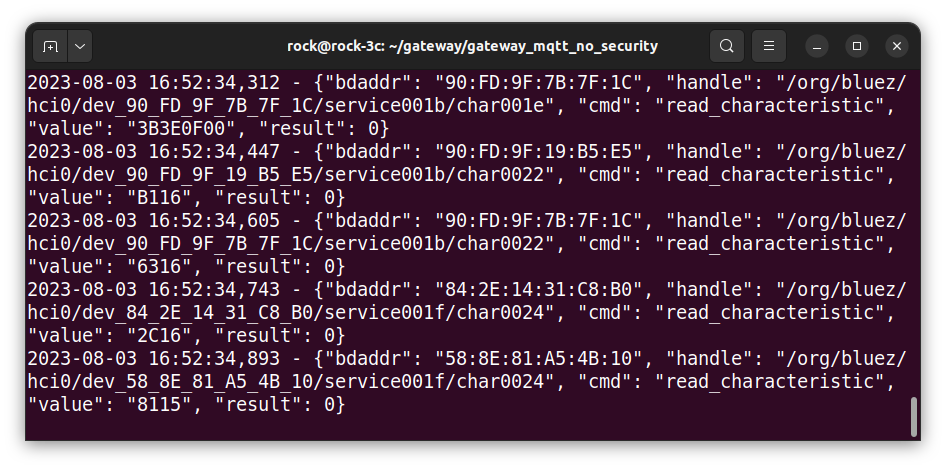
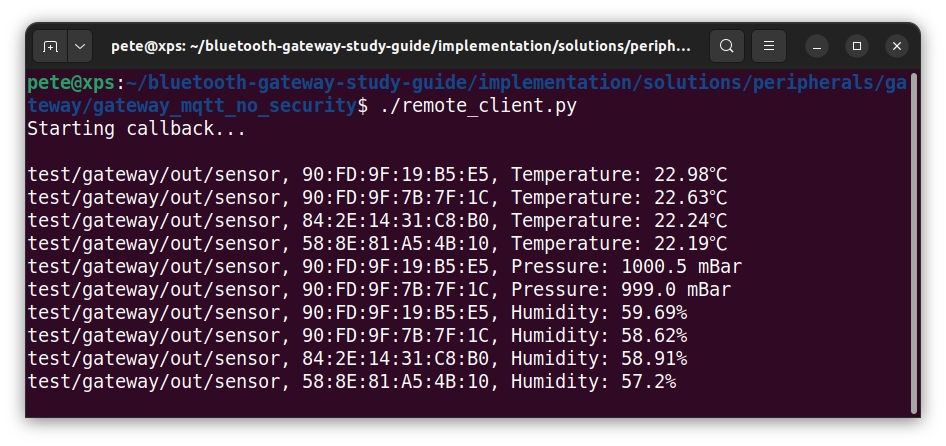
In the remote client session, you will see the responses being published by the sensor showing the MQTT topic, device MAC and formatted sensor type and value.
The values are converted from HEX format into scaled, decimal values for each type of sensor by the remote client. If the characteristic used is one of the standard BLE characteristics from the specification, then the spec defines this conversion so remote clients can perform it correctly. If not, then the conversion must be done according to the specification of the application running on the BLE peripheral or with detective work, in our case, with the Thunderboard mobile app.
Step 11: Troubleshooting
If you are having issues, there are a few things you can check to narrow things down:
- Python will give a traceback error if there’s a problem. The code currently has very little in the way of dealing with errors to keep it as simple as possible. Read the error traceback carefully, as it will have clues as to where the problem originates.
- Check that the Mosquitto broker is running, the mosquitto service must be active and running without errors:
systemctl status mosquitto.service- Check that the parameters (hostname & topic root) used by both mqtt_client and remote_client match.
- Check the present working directory in each session is set to (if you installed the gateway to the rock users home directory):
rock@rock-3c:~/gateway_mqtt_no_security/gateway$ pwd
/home/rock/gateway_mqtt_no_security/gateway- Check the Thunderboards are actually connected using Bluetoothctl in a separate remote session on the ROCK:
rock@rock-3c:~$ bluetoothctl
Agent registered
[CHG] Controller 50:5A:65:27:45:D8 Pairable: yes
[Thunderboard #19216]# devices
Device 84:2E:14:31:C8:B0 Thunderboard #51376
Device 58:8E:81:A5:4B:10 Thunderboard #19216
…
Summary
In this project, we have implemented a working MQTT to BLE gateway that runs on ROCK boards and can communicate with 4 or more Silicon Labs Thunderboards using BLE.
The gateway converts MQTT messages into commands issued by the Central (ROCK) to the BLE Peripheral (Thunderboard) devices connected to the gateway, allowing the integration of a network of BLE sensors into an MQTT-based network.
The gateway code is based on guidelines published by the Bluetooth SIG, which maintain the Bluetooth specification. The full guideline and documentation is published on the OKdo GitHub and is redistributable under a EULA.
We have shown how to prepare, install and run the Python code that runs on the gateway. We also illustrated using bluetoothctl to test connecting devices to the gateway, and a remote client script was also tested as an example of reading remote BLE sensors attached to the gateway.
Although the project was implemented on a ROCK 3C, it will run on any ROCK board with Bluetooth hardware. It was designed as part of a larger MQTT-based network but can also be used standalone in your own MQTT network projects.
References
- Project source code
- Bluetooth LE Primer
- Bluetooth Gateways
- Bluetooth specifications
- Eclipse Paho
- Mosquitto project
- Build the latest Linux kernel for ROCK
- Build a secure Mosquitto MQTT gateway
![]()


Let’s invent the future together
What’s your challenge? From augmented reality to machine learning and automation, send us your questions, problems or ideas… We have the solution to help you design the world. Get in touch today.
Looking for something else? Discover our Blogs, Getting Started Guides and Projects for more inspiration!
Like what you read? Why not show your appreciation by giving some love.
From a quick tap to smashing that love button and show how much you enjoyed this project.

