Add extra spookiness to Halloween by implanting a PIR sensor in a skull mask and moving its jaw with a servo. The whole thing is controlled by an Arduino Nano Every and is guaranteed to scare the living daylights out of anyone that sets it off!
1. Prepare the skull
The skull used in the project was designed to be worn as a mask and already had a movable jaw. We removed the elastic straps to hold it on your head and traced the outline onto some cardboard, then cut it down to size to fit inside the mask. The position for the PIR sensor and servo were marked out and then a shape was cut from hardboard using the template.
Holes were drilled in the hardboard for the sensor and the outline of the servo cut-out. These were filed out to the finished size, before spraying with matt black paint. Once dry, the shape was hot glued in place and the servo and sensor mounted in position.
We used an RC surface control horn and connector rod from a model supplier to attach the servo arm to the jaw.
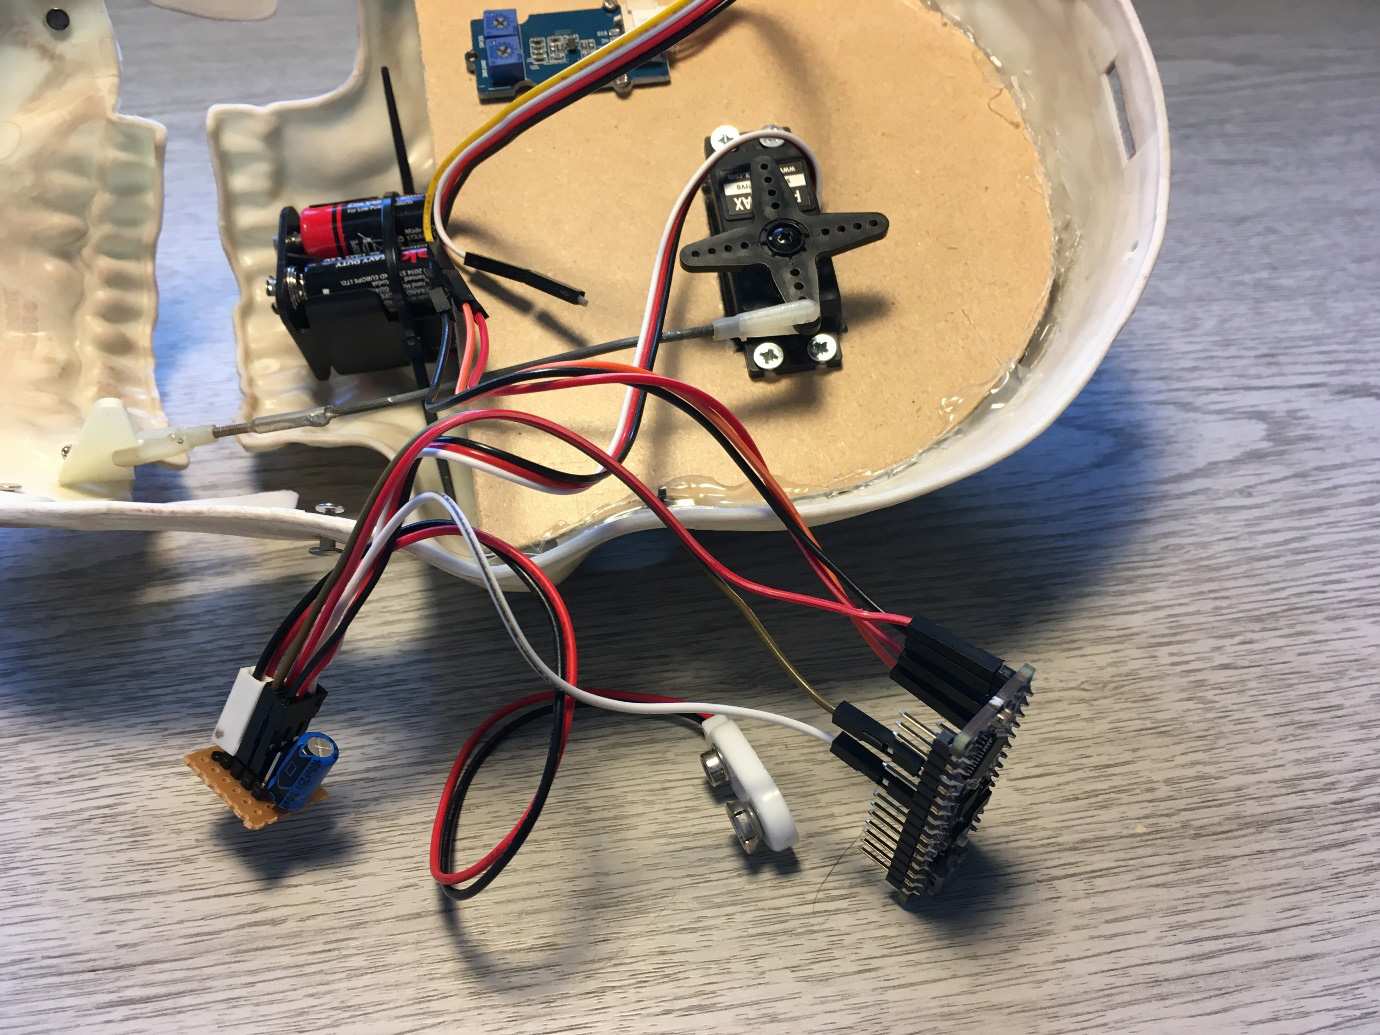
The 4 x AA battery box was held in place with cable ties behind the nose of the skull and the back of the jaw was cut away slightly to allow it to open against a flat surface. That completed the build.
2. Assemble the wiring harness
We kept the wiring to a minimum so that it used as few components as possible.
The Grove PIR sensor can be directly connected to the Nano’s +5V, GND and D20 pins as it is 5V tolerant.
We made a small connector block by soldering 3 x 4 pin headers to a piece of prototyping board. This provided a mini connection point for the +6V positive connections, a common GND connection and a spare rail for the servo PWM control line. We also used it to attach a 100uF electrolytic decoupling capacitor across the positive and GND to stop the Nano from resetting when the servo started up.
Electrolytic capacitors are polarised, the black band marking goes to the negative (GND) rail on the connector block.
Attach the 6V battery box connector to the positive and GRN rails of the connector block.
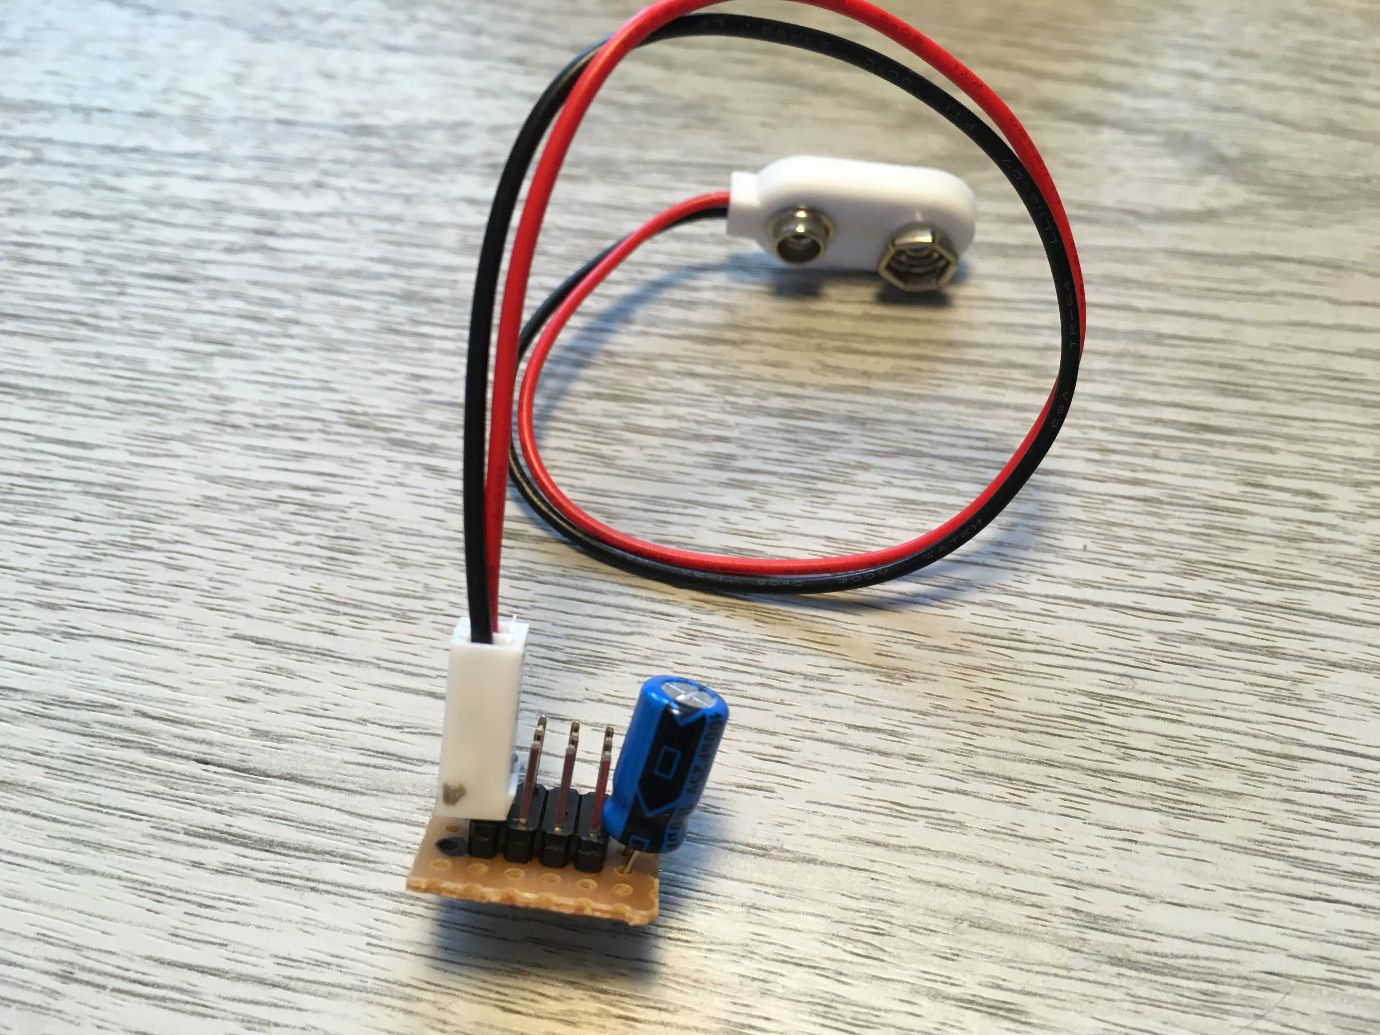
The Parallax servo is attached to the connection block and a lead from the control rail connected to pin D4 on the Nano.
A power line was connected from the +6V positive rail to VIN on the Nano and also a connection from the common GND rail to the second GND pin on the Nano completed the wiring harness, shown below:
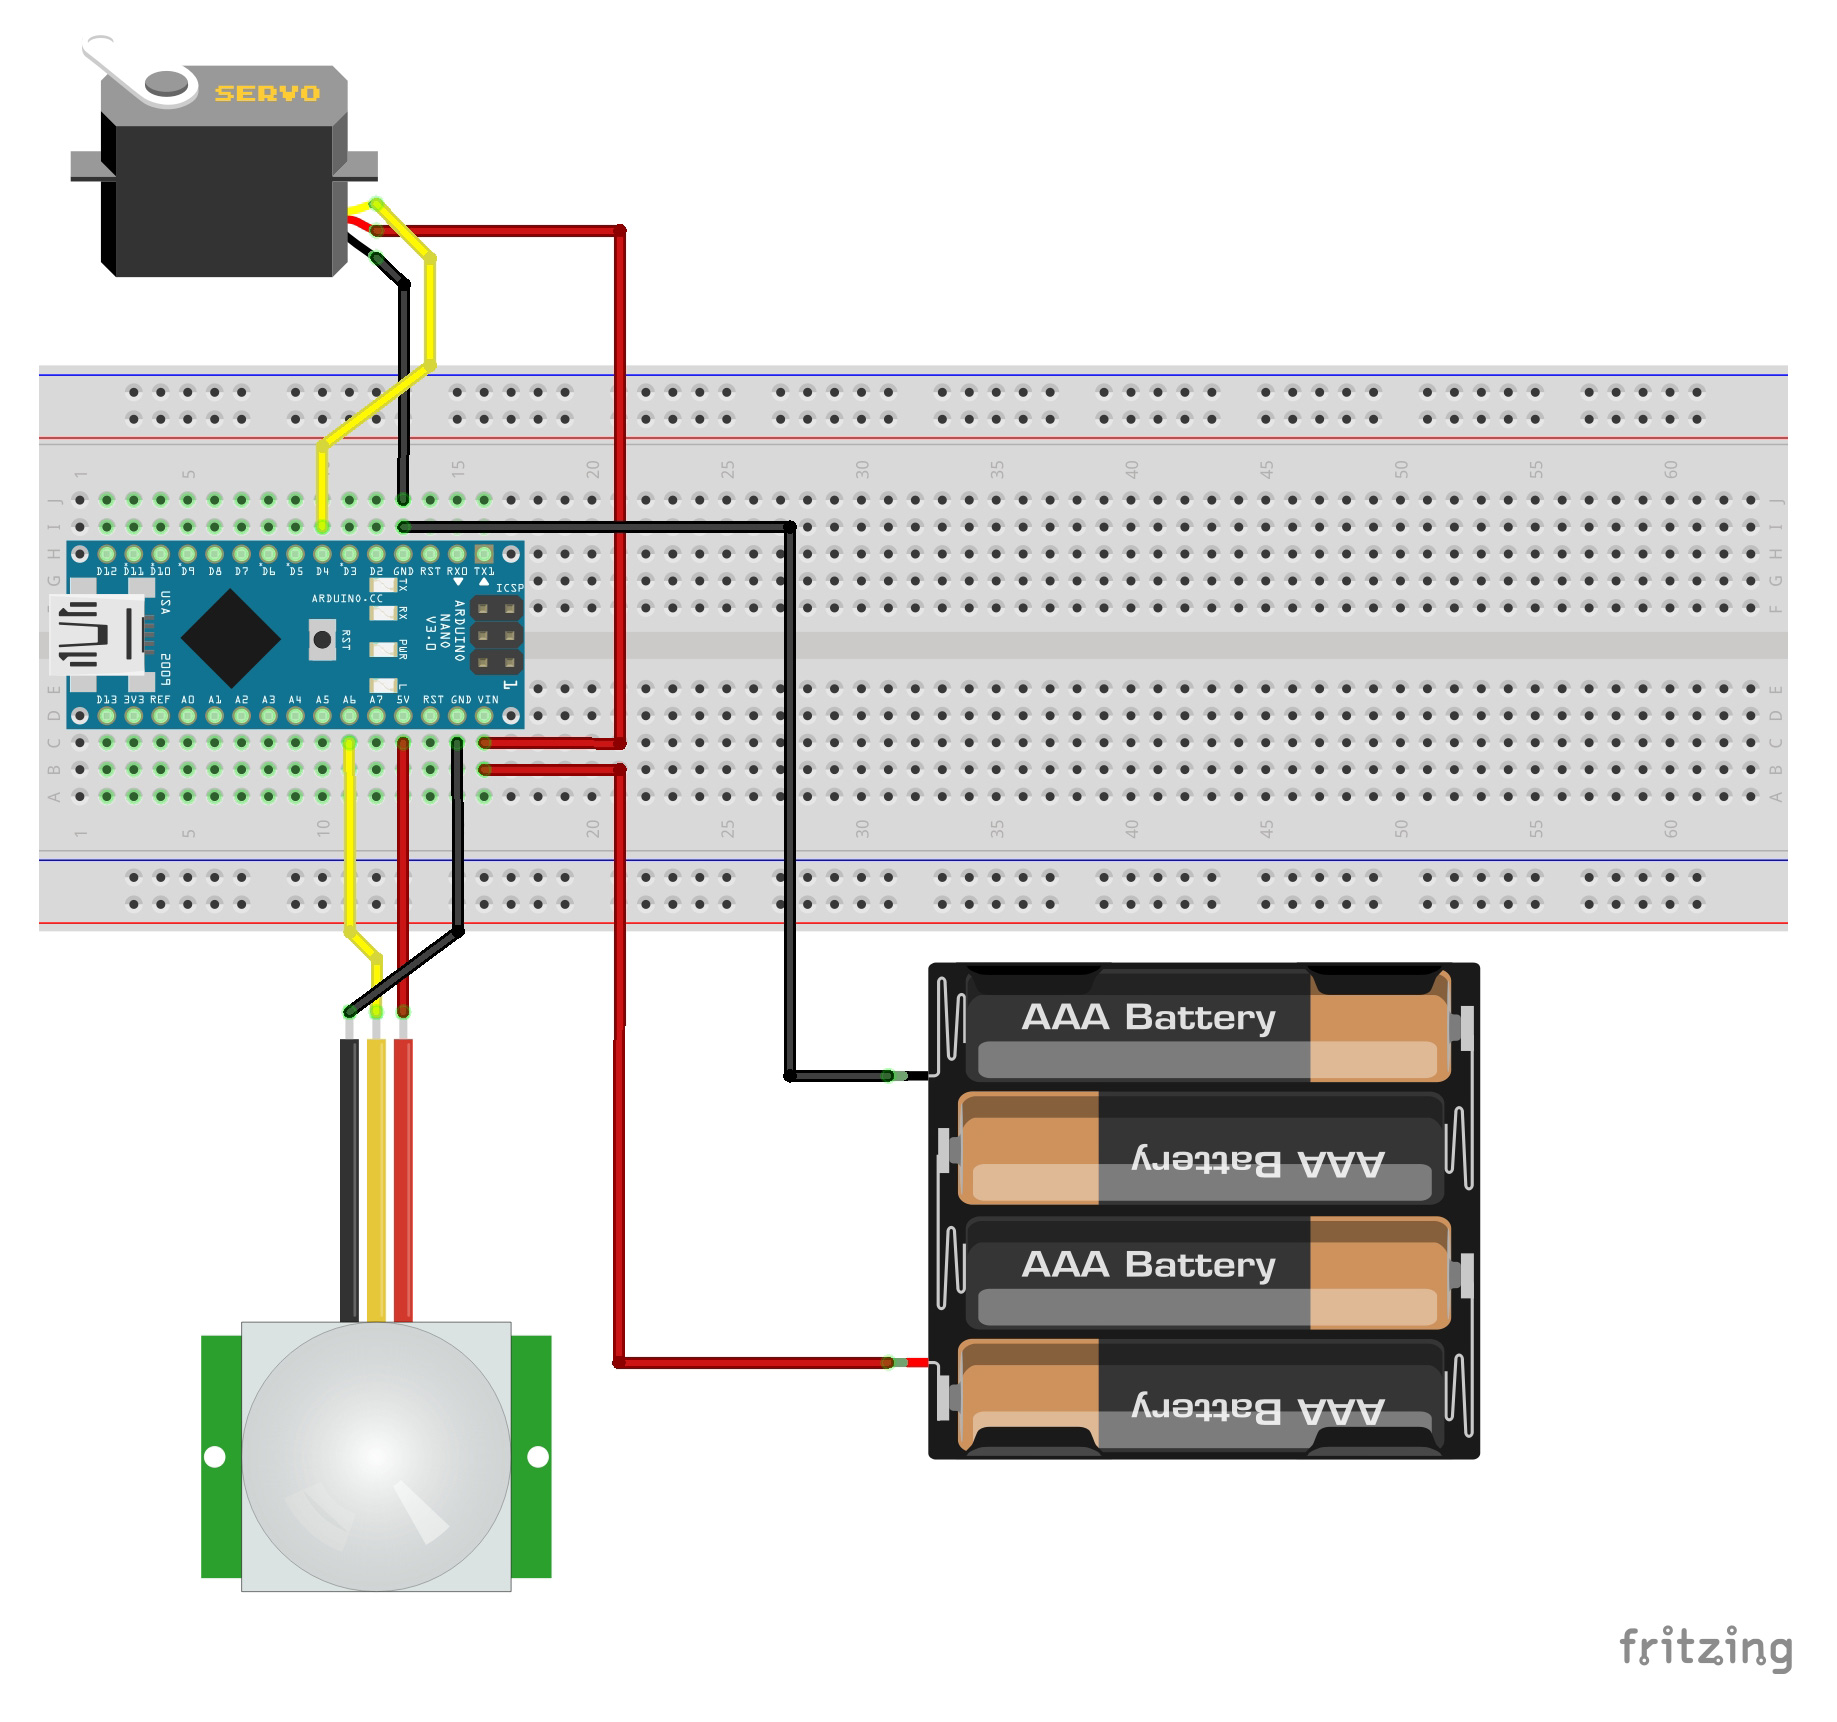
Here is the same circuit on a breadboard, which was used for testing:
Tip: Always check the positive (+6V) and ground (GND) connections are the correct way round before connecting the battery box.
3. Upload the code
Before attempting to upload the Arduino sketch, disconnect the servo connector and battery from the harness.
If you have not used the Nano Every with the Arduino IDE before, follow our getting started guide.
to set up your environment and connect your Nano to your PC ready for programming.
The code starts by including the servo library which is part of the Arduino IDE:
#include <Servo.h>Then pin numbers are assigned as literals
const byte PIR = 20;
const byte LED = 13;
const byte SERVO = 4;
The servo centre and maximum setting which controls how far the jaw opens, are also assigned to literals. These values may need adjusting for your servo, which you can do by experimenting:
const byte CENTRE = 90;
const byte CLOCKWISE_MAX = 45;
A servo object is then created:
Servo servo;
The setup function initialises the PIR sensor by setting the pin mode as a digital input and attaches the servo to its output pin. It then centres the servo so the main loop is ready to start.
void setup() {
  pinMode(PIR, INPUT);
  servo.attach(SERVO);
  servo.write(CENTRE);
  delay(1000);
}
Each time the main loop executes, it checks the state of the PIR sensor. If movement is detected, a constrained, random value is generated to set a new maximum position for the servo. If movement continues to be detected, the jaw will open and close several times. The amount it opens depends on this value, which adds to the scare factor!
void loop() {
  byte state = digitalRead(PIR);
  if (state) {
    long randNumber = CENTRE - random(CLOCKWISE_MAX);
    // Start servo action
Finally, the jaw opens by rotating the servo in an anti-clockwise direction. The speed of movement depends on how much the for loop is decremented each iteration. This can be changed to achieve different effects. The closing action is a similar for loop but in reverse.
for (byte position = CENTRE; position >= randNumber; position -= 2) {
      servo.write(position);
      delay(15);
    // Start closing action
The full code shown below can be cut and pasted into a new Arduino sketch or you can download the code from GitHub:
/*
  arduino-nano-halloween-skull

  A halloween skull mask with a sensor activated moving jaw.

  Copywrite 2020 Peter Milne
  License: GPL-3.0 License
*/

#include <Servo.h>

// Pin numbering
const byte PIR = 20;
const byte LED = 13;
const byte SERVO = 4;

// Servo settings - adjust to suit servo
const byte CENTRE = 90;
const byte CLOCKWISE_MAX = 45;

Servo servo;

void setup() {
  pinMode(PIR, INPUT);
  pinMode(LED, OUTPUT);
  servo.attach(SERVO);
  servo.write(CENTRE);  // Start with closed jaw
  delay(1000);
}

void loop() {
  // Check the PIR sensor
  byte state = digitalRead(PIR);
  digitalWrite(LED, state);

  if (state) { // If sensor is triggered
    long randNumber = CENTRE - random(CLOCKWISE_MAX); // Randomise jaw position
    // Open jaw
    for (byte position = CENTRE; position >= randNumber; position -= 2) {
      servo.write(position);

      delay(15);
    }
    // Close jaw
    for (byte position = randNumber; position <= CENTRE; position += 2) {
      servo.write(position);
      delay(15);
    }
  }
}
While uploading the sketch we did get errors and warnings from the IDE. If this happens, try repeating the upload process until you get the “Done Uploading” message, then you can ignore the jtag warning.

4. Testing and scaring
Once the code is loaded, fit the harness into the skull and secure with a cable tie, then hang the skull on the wall in a strategic position. You can adjust the sensitivity of the PIR sensor to trigger it as someone get close to it, by setting the potentiometer on the back of the sensor. The duration setting affects the number of times the jaw will open and close if someone stays in range of the sensor. Because PIR uses infra-red radiation it can be used in the day or especially at night!
Summary
We hope you like this fun project to add some extra scariness to Halloween. Experiment with the PIR settings and see if you can add extra animation effects to the jaw by changing the opening and closing code to give a dramatic effect.
Happy Halloween!
Like what you read? Why not show your appreciation by giving some love.
From a quick tap to smashing that love button and show how much you enjoyed this project.

