This project allows you to control IKEA Tradfri gadgets with a Raspberry Pi 400 or Pi 4B from within Node-RED.
Controlling smart devices from a mobile app is OK if you’re happy with the features offered but what if you want more? Perhaps you want to dim the lights and turn the music on using a sensor or be woken up in the morning by your lights slowly increasing in brightness. This is where Node-RED can be extremely useful. Node-RED is a visual editor for connected devices using Javascript to customise the way your devices behave and interact with each other. There’s a whole selection of pre-built device nodes that you can drag-and-drop and wire together or you can create your own. The software package comes pre-installed in RaspiOS for the Pi 400 and Pi 4B!
This project will guide you through setting up Node-RED to control the Tradfri smart devices. Everything you learn in this project can be applied to other smart devices so you can start using Node-RED as a central point for creating your own special effects with them.
1. Get your Pi ready
Tradfri smart products form a network based on the ZigBee wireless standard and the gateway implements the Constrained Application Protocol (CoAP) for network communication. To get started we’ll install a CoAP client on the Pi. This will enable Node-RED to send CoAP commands to the gateway. The gateway will then relay these commands to the smart devices.
- Open Terminal and use the following commands to install the build tools:
sudo apt install build-essential autoconf automake libtool nmap-
Install the CoAP client from GithHub and build it:
git clone --recursive https://github.com/obgm/libcoap.git
cd libcoap
git checkout dtls
git submodule update --init --recursive
./autogen.sh
./configure --disable-documentation --disable-shared
make
The CoAP client will be installed in /home/pi/libcoap/examples/coap-client.
Information about the CoAP standard can be found here: https://libcoap.net/
2. Testing
Make sure you can control your lights using the IKEA mobile app to test they are all connected and working as expected. You will be able to continue to use the app for control alongside Node-RED.
To run a test, several pieces of information are required:
- Tradfri gateway IP address – you can get this by checking your router’s web interface or opening a Terminal and running nmap. The following command will scan all the hosts on network 192.168.1.0 with a subnet mask of 255.255.255.0 :
nmap -sP 192.168.1.0/24nmap will return a list of devices connected to the network – our test gateway has a hostname starting GW followed by the Serial Number (MAC address) printed on the bottom of the enclosure – it has the IP address 192.168.1.120
Host is up (0.012s latency).
Nmap scan report for GW-XXXXXXXXXX.lan (192.168.1.120)- Tradfri Security Code – printed on the bottom of the gateway (also the QR code). eg gobbledygook
- Tradfri username – you can make this up, we used tradfri.
Now we have the credentials, we can use them to send messages to the gateway.
Create the following environment variables in the Terminal substituting your own credentials:
TF_GATEWAYCODE=gobbledygook
TF_USERNAME=tradfri
TF_GATEWAYIP=192.168.1.120
COAP_LIB=/home/pi/libcoap/examples- The first CoAP request will be used to obtain the authentication key using the following command:
$COAP_LIB/coap-client -m post -u "Client_identity" -k "$TF_GATEWAYCODE" -e "{"9090":"$TF_USERNAME"}" "coaps://$TF_GATEWAYIP:5684/15011/9063"- The key needs including when sending commands to the devices from now on. Create an environment variable to hold it:
TF_PRESHARED_KEY=jibber-jabber- Now we can list all the Tradfri devices on the network:
$COAP_LIB/coap-client -m get -u "$TF_USERNAME" -k "$TF_PRESHARED_KEY" "coaps://$TF_GATEWAYIP:5684/15001"This shows the device id’s of the two nodes on our network, the controller (id 65538) and a bulb (id 65539).
v:1 t:CON c:GET i:4af6 {} [ ]
[65539,65538]
Details of individual devices can be found by using their id in the request:
$COAP_LIB/coap-client -m get -u "$TF_USERNAME" -k "$TF_PRESHARED_KEY" "coaps://$TF_GATEWAYIP:5684/15001/65539"This returns details about the bulb:
v:1 t:CON c:GET i:fbf3 {} [ ]
{"9001":"TRADFRI bulb","9003":65539,"9002":1586186252,"9020":1607528189,"9054":0,"9019":1,"3":{"0":"IKEA of Sweden","1":"TRADFRI bulb E27 W opal 1000lm","2":"","3":"1.2.214","6":1},"5750":2,"3311":[{"5850":0,"5851":1,"9003":0}]}
Now we can use the device id to turn the bulb on at 50% brightness (“5851”: 127):
$COAP_LIB/coap-client -m put -u "$TF_USERNAME" -k "$TF_PRESHARED_KEY" -e '{ "3311": [{ "5851": 127 }] }' "coaps://$TF_GATEWAYIP:5684/15001/65539"And off again with (“5850”: 0):
$COAP_LIB/coap-client -m put -u "$TF_USERNAME" -k "$TF_PRESHARED_KEY" -e '{ "3311": [{ "5850": 0 }] }' "coaps://$TF_GATEWAYIP:5684/15001/65539"You now have control of your Tradfri network and devices so we can move on to setting up Node-RED.
Glenn de Haan has done a brilliant job of documenting all the Tradfri API endpoints here: https://github.com/glenndehaan/ikea-tradfri-coap-docs
3. Node-RED setup
Node-RED is installed by default in RaspiOS and there are already specialist nodes for Tradfri devices in the Node-RED repository that we will install in our instance.
- Open Node-RED from Main Menu > Programming > Node-RED.
- A Terminal window will open with information about the url.
- Open Chromium and go to http://127.0.0.1:1880
- A blank flow will open.
- Click the hamburger icon in the top-right of the window.
- Select Manage Pallet.
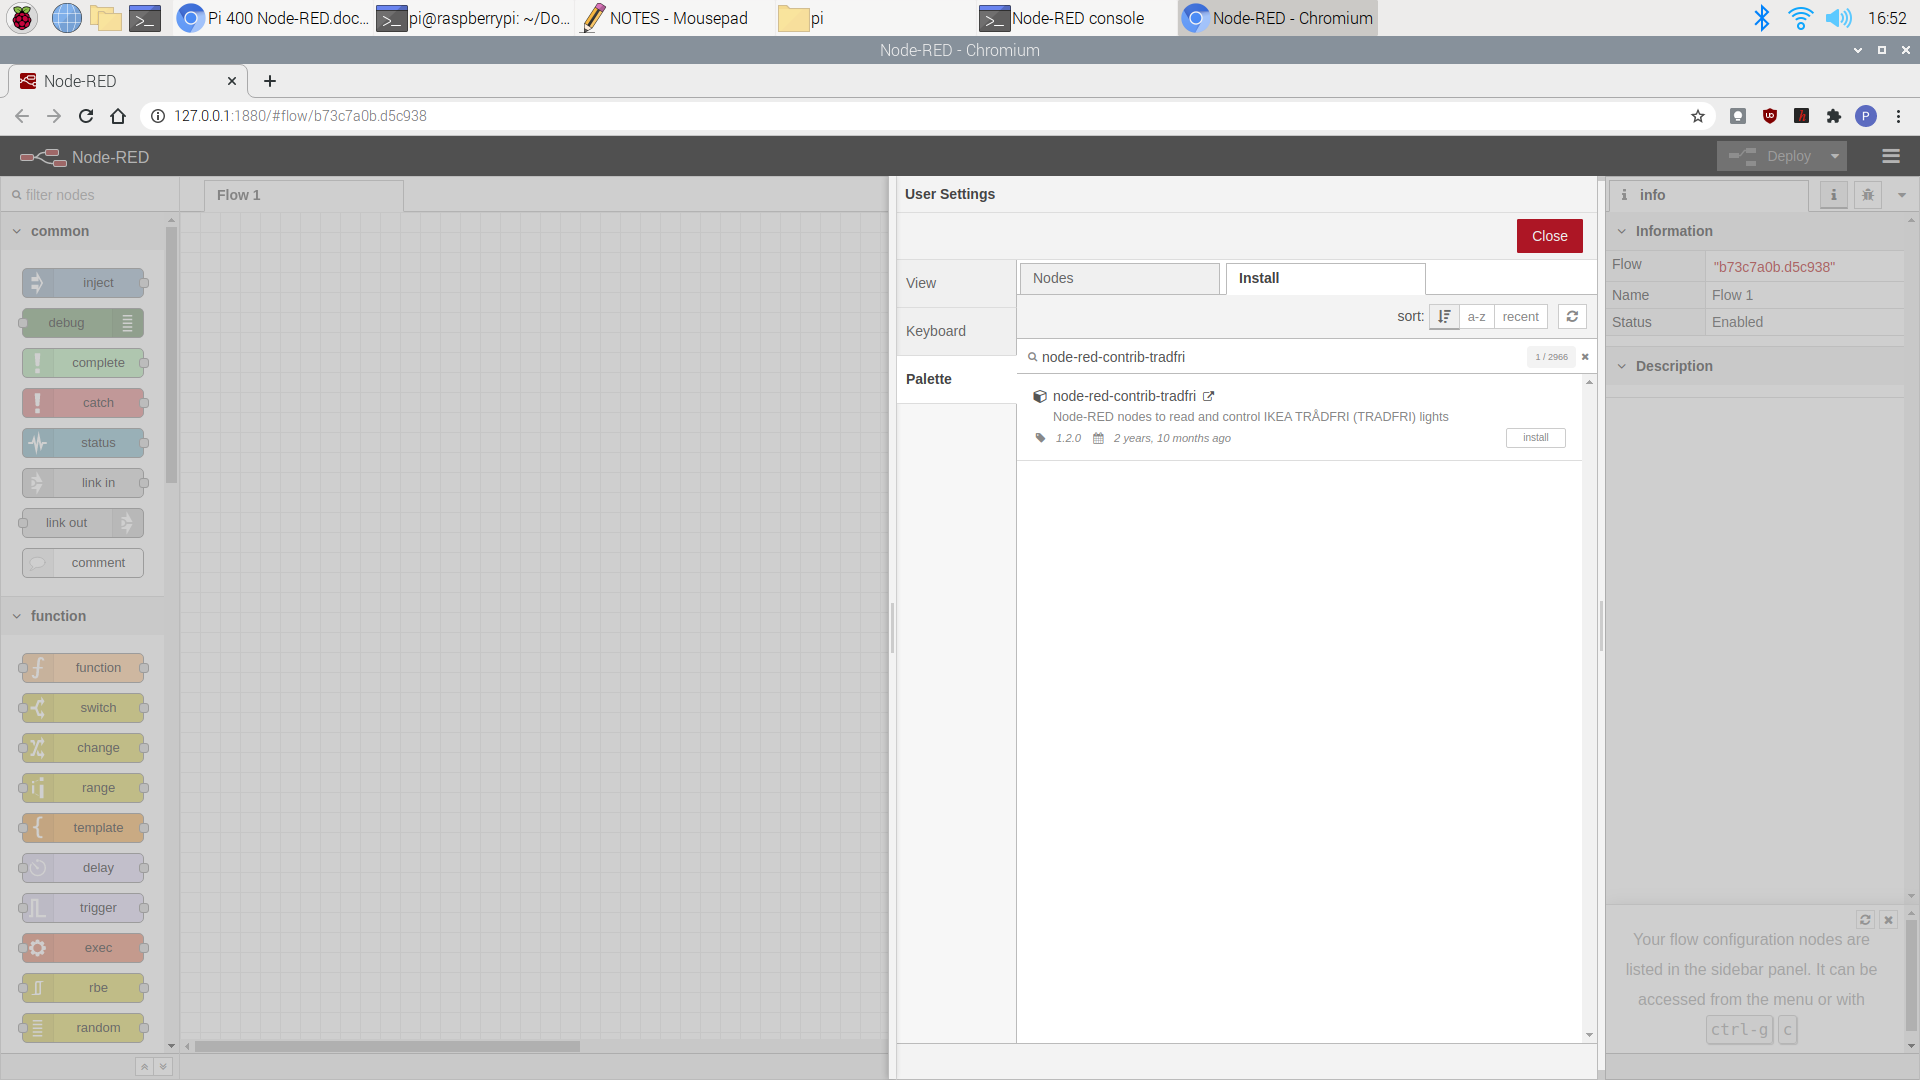
- Click the Install tab.
- Search for node-red-contrib-tradfri.
- Click Install.
- Click Close.
Documentation for this Node-RED library is here: https://flows.nodered.org/node/node-red-contrib-tradfri
Two new Tradfri nodes will now appear in the Pallet down the left-hand side of the window:
- Tradfri get
- Tradfri out
Drag them both onto the Flow.
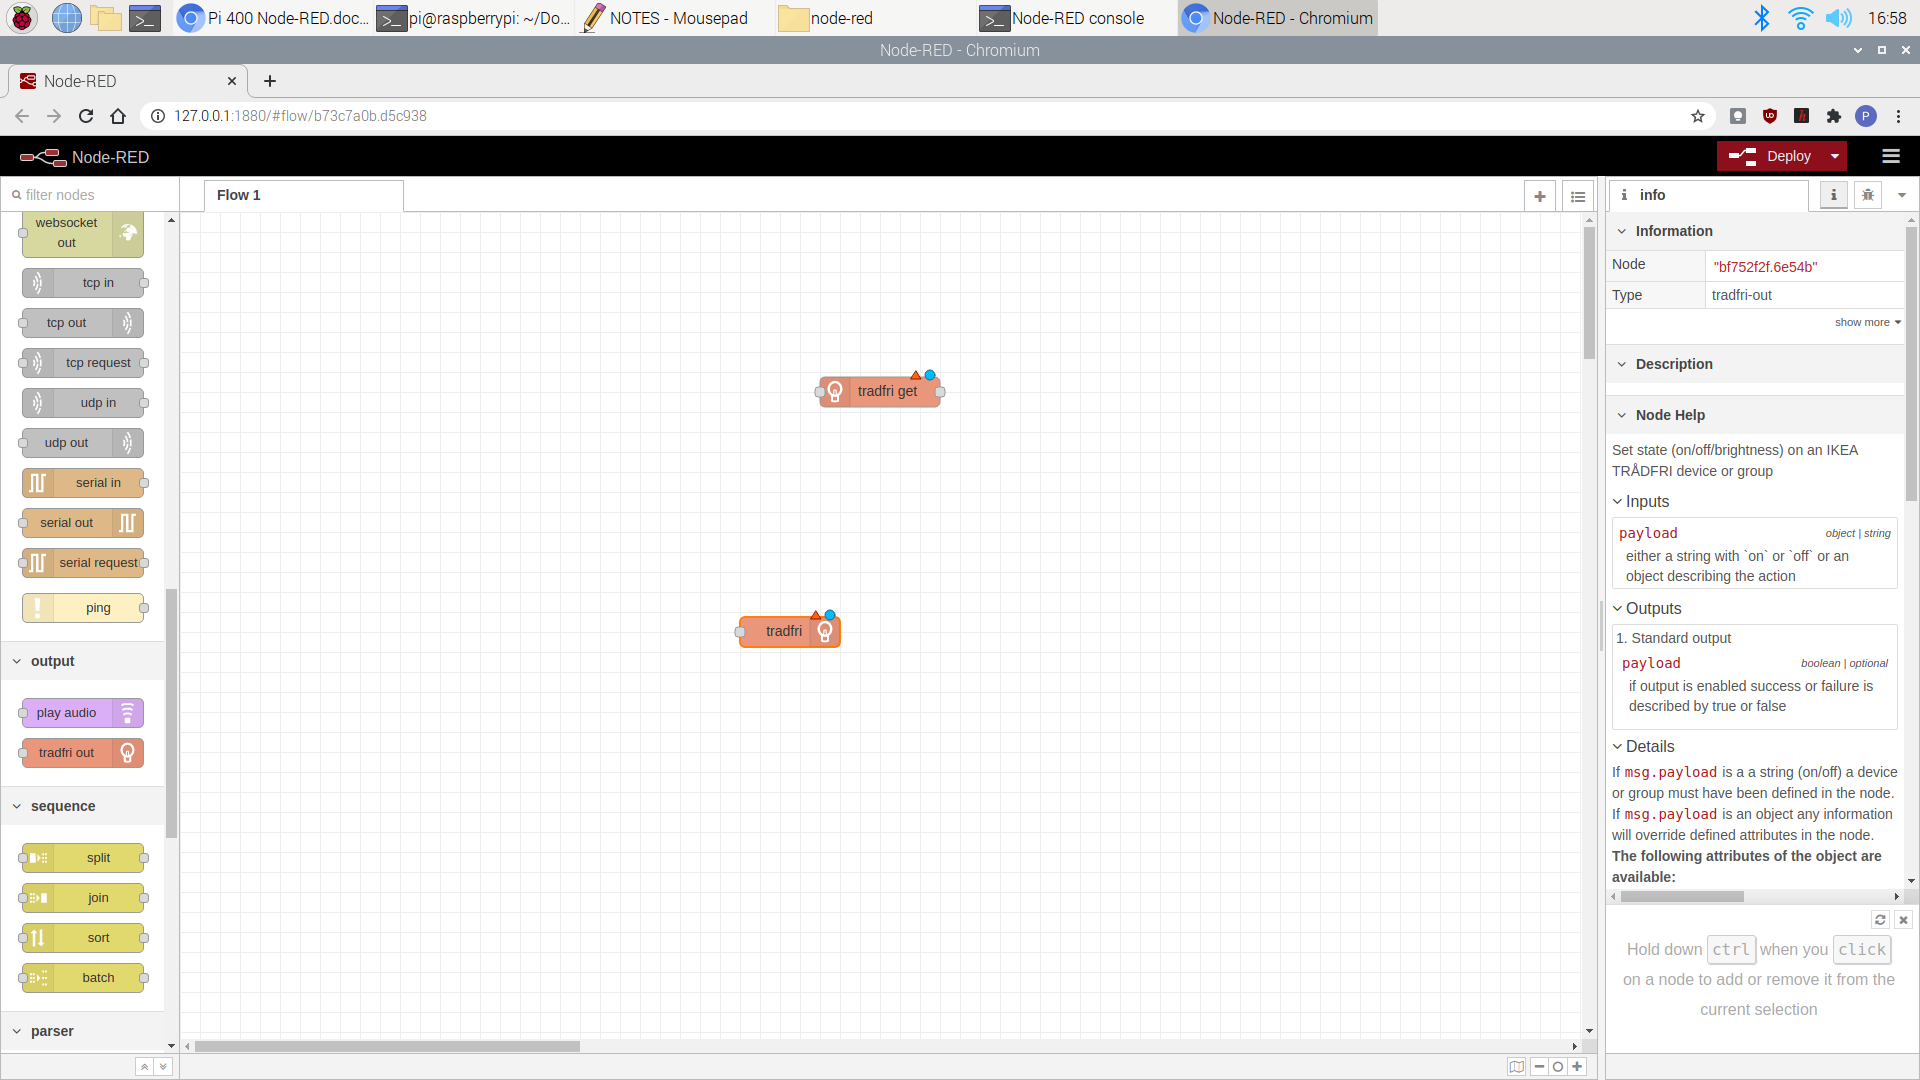
Node-RED is now setup.
4. Configure nodes
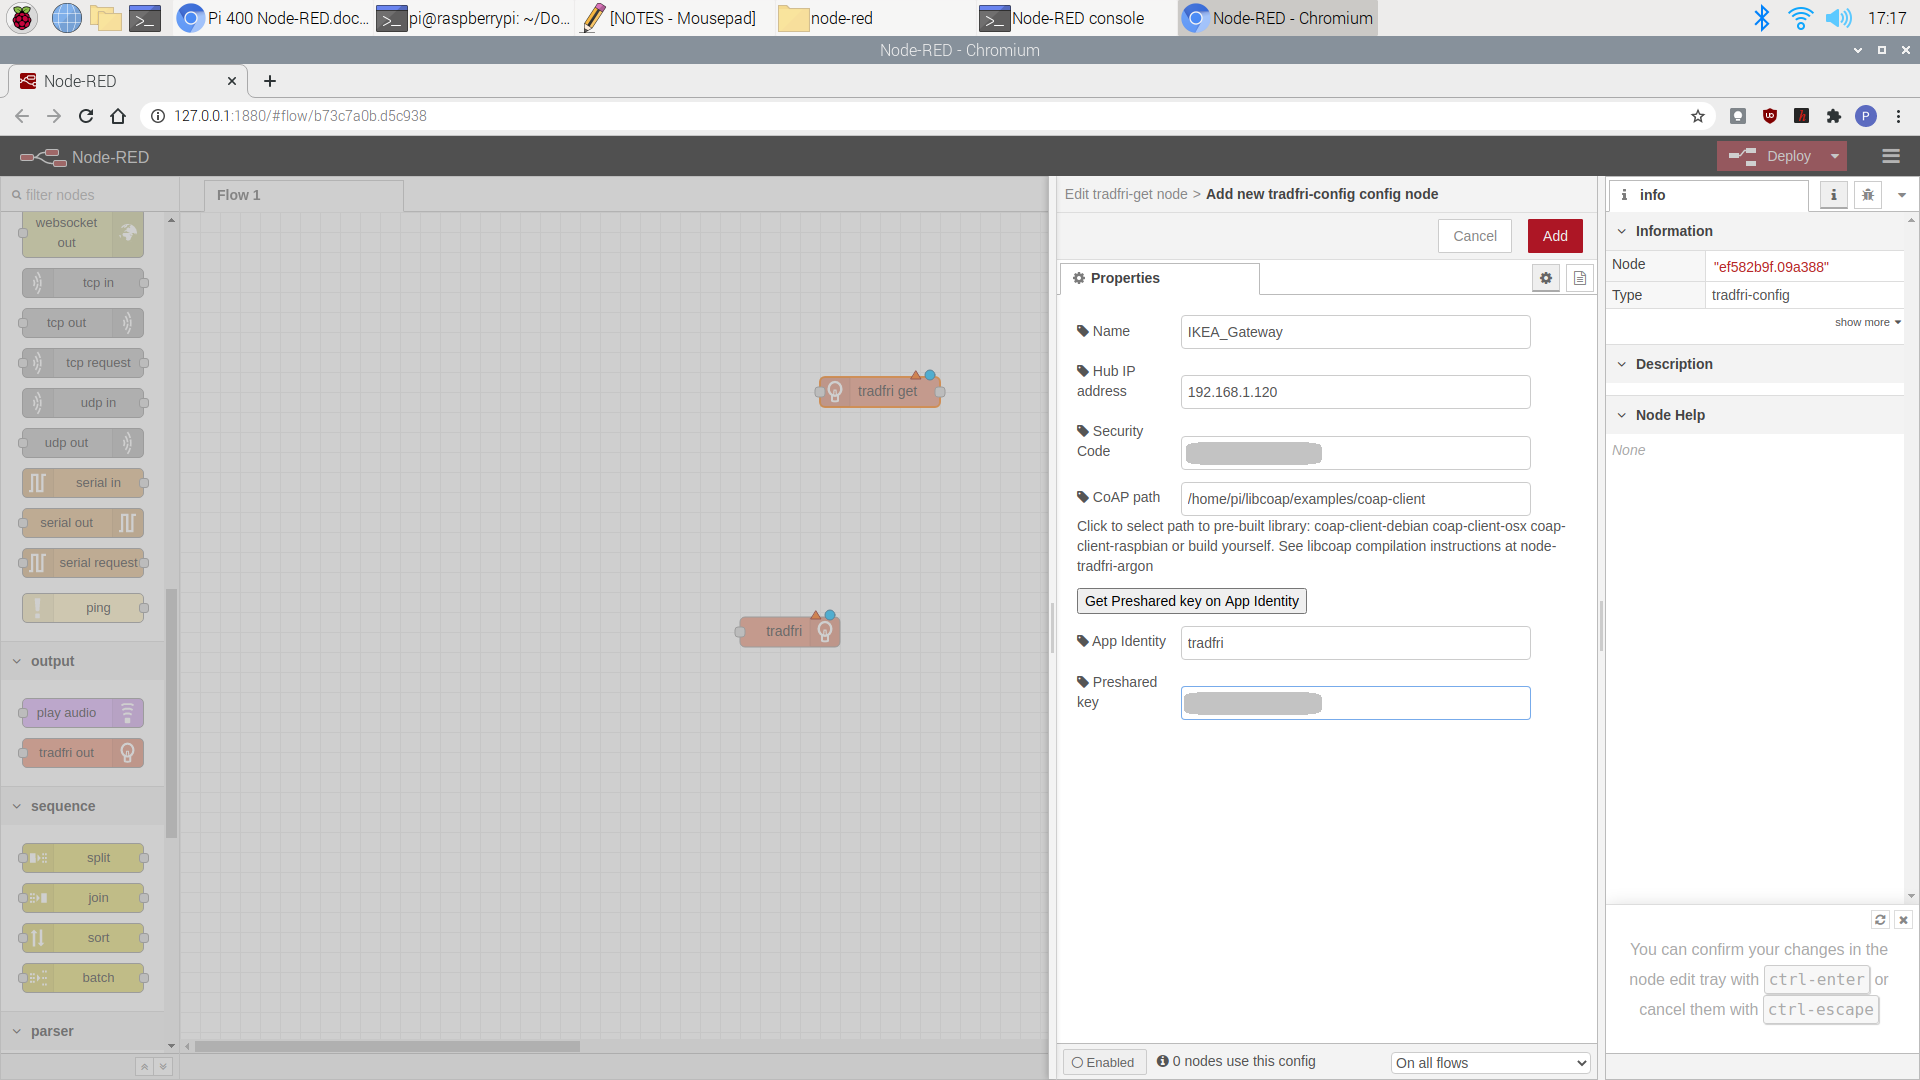
This step configures the Tradfri nodes with the credentials that were obtained in step 2. Use the Tradfri get node which will return details of the devices.
- Double click Tradfri get node.
- Click the pencil icon to edit a new configuration.
- Add the credentials obtained earlier.
- Click Add and Done.
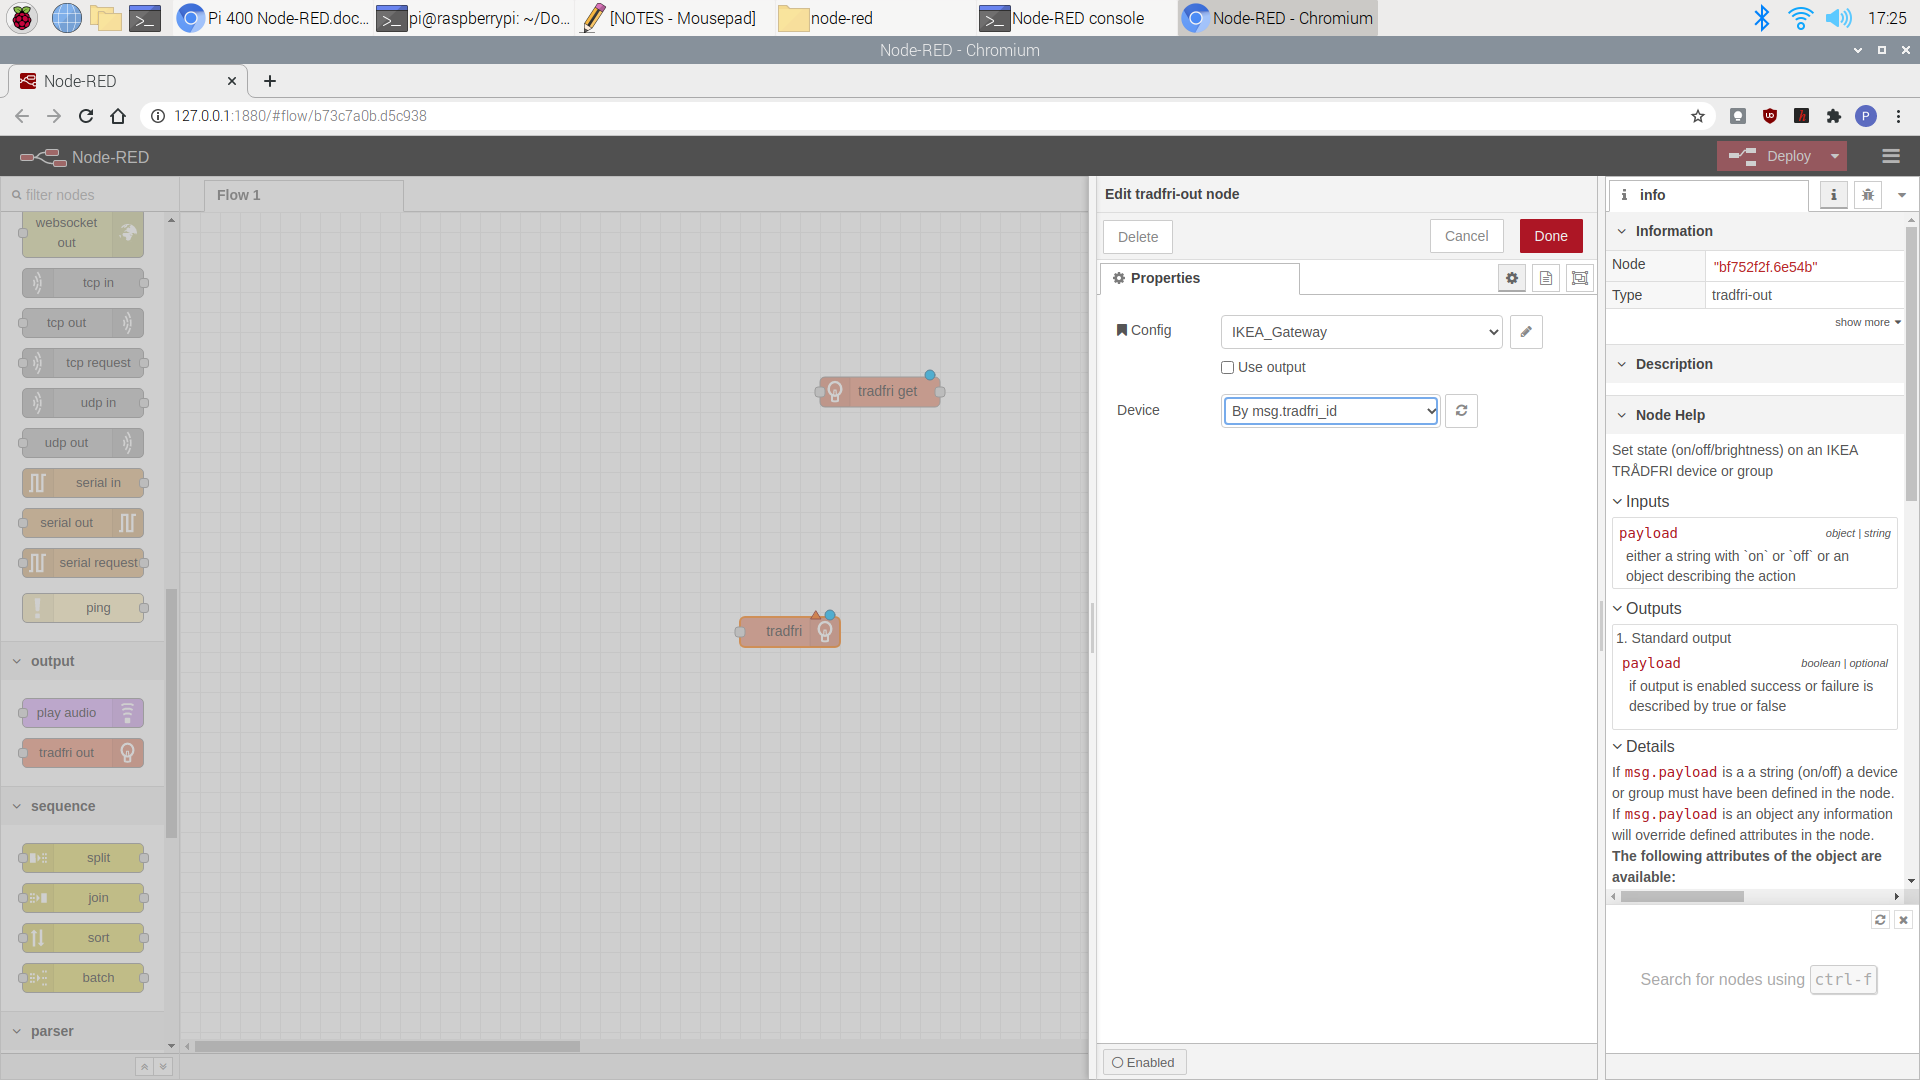
Now a node representing a bulb can be configured using the Tradfri out node.
- Double click the Tradfri out node.
- Click the Refresh button for the device – this will add any addressable devices to the dropdown.
- Select the device you want to control.
- Click Done.
The node name will change to represent a device on the network.
5. Network info flow
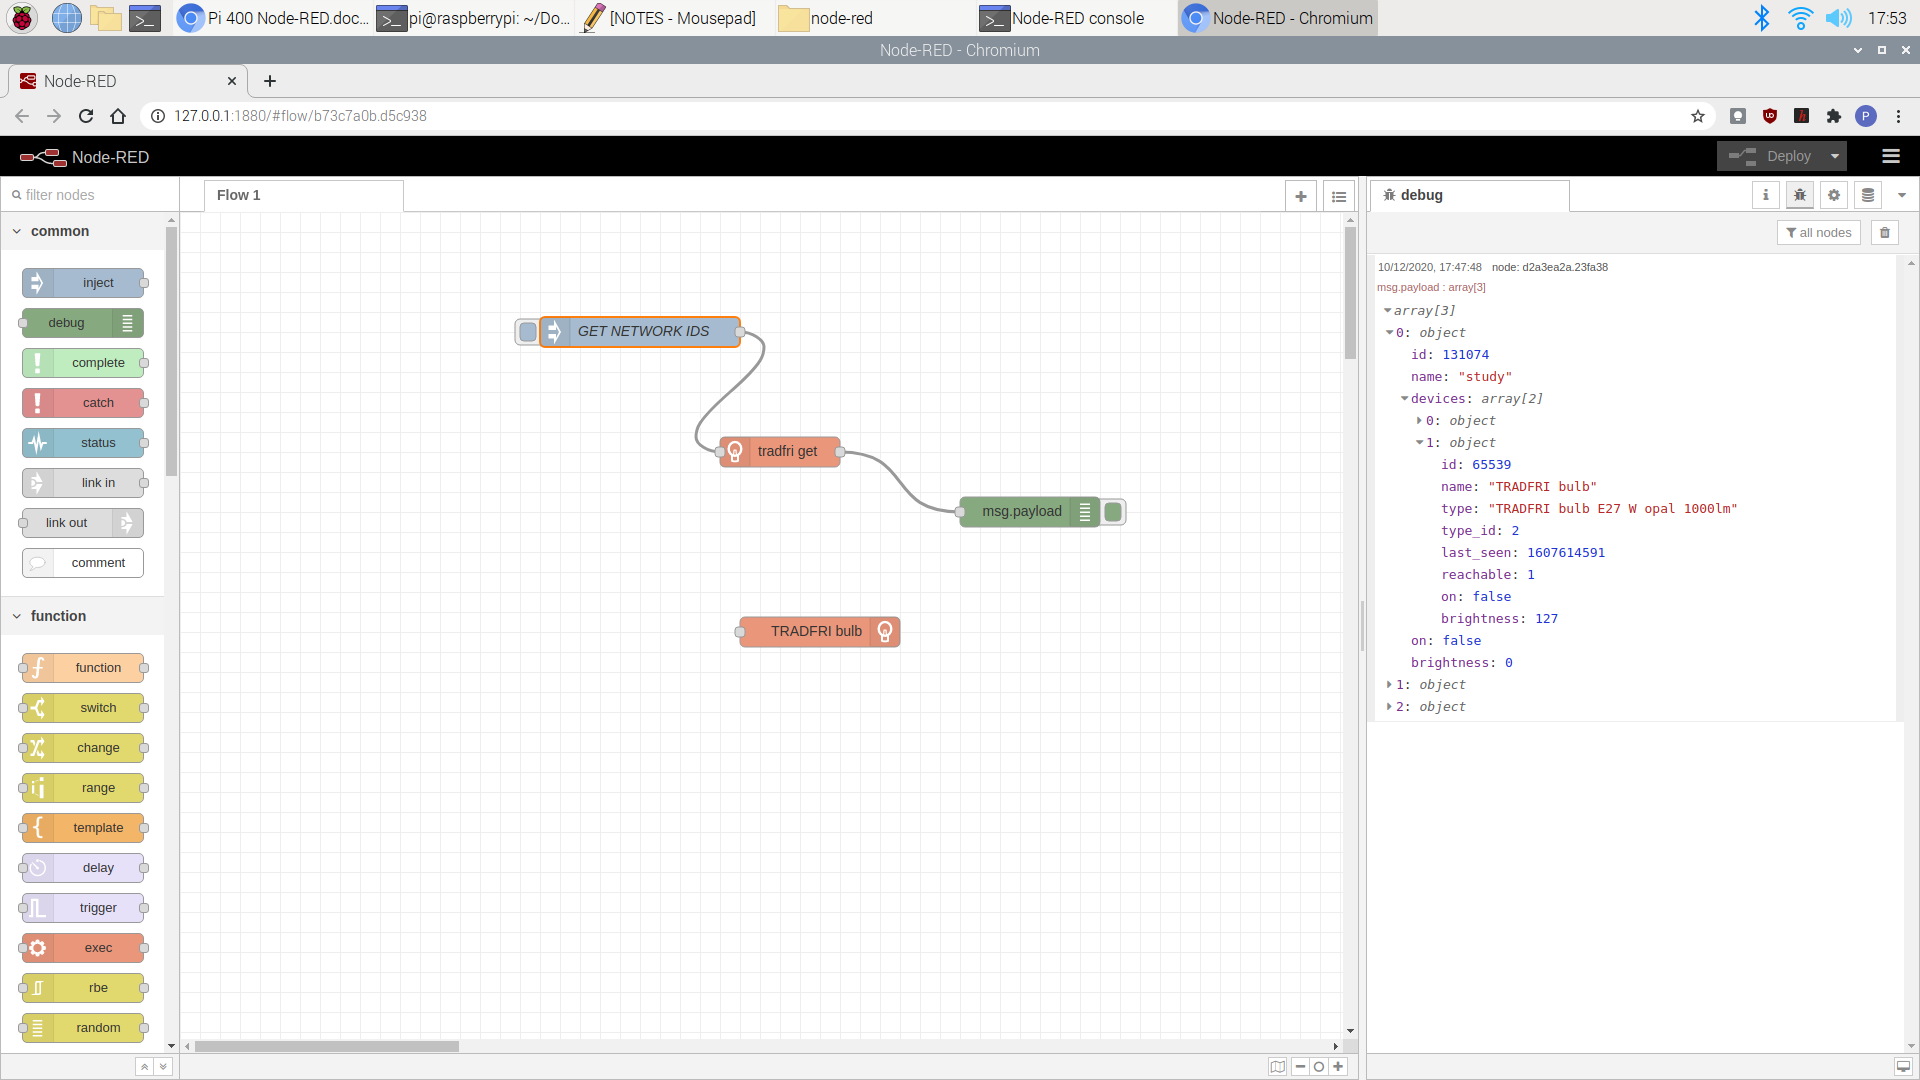
Now we can start using the nodes in a flow – here we get the network info from the Tradfri get node
- Add an Inject node – set its payload to the empty string “”
- Add a Debug node
- Wire the nodes; Inject -> Tradfri get -> Debug
- Click the Debug icon in the top-right pane to select the Debug view
- Click Deploy
- After deployment click the Inject button to view the output in the Debug pane
This shows the nodes in the network and their ID’s – it can be used to obtain the status of devices.
6. Control functions
Now let’s use the Tradfri out node and add some Function nodes to switch the light on and off and vary its brightness.
- Add another Inject node – the default Timestamp can be left as it is.
- Add a Function node.
- Add another Debug node.
- Wire the nodes Inject > Function > Tradfri out and also Function > Debug.
- Double click the Function node and give it a name – BULB ON.
- Add the following JavaScript object to the message payload:
msg.payload = {"state": "on"}
return msg;- Select Done & Deploy.
- Click the Inject button and the bulb will turn on.
A similar flow can be created by copying these nodes and setting the function node’s state to off so the light can be turned off.
Node-RED is very picky about bracketing correctly in Json – strings must use “str” not ‘str’.

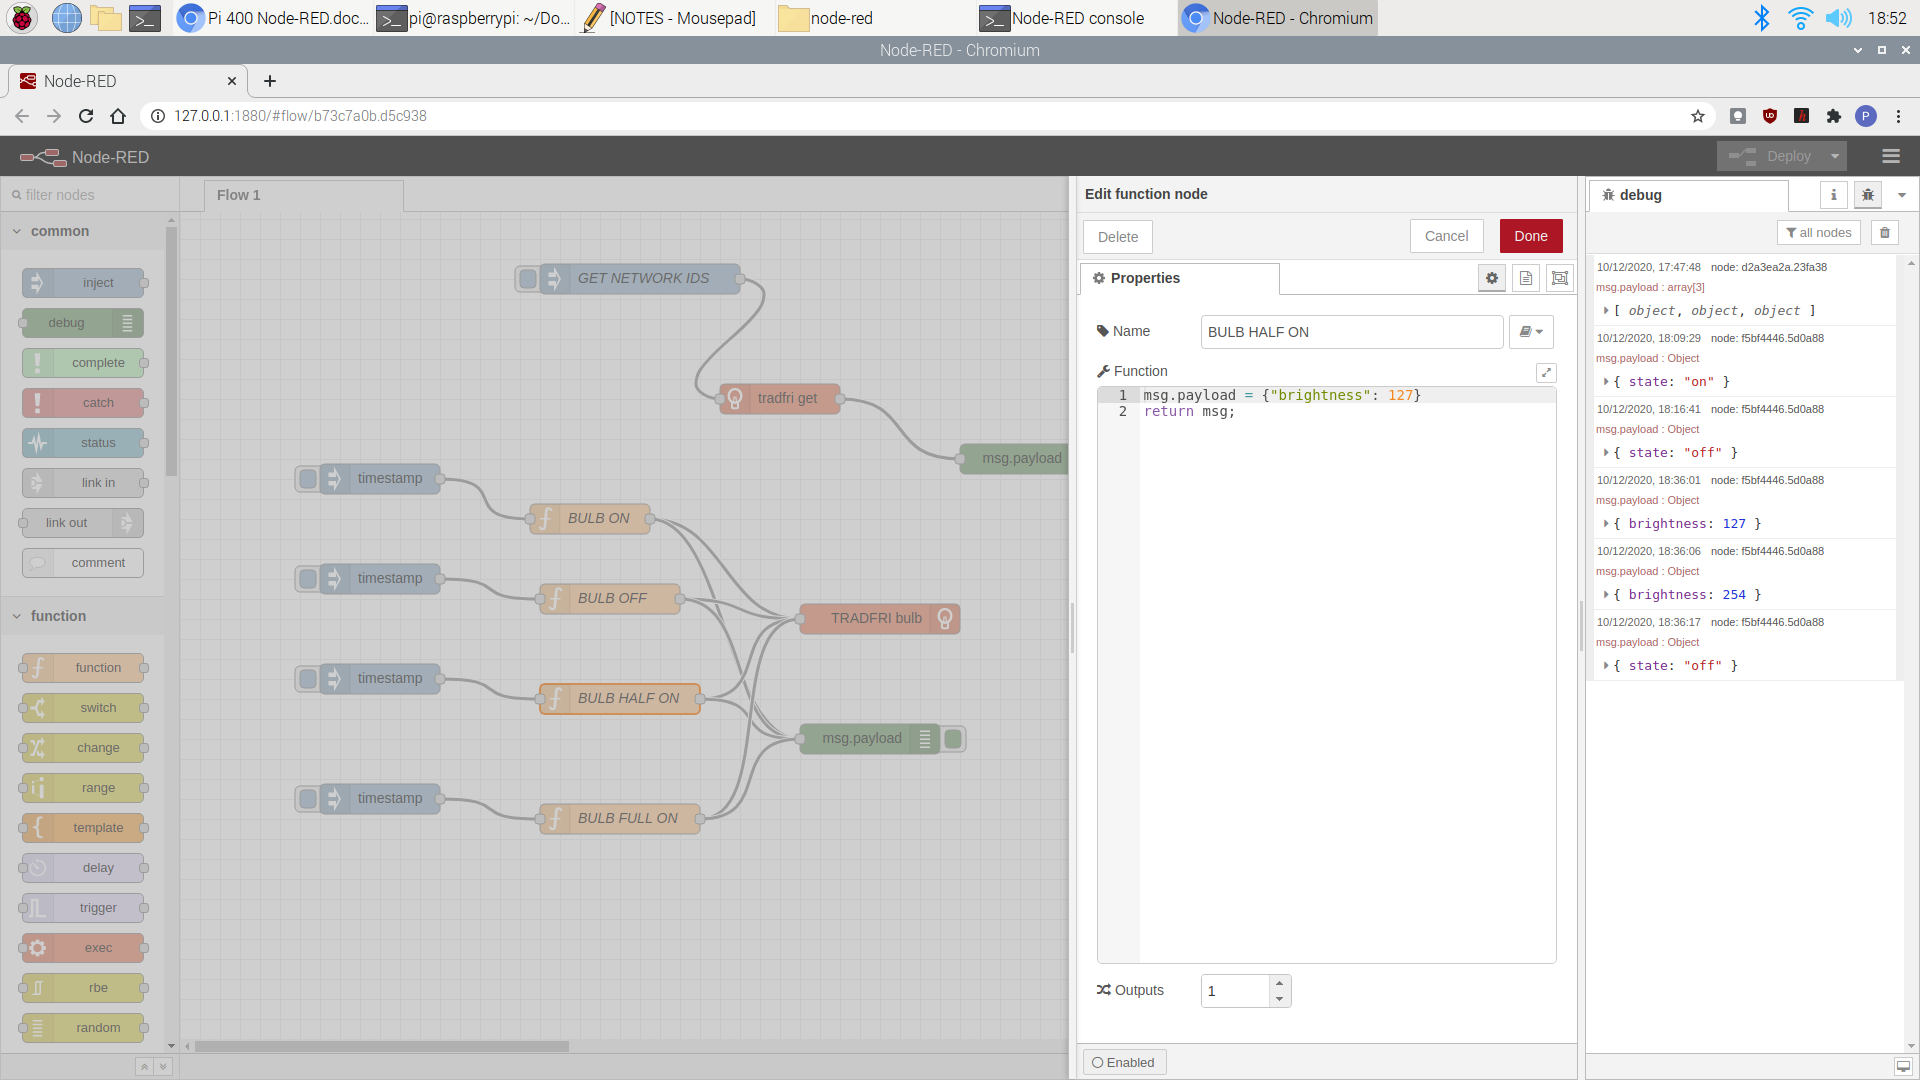
Add a couple of Function nodes to vary the brightness. Set them up like the on/off functions but use the brightness property with an integer value between 0 and 254.
- Add another Inject node – Timestamp is OK
- Add a Function node
- Wire the nodes; Inject > Function > Tradfri out and also Function > Debug.
- Double click Function node and name it BULB HALF ON.
- Add the following JavaScript object to the message payload:
msg.payload = {"brightness": 127}
return msg;- Select Done & Deploy.
- Click the Inject button and the bulb will turn on with half brightness.
Similar flows can be created with different brightness values by copying these nodes and editing the brightness values. Now the light can also be turned on at different brightness levels.
Node-RED is very picky about not using brackets for numbers – numbers must use 127 not ‘127’.
Summary
If everything has gone to plan, you should now be able to control your Tradfri lamps and gadgets from within Node-RED using your Pi 400 or Pi 4B. The function nodes that were configured in the project used Injection nodes as triggers for the purpose of testing. The same nodes can be triggered by wiring them up in Node-RED to many kinds of sensors, Arduinos, Raspberry Pi’s and other smart devices to create all sorts of automation effects. Your imagination is the only limit now. Check out all the available flows in Node-RED’s repo: https://flows.nodered.org/
Happy Node-REDing!
Like what you read? Why not show your appreciation by giving some love.
From a quick tap to smashing that love button and show how much you enjoyed this project.

