This project teaches you the basics of using a WebThings Gateway and MicroBlocks to program a remote switch for home automation using two micro:bits. Your WebThings Gateway will control some garden lights, based on predefined rules. You’ll also learn how to turn a micro:bit into a radio transmitter/receiver pair that will allow you to radio-control things around the house.
1. Prepare Webthings Gateway kit
You’ll need to have your WebThings Gateway kit up and running, you can learn here how to do it.
Once you’ve finished setting it up, log into your WebThings Gateway.
- Install MicroBlocks add-on by navigating to the menu>Settings>Add-ons, then click on + and find MicroBlocks. Click on Add to install it.
- Install Power Settings add-on so that you can turn off your WebThings Gateway safely.
- Install DateTime adapter and Scheduler so that you can add rules to your things.
2. Prepare MicroBlocks
- Install MicroBlocks on your host PC by downloading and following the instructions here.
- Once installed, open it and connect one micro:bit to your host computer using a micro USB cable.
- Update the firmware on the micro:bit by clicking the cog icon at the top of the MicroBlocks window and select Update firmware on board.
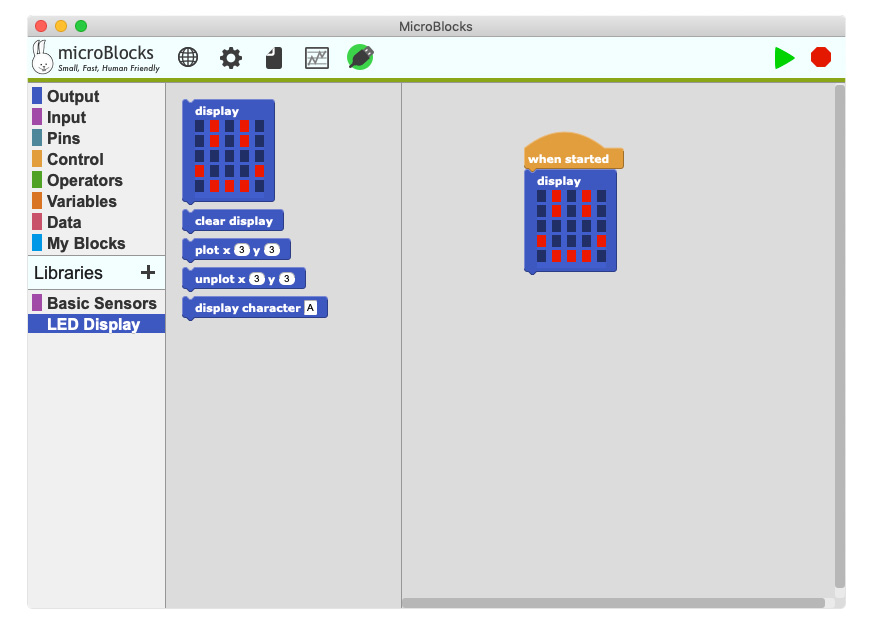
Once this is done you should have the LED Display menu added to your MicroBlocks.
MicroBlocks works by assembling “blocks” together. There are different kinds of blocks which are categorised and colour-coded. To test that your micro:bit and MicroBlocks are working, assemble the following blocks and then press the green arrow. Your micro:bit should display the smiley if everything is working.
While your micro:bit is connected, MicroBlocks constantly updates the code running on the micro:bit as you edit it in MicroBlocks.
Now everything is working, you can start a new project and install some additional libraries for WebThings and Radio functions.
- Open a new file by clicking the MicroBlocks File Icon.
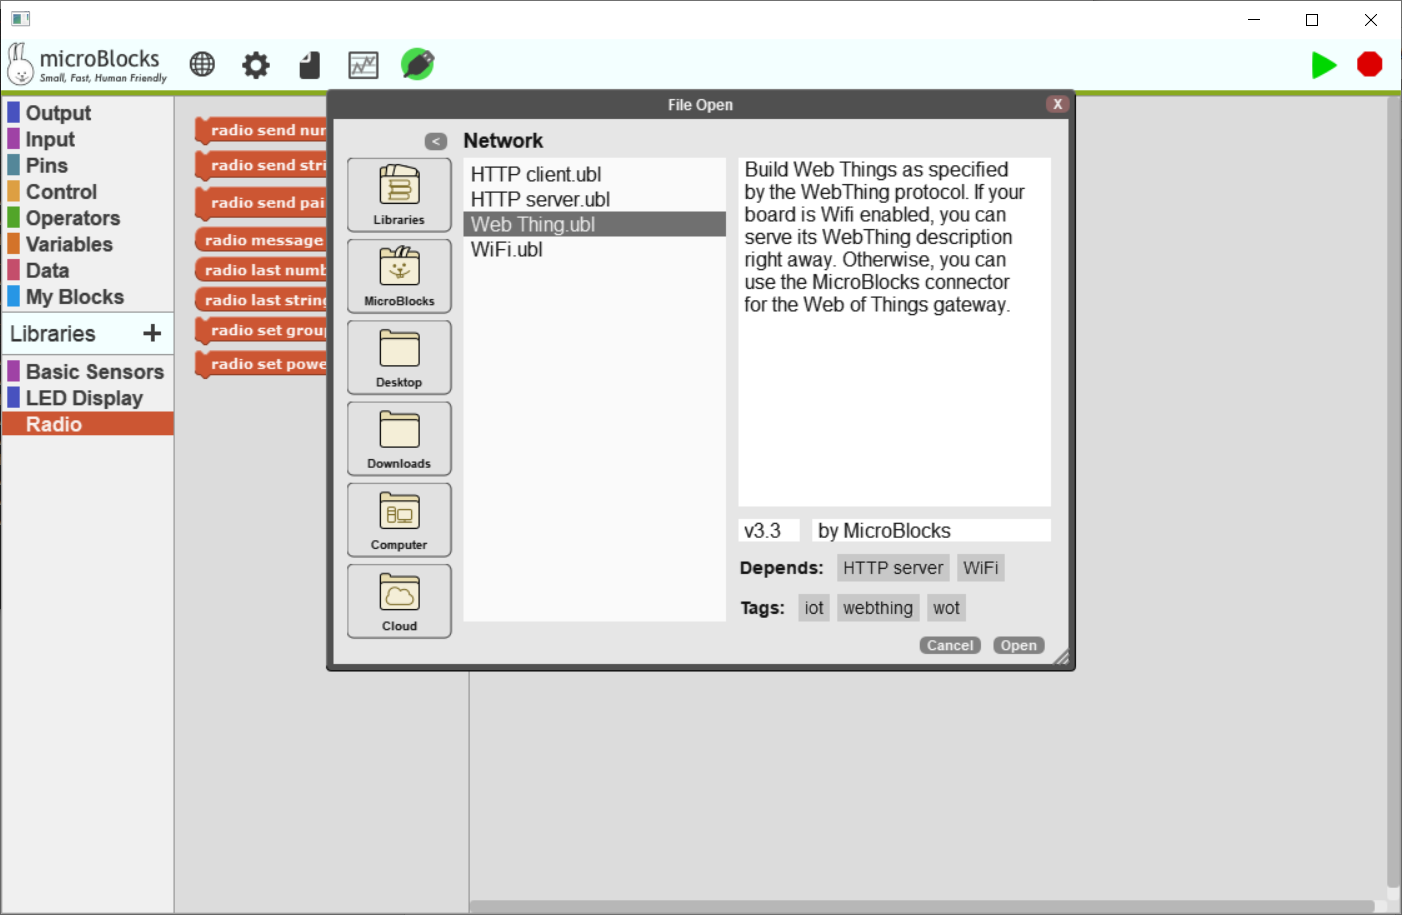
- Click on + next to Libraries. Select Radio.ulb and click Open.
- Click on + next to Libraries. Select Network > Web Thing.ubl and click Open.
3. Programme the transmitter with MicroBlocks
The micro:bit Transmitter will connect to the WebThings Gateway kit and communicate wirelessly with the remote micro:bit switching the garden lights, but before that can happen it needs programming with MicroBlocks.
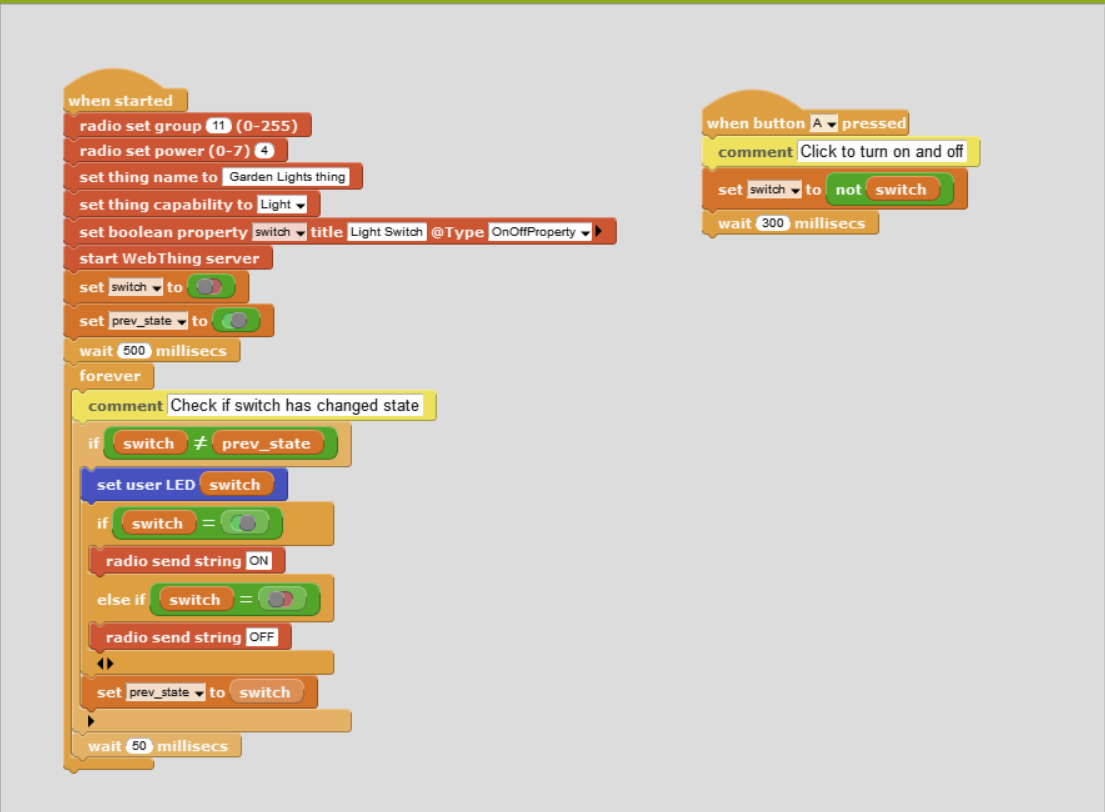
- With the micro:bit still connected to your host PC, build the following MicroBlocks as shown below. This will create a radio transmitter which can be discovered as a switch “thing” by WebThings. The transmitter sends “ON” and “OFF” commands via radio when it is switched either in WebThings or by pressing switch A on the micro:bit. A single LED on the micro:bit display indicates the status of the switch.
- When you’ve completed the blocks, click the Green arrow and check that the LED lights up when you click the “When button A pressed” block and when you press switch A.
- Save the blocks using File > Save and disconnect the micro:bit from your PC
If you need to reconnect your micro:bit to MicroBlocks, click the USB icon and choose Connect – the USB icon has a green background when the micro:bit is connected.
4. Programme the remote switch with MicroBlocks
The Remote micro:bit will be connected to a relay and will receive commands from the micro:bit Transmitter via radio. To do this we need to program a receiver using MicroBlocks.
- Attach the other micro:bit to your PC using the USB cable and update its firmware as above.
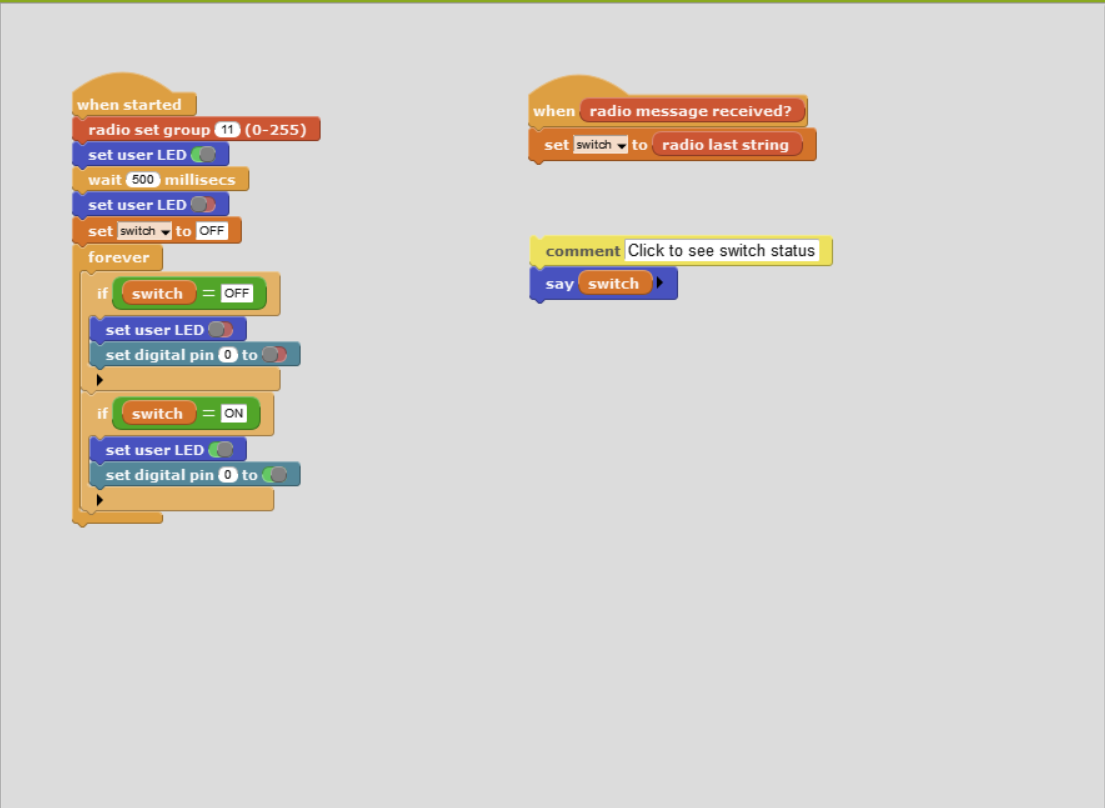
- Build the following blocks which will listen for “ON / OFF” radio commands and will switch Pin 0 on and off accordingly, which will control the relay switch. A single LED on the display indicates the status.
- When you’ve completed the blocks save them using File > Save and detach the micro:bit from the PC
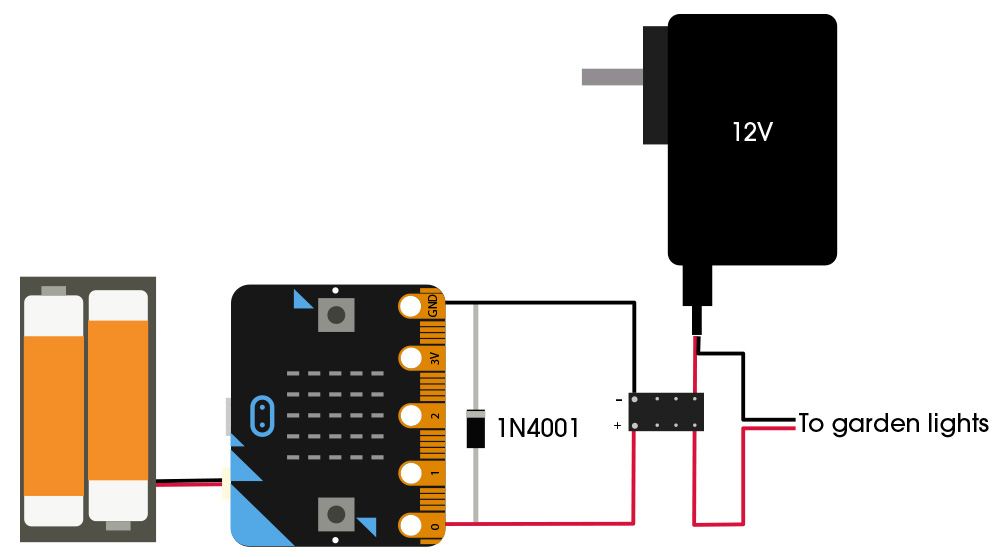
5. Build the remote switch circuit
Assemble the circuit as shown below. You can use a small breadboard, solder the connections, or use crocodile leads.
Ensure you are working on the 12V side of the PSU.
6. Add Transmitter to WebThings Gateway
The micro:bit transmitter needs to be configured within the WebThings gateway so it can be controlled from a browser or mobile device.
- Login to your WebThings gateway and attach the transmitter micro:bit to your gateway using the USB cable.
- Select the Things page from the menu and click the + icon.
- The transmitter will be discovered as a Garden Lights thing.

- Click Save and Done which will return you to the Things page with an icon for your light switch.
Now you can turn the lights on and off from this page and the remote switch should turn on and off accordingly.

7. Add rules
Now let’s add some rules to turn the lights on and off automatically.
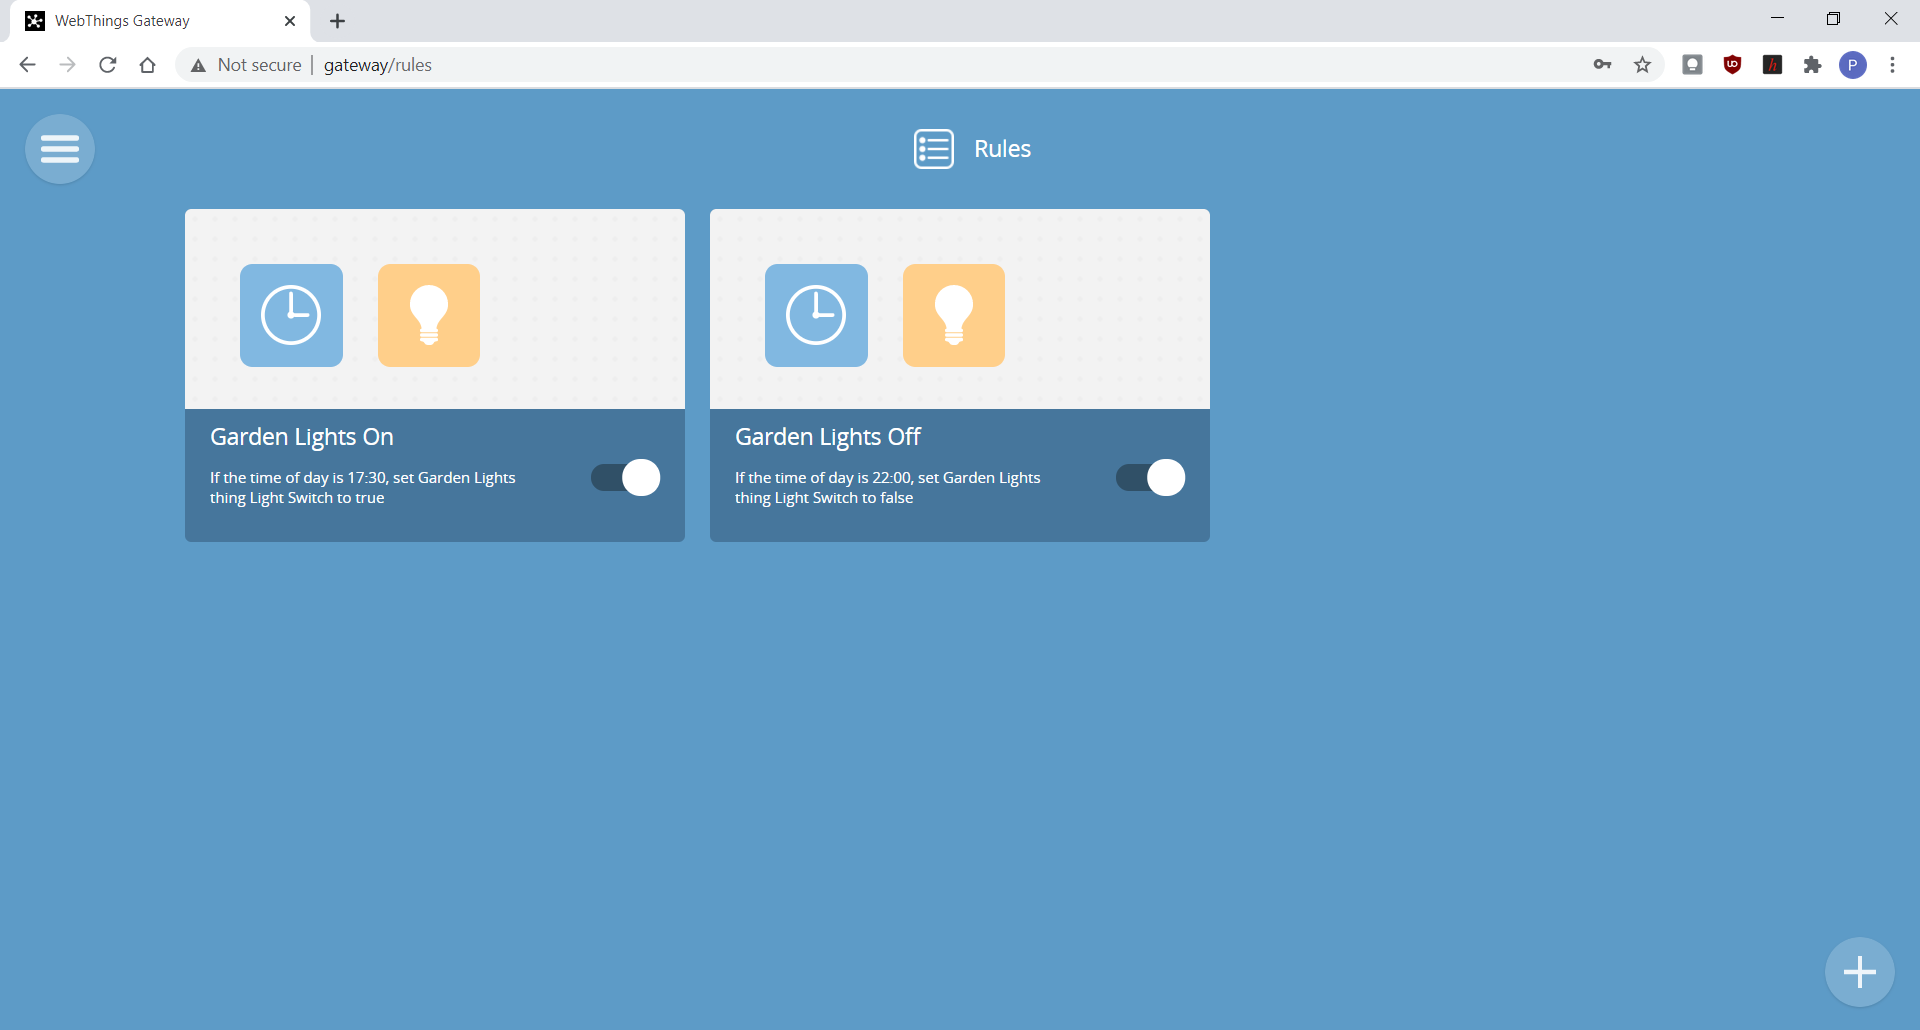
- Open the Rules page by clicking the Rules item in the menu.
- Click the + icon and give the rule a name – Garden Lights On
- Drag the Timer icon as an input and the Garden Lights icon as an output and set the time when you want the lights to turn on.
- Return to the Rules page by clicking the Back arrow.
- Add another rule to turn the lights off again.
Make sure you enable the rule using the button in the description block of each rule.
Now your lights will turn on and off automatically with the timer as well.
8. Summary
WebThings is a powerful and easy to use gateway which can connect to lots of different devices on your own home network. Using the MicroBlocks adapter for WebThings it’s possible to create your own micro:bit “things” which can be controlled using a browser, phone or tablet.
This project showed how to create a radio transmitter / receiver pair using micro:bits to control a remote relay switch, opening up all kinds of possibilities for connecting things around the home and controlling them through WebThings.
Like what you read? Why not show your appreciation by giving some love.
From a quick tap to smashing that love button and show how much you enjoyed this project.

