Ever wanted to see what your dog gets up to during the day? Ever wondered who keeps stealing your wheelie bin? Maybe you just want to see whats in your fridge while you’re at the shop? The applications of a live video feed are endless, but today we will show you how to quickly and easily set up your Raspberry Pi as a CCTV camera.
For this tutorial we will be using MotionEye, an operating system for your Raspberry Pi in order to stream your video live on your network and also look at viewing the feed outside your network.
We will be using the Raspberry Pi 4 for this tutorial, but any generation of Raspberry Pi will work, you will just notice worse performance the earlier the generation. But this can be a great use for your old Pi if you aren’t bothered about a high FPS or resolution.
Getting the operating system installed
To begin with you will need a micro SD card, ideally above 16GB in order to leave room for some recording space, but a bigger card will give you more recording time. Firstly you will need to format this SD card, you can use whatever tool you want for this, but my personal choice is SD Memory Card Formatter from SD association. The download link can be found here
Note: you will want a class 10 or better SD card to prevent recording issues with data bottlenecks
You will then want to download the MotionEye operating system which can be found here. Make sure to select the latest build that will work with your device. As of writing the Raspberry Pi 4 image (which we will be using here) works but is still in re-release.
You should download a file with the extension “.img.xz” which is what we want. Now to get the software on the SD card, and yes, it does again require more software. I am using a tool called balenaEtcher which can be downloaded here.
Once you have it installed, insert the SD card into your laptop or computer (you may need some kind of adapter, not many laptops have a micro SD card slot) you should launch balenaEtcher and you will be greeted by this screen that looks something like this if everything went well
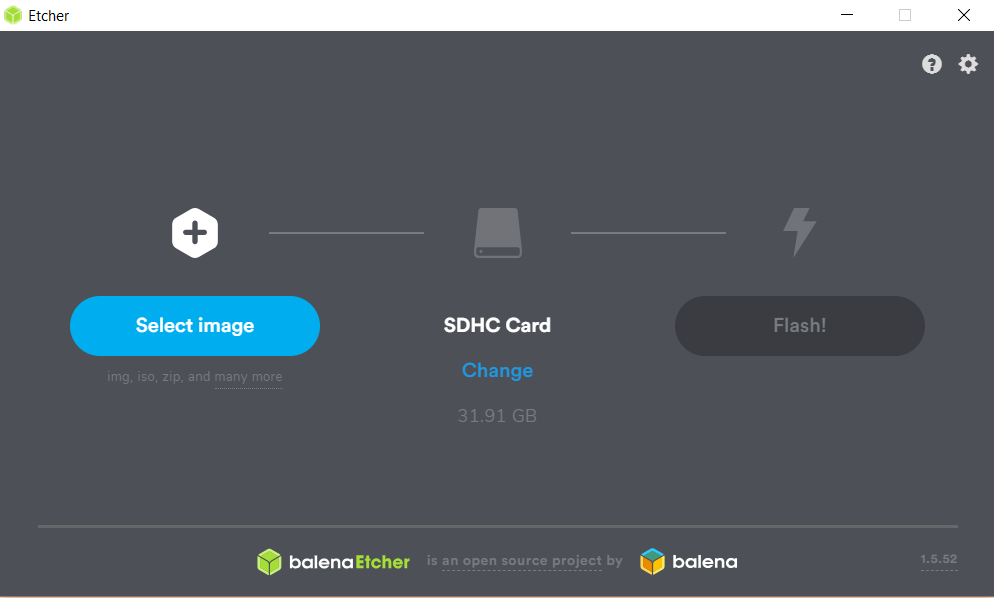
Once you have gotten this far, click “Select image” and go to wherever you put the unzipped “.img” file and select that. You should be greeted by the following page. Make sure to select the right SD card (I’m not being held responsible if you wipe over the wrong thing here) and once you’re happy, hit “Flash!”
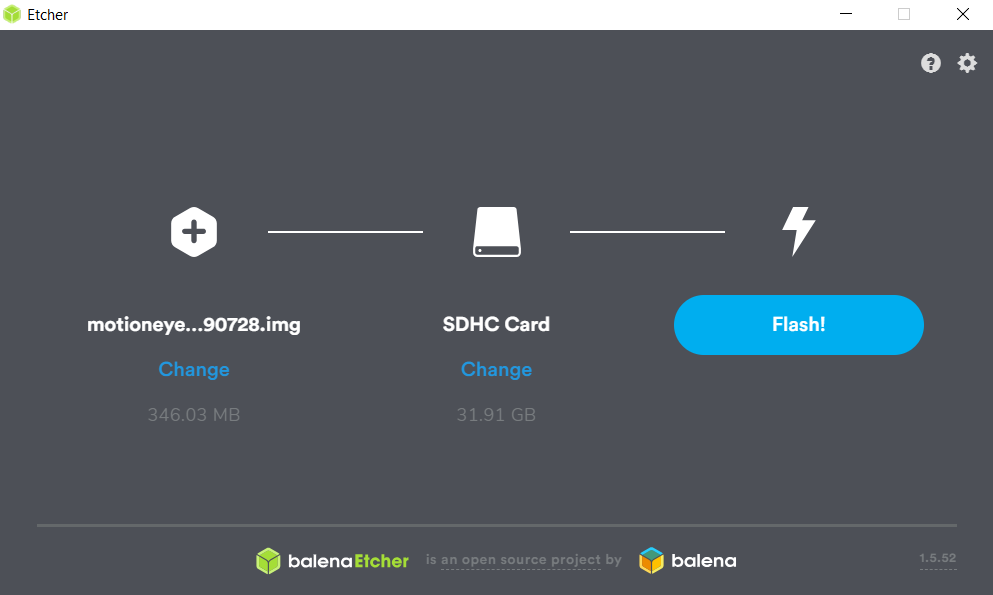
Once done, windows will probably freak out and tell you to format the drive and open many windows and show a handful of error messages. Just close them all down and make sure not to format the drive, we don’t want to undo all of our hard work!
Getting the hardware side ready
Firstly we will want to get our Pi ready. Things will be easier for you if you have a screen of some kind (be it a monitor or my personal favourite, the 7″ Pi touchscreen) to view the output of the Pi, but this isn’t strictly necessary if you have an ethernet cable and router/modem. Even if you want to use it on Wi-Fi but have the option to plug it into the ethernet, setting it up while it’s on a wired connection will be easier.
First things first, get your Pi and plug it into the router/modem using the ethernet cable. If you want to use a screen for debugging or entering commands, connect this up now. Next insert the SD card which we put the image onto in step 1.
The next step is to add the cameras. I will be using an official Raspberry Pi camera which uses the CSI port, which allows for a compact camera module on a flat cable, but you can use a USB webcam if you wish. I’m unsure of the maximum number of cameras, but feel free to experiment, after all the Pi 4 has a CSI port and 4 USBs, maybe a USB hub will give you even more cameras? Who knows, but be wary of the fact that adding more cameras will limit each of their respective resolutions and FPS.
Note: when connecting the camera, the CSI ports are fragile, so handle with care. Also note that the metal contacts are on the side opposite the locking mechanism, so be sure to connect the camera correctly.
Finally, connect it up to the power and you should have something that looks like this with blinking lights:
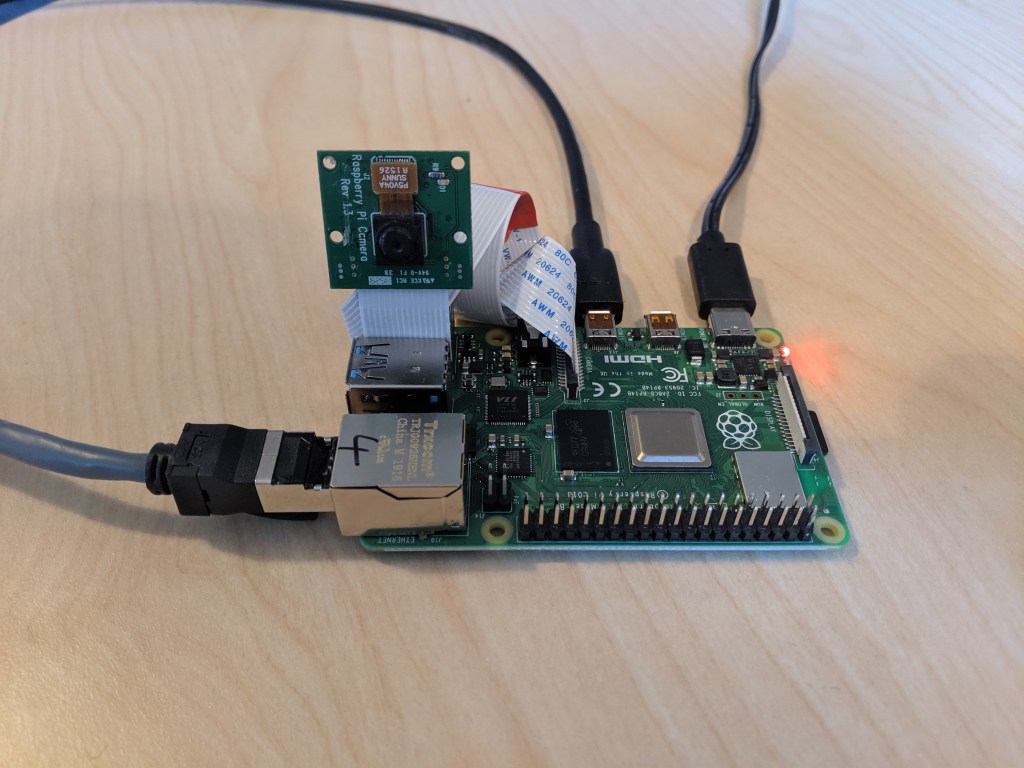
Note: my camera is using an extra long CSI ribbon cable which is coiled up, so yours may look different
The next steps are to find the IP address of the Pi. If you have the screen attached to it then your life will be much easier. The IP address should be printed on screen and should take the form of something along the lines of 192.168.0.106 . The last few numbers will most likely be different as it is dependant on your network and how many devices you have on.
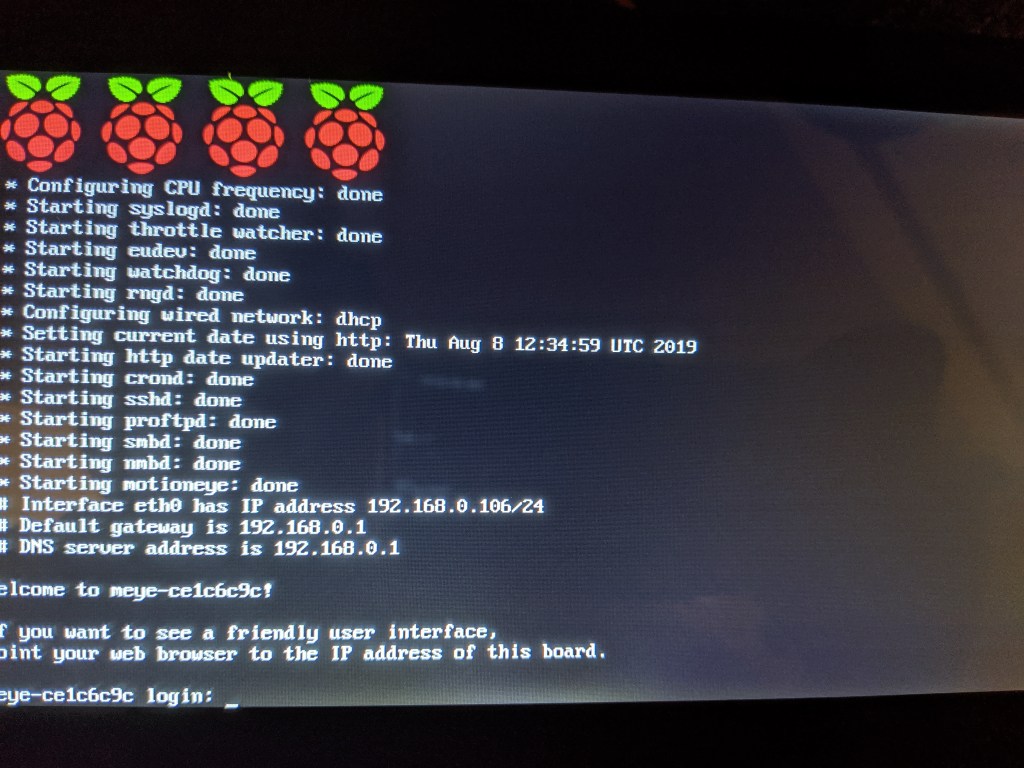
Above is the screen you will see, as you can see, the eth0 has the IP address 192.168.0.106 (apologies for the lack of ability to screenshot it).
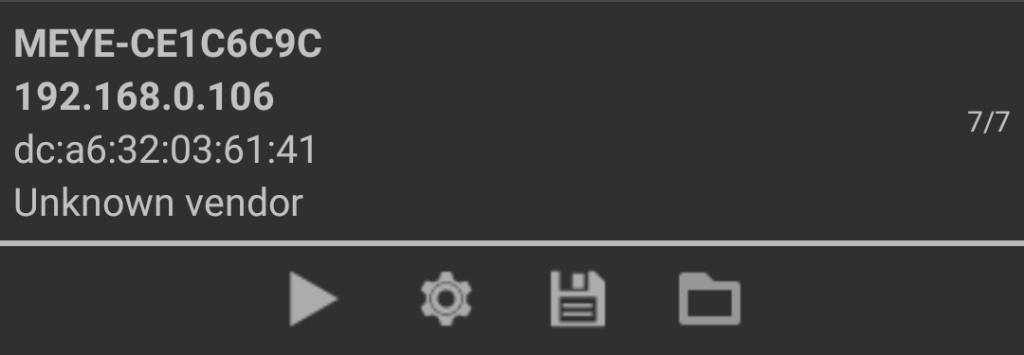
If you don’t have a screen, you will need to download an app like “Network Utilities” on Android to scan the network for local IPs using the IP discoverer. You’re looking for a device which looks like a Raspberry Pi and might show up as “Unknown vendor”. You can also log into your router (information on the admin address and then the username and password will be on the bottom of your router) to find out the IP address on your network. Just make sure that whatever device you use to sniff for IP addresses is on the same network!
Note: the Raspberry Pi may take a little while to boot, especially if you use an earlier generation, so wait a few minutes if you don’t pick it up.
Here you can see the Raspberry Pi on my local network:
Once you have the IP, it’s time to check if everything worked, note down the IP of your Pi and then load up your web browser. In the search bar type in the IP of your Pi, press enter and if everything worked out, you should be greeted with the Motion Eye page with your cameras showing up!
Here is how it should look:
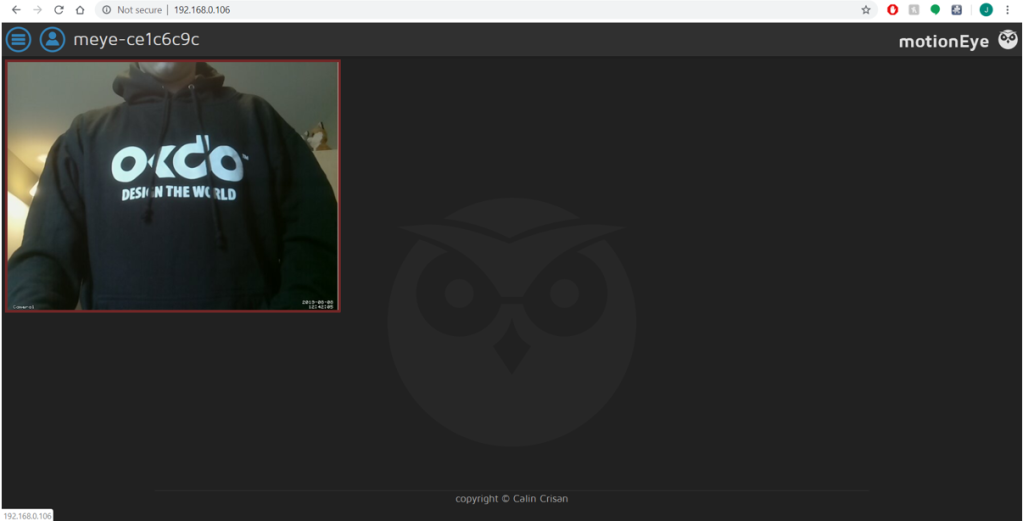
As you can see the camera is already going without any extra setup! I’m rocking the extra comfortable OKDO hoodie as ever.
Getting it setup on Wi-Fi
Getting setup on Wi-Fi is really straightforward, click on the icon of the person in the top left of the screen (2nd button along) and it should prompt you to log in. The default username is “admin” and the password is left blank. Once logged in click on the 3 lines icon in the top left (1st button along) and you should be presented with a large list of settings (we will touch on this later).
Scroll down to “Network” and expand the menu out, you should have a button to toggle “Wireless Network”. Toggle this to enable it and then enter the SSID and password of the network you want to connect to as shown below:
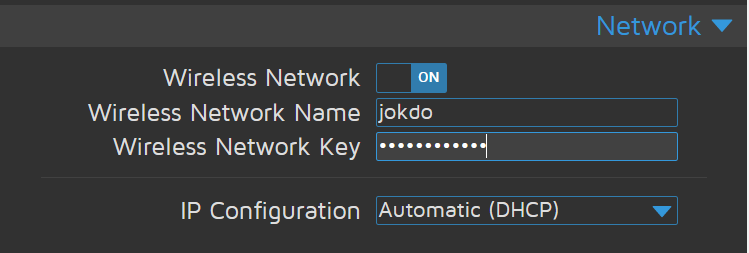
My network is called “jokdo”, get it, Joe-K-DO, because my name is Joe? My comedy is wasted on you people 😉
Once entered just hit “Apply” at the top of the menu and then the Pi will reboot and save the settings.
Note: once you switch over to Wi-Fi, your IP address will probably have changed and you will need to scan the network again to find out the IP address.
Feel free to remove the ethernet cable now and use it over Wi-Fi. If you don’t see the Wi-Fi option, it might be that your Pi doesn’t have Wi-Fi support if it is an older generation or the Zero.
Optimization and settings
Now for the sad part. Streaming cameras uses so much bandwidth, especially at high data rates, so if you have a limited internet tarif or you want to maximise bandwidth for streaming Netflix, then you will want to change some more settings. If you’re only using it internally though, you can probably get away with higher resolutions and FPS as you aren’t limited by your ISP.
Choosing the right resolution setting
This entirely depends on your use case, if this is a security system and you want to see someones face, you might want to crank the resolution up to 1280*720 or higher. This can be done in the “Video Device” menu and there should be a drop down list for each camera of the available resolutions. The higher the numbers, the harder it is on your Pi and internet.
If however you aren’t too bothered by the quality and this is more of a, making sure your wheelie bin is still there, then you could choose a much lower resolution like 320*240 which will save massively on processing time, video save file size and bandwidth
Choosing the right FPS (Frames Per Second)
FPS is pretty self explanatory, its how many images you see a second, the more you use, the more bandwidth and storage is required, but the more fluid the feed will seem. This might be quite useful if you need to find out exactly what time someone steals your wheelie bin, whereas a really low FPS might be for something like a camera watching the sky in a weather monitoring system. For the weather monitoring application you can trade off FPS for more resolution, so you could have 0.01 FPS (more of a slide show) but be able to stream at a glorious 1920*1080 with no compression.
The FPS is edited in the “Video Device” menu and then the rate at which it is broadcast is dictated in the “Video Streaming” section. There is a big trade off with FPS and resolution, you normally can’t have both, so experiment a bit.
There are so many settings and features with this software, too many for this tutorial, but make sure to go through the menu and change everything to optimise it for exactly what you want. You can do many things which are explained really well within the software itself. Just some of the features are:
- Motion detection
- Manual and automatic still images
- Notifications when there is movement
- Scheduling when the camera is on
Viewing the feed externally
Here is a tricky bit for some users, if you are on a managed network like at work or in university halls, you might struggle to achieve the next steps and may well be limited to your internal network. There are some paid solutions to get around this which we won’t be discussing here, but what we aim to do is port forward from our router.
Now when you do this, be careful to set a new password on motionEye because you don’t want this falling into the wrong hands because anyone would be able to view your camera feed then.
First step is to go to the “Video Streaming” menu and click on the “Streaming URL” which should give you a message box with a link like: 192.168.0.106:8081 . This is the video stream to your camera and if you go to it, should give you a feed of just the camera, which means anyone viewing it can’t see all the settings and normally improves streaming quality. You can change the port to something else from 8081, but there is no reason to change this unless there is a conflict somehow.
What we want to do next is to get into the admin settings of your router. This can be done by checking on the bottom of your router for the admin address (normally something like 192.168.0.1) and it should have the admin username and password. Odds are the username and password are still the default, but be sure to ask the bill payers or network administrators permission first. If they aren’t on the bottom (or back) of the router then find the model number and google the credentials, they’re normally readily available.
One you go to the admin address and login successfully, you should find a menu called something along the lines of “Forwarding” or “Port forwarding”. Certain providers like Sky often don’t allow this for whatever reason, so you may need to buy a new router or just accept this method won’t work. The menu should be straight forward but essentially you want to add a new rule to say that the IP of your Pi port 8081 (or whatever port you chose) is to be forwarded to port 8081. If you can’t work out how to do this, google is your friend as there will be a tutorial somewhere on how to do it for your routers brand.
An important step after this is to map your devices MAC address to an static internal IP address. This prevents when your device reboots to go to a different IP like 192.168.0.107 instead of 192.168.0.106 which would void the port forwarding we did. This is normally under a setting like IP and MAC binding, but again google is your friend here. You should be given a list of the currently connected devices and their respective MAC addresses and internal IP addresses. Note down both the MAC address and internal IP and then find the settings page to map the MAC address to the internal IP address. The MAC address of a device is unique to it and won’t change.
If you have managed everything up to now, google “My IP” (other search engines are available). So long as you aren’t using a VPN, your public IP address should show up. This IP will be very different to your internal ones with lots of different numbers. To check if this has worked, copy that address, paste it into the address bar at the top of the screen followed by a colon and then followed by the port you chose when port forwarding so you should have something like: 100.76.247.98:8081
If this address doesn’t work, it might be that your network provider or manager doesn’t allow this to happen (I can’t get it to work in the OKDO headquarters). It might also be worth checking on the router admin page to see what it thinks its public IP address is and use that with the port instead.
Note: if you are using consumer internet like that you find in your average house, you might have what is known as a dynamic IP. This basically means your public IP changes every few days, sometimes it might last a week or two. I you don’t want to have to keep looking up your IP address there are two solutions, ring up your ISP and ask to be upgraded to a static IP (this might cost extra).
Debugging
Here are some debugging steps you can take if you have any issues with your Pi camera. Google might be able to help better with some of these issues, but this is a good starting point
No cameras being detected
- Make sure you have the CSI cable the right way round, you should be able to see the pins in the connector and match them up to the cable
- Make sure the CSI cable isn’t damaged. You can always test each section with a multimeter
- Try the camera in a different Raspberry Pi
Not able to find it on the network
- Check your Pi has enough power and can boot properly, if you’re using lots of cameras, they will draw a lot of power
- Make sure the device searching the network is on the same one as the Pi
- Check you put the SD card in, and if you did, make sure it is the right SD card. Took me a while to realise I uploaded Debian not MotionEye
Lots of lag and delay on the camera feed
- Try reducing the camera streaming FPS. You can keep the recording FPS up, but will save bandwidth to stream at a lower FPS
- Try reducing the resolution of the camera. Less pixels, less data.
- Increase the compression to reduce bit rate
Corrupted save files
- Sometimes if you don’t halt the recording manually, the video feed will become corrupt if you disconnect the power suddenly. There are several programs and apps you can use online to repair these files, but I’m yet to find a good service which is free.
Like what you read? Why not show your appreciation by giving some love.
From a quick tap to smashing that love button and show how much you enjoyed this project.

