Let’s jump on this project together and make a Christmas jumper with lights! Making lights flash using microcontrollers is always fun, especially during holiday time. If you’ve mastered turning an LED on and off, then this project will take you to the next level by controlling RGB LED. You can program each one to glow and flash with up to 65 Million different colour combinations!
This project will guide you through the steps of making a flashing light Christmas jumper and setting up a Circuit Playground board that has 10 built-in, bright Neopixels and sensors. We’ll create an interactive flashing “star” that you can attach to your favourite Christmas jumper and wear the best light up Christmas jumper this holiday season.
The star has two different modes. One of them pulses white, like a heartbeat, which turns to a flash if you blow a kiss or click your fingers! The other mode is for partying, with lots of sound triggered pixel patterns to enhance your dance moves.
The code is Open-source so that you can add and modify it to your heart’s content. Let’s find out how to make a Christmas jumper with lights!
How to make a Christmas jumper with lights
1. Arduino IDE Setup
We programmed the Circuit Playground using Arduino C/C++ so we could add loads of exciting lighting effects.
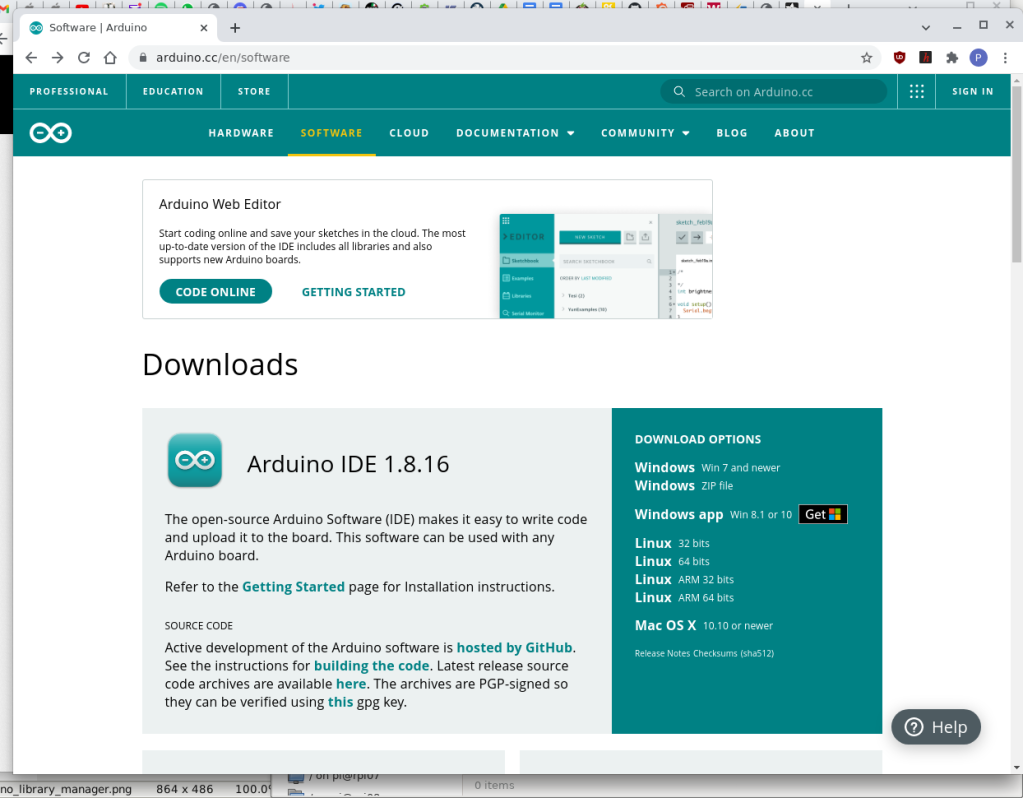
Arduino provides several ways to program devices with their Integrated Development Environment (IDE), including installing the IDE locally on your Windows / Mac or Linux computer or using a web-based editor online.
For this project, we used a PC with the IDE locally installed. If you don’t already have the IDE installed, follow this link to the Arduino download page to step through the latest instructions for your machine.
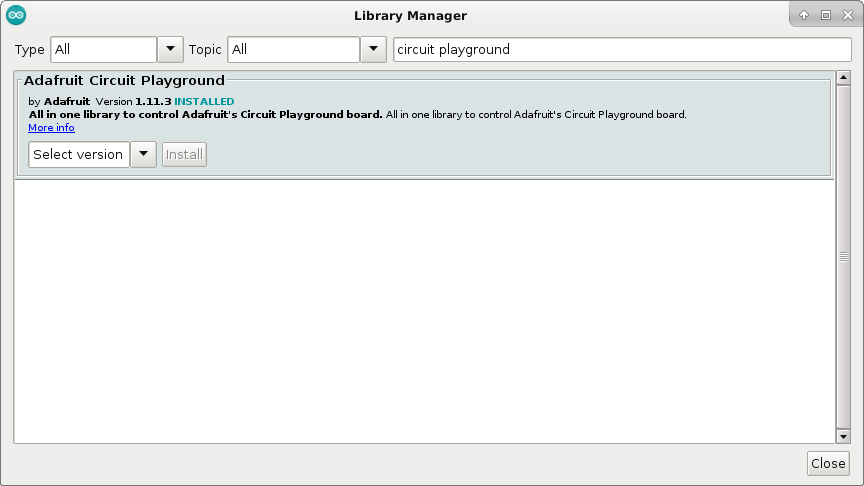
Once you have the IDE in place, you will need to add the Circuit Playground library from Adafruit, making programming the board easier.
- From the IDE main menu, select Tools -> Manage Libraries and wait for the Library Manager dialogue to open.
- In the filter box at the top, enter “circuit playground” and wait for the selection to appear.
- Click INSTALL and wait for the library to download and install
Now you are all ready to start programming the Circuit Playground.
2. Programming
The Arduino C/C++ code for the Star is Open-source and available to download from the OKdo Github repository:
- Visit the project page and click the Code button to download the Zip file containing the code
- Copy the Zip file to a directory where you want to keep the project with your file manager and unzip it.
- Navigate to the Star directory and click the Star.ino file – this will open in the Arduino IDE
You’re now ready to flash the code to your Circuit Playground board:
- Connect a USB cable to the Circuit Playground and attach it to your computer
- The green On led will turn on
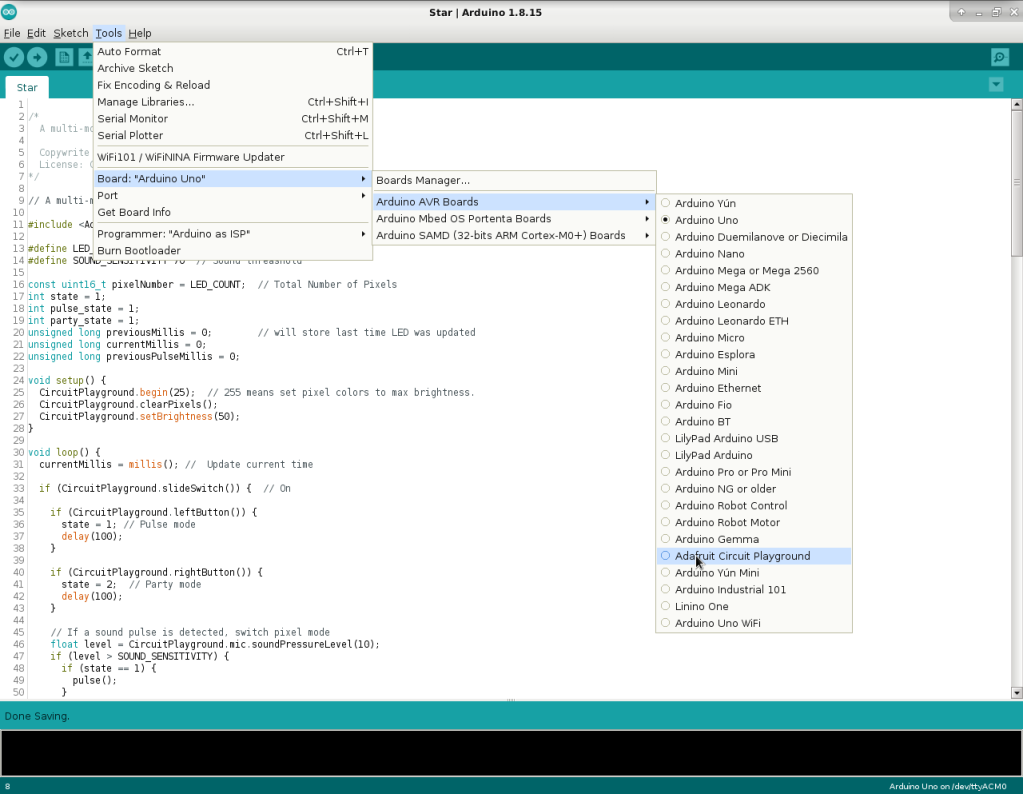
- In the IDE’s main menu, open Tools -> Boards -> Arduino AVR Boards
- Select Adafruit Circuit Playground
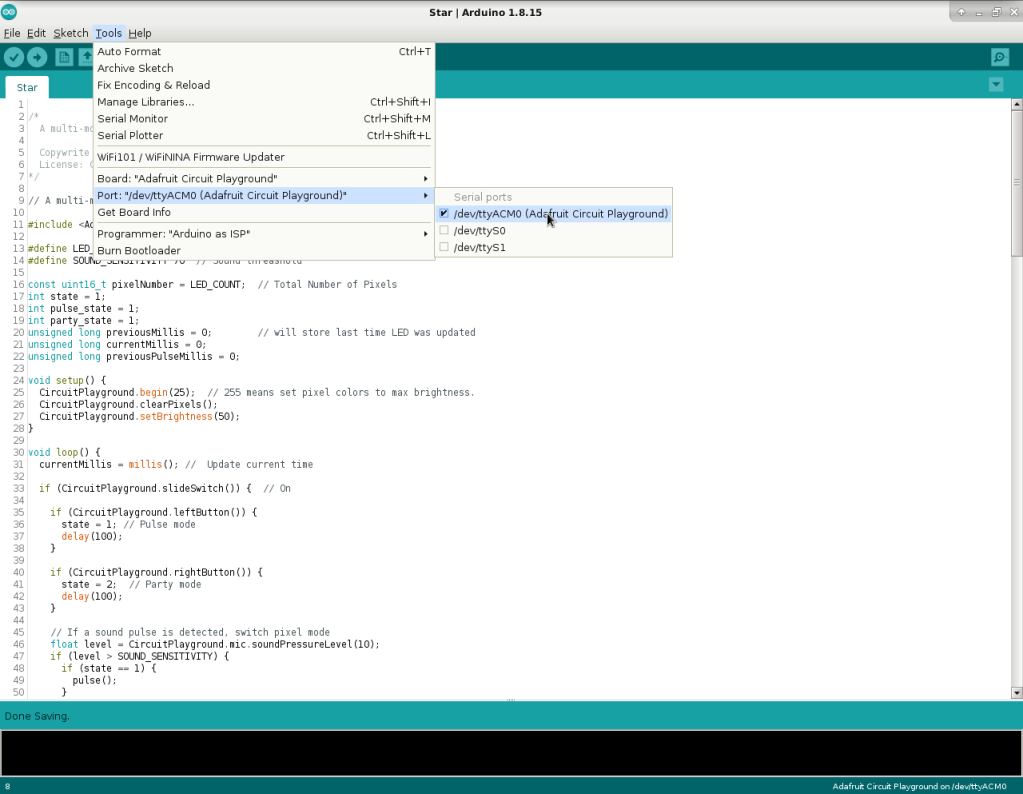
- Open the Tools menu and check the Port is discovered for your board – if not, select it from the Port menu item.
The IDE is all set up and configured for the Circuit Playground, so you can go ahead and upload the code to the board:
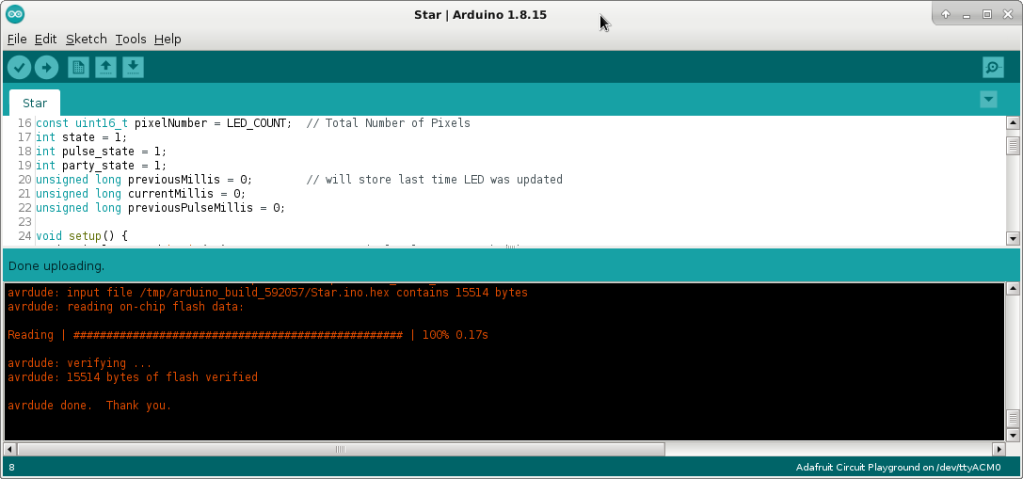
- From the menu, select Sketch -> Upload or click the Upload icon
The pane at the bottom of the IDE will indicate that the code is being compiled and uploaded. While it’s uploading, the red #13 led should pulse, indicating the bootloader mode
Tip: If you have trouble uploading code, double press the RESET button on the board after clicking Upload.
When the flash is completed, the red led will go off as the board resets itself, and it’s now ready to test!
3. Testing
Buttons on the star control its functions.
- A slider switch above the battery connector starts and stops the effects – slide it to the left to start the Neopixel sequence in pulse mode. All the pixels should come on in White and pulse together like a heartbeat.
- Click your fingers, and it should change to a white chaser pattern for one second, then return to pulsing mode.
- The left-hand button also puts the star into a pulsing mode
- The right-hand button enters party mode – made up of 4 different pixel patterns that change to the beat of the music
- Play some music with a strong beat and watch the pixel patterns change
When you’ve finished, slide the switch to the right, and the pixels should go off – the board is still on until you disconnect power.
4. Jumper
When you’ve finished testing, remove the USB cable and attach the board to your favourite Christmas jumper using some double-sided tape or a few stitches through the ring terminals.
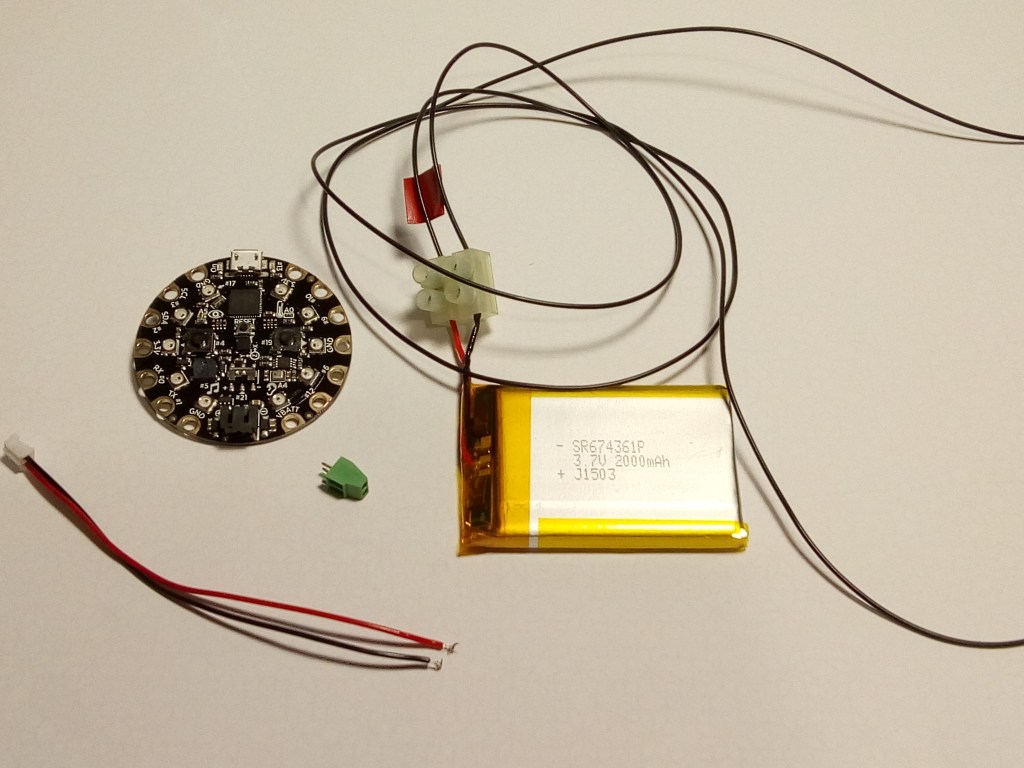
You can power the board with a 3.7V LiPo rechargeable battery or 3 x 1.5V AAA or AA batteries.
Warning: Make sure to get the correct polarity for your battery connector. The plus and minus signs are marked next to the JST connector on the board.
The battery connector at the bottom of the Circuit Playground is a JST PH connector. We cut the leads off a battery box with the right connector to poke the leads through the weave of the jumper without damaging it. Then we extended the leads with some multi-core stranded cable by stripping the ends, twisting them together, and putting them in a terminal block connector.
The battery was connected to the other end of the leads with another terminal block, and the whole thing was put inside the plastic sales bag so we could safely conceal it in a pocket.
5. Adding Code
You may want just to flash the code and have fun, but you can also change it and make it your own. Here are a few hints and tips if you want to modify it.
Each pixel pattern is defined in a separate function making it easy to add or re-order the lighting effects. Create some of your own by copying the example code and renaming the function. Then add more case statements to include it:
     case 2: // Party mode
        switch (party_state) {
          case 1:
            myTheaterChase(127, 127, 127, 100);
            break;
          case 2:
...
            break;
          case 4:
            //<add your own function here>
        }
    }
Don’t use the delay() function in your code. It will make the buttons and sound sampling very erratic. Each pixel effect function uses milllis() to calculate if it is time to run the next section of code, which has the effect of delaying execution without blocking any other code from running. Here’s an example from the pulse function:
void myPulse(const uint8_t max_brightness, uint8_t interval) {
  if ((currentMillis - previousMillis) >= interval) {
    previousMillis = currentMillis;
...
It makes things a bit more complicated, but the buttons and pixel effects will be much more responsive.
The MEMS microphone is sampled each time through the main loop to pick up any loud sound pulses, which triggers the pixel mode to change. The sensitivity is determined by the value in the #define SOUND_SENSITIVITY statement at the top of the code. Change this to experiment with different values.
You can also change the sample length which is set to 10 ms by altering the value in the soundPressureLevel parameter:
  float level = CircuitPlayground.mic.soundPressureLevel(10);
    if (level > SOUND_SENSITIVITY) {
      if (state == 1) {
        pulse();
      }
      if (state == 2) {
        party();
      }
    }
You could add in a similar effect using the built-in light sensor, which can be programmed in a similar way or you could trigger effects using movement from the onboard IMU sensor.
Once you’ve made any changes, re-flash the board and test it out. There are so many possibilities to experiment with on Circuit Playground.
Summary
The Circuit Playground board is packed with different devices that can be used to make cool interactive displays using the Neopixel LEDs around the perimeter of the board.
We showed how to create different lighting effects using Neopixel patterns that respond to the sound level sensor on the board. To make this work effectively, the code uses non-blocking techniques, which is very useful to learn for most microcontroller projects.
Happy Christmas!
____________________________________________________________
Interested in Arduino products? Visit our Arduino shop here and browse the latest Arduino boards and modules and easy-to-use kits and hardware. You’ll find everything you need for your project right here!
Like what you read? Why not show your appreciation by giving some love.
From a quick tap to smashing that love button and show how much you enjoyed this project.

