An easy and fun way to create an Easter egg hunt using two micro:bits. One acts as a radio transmitter placed next to where the egg is hidden. The other is used as a receiver indicating proximity via the LED matrix and an audible ping. As the two micro:bits get closer together, more LEDs light up and the ping increases in pitch and intensity until you find your egg!
We created the code using MakeCode and you can import directly into your editor. You will need at least one V2 micro:bit for the receiver and a V1 or V2 for the transmitter.
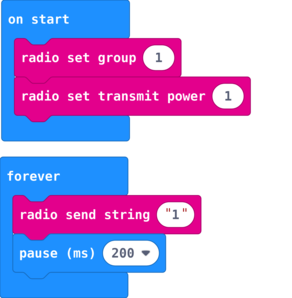
1. Micro:bit transmitter
This will be the micro:bit that is hidden with your egg. You can use either a V1 or V2 micro:bit.
It transmits a radio signal containing a string ID five times a second.
The radio group can be any number from 0 to 128 but it must be the same for both transmitter and receiver – we used group 1. Transmit power alters the strength and range of the radio signal, making it easier or harder to detect. We used 1 for indoors but this can be increased up to 7 for outside use.
Import the microbit-detector-tx project from the OKdo GitHub into MakeCode:
- Open https://makecode.microbit.org/
- Click on Import then click on Import URL.
- Paste https://github.com/LetsOKdo/microbit-detector-tx and click import.
- Using the USB cable, attach one micro:bit to your computer and click the Download button. Click Save As and save to the micro:bit.
- When the Download has completed, detach the cable and add the battery pack. When you switch the battery on, the micro:bit will start transmitting.
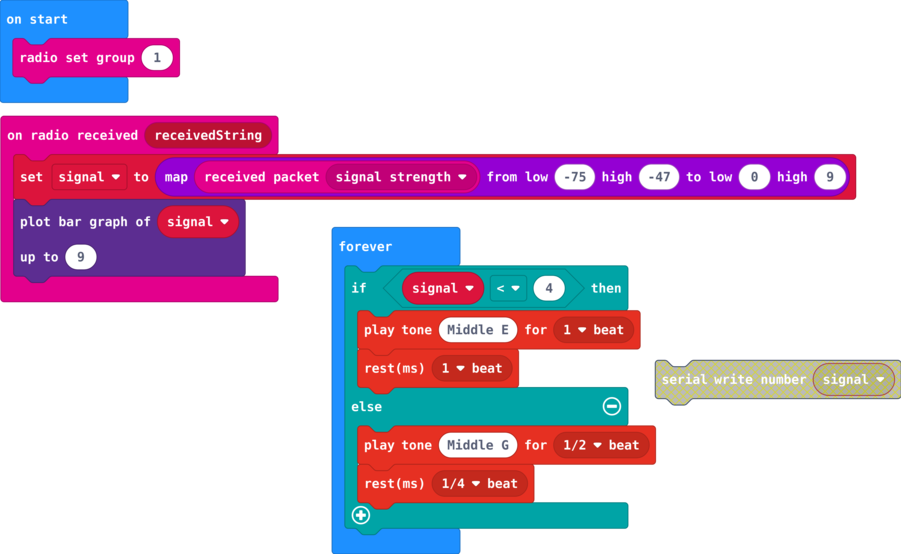
2. Micro:bit receiver
This micro:bit acts as the radio receiver for detecting the egg’s location.
The LED matrix lights up according to how near or how far you are from the transmitter. The number of LEDs that light up are controlled by the signal value in the map block, which gets updated every time a signal pulse is received. The bar graph block creates the display using this value.
The forever loop uses signal strength to alter the pitch and duration of the speaker. Once you get close to the transmitter, the ping sound will increase in intensity.
Import the microbit-detector-rx project into MakeCode from the OKdo GitHub repository:
- Open https://makecode.microbit.org/
- Click on Import then click on Import URL.
- Paste https://github.com/LetsOKdo/microbit-detector-rx and click Import.
- Attach the other micro:bit ( it must be a V2 micro:bit with a speaker ) to your PC with the USB cable.
- Download the code to the micro:bit.
- Disconnect and connect and switch on the battery pack.
The micro:bit should start receiving the radio signal from the transmitter. The LED matrix will light up and the speaker will start pinging.
3.Testing & hiding
Make sure that the radio group block is set to the same channel number for both micro:bits!
Try moving the two micro:bits closer together and further apart to test the sensitivity. This can be altered in several ways:
- Set the transmitter signal strength using the transmit power block. We used the lowest power (1) which works well indoors. If you are outside you may need to increase it, min is 0, max 7.
- Set min and max values for the signal strength detection in the receiver map block. Lowest is -128 (weakest signal) up to -45 (strongest signal) – try altering min to change when the display starts increasing.
- Ping tone is set by the receiver’s if signal comparison in the forever block. Min value is 0 and max 9. We set it to 4 so the ping changes at about 0.5m from the transmitter.
Once everything is set up, hide your transmitter micro:bit with your egg and use the detector to find it!
Summary
Hopefully, you will now have a micro:bit detector pair that you can use to find your hidden Easter eggs.
The project shows how to set up a transmitter and receiver and use radio signal strength as a measure of proximity between the two. The LED matrix was used to give visual feedback along with a changing audible ping.
The code is simple but fine-tuning the values can alter the sensitivity, making it easier or harder to detect the location of the eggs, depending on how difficult you want the game to be.
Happy egg hunting – don’t eat too many!
You can find more information and resources for your micro:bit here: https://microbit.org/
Like what you read? Why not show your appreciation by giving some love.
From a quick tap to smashing that love button and show how much you enjoyed this project.

