This project demonstrates how to connect OKdo E1 and Atmosphere. Connect powered sensor networks to the cloud using Atmosphere Studio visual editor. We add Wifi connectivity to the E1 using MIKROE’s Wifi7 Click module and sample environmental temperature, humidity and pressure with MIKROE’s Weather Click board, pushing data to the cloud. Because Atmosphere Studio supports all these components, it can be used to build and flash the E1 device firmware and provision IoT devices quickly and easily without the need for programming. This speeds up development and ensures secure and reliable connectivity with cloud services.
1. Hardware build
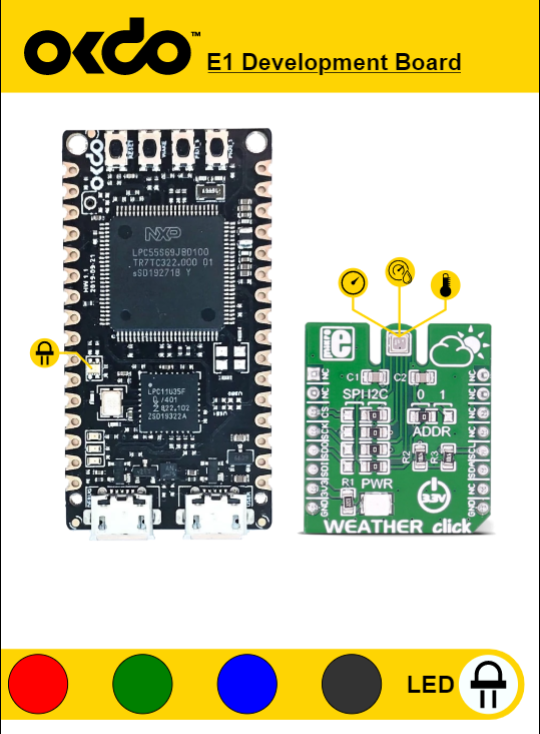
This example project builds a sensor network node using MIKROE Click modules which plug together, although some soldering of pin headers is required.
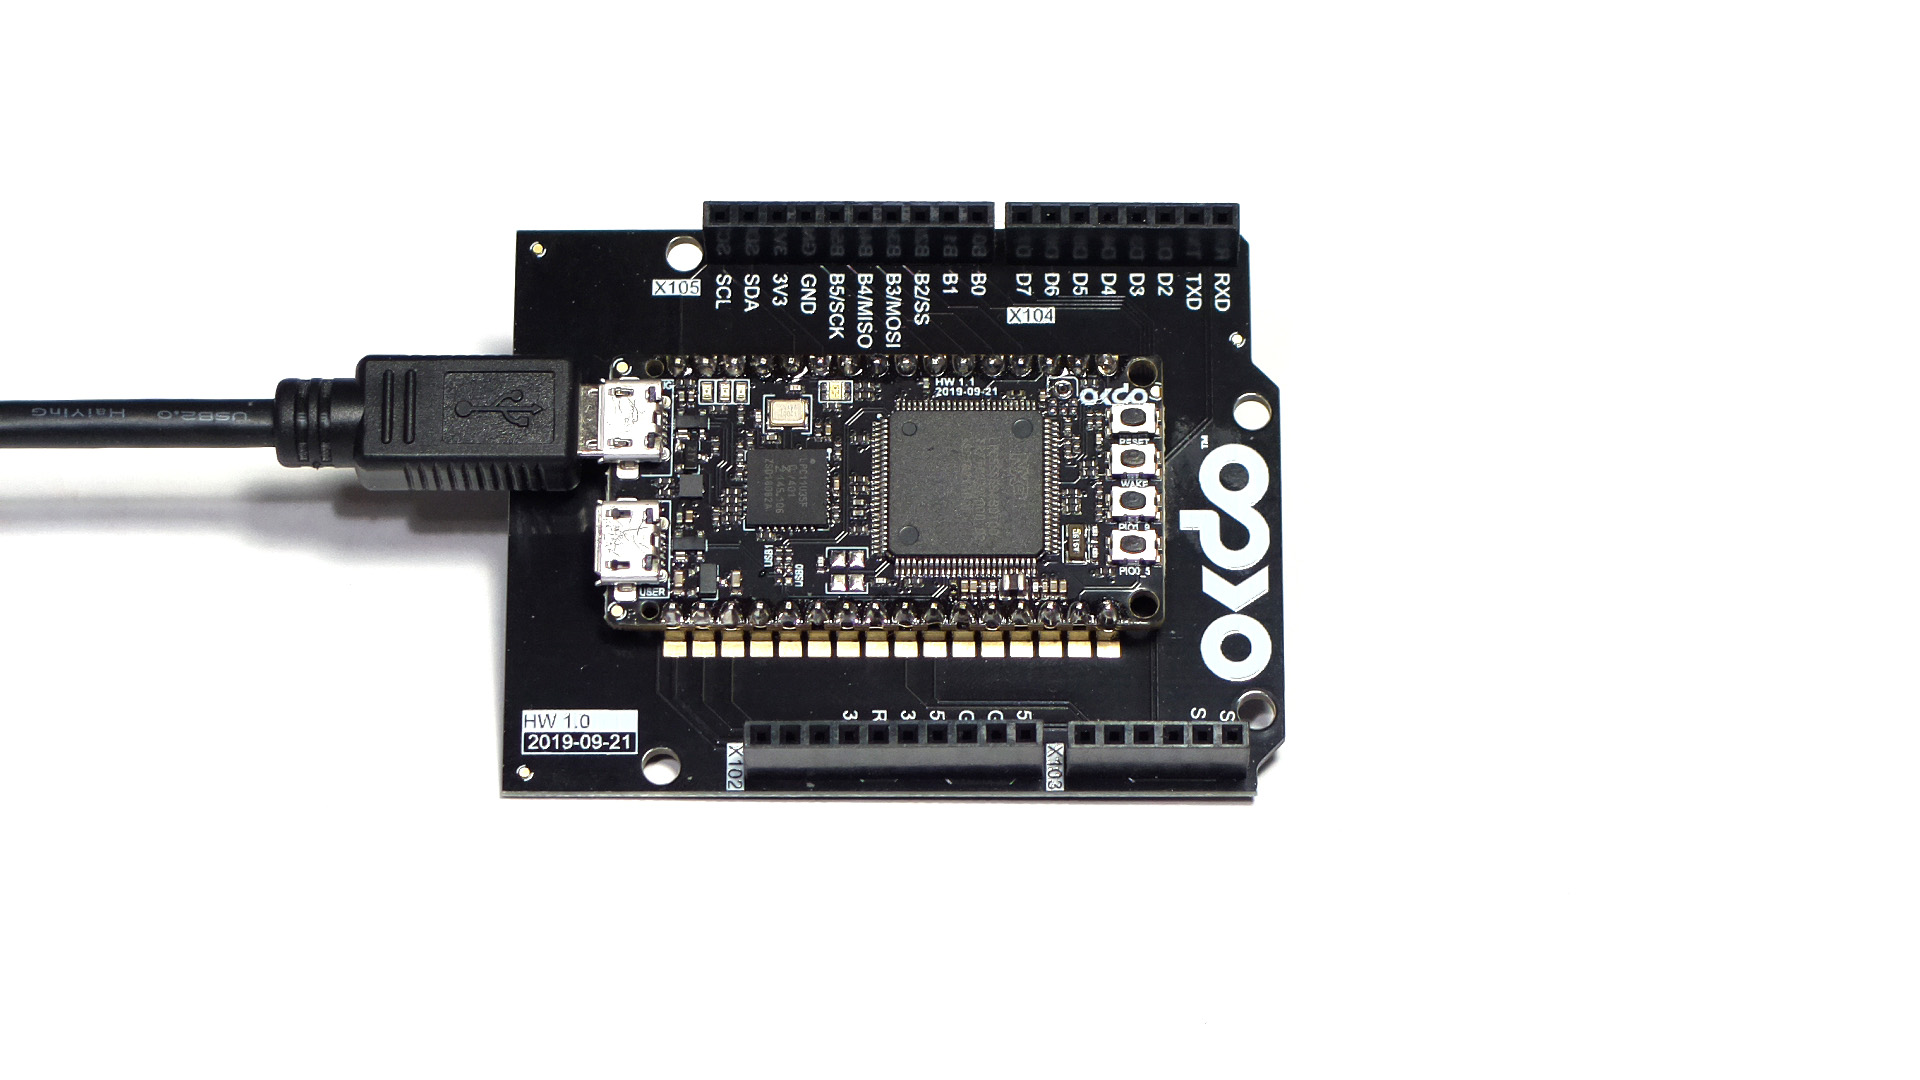
First, prepare the E1 Expansion Board and attach the E1 module. This makes the E1 pin-out compatible with the Arduino Uno form factor:
- Insert the long pins of 2 x 16 pin male headers through the top of the E1 Expansion board and solder from underneath.
- Solder the E1 module to the top side of the pin headers, orientated with the E1 push buttons closest to the OKdo logo on the Expansion board.
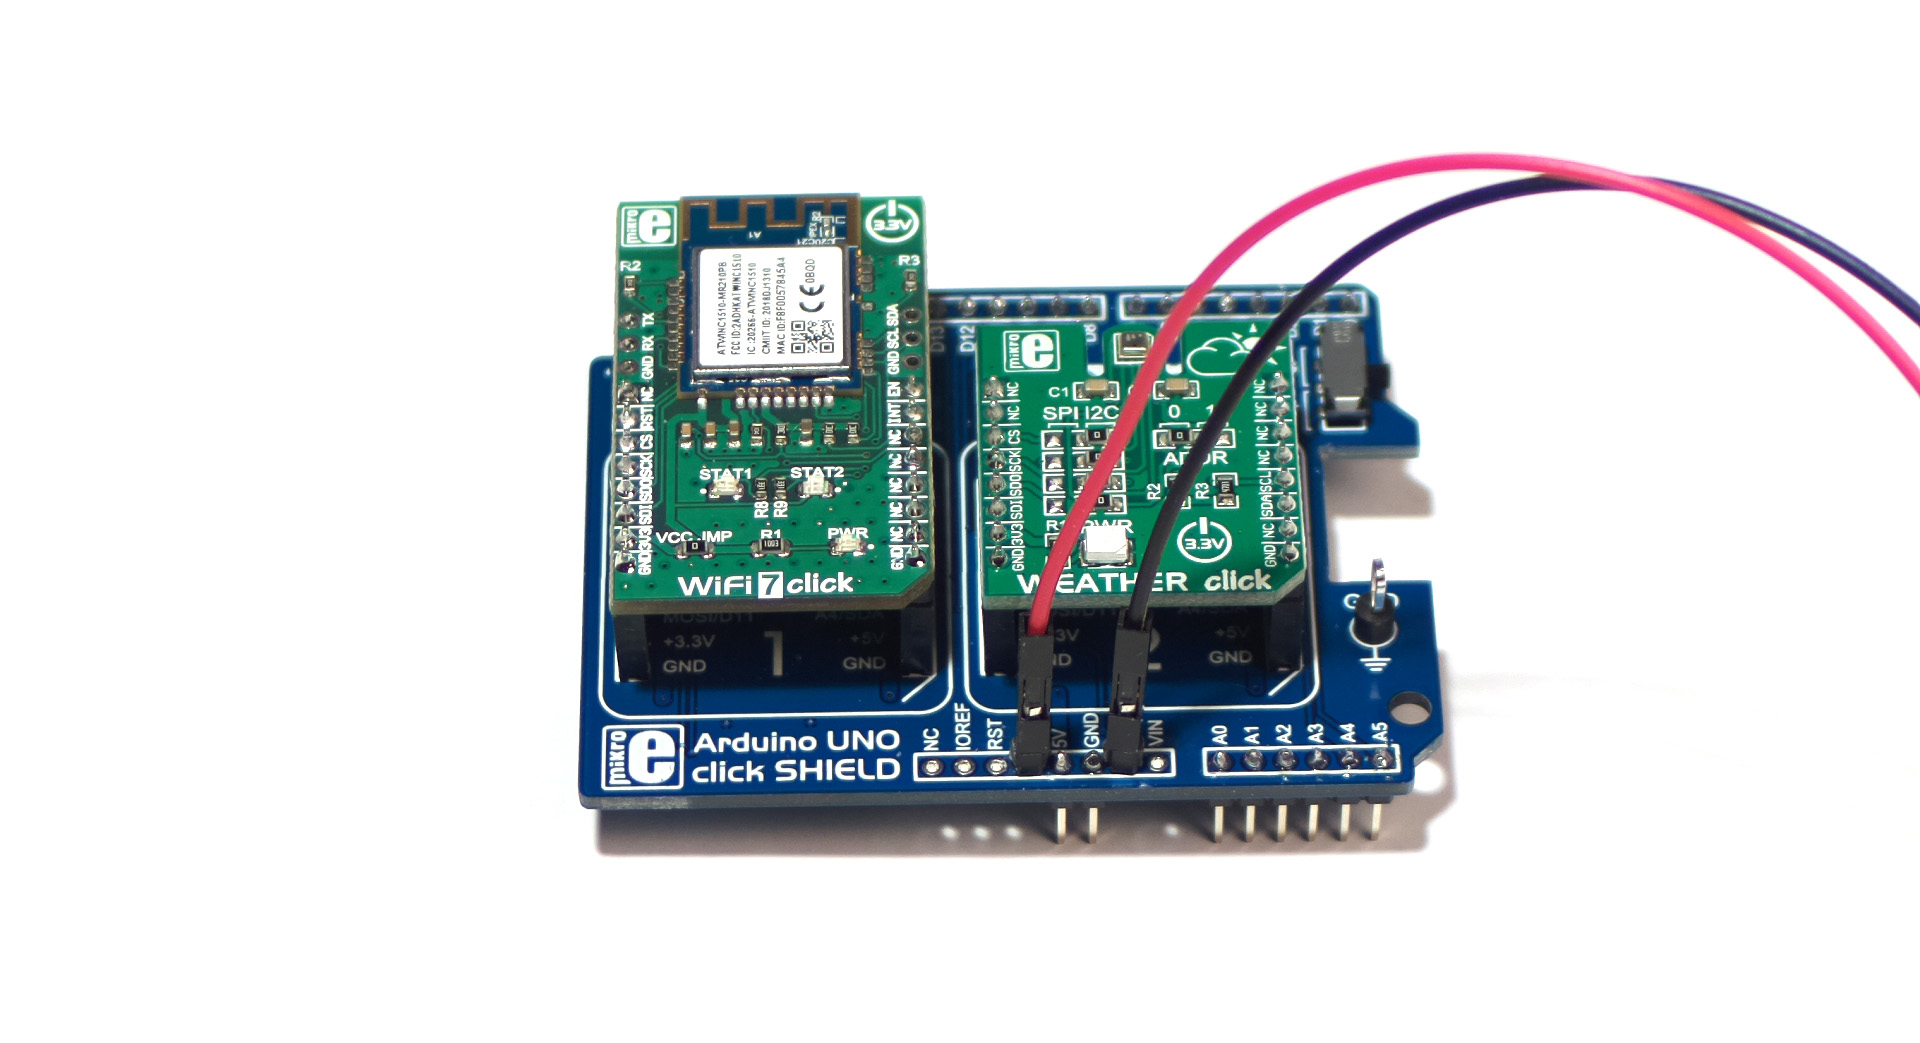
Now prepare the MIKROE Uno Click Shield with the supplied pin headers. A slight modification to the standard connection is required so the Wifi module can be powered from a separate 3.3V power supply.
- Insert the male headers into the E1 Expansion board with the exception of the 10-pin Power / GND header.
- Break off 2 pins and insert them into the 5V and GND positions on the E1 Expansion board.
- Position the Uno Click Shield over the headers and solder from the top side, then detach the Uno Click Shield from the E1 Expander.
- Break off 2 single header pins, place them in the 3.3V and GND positions on the Uno Click Shield and solder them from the underside.
The NC, IOREF, RST and VIN pins on the Uno Click Shield are left not connected.
- Attach the MIKROE Wifi 7 Click to Slot 1 of the shield.
- Attach the MIKROE Weather Click to Slot 2 shield.
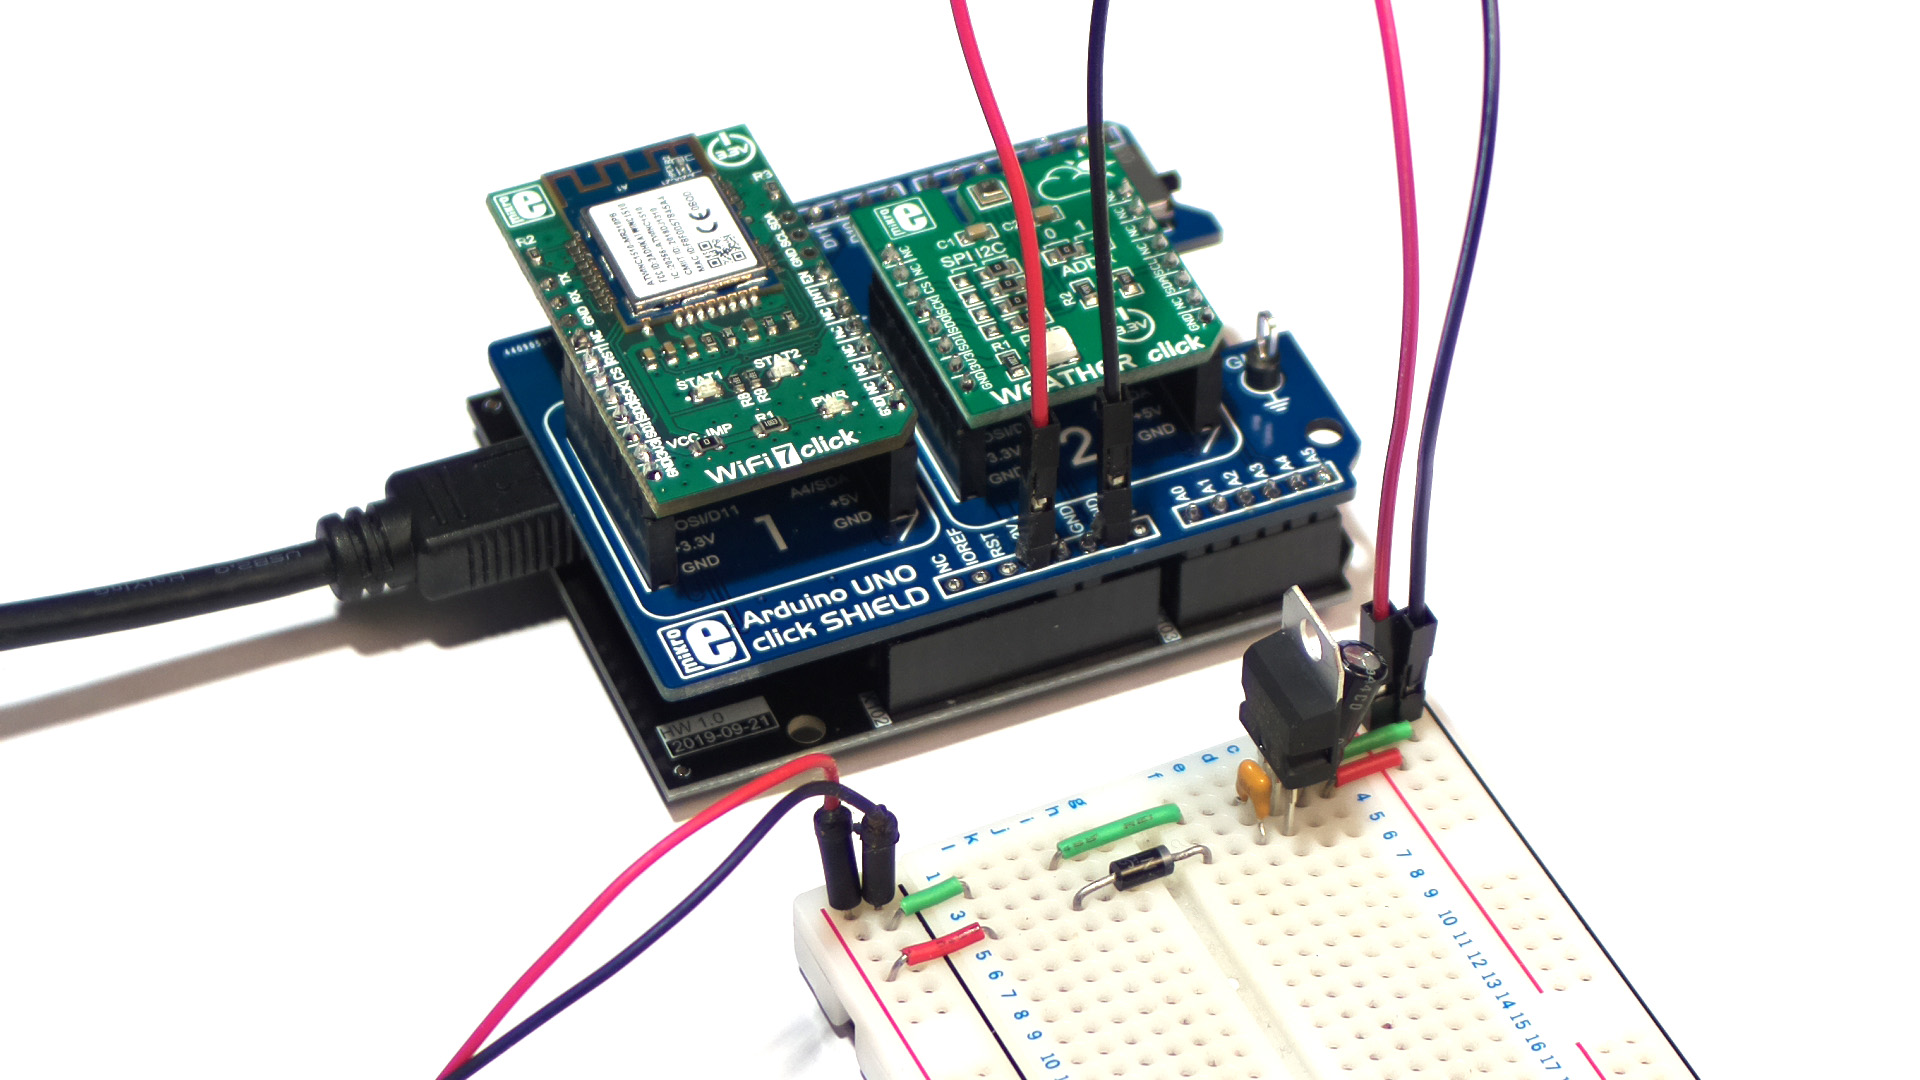
Finally, we built a stable 3.3V power supply on a breadboard using a 3.3V LDO Regulator (STMicroelectronics LD1117V33C) with 100nF ceramic capacitor across Vin and GND and a 10uF electrolytic capacitor across Vout and GND. A protection diode (1N4001) was placed in series with Vin. A bench power supply set to 5V DC supplied the input voltage and the output was connected to the 3.3V pin and GND pin of the Uno Click shield.
2. Install Atmosphere IoT Agent
In order to flash the Atmosphere firmware to the E1 board and configure the Wifi, the Atmosphere IoT Agent must be installed on the host PC. This bridges between the connectivity protocol drivers and the browser running Atmosphere used to program the device. The agent is available for Windows 10, Mac OS and Linux. We used a Windows 10 host PC:
- Download the Atmosphere IoT Agent installer for your PC from here.
- Follow the instructions to install the agent.
- Check that the agent is running – an icon appears in the system tray in Windows.
3. Create a project
To use the Atmosphere Studio which is a visual editor for creating projects, you will need a free Atmosphere developer account.
- Navigate to https://atmosphereiot.com and create an account by clicking the Get Started button.
- Validate the account from your email address and login.
- From the navigation bar on the left side of the page click the project icon and open the demo projects tab

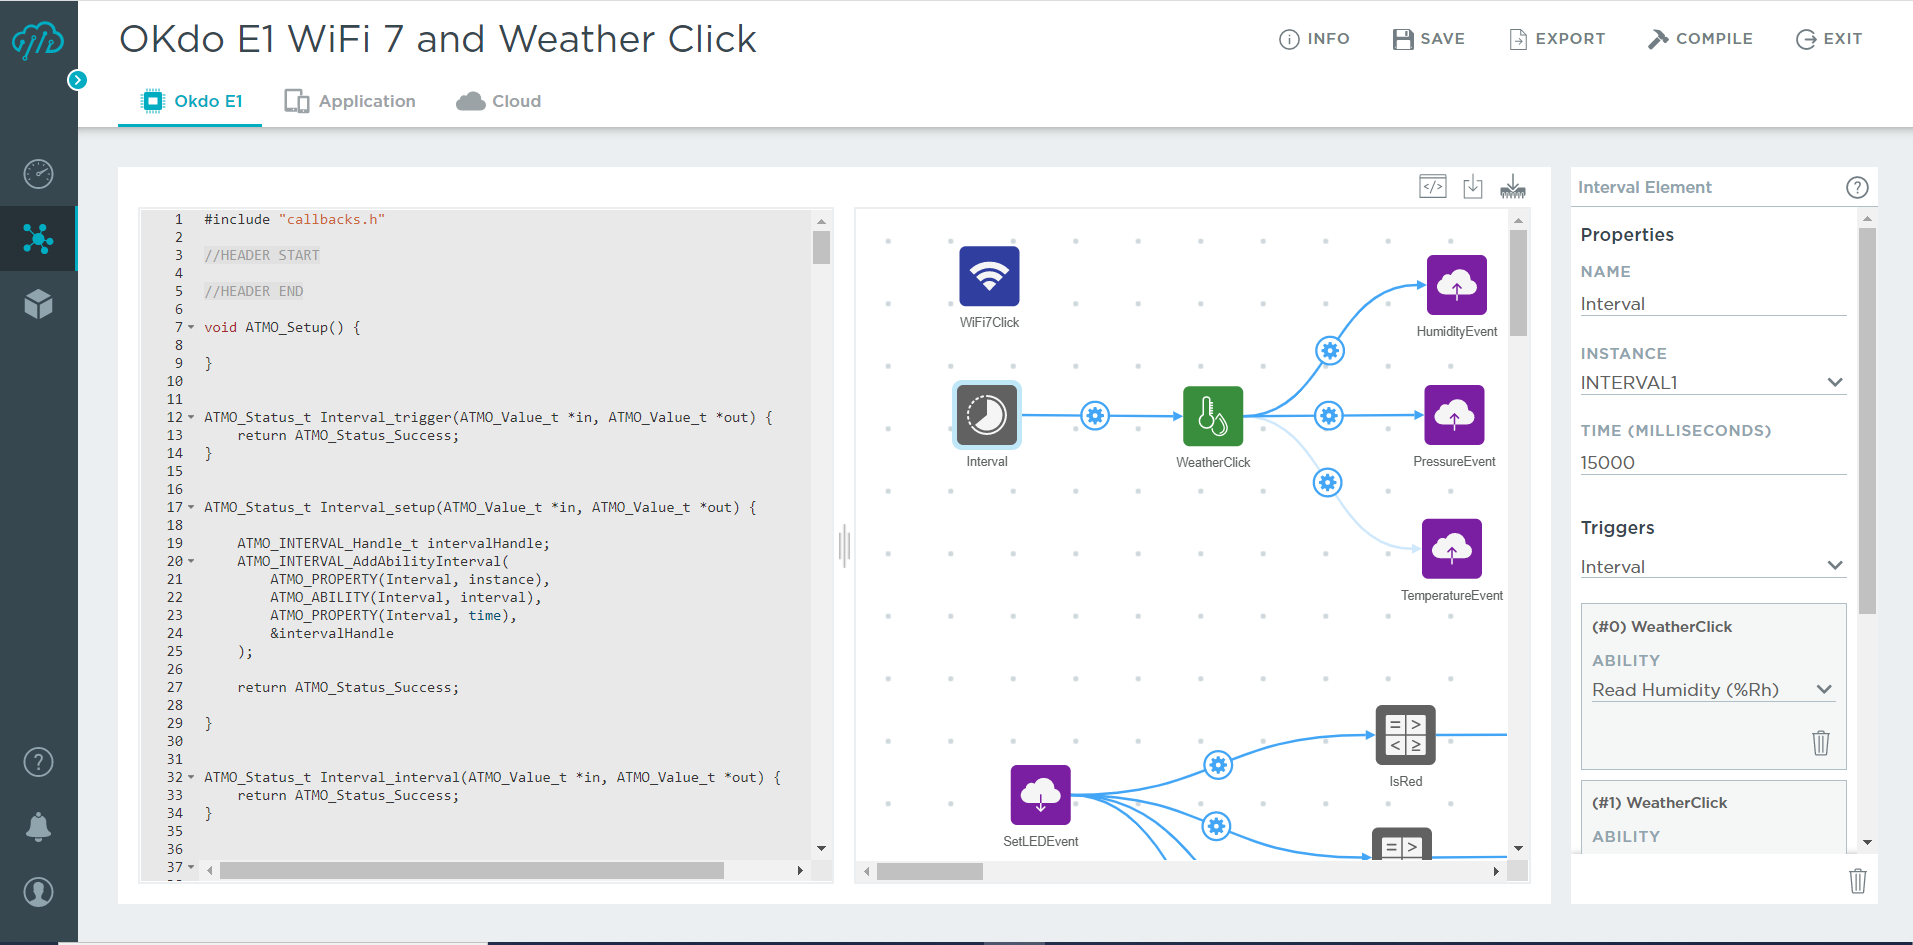
- Select the OKdo E1 Wifi 7 Weather Click project – the project will open in the Embedded view for the E1 board.
This view shows a representation of how all the hardware elements in the project are connected together. By selecting individual elements, you can view their properties and settings in the panel on the right side of the window.
The example project consists of:


The Weather Click Element is connected between the interval timer and temperature, humidity and pressure device element representing the on-board sensors. The timer is set to uploaded readings every 1.5 seconds.
Clicking the Code Editor icon opens a window displaying the generated C code for the project.
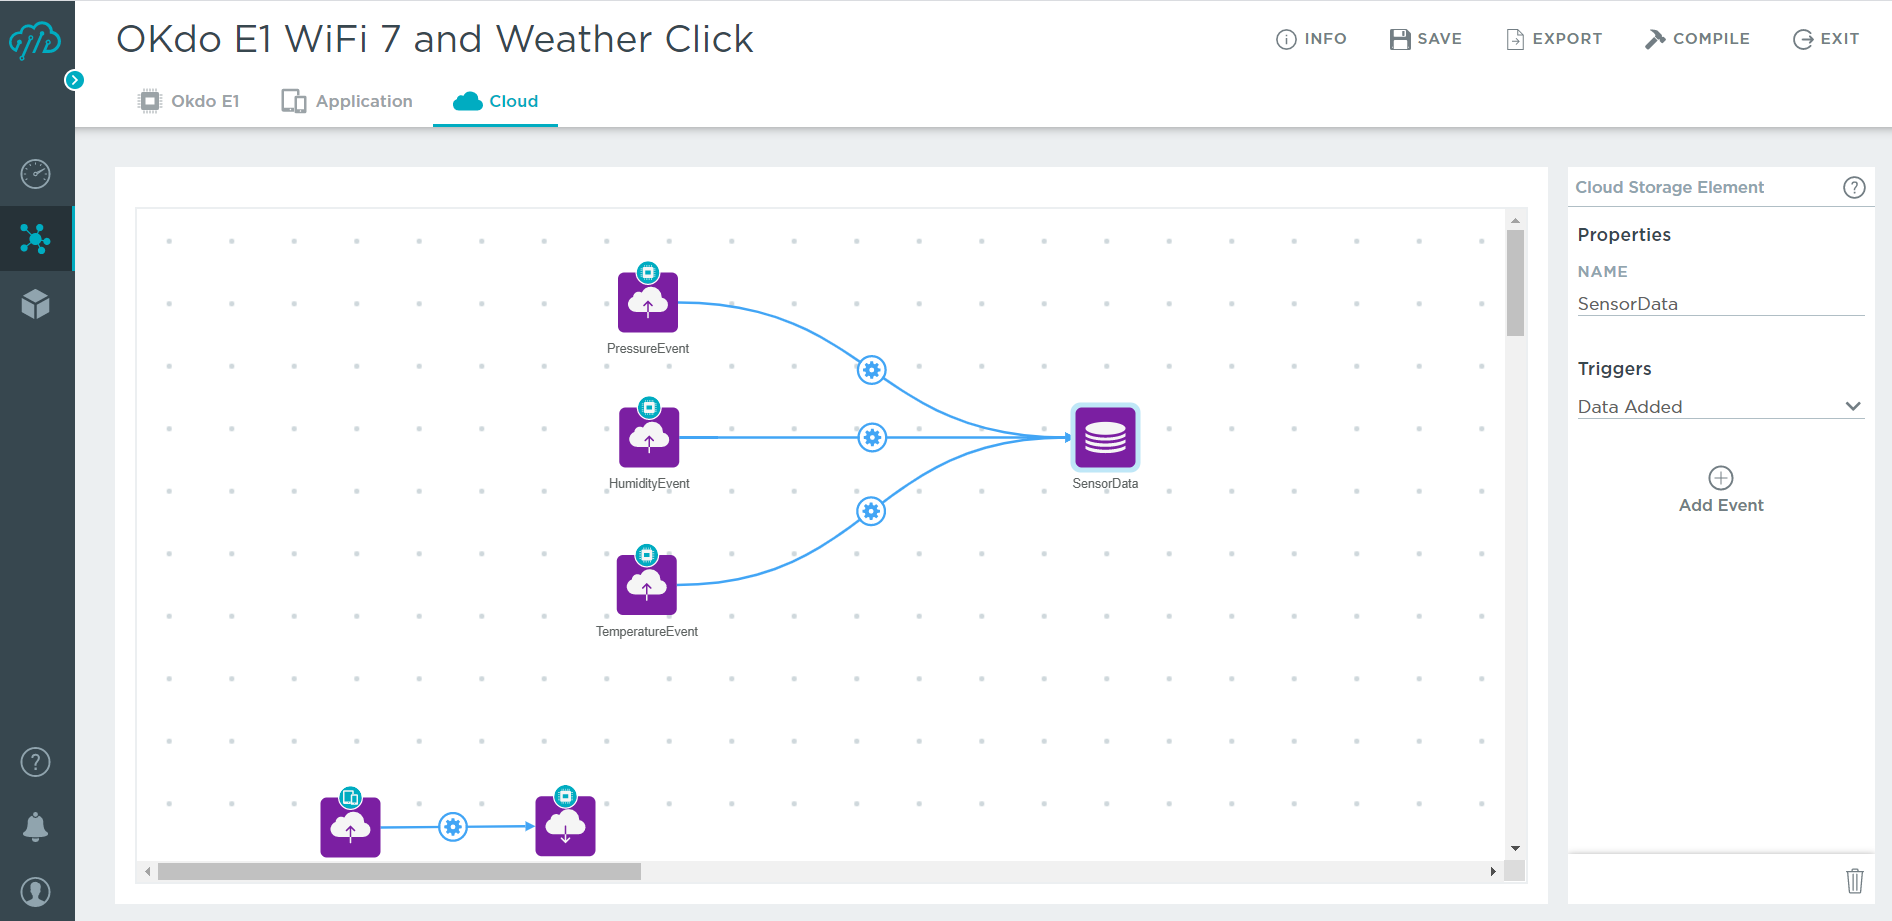
Selecting the Cloud tab shows how the sensor Device Elements are connected to a Cloud Storage Element.

This stores the sensor readings so that they can be retrieved and used in the Dashboard.
4. Flashing firmware
E1 is one of the many hardware platforms supported by Atmosphere Studio so the example project has already been set up and configured. The project just needs compiling and flashing with the built-in embedded programmer. This can be accomplished entirely from within the Atmosphere Studio with the help of the Atmosphere IoT Agent previously installed.
- Connect the E1 to the host PC using a USB cable attached to the power/programming port on the E1. Ensure that the Uno Click Shield is not attached.
- In the Embedded view, click the Hammer icon to Compile the project.

- After compilation has finished, click the Program Firmware button to flash the E1 – a status dialogue shows progress.
![]()
- After programming has completed, detach the E1 from the PC and plug on the Uno Click Shield with the Wifi 7 and Weather Click modules in place.
- Power on the 3.3V supply for the peripherals and re-connect the E1 to the PC.
The hardware and software build is now complete and the device is ready for provisioning.
5. Device provisioning
Before the E1 can connect and push data to the cloud the Wifi must be configured and the device provisioned. This registers the particular device with Atmosphere and sets up a secure connection.
- Ensure the Atmosphere IoT Agent is running and the E1 is connected to the host via USB.
- Click the Device icon in the left-hand navigation panel.

- Click the Scan icon – a dialogue will open and list the device.
![]()
- Select the device – provisioning will take place and the Wifi configuration dialogue will open.
- Add your Wifi credentials.
Once configuration and provisioning is complete, the E1 can be disconnected from the host PC and powered independently. The connection to the network will be made via Wifi.
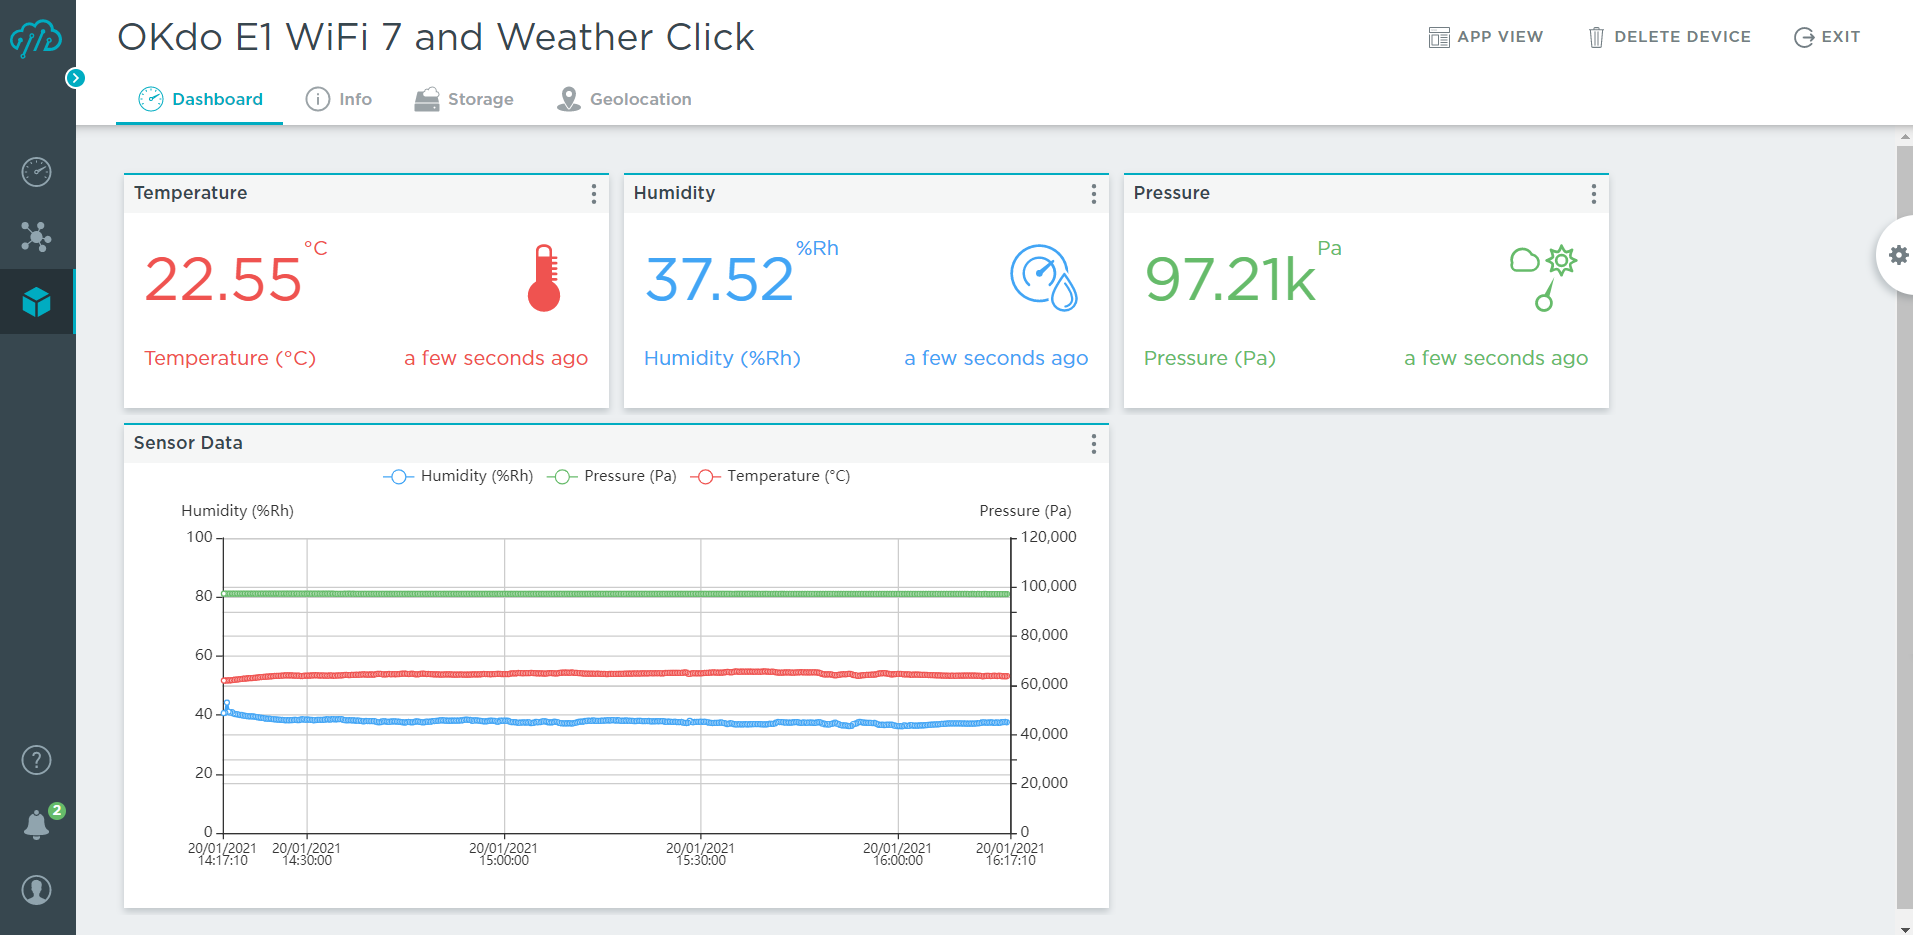
6. Viewing data
You should now be able to select the dashboard view in your browser and see your sensor readings, as well as a chart showing how they vary over time. All these elements are configurable in Atmosphere Studio.
Atmosphere also has a mobile app for Android and iOS that allows you to control the RGB Led on the E1 to demonstrate sending signals to the E1 from the Cloud, by clicking the buttons on the display.
Summary
In this project, we have shown how to quickly prototype an E1 sensor network and connect it to the Atmosphere cloud using the Atmosphere Studio visual editor.
The Atmosphere platform is extensive in its capabilities and support for IoT deployments and hardware – to understand more visit the Documentation Hub https://docs.atmosphereiot.com/
Or watch a series of short videos introducing the Atmosphere IoT Platform
https://atmosphereiot.com/videos/introduction-to-atmosphere-iot-platform-1/
Like what you read? Why not show your appreciation by giving some love.
From a quick tap to smashing that love button and show how much you enjoyed this project.

