This project takes advantage of the Touch Board’s capacitive sensor capabilities and its MP3 player ability to bring your Halloween pumpkin into the 21st century. It will display sound-reactive LED lighting and will make spooky sounds when touched. It all runs from a small USB power bank so you can place it wherever you want, no cables attached.
1. Gather your sounds.
The pumpkin will trigger a sound randomly every time it is touched. The first step will be to gather your sounds. You can use any MP3 files so you can record your own, put music files on it etc.. We’ve gone for a series of spooky sound effects that really fit the Halloween theme. You can have as many sounds as fit on the Touch Board’s micro SD card.
We got our sounds from https://freesound.org/ which has a vast library of free sounds to use. You’ll need to register to download.
These are the sounds we used for ours:
https://freesound.org/people/newagesoup/sounds/337164/
https://freesound.org/people/InspectorJ/sounds/413315/
https://freesound.org/people/InspectorJ/sounds/370937/
2. Load your sounds
The Touch Board only plays MP3 files so you might need to convert your sounds if they are in a different format. You can use Audacity to convert your sounds. It is a highly rated free, open-source, cross-platform audio application with powerful features.
- Ensure all your sounds are in MP3 format.
- Connect the Touch Board’s micro SD card to your computer using the adapter included with the Touch Board kit.
- Create a folder called E0 at the root of the micro SD card.
- Load your sounds to the EO folder.
- Insert the micro SD card into the Touch Board.
3. Assemble the circuit
You’ll need to have the Touch Board’s headers already in place in to complete the circuit. If you need help doing this you can find it here.
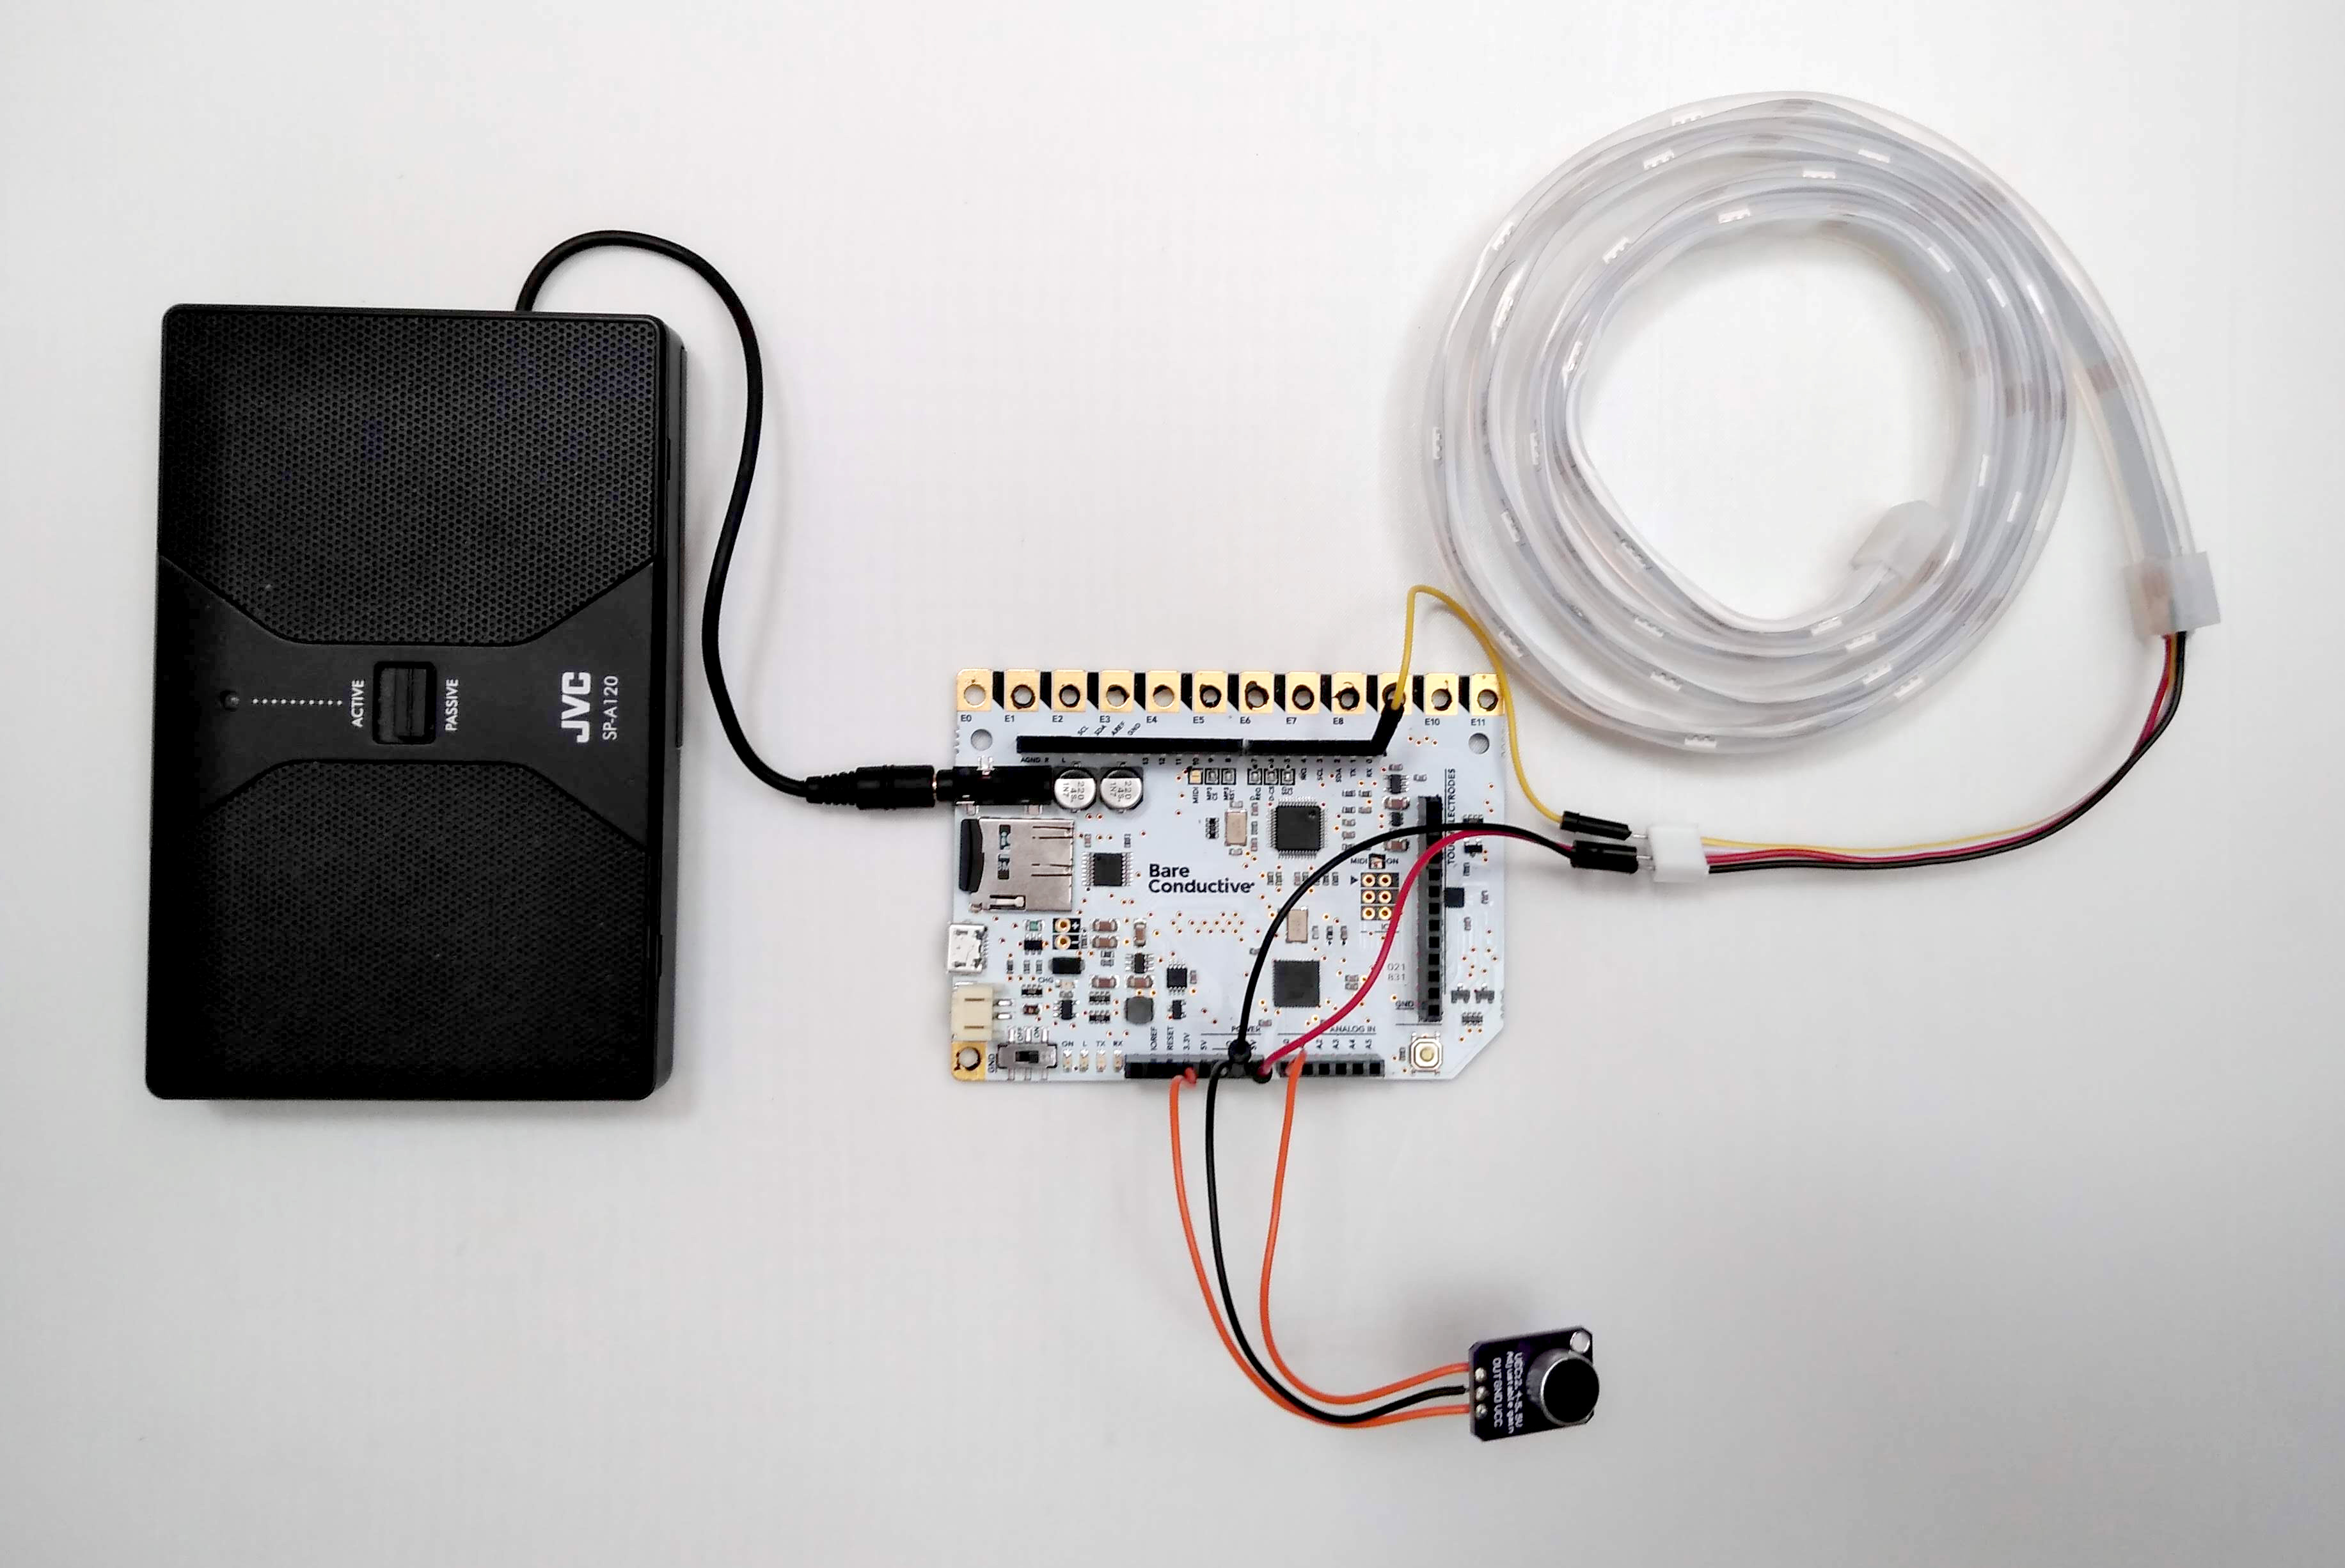
- Connect the data cable of the LED strip to 0 on the Touch Board.
- Connect the +5V of the LED strip to 5V on the Touch Board.
- Connect the GND of the LED strip to GND on the Touch Board.
- Solder 3 cables to the contacts of the microphone.
- Connect the GND of the microphone to GND on the Touch Board.
- Connect the VCC of the microphone to 3.3V on the Touch Board.
- Connect the OUT of the microphone to A0 on the Touch Board.
- Connect the speaker to the audio out of the touch Board.
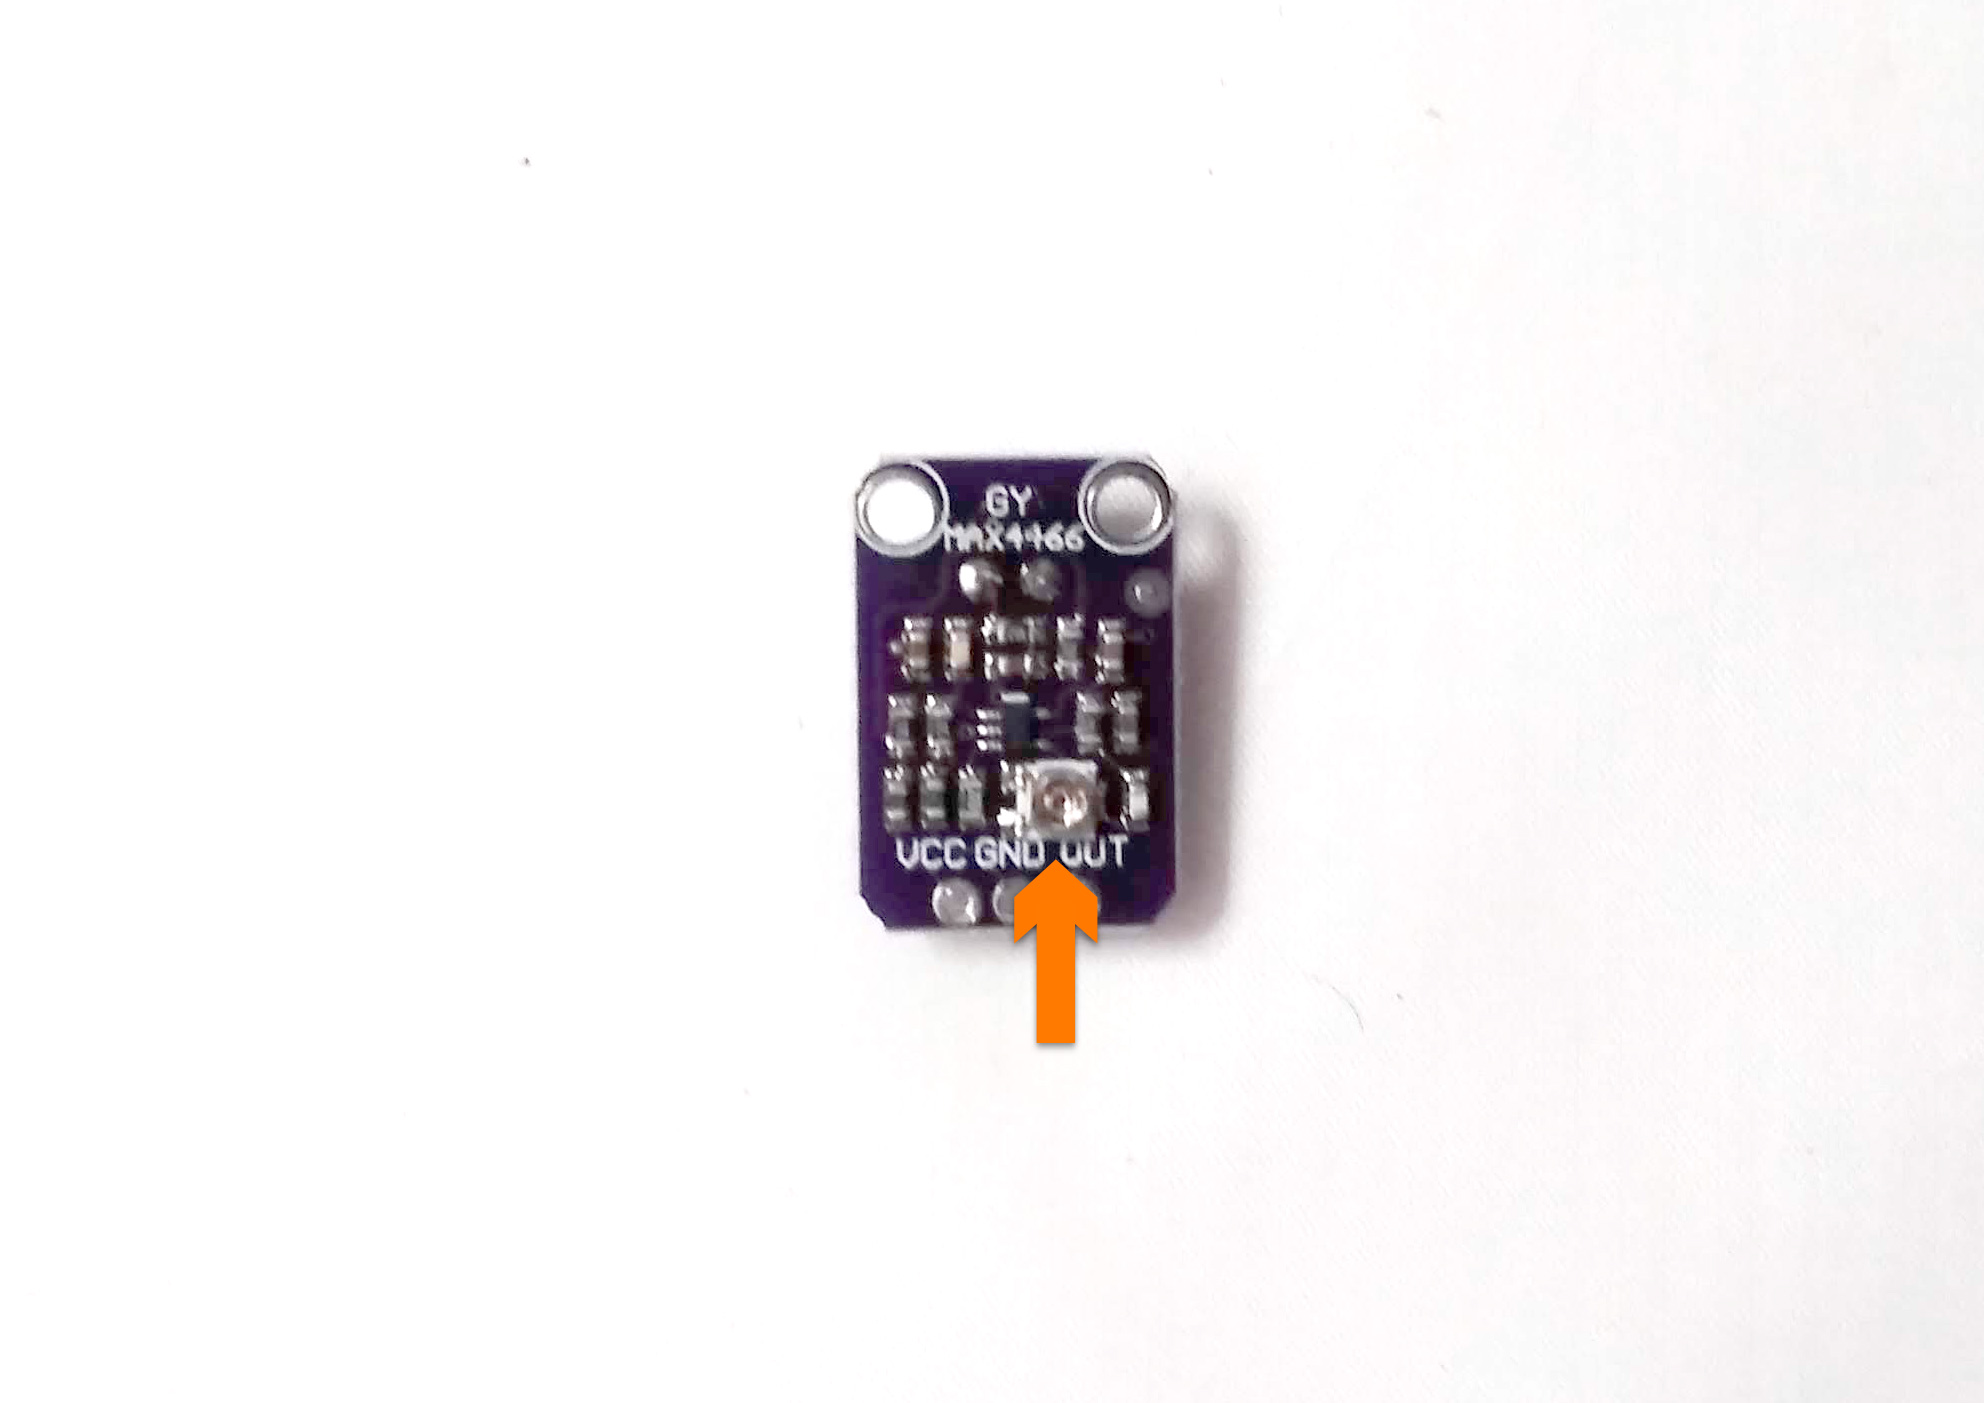
4. Adjust the microphone's gain
The microphone has a small screw on the reverse to adjust its gain. Adjusting it is a bit tricky because the screw goes round and round forever with no obvious high or low points. The best way to adjust it is to run a sketch that will display the input levels and adjust the screw position based on this. Because the speaker will be in close proximity to the microphone you’ll want the gain to be as low as possible.
To programme the Touch Board you’ll need to have the Arduino IDE and the Touch Board. add-on installed. You can find out how to do this here.
- Connect the Touch Board to your computer using the micro USB cable. Load the following sketch on to the Touch Board. You can find information on how to do this here.
const int sampleWindow = 50; // Sample window width in mS (50 mS = 20Hz)
unsigned int sample;

void setup()
{
   Serial.begin(9600);
}


void loop()
{
   unsigned long startMillis= millis();  // Start of sample window
   unsigned int peakToPeak = 0;   // peak-to-peak level

   unsigned int signalMax = 0;
   unsigned int signalMin = 1024;

   // collect data for 50 mS
   while (millis() - startMillis < sampleWindow)
   {
      sample = analogRead(0);
      if (sample < 1024)  // toss out spurious readings
      {
         if (sample > signalMax)
         {
            signalMax = sample;  // save just the max levels
         }
         else if (sample < signalMin)
         {
            signalMin = sample;  // save just the min levels
         }
      }
   }
   peakToPeak = signalMax - signalMin;  // max - min = peak-peak amplitude
   double volts = (peakToPeak * 5.0) / 1024;  // convert to volts

   Serial.println(volts);
}
- Have some audio with a uniform volume playing in the background, a radio chat show is perfect.
- Open the serial monitor on the Arduino IDE by clicking on the magnifying glass button.
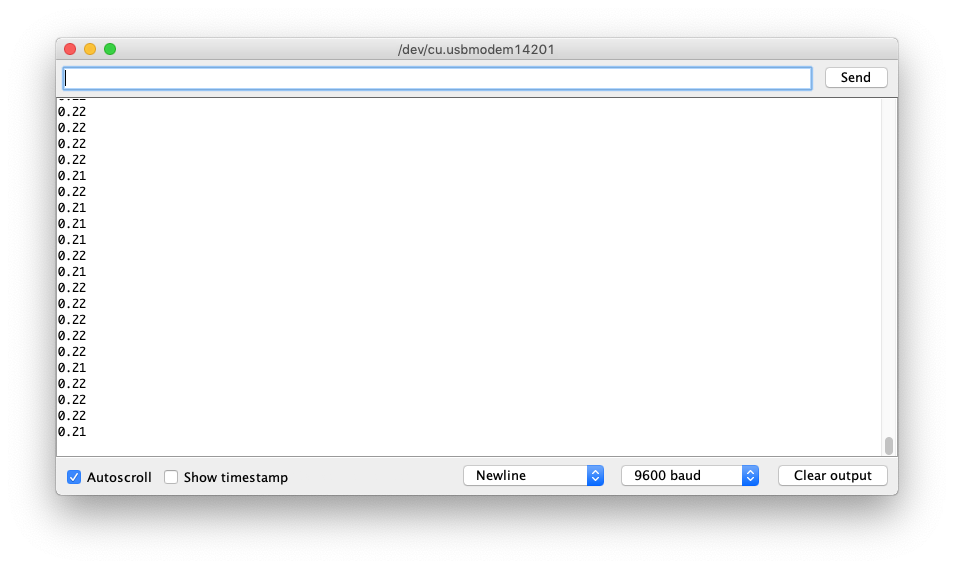
If you set the Serial Monitor to autoscroll, you’ll see the figures related to the detected volume running down the screen.
- Use a small Phillips screwdriver to slowly turn the screw until you see the lowest possible value. In our case, the range detected went from 1.72 to 0.21 so we set the screw to receive mostly around 0.21. The exact numbers you see will depend on the volume of your ambient sound, just ensure that you’ve set it to the lowest possible value.
5. Programme the Touch Board
- Paste the following code into the Arduino IDE and upload it to the Touch Board.
/*
 Based on code by Jim Lindblom and plenty of inspiration from the Freescale
 Semiconductor datasheets and application notes.

 Bare Conductive code written by Stefan Dzisiewski-Smith and Peter Krige.

 halloween sketch assembled by Mowgli.

 This work is licensed under a MIT license https://opensource.org/licenses/MIT

 Copyright (c) 2016, Bare Conductive

 Permission is hereby granted, free of charge, to any person obtaining a copy
 of this software and associated documentation files (the "Software"), to deal
 in the Software without restriction, including without limitation the rights
 to use, copy, modify, merge, publish, distribute, sublicense, and/or sell
 copies of the Software, and to permit persons to whom the Software is
 furnished to do so, subject to the following conditions:

 The above copyright notice and this permission notice shall be included in all
 copies or substantial portions of the Software.

 THE SOFTWARE IS PROVIDED "AS IS", WITHOUT WARRANTY OF ANY KIND, EXPRESS OR
 IMPLIED, INCLUDING BUT NOT LIMITED TO THE WARRANTIES OF MERCHANTABILITY,
 FITNESS FOR A PARTICULAR PURPOSE AND NONINFRINGEMENT. IN NO EVENT SHALL THE
 AUTHORS OR COPYRIGHT HOLDERS BE LIABLE FOR ANY CLAIM, DAMAGES OR OTHER
 LIABILITY, WHETHER IN AN ACTION OF CONTRACT, TORT OR OTHERWISE, ARISING FROM,
 OUT OF OR IN CONNECTION WITH THE SOFTWARE OR THE USE OR OTHER DEALINGS IN THE
 SOFTWARE.

*******************************************************************************/

//led////////

#include "FastLED.h"
FASTLED_USING_NAMESPACE
#define NUM_LEDS 15 // Limit number of LEDs to avoid external power
//#define BRIGHTNESS 100 // Adjust brightness base
CRGB leds[NUM_LEDS];
#define PIN 0 // pin used for LED strip
#define FRAMES_PER_SECOND  120
/////////////////////////////////////////////////////////////////////

//mic//////////////////////////////////////////////////////////////
const int sampleWindow = 50; // Sample window width in mS (50 mS = 20Hz) was 50
unsigned int sample;
int volts;
int BRIGHTNESS = 100;
int totalBrightness;
int incomingBrightness;
/////


// touch includes
#include <MPR121.h>
#include <Wire.h>
#define MPR121_ADDR 0x5C
#define MPR121_INT 4
#define EFFECTS_VOLUME 0// lower number is higher volume!range 0-254

// mp3 includes
#include <SPI.h>
#include <SdFat.h>
#include <FreeStack.h>
#include <SFEMP3Shield.h>

// mp3 variables
SFEMP3Shield MP3player;
byte result;
int lastPlayed = 0;

// sd card instantiation
SdFat sd;
SdFile file;

// define LED_BUILTIN for older versions of Arduino
#ifndef LED_BUILTIN
#define LED_BUILTIN 13
#endif

void setup(){

  Serial.begin(9600);
  delay(3000);

  /////leds/////////
  FastLED.addLeds<WS2811, PIN, RGB>(leds, NUM_LEDS).setCorrection( TypicalLEDStrip );
  FastLED.setBrightness(BRIGHTNESS);
  leds[NUM_LEDS] = CRGB( 0, 0, 0);

  //////////////////


  pinMode(LED_BUILTIN, OUTPUT);

  //while (!Serial) ; {} //uncomment when using the serial monitor
  Serial.println("Bare Conductive Random Touch MP3 player");

  // initialise the Arduino pseudo-random number generator with
  // a bit of noise for extra randomness - this is good general practice
  randomSeed(analogRead(0));

  if(!sd.begin(SD_SEL, SPI_HALF_SPEED)) sd.initErrorHalt();

  if(!MPR121.begin(MPR121_ADDR)) Serial.println("error setting up MPR121");
  MPR121.setInterruptPin(MPR121_INT);

  /////////////////////////////////////////////////
  // Changes from Touch MP3 for distance

  // this is the touch threshold - setting it low makes it more like a proximity trigger
  // default value is 40 for touch
  MPR121.setTouchThreshold(8);

  // this is the release threshold - must ALWAYS be smaller than the touch threshold
  // default value is 20 for touch
  MPR121.setReleaseThreshold(1);
/////////////////////////////////////////////////////////////////

  result = MP3player.begin();
  MP3player.setVolume(EFFECTS_VOLUME,EFFECTS_VOLUME);////////////////////////////////////////////////////

  if(result != 0) {
    //Serial.print("Error code: ");
    //Serial.print(result);
    //Serial.println(" when trying to start MP3 player");
   }

}
///////////////////
uint8_t gHue = 10; // rotating "base color" used by many of the patterns
///////////////
void loop(){
  readTouchInputs();
  readMic();
  rainbow();


FastLED.setBrightness(totalBrightness);
  FastLED.show();
  FastLED.delay(1000/FRAMES_PER_SECOND); // insert a delay to keep the framerate modest

  // do some periodic updates
  EVERY_N_MILLISECONDS( 20 ) { gHue++; } // slowly cycle the "base color" through the rainbow


}

//////////LEDS//////////////////////////////////////////////////////////

void rainbow()
{
  // FastLED's built-in rainbow generator
  fill_rainbow( leds, NUM_LEDS, gHue, 7);
}


////////////

/////////mic////////////////////////////////////////////////////////
void readMic(){
  unsigned long startMillis= millis();  // Start of sample window
   unsigned int peakToPeak = 0;   // peak-to-peak level

   unsigned int signalMax = 0;
   unsigned int signalMin = 1024;

   // collect data for 50 mS
   while (millis() - startMillis < sampleWindow)
   {
      sample = analogRead(0);
      if (sample < 1024)  // toss out spurious readings
      {
         if (sample > signalMax)
         {
            signalMax = sample;  // save just the max levels
         }
         else if (sample < signalMin)
         {
            signalMin = sample;  // save just the min levels
         }
      }
   }
   peakToPeak = signalMax - signalMin;  // max - min = peak-peak amplitude
   double volts = (peakToPeak * 5.0) / 1024;  // convert to volts


   if(volts > 2){ BRIGHTNESS = 40;
   }
        else if (volts< 1){BRIGHTNESS = 100;

        }


   incomingBrightness = volts*BRIGHTNESS;

   if(incomingBrightness > 254){ incomingBrightness = 252;}

   totalBrightness = incomingBrightness;
   Serial.println("     volts");
   Serial.println(volts);

}

//////////////////////////////////////////////////////////////


void readTouchInputs(){
  if(MPR121.touchStatusChanged()){

    MPR121.updateTouchData();

    // only make an action if we have one or fewer pins touched
    // ignore multiple touches

    if(MPR121.getNumTouches()<=1){
      for (int i=0; i < 1; i++){  // Check which electrodes were pressed
        if(MPR121.isNewTouch(i)){
            //pin i was just touched
           // Serial.print("pin ");
           // Serial.print(i);
           // Serial.println(" was just touched");
            digitalWrite(LED_BUILTIN, HIGH);

            if(MP3player.isPlaying()){
              if(lastPlayed==i){
                // if we're already playing from the requested folder, stop it
                MP3player.stopTrack();
               // Serial.println("stopping track");
              } else {
                // if we're already playing a different track, stop that
                // one and play the newly requested one
                MP3player.stopTrack();
               // Serial.println("stopping track");
                playRandomTrack(i);

                // don't forget to update lastPlayed - without it we don't
                // have a history
                lastPlayed = i;
              }
            } else {
              // if we're playing nothing, play the requested track
              // and update lastplayed
              playRandomTrack(i);
              lastPlayed = i;
            }
        } else {
          if(MPR121.isNewRelease(i)){
           // Serial.print("pin ");
            //Serial.print(i);
           // Serial.println(" is no longer being touched");
            digitalWrite(LED_BUILTIN, LOW);
          }
        }
      }
    }
  }
}

void playRandomTrack(int electrode){

  // build our directory name from the electrode
  char thisFilename[255]; // 255 is the longest possible file name size
  // start with "E00" as a placeholder
  char thisDirname[] = "E00";

  if(electrode<10){
    // if <10, replace first digit...
    thisDirname[1] = electrode + '0';
    // ...and add a null terminating character
    thisDirname[2] = 0;
  } else {
    // otherwise replace both digits and use the null
    // implicitly created in the original declaration
    thisDirname[1] = (electrode/10) + '0';
    thisDirname[2] = (electrode%10) + '0';
  }

  sd.chdir(); // set working directory back to root (in case we were anywhere else)
  if(!sd.chdir(thisDirname)){ // select our directory
    Serial.println("error selecting directory"); // error message if reqd.
  }

  size_t filenameLen;
  char* matchPtr1;
  char* matchPtr2;
  unsigned int numMP3files = 0;

  // we're going to look for and count
  // the MP3 files in our target directory
  while (file.openNext(sd.vwd(), O_READ)) {
    file.getName(thisFilename, sizeof(thisFilename));
    file.close();

    filenameLen = strlen(thisFilename);
    matchPtr1 = strstr(thisFilename, ".mp3");
    matchPtr2 = strstr(thisFilename, "._");
    // basically, if the filename ends in .MP3, we increment our MP3 count
    if(matchPtr1-thisFilename==filenameLen-4 && matchPtr2-thisFilename!=0) numMP3files++;
  }

  // generate a random number, representing the file we will play
  unsigned int chosenFile = random(numMP3files);

  // loop through files again - it's repetitive, but saves
  // the RAM we would need to save all the filenames for subsequent access
  unsigned int fileCtr = 0;

  sd.chdir(); // set working directory back to root (to reset the file crawler below)
  if(!sd.chdir(thisDirname)){ // select our directory (again)
    //Serial.println("error selecting directory"); // error message if reqd.
  }

  while (file.openNext(sd.vwd(), O_READ)) {
    file.getName(thisFilename, sizeof(thisFilename));
    file.close();

    filenameLen = strlen(thisFilename);
    matchPtr1 = strstr(thisFilename, ".mp3");
    matchPtr2 = strstr(thisFilename, "._");
    // this time, if we find an MP3 file...
    if (matchPtr1-thisFilename==filenameLen-4 && matchPtr2-thisFilename!=0) {
      // ...we check if it's the one we want, and if so play it...
      if(fileCtr==chosenFile){
        // this only works because we're in the correct directory
        // (via sd.chdir() and only because sd is shared with the MP3 player)
       // Serial.print("playing track ");
       // Serial.println(thisFilename); // should update this for long file names
        MP3player.playMP3(thisFilename);
        return;
      } else {
          // ...otherwise we increment our counter
        fileCtr++;
      }
    }
  }
}- Upload the code to the Touch Board.
Note that the code limits the LEDs used to 15. This is to limit the overall power consumption to avoid having to use a more powerful power supply or USB power bank to feed the LED strip.
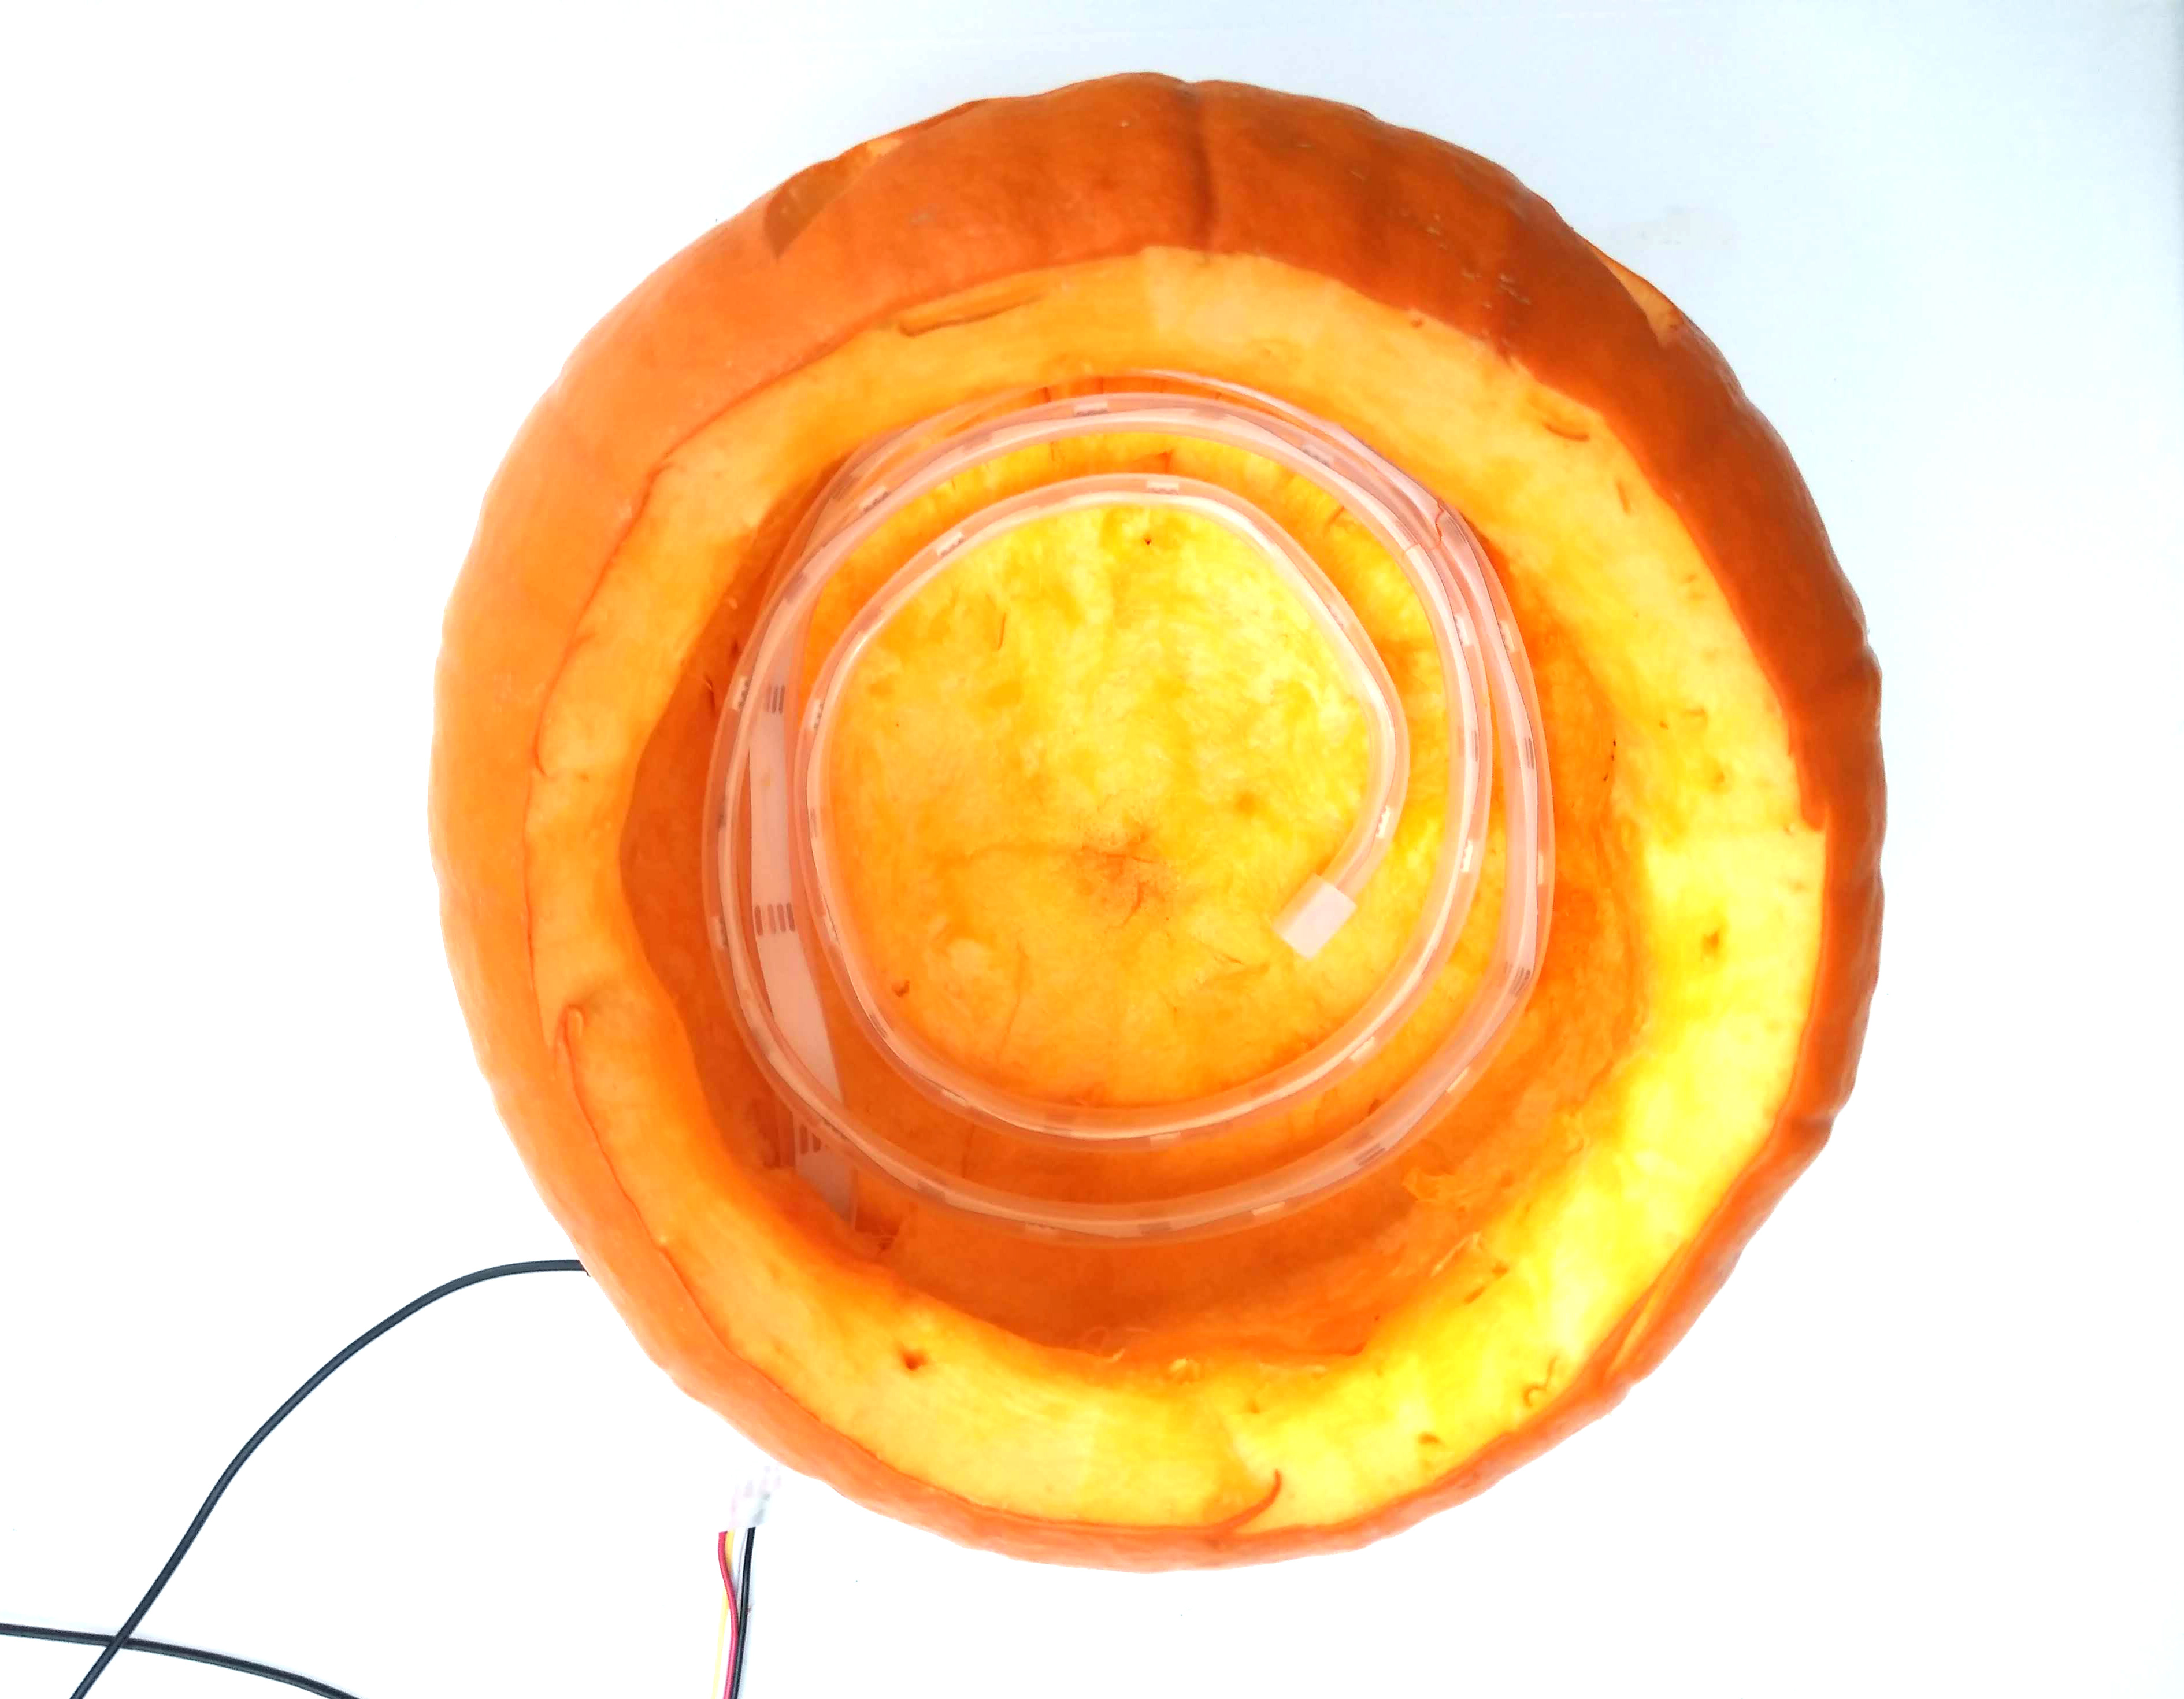
6. Carve the pumpkin
You can carve your pumpkin however you like but bear in mind that if the openings are too big you’ll be able to see the LED strip inside. You can go for a classic look or a modern take. If you need inspiration you can try this. Don’t forget to make a hole on the back to feed the LED strip.

7. Assemble the pumpkin
- Feed the LED strip through the hole on the back of the pumpkin.
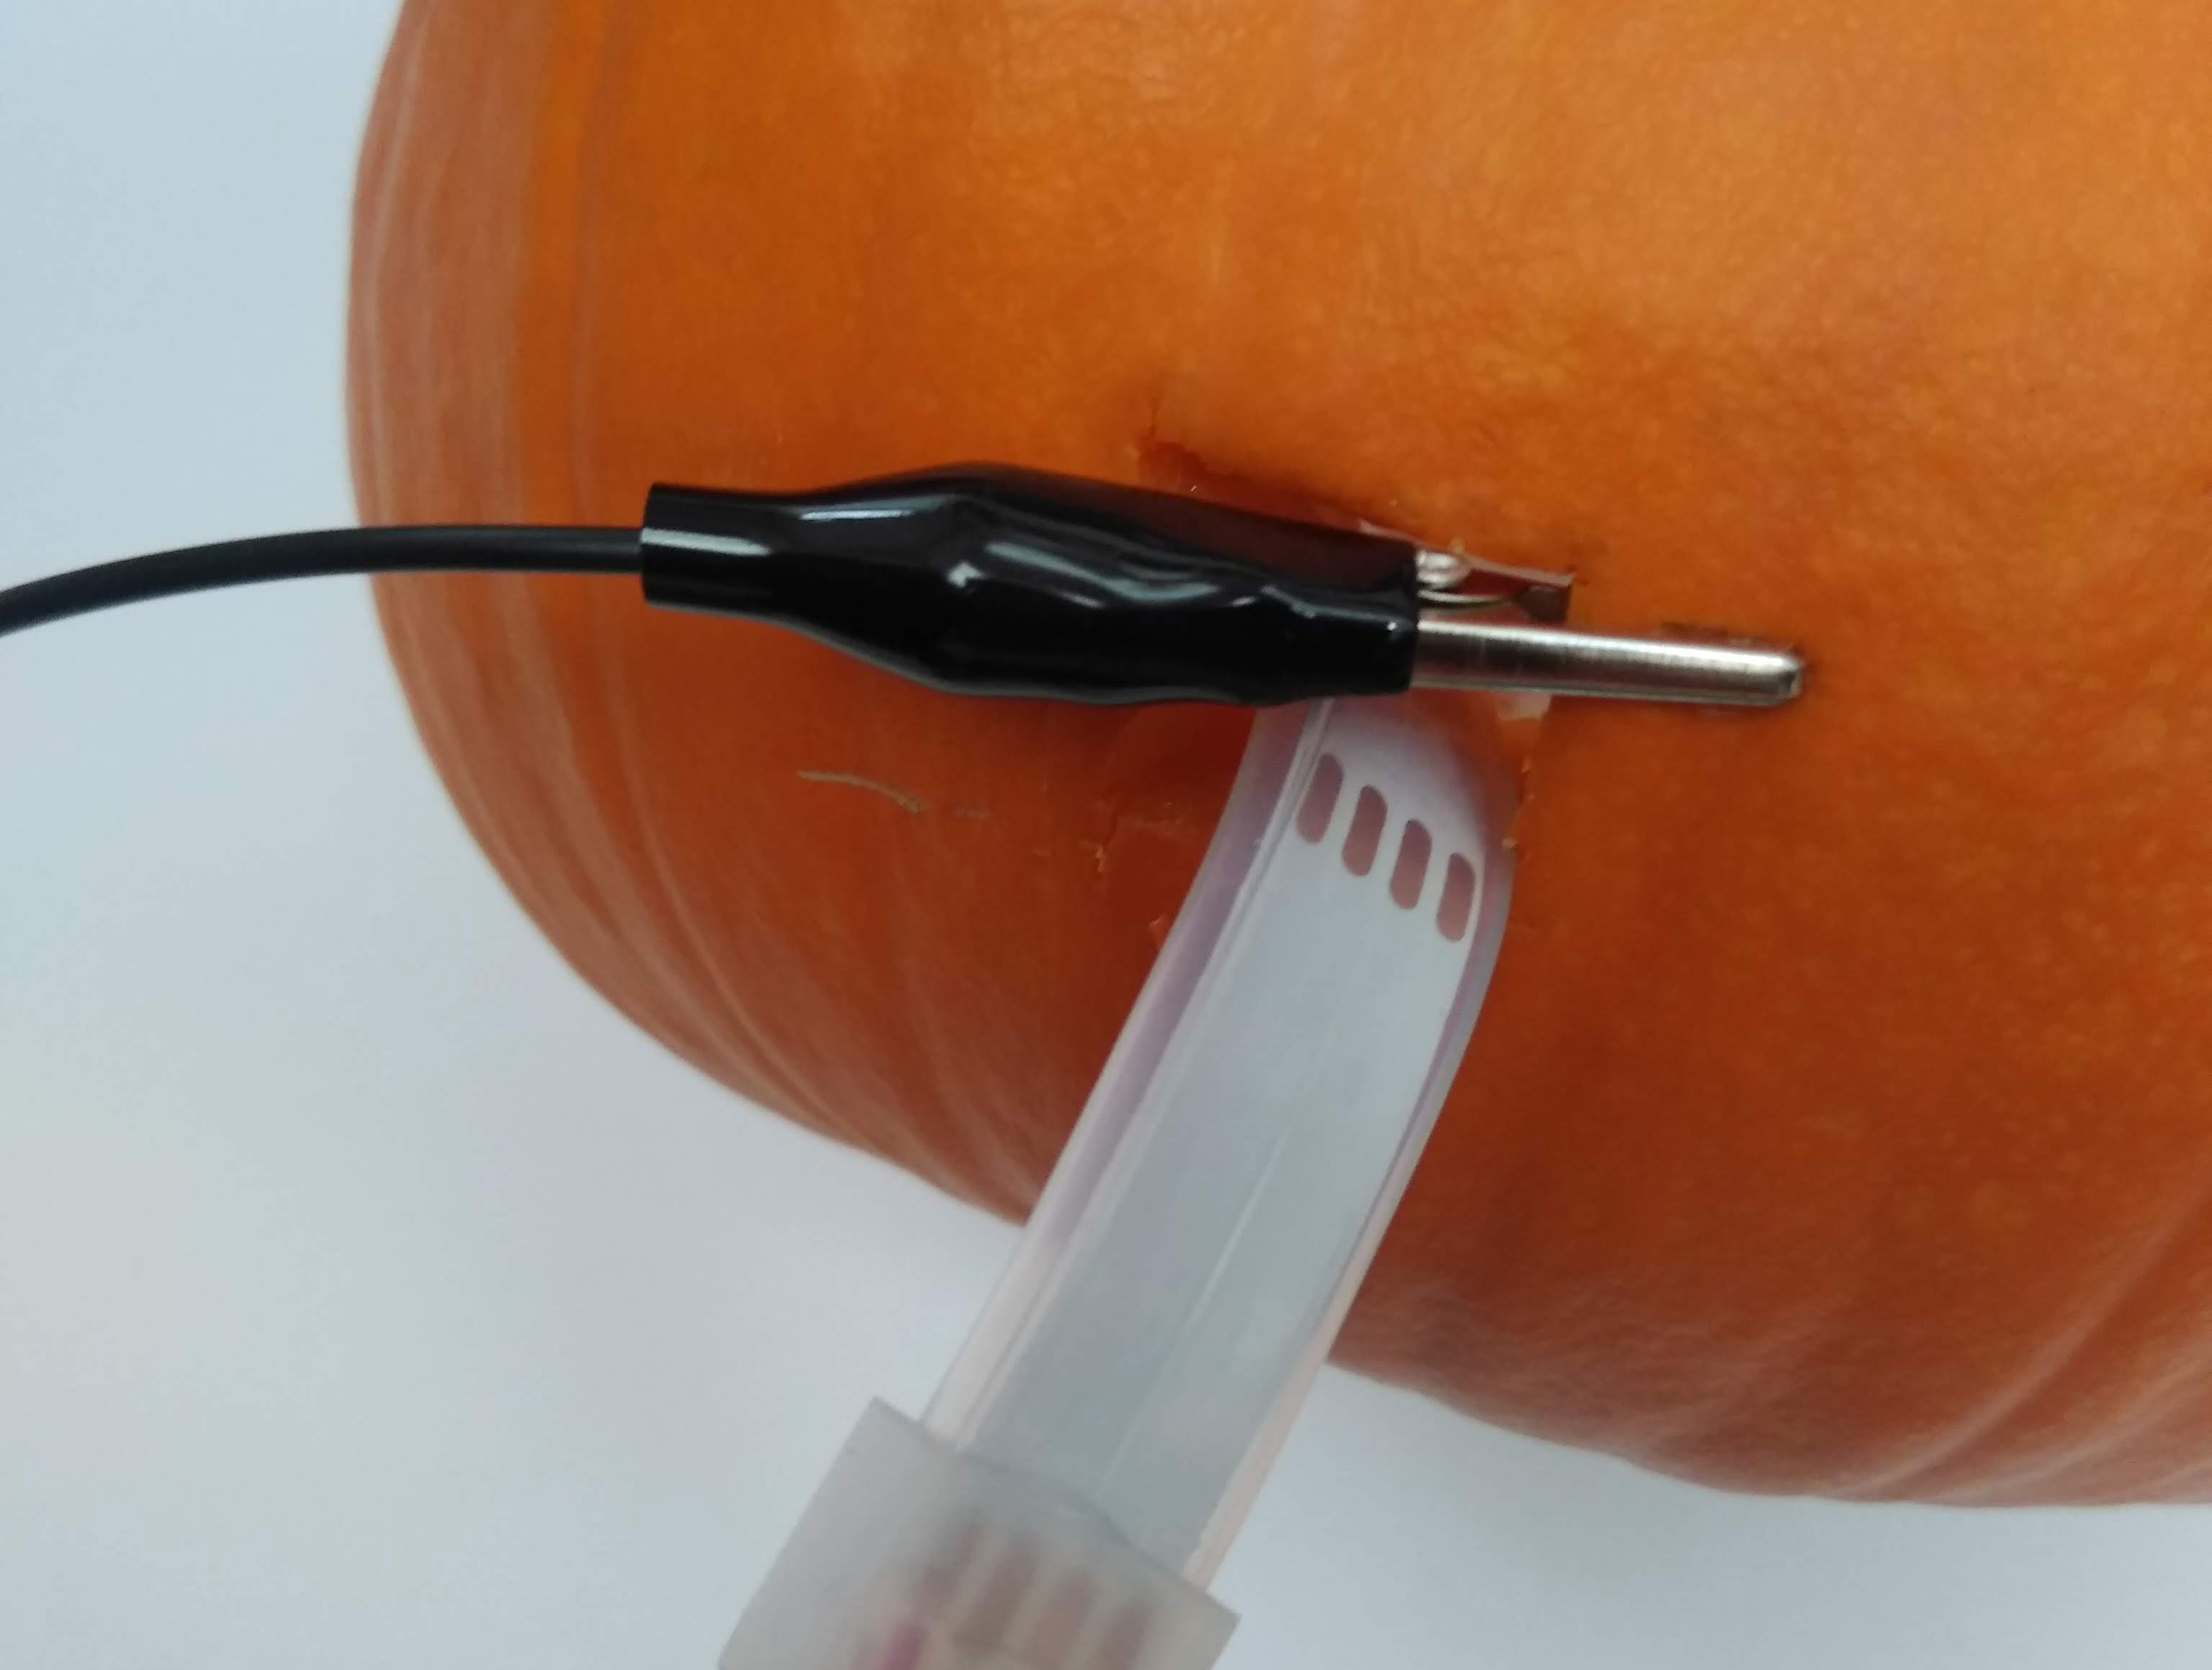
- Connect a crocodile clip to the E0 contact on the Touch Board.
- Connect the free end of the crocodile clip to the pumpkin. We used the hole at the back for this.
- Power the pumpkin.
- Press the reset button on the Touch Board.
- Arrange the LED strip inside so that the pumpkin looks its best. You can place the LED’s inside a plastic bag to diffuse their light if necessary.
- Touch the pumpkin!
You should now have an all-singing pumpkin. The code is set to act on proximity rather than touch so putting your hand near it should be enough to trigger the audio. The LEDs will react to any audio around, whether the pumpkin’s own sounds or external music.
The Touch Board’s sensitivity can be affected by nearby currents. If your pumpkin is not working as expected, make sure that the Touch Board’s electrode and the crocodile clip cable are not being affected by the speaker or other electric fields. You can see if the Touch Board is detecting touch when its red LED turns on. Remember to always press the reset button on the Touch Board after moving things around or connecting/disconnecting the crocodile clip.
Like what you read? Why not show your appreciation by giving some love.
From a quick tap to smashing that love button and show how much you enjoyed this project.

