This project will turn your Raspberry Pi 400 (or any other Raspberry Pi) into a simulation of an Enigma cryptography machine so you can send encrypted messages to your friends. It will also demonstrate how to convert text-to-speech using a synthesizer.
An estimated 100,000 Enigma machines were constructed in different versions and this project will simulate the 3 rotor type used by the German army in World War II.
Enigma machines consisted of a keyboard for typing messages to be encrypted. Each character was first passed to a plugboard where it was mapped to an alternate character before being fed through a series of rotors, each with 26 characters which produced a further transformation, before feeding it back again by a reflector. The resulting ciphertext character was lit up by a lamp on the board between the rotor and keyboard.
Operators were provided with a copy of a monthly “key sheet” which contained initial settings for the machine’s rotors and plugboard, which were changed on a daily basis. Each time a key was pressed to encode a character, the rotors moved so that the same letter was never encoded the same way twice.
The project uses a software simulator written in Python to encrypt and decrypt messages in a similar way to that used in the original machine. It will also show how to convert text-to-speech so that decoded messages can be heard through a speaker.
1. Install software
The following commands will install py-enigma which is written in Python and the text-to-speech synthesizer, speak.
- Open a Terminal window and enter:
sudo pip3 install py-enigmaThis will install py-enigma, your Pi will notify you of completion with “Succesfully installed py-enigma”
- Enter the following command to install speak:
sudo apt install espeak- Enter Y (for yes) when prompted.
You are now ready to start using your Python Enigma machine.
Excellent documentation is available – https://py-enigma.readthedocs.io/en/latest/index.html
2. Key sheet
Just like with the physical Enigma machine, a key sheet containing daily settings is required. Originally these were printed on paper and physically distributed. Our version will be contained in a file but it will hold very similar information.
The file will need a row for each day of the month containing the following codes:
Day – Integer value between 1 and 31
Rotors – 3 Roman numerals between I to V, one for each of the rotors
Ring setting – 3 random characters
Plugboard settings – 10 pairs of characters
Reflector type – character B
- Open Text Editor from Main menu > Accessories > Text Editor.
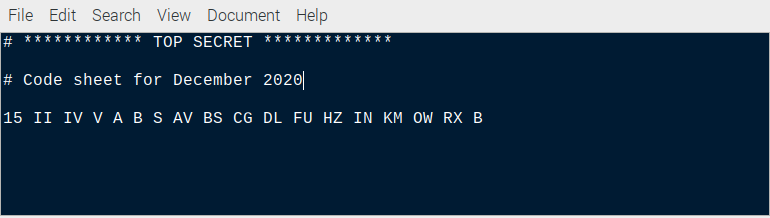
- Enter values for each day of the month. You can make up the values, here is an example for the fifteenth day of the month which is used in the simulation – separate codes with spaces:
15 II IV V A B S AV BS CG DL FU HZ IN KM OW RX B- Save the file to your Home Folder: File > Save As > keysheet.
Codes contained in the key sheet file will be read by py-enigma to set up the simulated machine for a particular day of the month.
Detailed information about the key file format can be found in the documentation: https://py-enigma.readthedocs.io/en/latest/keyfile.html
3. Encoding secret messages
To encrypt a secret message we will follow a similar procedure used by real Enigma machine operators.
Firstly they would check the key sheet for the machine settings for that particular day. They would select 3 out of a set of 5 available rotors and place them on the spindle in the order shown on the key sheet. They would set the start position of the rotors to the 3 letter ring settings.
The 10 character pairs on the key sheet would then be configured on the plugboard by connecting pairs of letters together using cables. The simulation does all of this by reading a row from the keysheet file according to the day of the month.
Once the Enigma machine was set up, the operator would make up a random 3 letter starting sequence and a 3 letter key.
The rotors would be set to the starting sequence then the key would be typed in to encode it. The result was noted for use later.
This is how it is done in the simulation:
- Open Terminal.
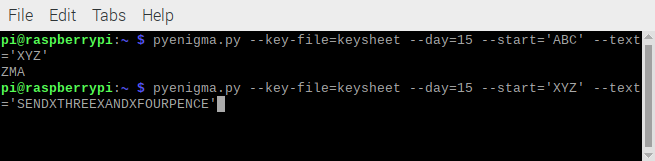
- Enter the following command:
pyenigma.py --key-file=keysheet --day=15 --start='ABC' --text='XYZ'- The encoded key is returned:
ZMAHaving obtained the encoded key, the operator would set the rotors back to match the unencrypted key. Now the message could be typed in to encrypt it.
- This is simulated using the following command in Terminal. The spaces are replaced with the letter X.
pyenigma.py --key-file=keysheet --day=15 --start='XYZ' --text='SENDXTHREEXANDXFOURPENCE'- The encrypted message is returned:
RZJULYOPHSFFWRCEFGCMWOIZThe message was then sent via morse code. It contained the transmitting station, receiving station, date, time, rotor starting position and encrypted message key along with the encrypted message itself.
4. Decoding secrets
The decryption procedure is similar to encryption but in reverse.
Enigma operators would find the settings for the day in the key sheet and the machine would be configured accordingly. The rotors would then be set to the 3 letter starting position obtained from the message. They would then type in the encrypted key sent in the message to decrypt it.
- This is done in Terminal with the following:
pyenigma.py --key-file=keysheet --day=15 --start='ABC' --text='ZMA'- The unencrypted key is returned.
-
XYZ
Now the rotors are re-set to the 3 letter unencrypted key and the message decrypted.
- This is done with the following command in the simulator:
pyenigma.py --key-file=keysheet --day=15 --start='XYZ' --text='RZJULYOPHSFFWRCEFGCMWOIZ'- The original message is returned with spaces replaced by X.
SENDXTHREEXANDXFOURPENCE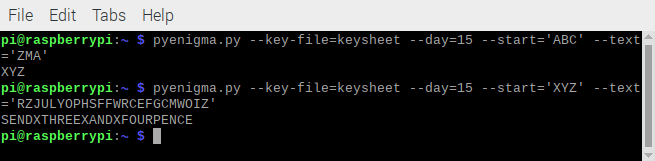
5. Encode & text-to-speech
In this final section, we will chain together a series of Linux bash commands to process an encrypted message, decrypt it and pass it through a text-to-speech synthesizer so we can hear the result through speakers.
- Open Text Editor from Main menu > Accessories > Text Editor.
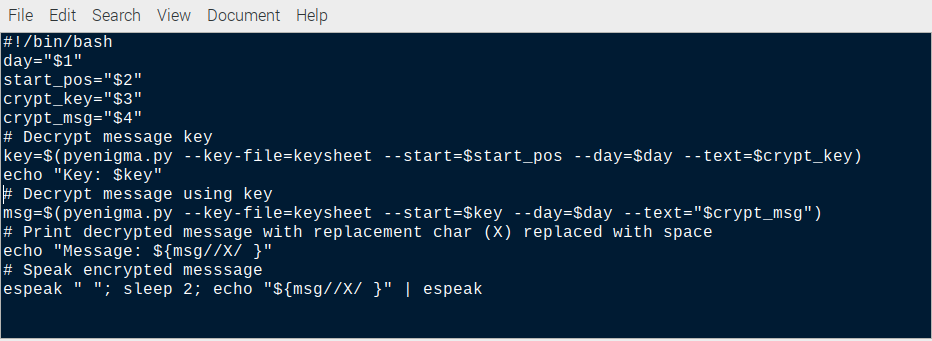
- Enter the following code:
#!/bin/bash
day="$1"
start_pos="$2"
crypt_key="$3"
crypt_msg="$4"
# Decrypt message key
key=$(pyenigma.py --key-file=keysheet --start=$start_pos --day=$day --text=$crypt_key)
echo "Key: $key"
# Decrypt message using key
msg=$(pyenigma.py --key-file=keysheet --start=$key --day=$day --text="$crypt_msg")
# Print decrypted message with replacement char (X) replaced with space
echo "Message: ${msg//X/ }"
# Speak encrypted messsage
espeak " "; sleep 2; echo "${msg//X/ }" | espeak- Save the file: File > Save As> decode
Now we can easily decrypt the same message from step 3 and hear it spoken by the espeak synthesizer:
- Open Terminal.
- Enter the following command:
- Make decode executable
chmod +x decode- Execute the script with day, start setting, encrypted key and message parameters.
./decode 15 ABC ZMA RZJULYOPHSFFWRCEFGCMWOIZThe response is shown below and you should hear it spoken by espeak.
Key: XYZ
Message: SEND THREE AND FOURPENCE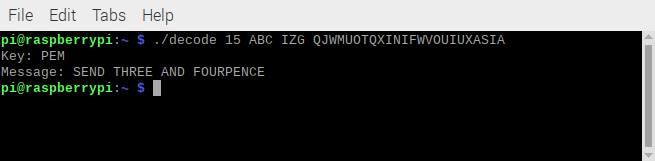
Summary
Now your Raspberry Pi is set up to encrypt secret messages which you can send to other people. Providing they have a copy of your key sheet and they set up their simulated machine accordingly, they will be able to decrypt your messages and send encrypted messages back.
As a bonus, you should also now be able to convert text-to-speech as well.
To understand how the Python code was written to simulate the Enigma machine, you can view the source code files in:
/usr/local/lib/python3.7/dist-packages/enigma
Enigma machines and their history are well documented on-line and several original examples have survived and are on display in museums in the UK, Europe and the United States.
A good place to start is with the references in the py-enigma documentation:
https://py-enigma.readthedocs.io/en/latest/overview.html
Happy encrypting!
Like what you read? Why not show your appreciation by giving some love.
From a quick tap to smashing that love button and show how much you enjoyed this project.

