Get the weather, news and even commute times all while grooming in the morning with the aid of a Raspberry Pi and the official Raspberry Pi touch screen.
You will use Magic Mirror, an open-source application. MagicMirror is an information dashboard app written in Node.js. You can customise the data and look with standard web technologies like Javascript and CSS. MagicMirror comes with a set of built-in modules for things like the weather, calendars and news but also has a large community of third party modules for things like tracking your commute or integration with smart home devices like Amazon Alexa. With a little JavaScript knowledge, you can even write your own modules.
1. Install Raspbian
You should start with a Raspberry Pi running the latest Raspbian.
- Download and unzip Raspbian from here. Depending on what you plan to do with your Pi besides this project, you can choose between Lite, with Desktop or with recommended software. If you’re a newbie we recommend one of the versions with desktop. If you’ll only want to use the Pi for Magic Mirror, the desktop only version will be enough.
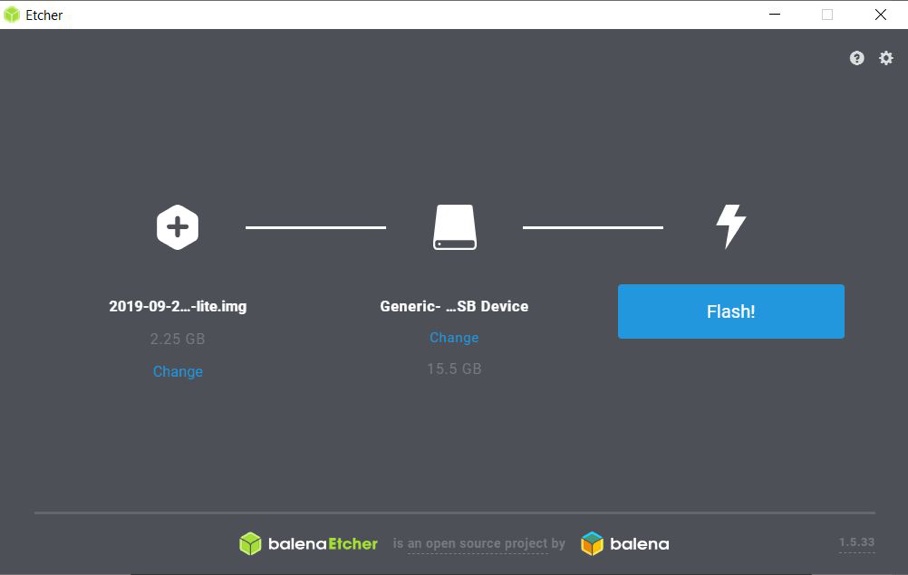
- Flash the Raspbian image to the SD card using Etcher: https://www.balena.io/etcher/
- In Etcher, select your Raspbian download, select the micro SD card and click Flash!
- Safely eject your flashed SD card
This will erase all data on the SD card. Take care to select the correct destination for the install, Etcher usually detects the SD card by default but check to make sure. Cancel any requests to format the drive on Windows.
2. Set up the Raspberry Pi & touchscreen
- Follow steps 2-3 that you can find here to set up your screen.
The steps on the link are for Raspberry Pi 4 but are the same for Raspberry Pi 3.
3. Configure Your Pi
- Insert your freshly flashed micro SD card into your Pi, connect a USB keyboard to it and start it up.
- Go through the on-screen setup prompts.
- Reboot your Pi.
- Open a Terminal window and enter:
sudo apt-get install xscreensaver
This will install screensaver, which we’ll need to stop the Pi from going to sleep.
- Reboot your Pi.
- Go to Preferences>Screensaver>Display Mode>Mode and select Disable Screen Saver.
Yes, this is counter-intuitive, but that’s the way to prevent a sleeping pi.
- Now you’ll need to find your Pi’s IP address. Open a Terminal window and enter:
ifconfig- In the text block that will appear, find the IP address. It will be next to inet addr and it will look something like 192.168.X.X. Make a note of it.
- Go to Preferences > Raspberry Pi > Configuration > Interfaces and enable SSH. We’ll need this to be able to access the Pi from another computer. This is necessary because once it sits behind a mirror hanging on a wall, it won’t be very accessible!
- Reboot your Pi.
4. Install Magic Mirror
For the next steps, we will connect to the Pi from our host computer.
- Open a Terminal window (Mac) or Command Prompt (Windows)and enter the following making sure you replace the text with the IP address that you noted earlier.:
ssh pi@YOUR-PIs-IP-ADDRESS- When prompted enter the Pi’s password which is raspberry by default but you should’ve changed it already in the setup process.
- Download and install the latest Node.js version by entering the following commands:
curl -sL https://deb.nodesource.com/setup_10.x | sudo -E bash -sudo apt install -y nodejs
- Clone the Magic Mirror repository by entering:
git clone https://github.com/MichMich/MagicMirror
- Enter the Magic Mirror repository:
cd MagicMirror/
- Install Magic Mirror:
npm installThe installation step for npm install will take a long time, often with no terminal activity. Do not interrupt the task or you risk getting a corrupted Pi.
- Make a copy of the config sample file:
cp config/config.js.sample config/config.js- Start the application:
npm run start
5. Configure Magic Mirror
- To start Magic Mirror when the Pi boots up run the following command from your host computer:
sudo npm install -g pm2This will install PM2 which is a node.js application which allows you to keep applications running constantly and to automatically reload them amongst other things.
- To start PM2 on boot enter the following:
pm2 startup- You’ll be prompted with instructions inside Terminal to copy/paste commands and follow them.
- Enter the following to create a script that will use PM2 with Magic Mirror:
cd ~
nano mm.sh
You’ll now be presented with a script window inside Terminal.
- Add the following in the script window:
cd ~/MagicMirror
DISPLAY=:0 npm start- Close the script by pressing CTRL X followed by Y when prompted to save and then Return.
- Test that the script is executable by entering the following:
chmod +x mm.shAfter a short while, you should get confirmation that the script is executable.
- Start Magic Mirror by entering:
pm2 start mm.sh
- Enter the following to save the current state of all the scripts running via PM2:
pm2 save
If you want to change the orientation of your Magic Mirror, you can follow the following steps which are optional:
- Enter:
sudo nano /boot/config.txt- Anywhere in config.txt add the following:
# Rotate display vertically
display_rotate=1- Save the changes using CTRL X and enter Y after the saving prompt
- Reboot your Pi, you can do so by using:
sudo rebootThis is the basic setup completed. You should now have a remotely accessible Pi which automatically boots into Magic Mirror displaying the default modules and doesn’t sleep.
Now you’ll need to customise the modules displayed. There are unlimited possibilities regarding this so the next steps are just an introduction. You’ll find a list of resources for further customisation at the end of this step.
- Open a Terminal window (Mac) or Command Prompt (Windows) and without being logged in to your Pi through SSH, enter the following command ensuring that you have your Pi’s IP address in there and that you have that last full stop.
scp pi@YOUR PI's IP ADDRESS:MagicMirror/config/config.js .- Open the file using a code or plain text editor. You’ll find the file in your host computer’s current directory, to find out where that is you can enter:
pwdand the path to it will be displayed.
Config.js is a javascript file which contains all of Magic Mirror’s configurations. If you know Javascript you can edit it to your heart’s content but don’t despair if you don’t, it’s simple enough to do some basic tweaking.
- Make a copy of config.js, you’ll use this as a backup in case you mess anything up.
- Scroll to the part of the file with the heading modules.
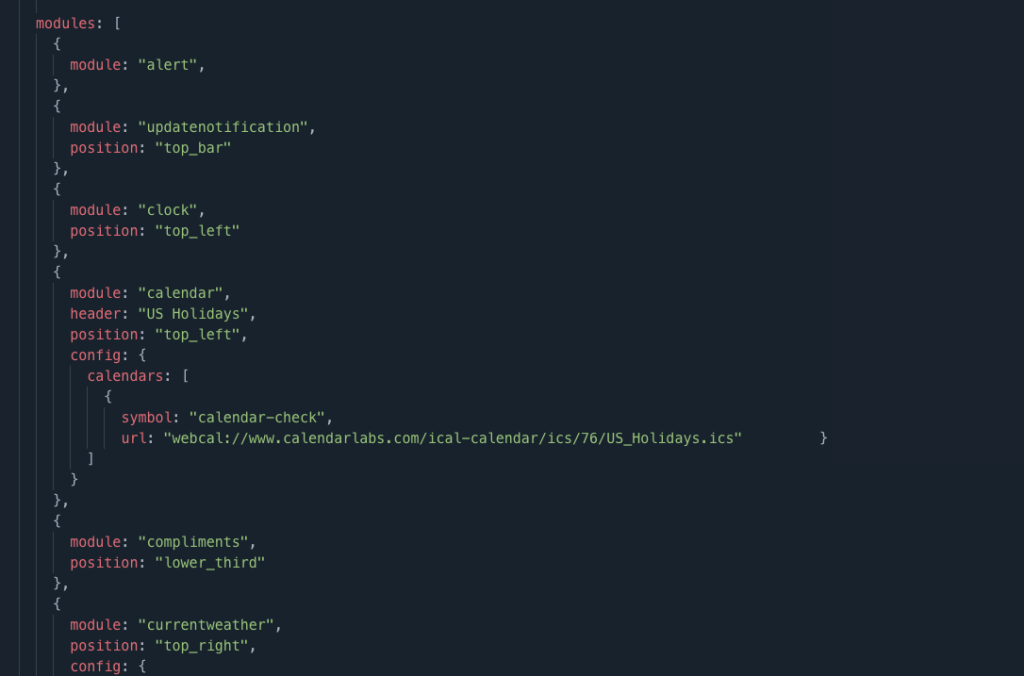
- module is the name of each module, you can change them to incorporate different ones, or you can delete them. To do that ensure that you delete the blocks from curly bracket to curly bracket including the coma at the end.
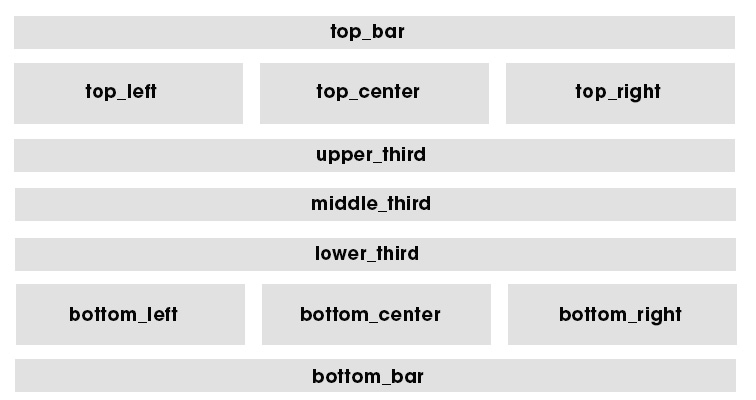
- position dictates where on screen the modules are placed. In the diagram below you can see a map of the positions for your reference.
- config refers to the configuration of each module. The most basic edit you can do here is to change the URL’s for your preferred services which have RSS. For instance, you could swap webcal://www.calendarlabs.com/ical-calendar/ics/76/US_Holidays.ics for webcal://www.officeholidays.com/ics/united-kingdom/england
- Once you’ve finished editing, save your file.
- Upload the file to your Pi by using the following command replacing [Path of File To Copy to Pi] and[IP Address of Raspberry Pi] with the relevant information. Remember that this is done while NOT connected through SSH!
scp [Path of File To Copy to Pi]@ [IP Address of Raspberry Pi]:MagicMirror/config/config.js .
Additional configurations
For information on configuring the default modules, you can check out the documentation here.
You can also use a number of 3rd party modules that allow for all kinds of integrations, including Alexa, and Google Maps, as well as for adding hardware like PIR sensors.
6. Controlling your Magic Mirror remotely
To control your Magic Mirror you’ll need to connect to it as described above using
ssh pi@YOUR-PIs-IP-ADDRESSfrom your host computer. Then you can use the following commands for different tasks.
Restarting your MagicMirror
pm2 restart mmStopping your MagicMirror
pm2 stop mmShow the MagicMirror logs
pm2 logs mmShow the MagicMirror process information
pm2 show mm7. Assembling the frame
- Apply the mirror film
To make my mirror I used a roll of window mirror film but you can also use two-way mirrored acrylic, this will make a better mirror and is easier to install but will be more expensive.
- Cut the paper backing
Unless your screen covers the entire mirror area you will want to place a piece of black paper directly behind the acrylic. This will disappear behind the mirror. You will need a cut hole the size of the display. I made mine opening a little smaller than the screen so as to hide any edges.
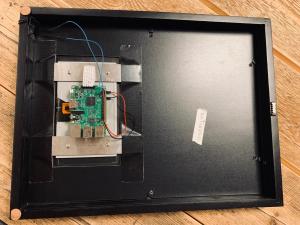
- Cut the frame back and install the screen
My frame came with a pressboard back. I used a drill and small hand saw to cut out a hole exactly the width and height of the Raspberry Pi Touchscreen. I wanted a snug fit so the screen can’t move around at all.
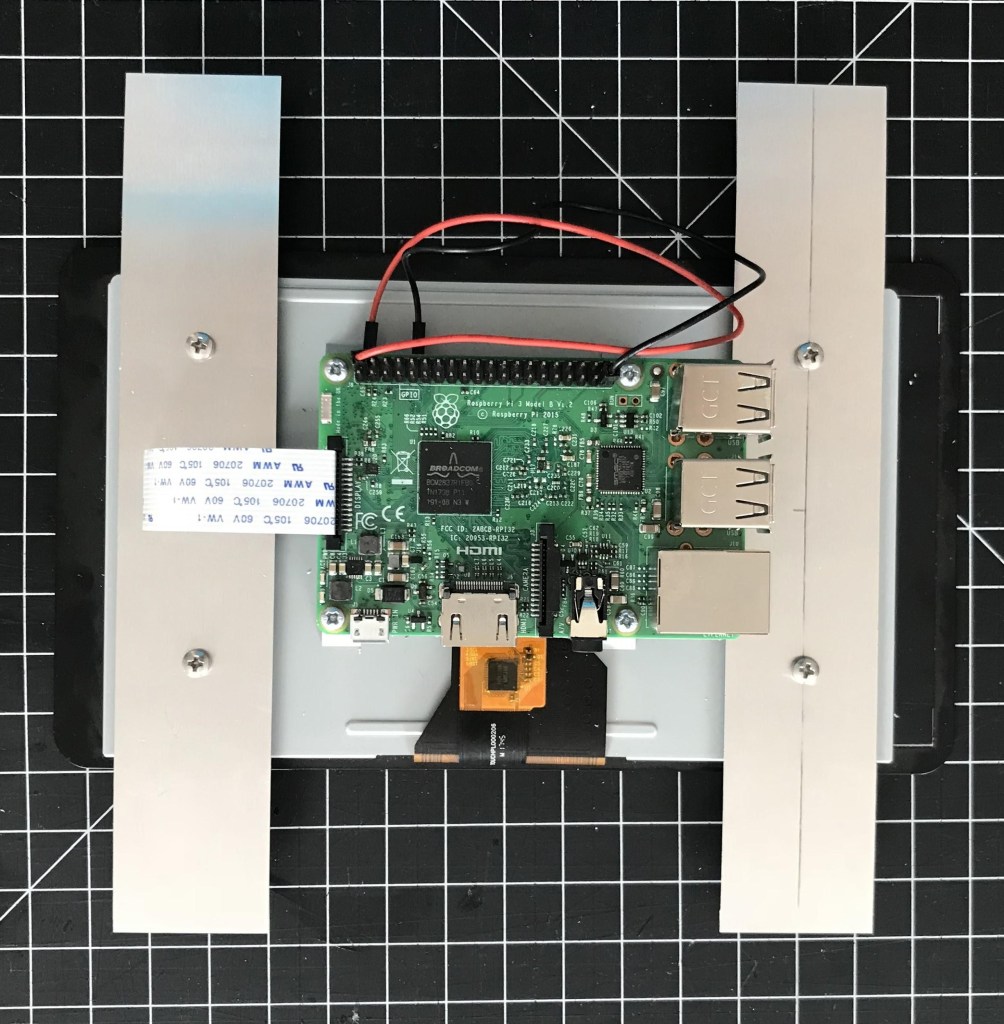
To install the touchscreen. I cut two pieces of aluminium flashing about 5 to 10cm longer than the screen height. I then marked and drilled holes in the flashing the same distance as the mounting holes on the back of the touchscreen. I then used the mounting screws to attach the flashing to the touchscreen. Then I placed the screen in the whole and used duct tape to attach the flashing to the frame back.
Using the aluminium flashing created a snugged yet flexible fit holding the screen against the acrylic. It also lets me unscrew the touchscreen from the frame without removing the duct tape if I need to.
8. Finishing Up
After installing it behind the glass you may need to adjust the brightness of the screen.
- Login to your Pi using SSH and then enter the following command replacing [VALUE] with a number between 0 (darkest) and 255 (brightest) :
sudo bash -c "echo [VALUE] > /sys/class/backlight/rpi_backlight/brightness"- Just unplugging a Raspberry Pi without shutting it down can harm the SD image so remember to shut it down using the Terminal commands listed earlier.
Magic Mirror is a big well-documented project, with an active user base, you can join the community and find answers, updates and suggestions here.
***
Have you enjoyed creating this project? If you’re now ready to jump onto the next one, visit our Project Hub for more exciting projects to try. Also, discover our Raspberry Pi shop for more amazing products for your next projects.
Like what you read? Why not show your appreciation by giving some love.
From a quick tap to smashing that love button and show how much you enjoyed this project.

