Node-RED is an open-source flow-based programming tool designed for wiring together hardware devices, APIs, and online services. It provides a visual programming interface that allows users to create and deploy event-driven applications easily. In Linux, Node-RED is a popular choice for IoT (Internet of Things) projects, automation, and rapid prototyping.
With Node-RED, users can create flows by connecting pre-built nodes together using a web-based editor. Each node represents a specific functionality or service, and flows represent the connections and data transformations between them. The visual nature of Node-RED makes it accessible to both experienced developers and those new to programming.
Node-RED offers a vast ecosystem of contributed nodes that extend its functionality, making it highly customizable and adaptable to various use cases. These nodes enable integration with databases, cloud services, hardware devices, messaging protocols, and more.
Running on Linux, Node-RED can be easily installed using package managers like apt or npm, and it runs on a wide range of Linux distributions. It provides a flexible and extensible platform for building IoT applications, automation workflows, and data processing pipelines in Linux environments.
Author: Pradeep Nandigama, Software Developer, OKdo
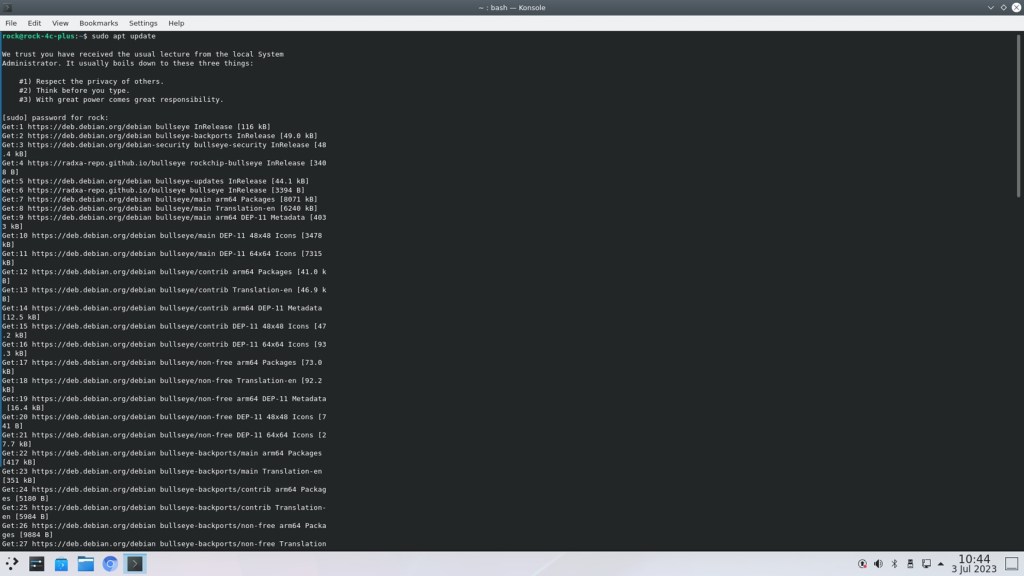
Step 1: Update package lists or repositories
Open a terminal and type the command below, enter password for sudo, if asked:
sudo apt updateThe command “sudo apt update” is used in Linux systems, particularly those using Debian-based distributions like Ubuntu, to update the package lists or repositories.
Here’s a breakdown of the command:
- “sudo”: It stands for “Super User Do” and is used to run a command with administrative privileges or as the “root” user. It allows you to execute commands that require elevated permissions.
- “apt”: It refers to the Advanced Package Tool, which is a package management system used in Debian-based Linux distributions. It provides a command-line interface for managing software packages, including installation, removal, and updating.
- “update”: It is an apt command used to update the package lists or repositories on your system. When you run “sudo apt update,” it retrieves the latest information about available packages from the software repositories configured on your system.
The process of running “sudo apt update” involves the following steps:
- Authentication: Since the command is executed with administrative privileges, you might be prompted to enter your password. This is to ensure that only authorized users can perform system-level operations.
- Package List Update: Once authenticated, the command connects to the configured software repositories and retrieves updated information about available packages. It checks for changes in the package lists and updates the local cache accordingly.
- Repository Synchronization: The command synchronizes the local package lists with the repositories, ensuring that your system has the latest information about package versions, dependencies, and security updates.
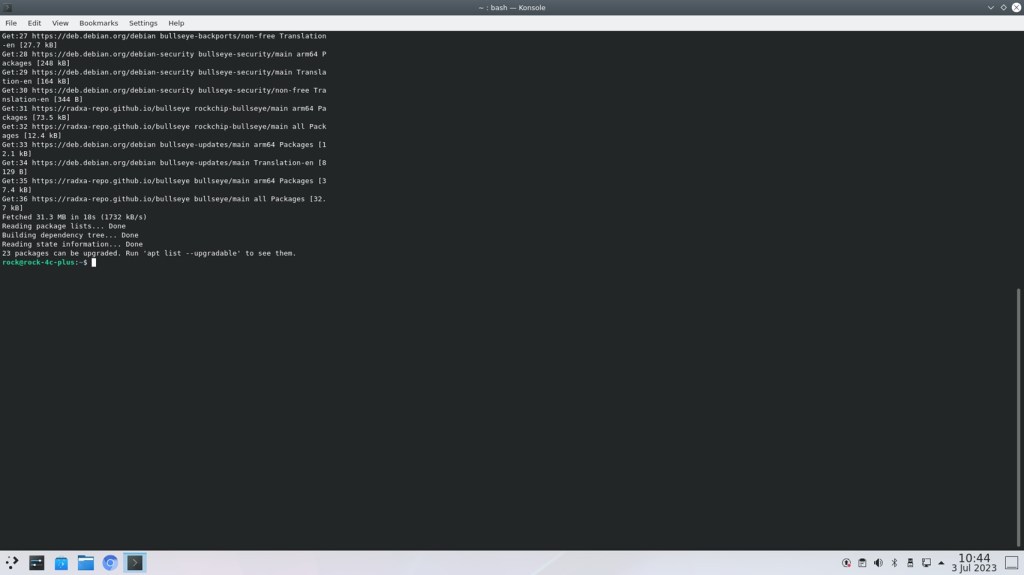
After running “sudo apt update,” you will see the output showing the progress of the update process, including the repositories being accessed and the packages being refreshed. Once completed, your package management system will be up to date and ready for package installation or upgrade using commands like “sudo apt install” or “sudo apt upgrade.”
It is a good practice to run “sudo apt update” regularly to keep your system updated with the latest software packages, security patches, and bug fixes provided by the distribution’s package maintainers.
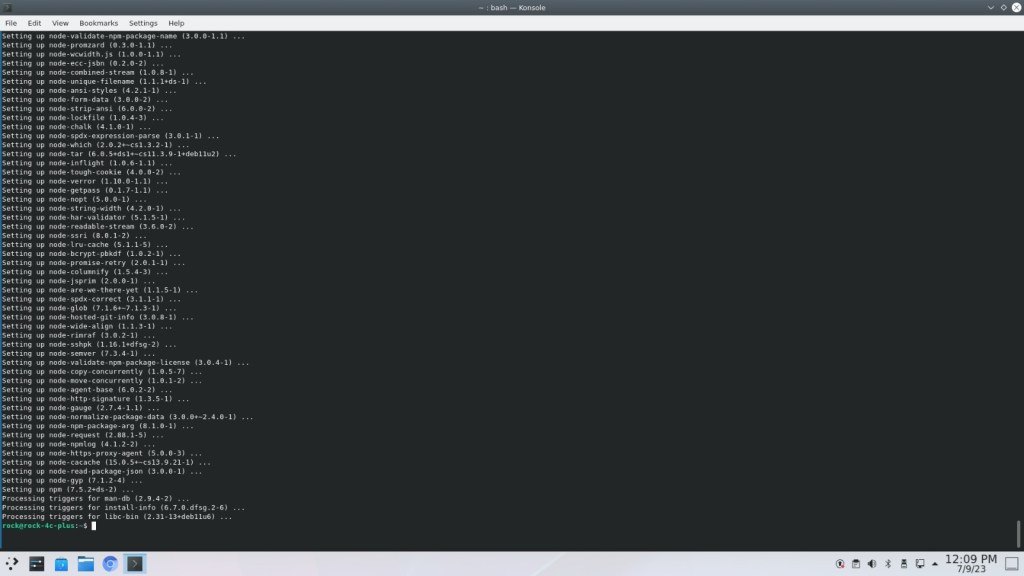
Step 2: Install npm
Open a terminal and type the command below, enter password for sudo, if asked:
sudo apt install npm -yThe command “sudo apt install npm -y” is used in Linux systems, particularly those using Debian-based distributions like Ubuntu, to install the npm (Node Package Manager) tool.
Here’s a breakdown of the command:
- “sudo”: It stands for “Super User Do” and is used to run a command with administrative privileges or as the “root” user. It allows you to execute commands that require elevated permissions.
- “apt”: It refers to the Advanced Package Tool, which is a package management system used in Debian-based Linux distributions. It provides a command-line interface for managing software packages, including installation, removal, and updating.
- “install”: It is an apt command used to install software packages on your system.
- “npm”: It is the name of the package that you want to install. In this case, “npm” refers to the Node Package Manager, which is a command-line tool that comes bundled with Node.js. npm is used to install, manage, and update Node.js packages and libraries.
- “-y”: It is an option used with the “apt install” command to automatically answer “yes” to any prompts or confirmation messages that may appear during the installation process. This flag enables unattended installations, allowing the command to run without user intervention.
When you run the command “sudo apt install npm -y”, it installs the npm tool on your system. The package manager retrieves the necessary files from the software repositories, resolves dependencies, and handles the installation process.
After the installation is complete, you can use npm to install and manage various Node.js packages and libraries, which are essential for developing JavaScript-based applications, server-side scripts, or building tools and utilities.
By including the “-y” flag, the command ensures that the installation proceeds without requiring manual confirmation for each step, allowing for automated installation scripts or unattended installations.
Installing npm using the “sudo apt install npm -y” command is a common approach on Debian-based Linux systems, as it provides a straightforward way to set up npm and start working with Node.js packages.
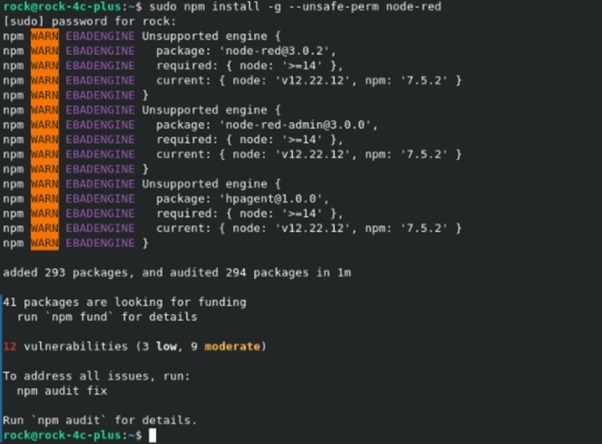
Step 3: Install node-red
Enter the command as shown below:
sudo npm install -g --unsafe-perm node-redThe command “npm install -g –unsafe-perm node-red ” is used to install Node-RED, which is a flow-based programming tool and runtime for wiring together hardware devices, APIs, and online services.
Let’s break down the command ‘sudo npm install -g –unsafe-perm node-red’:
- sudo: It stands for “Super User Do” and is used to run a command with administrative privileges or as the “root” user. It allows you to execute commands that require elevated permissions. In this case, it is used to install Node-RED globally, which typically requires administrative privileges.
- npm: It stands for Node Package Manager, which is a command-line tool that comes bundled with Node.js. npm is used to install, manage, and update packages and dependencies for Node.js-based applications.
- install: It is an npm command used to install packages or dependencies for a Node.js project. In this case, it is used to install the Node-RED package.
- -g (or –global): It is an npm flag that specifies that the package should be installed globally rather than locally. Installing a package globally makes it available to all projects on your system.
- –unsafe-perm: It is an npm flag that allows installation to proceed even if the user running the command doesn’t have sufficient permissions. This flag is used to bypass any permission-related issues that may occur during installation.
- node-red: It is the name of the package that you want to install. In this case, it refers to the Node-RED package, which provides the Node-RED runtime and associated libraries.
When you run the command ‘sudo npm install -g –unsafe-perm node-red’, it installs the Node-RED package globally on your system. The npm tool retrieves the necessary files from the npm registry, resolves dependencies, and handles the installation process.
Installing Node-RED globally allows you to run the ‘node-red’ command from any directory in the terminal, making it easier to access and use Node-RED for creating flows and building applications.
Note: The use of the –unsafe-perm flag is sometimes necessary when installing global npm packages with sudo on certain systems, as it ensures that the installation process doesn’t encounter permission-related errors. However, it is recommended to exercise caution and only use –unsafe-perm if needed, as it bypasses some security measures.
Step 4: Run node-red backend
Open terminal window and type the following command:
node-red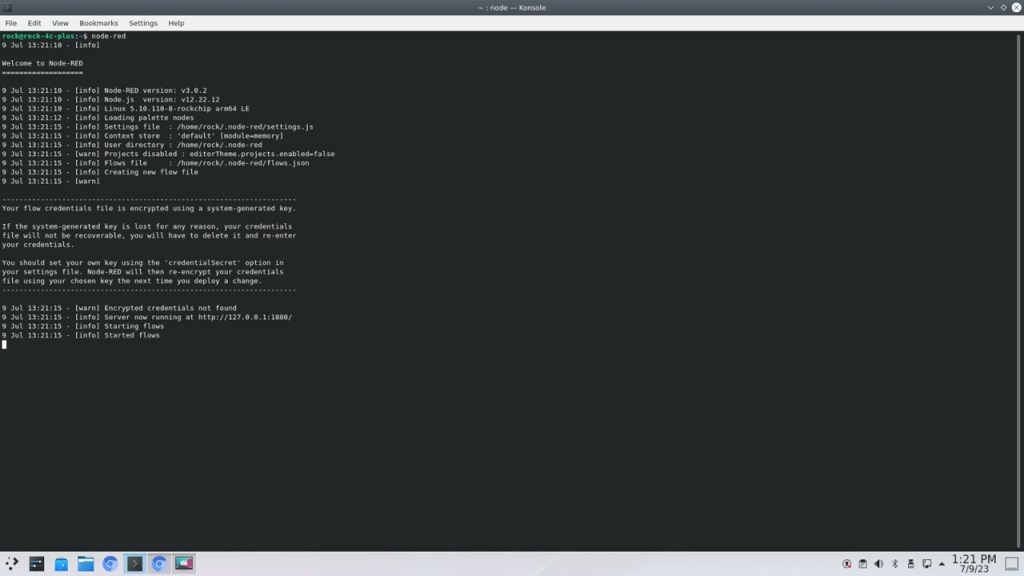
Step 5: Run node-red client – No ROCK GPIO support by default
Open chromium browser and type
http://127.0.0.1:1880/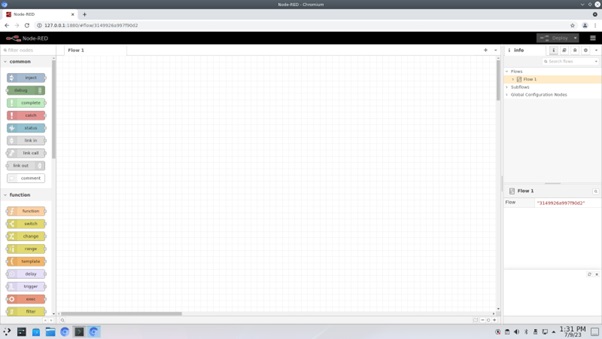
Node red provides a visual programming environment for creating and managing flows, connecting nodes, and configuring their behavior.
Here are some key aspects of the Node-RED frontend:
- Flow Editor: The core component of the frontend is the flow editor, where users can create, modify, and deploy flows. It provides a canvas where nodes representing different functionalities can be added, connected, and configured using a drag-and-drop interface. Users can visually design the flow of data and control the behavior of their applications.
- Node Palette: The node palette is a sidebar in the frontend that contains a wide range of pre-built nodes representing various functionalities, such as input sources, data processing, and output destinations. Users can search for specific nodes, drag them onto the canvas, and configure their properties.
- Flow Configuration: Users can configure the properties of each node in the flow, such as input/output settings, data transformations, and behavior. Configuration options can be accessed by selecting a node on the canvas and adjusting its settings through a user-friendly interface.
- Debugging and Logging: The frontend provides debugging capabilities, allowing users to monitor the flow, inspect messages, and track the execution of nodes. Users can set breakpoints, view debug messages, and inspect the values of variables during runtime. Additionally, logging messages can be displayed to provide real-time feedback on the flow’s execution.
- User Interface Customization: Node-RED allows users to customize the appearance and behavior of the frontend. Users can choose from different themes, adjust the layout, and add custom CSS styles to personalize their development environment.
- Dashboard and UI Nodes: Node-RED frontend also supports the creation of dashboards and user interfaces. There are specific nodes available to build interactive web-based dashboards, allowing users to create custom user interfaces to monitor and control their applications.
The Node-RED frontend provides an intuitive and visual interface for creating flows, configuring nodes, and managing the behavior of applications. Its user-friendly design makes it accessible to both beginners and experienced developers, enabling rapid prototyping, automation, and integration of various services and devices
Step 6: Install libmraa for GPIO control
Please follow the instructions in our guide on how to install MRAA library on ROCK.
Step 7: GPIO without sudo – Create group gpio
Use ‘groupadd’ command to create a group called ‘gpio’
Use ‘groupadd’ command to create a group called ‘gpio’Step 8: Support GPIO without sudo – Edit the udev rules file
- Open a terminal window and enter the following command to edit the udev rules file:
sudo nano /etc/udev/rules.d/10-gpio-permissions.rules- Add the following line to the file to grant permissions to the GPIO pins:
SUBSYSTEM=="gpio", PROGRAM="/bin/sh -c '
    chown -R root:gpio /sys/class/gpio && chmod -R 770 /sys/class/gpio;
    chown -R root:gpio /sys/devices/platform/soc/*.gpio/gpio && chmod -R 770 /sys/devices/platform/soc/*.gpio/gpio;
    chown -R root:gpio /sys$devpath && chmod -R 770 /sys$devpath
'"
Press ‘ctrl+o’ and ‘ctrl+x’ to save.
- Restart the udev service using the following command
sudo service udev restart- Make sure that the user running the Python script is a member of the gpio group. You can add the user to the gpio group using the following command:
sudo usermod -aG gpio <username>Replace <username> with the actual username of the user running the script. In ROCK boards, it will be either ‘rock’ or ‘radxa’ by default.
Log out and log back in to apply the group membership changes.
After following these steps, you should be able to run the Python code that uses libmraa without requiring sudo privileges. The user running the script will have the necessary permissions to access the GPIO pins.
Step 9: GPIO Mapping
ROCK 4 series has a 40-pin expansion header. Each pin is distinguished by color. For ROCK 4C+, the following pin-out is applicable for version 1.2 and later.
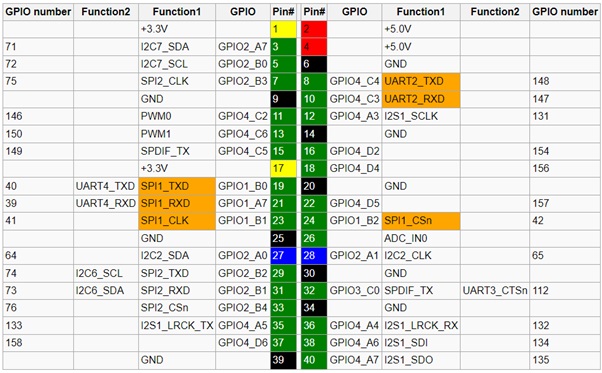
Notes about 40-pin Header
- Function marked with color orange is the default function of this pin.
- Except Pins for power supply, all pins are routed directly to SoC RK3399.
- For pin 3, 5, 27, 28, 29 and 31, each pin is connected to the 3.0V supply through a 4.7K pull-up resistor.
- Pin 7 is routed directly to the pin of MIPI CSI on board.
SPI
- Pin 19, 21, 23, 24 also route to the pins of SPI flash on board. If the ROCK 4 model has SPI flash soldered on board, the SPI function is not available on GPIO header.
UART
- UART2 is enabled as U-boot and Linux serial console by default. Check Rockpi4/dev/serial-console to use. Check Rockpi4/hardware/devtree_overlays to disable serial console on UART2.
- UART2 & UART4 support a wide range of baud rate. It includes but not is not limited to the following baud rates. For instance, 115200bps. 500000bps, 1500000bps and so on.
- For v1.4 and later hardware, on board SPI flash is soldered, UART4 PINs are used as SPI function.
For I2C-2 and I2C-7
- We have do the test using the i2c device e2prom. We need to open the i2c device file, and then do the read or write operation.
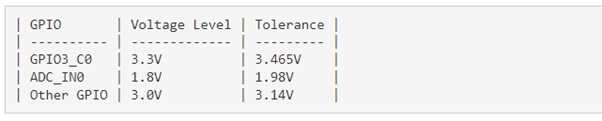
IO Voltage
RK3399 have three IO voltages, 1.8V/3.0V/3.3V. For ROCK 4C+, below is the default voltage:
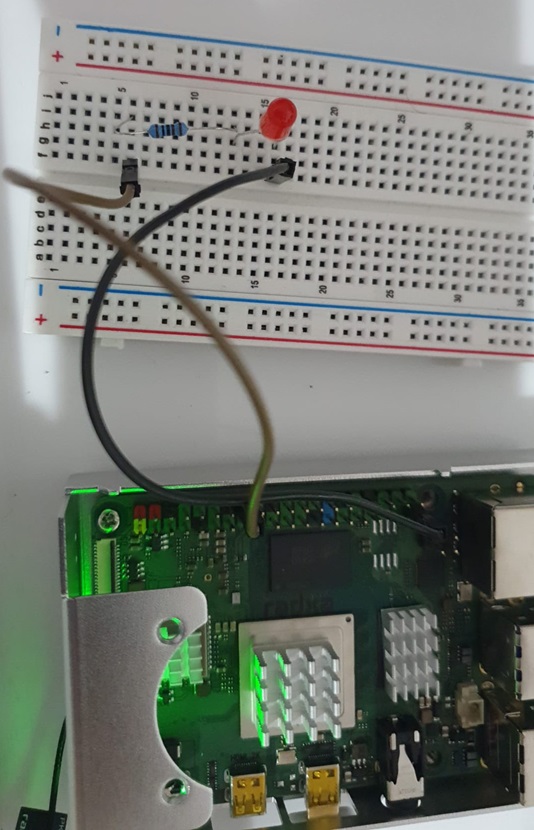
Step 10: GPIO hardware setup
Connect a LED to pin 16 GPIO to an LED via a 1k resistor as show in the image.
Step 11: Create directories to implement gpio modules
Create a new directory to implement modules to support ROCK gpio.
sudo mkdir /usr/local/lib/node_modules/node-red/node_modules/ node-red-contrib-rock-4c-gpioIn this directory, 3 files are created.
Here’s a brief explanation of the roles of rock-4c-gpio.js, rock-4c-gpio.html, and package.json:
- rock-4c-gpio.js: The rock-4c-gpio.js file typically contains the backend or server-side logic for controlling the GPIO (General Purpose Input/Output) pins on a ROCK 4C+ board. It utilizes libraries and APIs specific to the ROCK 4C+ GPIO functionality to interact with the hardware. The JavaScript code in rock-4c-gpio.js handles tasks such as reading and writing GPIO pin values, setting pin directions (input/output), and responding to pin state changes.
- rock-4c-gpio.html: The rock-4c-gpio.html file is the frontend or client-side component of the application. It provides the user interface for interacting with the GPIO pins. The HTML file typically includes elements such as buttons, dropdowns, or input fields that allow users to select and control the GPIO pins. It may also include JavaScript code to handle user interactions and communicate with the backend (rock-4c-gpio.js) to send commands or receive updates about GPIO pin states.
- json: The package.json file is a configuration file used in Node.js projects. It contains metadata about the project, as well as information about its dependencies and scripts. The file lists the required dependencies for the project, including any libraries or modules used in the rock-4c-gpio.js file. It ensures that the necessary dependencies are installed when the project is set up or deployed. The package.json file also allows you to define scripts for tasks such as starting the application or running tests.
In summary, rock-4c-gpio.js provides the backend logic for GPIO pin control, rock-4c-gpio.html provides the frontend interface for user interaction, and package.json manages the project’s dependencies and defines various project-related configurations and scripts. Together, these files enable the interaction between the hardware (GPIO pins) and the user interface for GPIO control on the ROCK 4C+ board.
Step 12: Create package.json
Open a terminal window and enter the following command to create package.json:
sudo nano /usr/local/lib/node_modules/node-red/node_modules/ node-red-contrib-rock-4c-gpio/package.jsonAdd the following configuration:
{
  "name": "node-red-contrib-rock-4c-gpio",
  "version": "1.0.0",
  "description": "Node-RED custom node for Rock 4C+ GPIO",
  "dependencies": {
    "mraa": "^2.2.1"
  },
  "node-red": {
    "nodes": {
      "rock-4c-gpio": "rock-4c-gpio.js"
    }
  },
  "keywords": [
    "node-red",
    "gpio",
    "rock-4c-gpio"
  ],
  "author": "Your Name",
  "license": "MIT"
}
Press ‘ctrl+o’ and ‘ctrl+x’ to save.
- name: Specifies the name of the package. In this case, it is “node-red-contrib-rock-4c-gpio”. The name should be unique and follow the naming conventions for npm packages.
- version: Indicates the version number of the package. The provided value is “1.0.0”, but you can adjust it based on your project’s versioning scheme.
- description: Provides a brief description of the package’s purpose. In this case, it describes the package as a “Node-RED custom node for Rock 4C+ GPIO”. You can modify this field to provide a more detailed explanation of your custom node.
- dependencies: Lists the dependencies required by the package. In this case, the “mraa” dependency is included, with a minimum version of “^2.2.1”. This means that the package requires the “mraa” library with a version of 2.2.1 or above. The dependencies specified here will be automatically installed when the package is installed.
- node-red: This section contains configuration specific to Node-RED. The “nodes” field specifies that the “rock-4c-gpio” node is associated with the “rock-4c-gpio.js” file. This allows Node-RED to recognize and load the custom node during runtime.
- keywords: An array of keywords that represent the package. These keywords help in categorizing and searching for the package. In this example, the keywords include “node-red”, “gpio”, and “rock-4c-gpio”. You can add or modify the keywords based on your project’s context.
- author: Specifies the author or maintainer of the package. Replace “Your Name” with your actual name or the name of your organization. You can also include contact information or other relevant details about the author.
- license: Specifies the license under which the package is distributed. The provided value is “MIT”, but you can choose a different license that suits your requirements. The license field defines the terms and conditions for using and distributing the package.
The package.json file is an essential part of any Node.js project. It helps in managing dependencies, providing metadata about the package, and defining various configurations and scripts related to the project. It ensures that the necessary dependencies are installed correctly and provides important information for developers and users who interact with your package.
Step 13: Create rock-4c-gpio.js
sudo nano /usr/local/lib/node_modules/node-red/node_modules/ node-red-contrib-rock-4c-gpio/rock-4c-gpio.jsmodule.exports = function (RED) {
function Rock4CGPIONode(config) {
RED.nodes.createNode(this, config);
var node = this;
var spawn = require('child_process').spawn;
// Retrieve configuration from the node's properties
this.gpioPin = config.gpioPin;
this.direction = config.direction;
this.value = config.value;
// Handle incoming messages
this.on('input', function (msg) {
console.log( "input", msg );
var payload = msg.payload;
// Update configuration based on the incoming message
if (payload.hasOwnProperty('gpioPin')) {
node.gpioPin = payload.gpioPin;
}
if (payload.hasOwnProperty('direction')) {
node.direction = payload.direction;
}
if (payload.hasOwnProperty('value')) {
node.value = payload.value;
}
else {
node.value = msg.payload;
}
if (node.direction == 'out') {
        mraaGpio = spawn('mraa-gpio', ['set', node.gpioPin.toString(), node.value.toString()]);
      }
      else {
        mraaGpio = spawn('mraa-gpio', ['get', node.gpioPin.toString()]);
      }

      // Handle command output
      mraaGpio.stdout.on('data', (data) => {
        // Process the command output as needed
        node.send({ payload: data.toString() });
      });

      // Handle command errors
      mraaGpio.stderr.on('data', (data) => {
        // Process the command error as needed
        node.error(data.toString());
      });
      // Send the updated configuration as the output message
      msg.payload = {
        gpioPin: node.gpioPin,
        direction: node.direction,
        value: node.value
      };

      node.send(msg);
    });
  }

  RED.nodes.registerType('rock-4c-gpio', Rock4CGPIONode);
};
Let’s explain the key parts of the code:
- exports = function (RED) { … }: This line exports a function that accepts the RED object, which is provided by Node-RED, as an argument. This function serves as the entry point for creating the custom node.
- function Rock4CGPIONode(config) { … }: This is the constructor function for the Rock4CGPIONode. It is executed when a new instance of the custom node is created. It takes a config object as a parameter.
- nodes.createNode(this, config): This line creates a new node instance and assigns it to the this context. It also sets up the node with the provided configuration.
- on(‘input’, function (msg) { … }): This sets up an event listener for incoming messages. When an input message is received, the function defined inside is executed.
- Configuration Retrieval: The code retrieves the GPIO pin, direction, and value from the node’s configuration (config) object. These values are stored in this.gpioPin, this.direction, and this.value, respectively.
- Handling Incoming Messages: The function inside the event listener handles incoming messages. It updates the configuration based on the message payload and sets the node.gpioPin, node.direction, and node.value accordingly.
- GPIO Pin Control: Depending on the direction (node.direction), the code uses the mraa-gpio command-line tool to set or get the value of the GPIO pin specified by node.gpioPin.
- Handling Command Output and Errors: The code listens for the output and error events from the mraaGpio process. The command output is processed and sent as a message using node.send(). Any command errors are handled and reported using node.error().
- Sending Updated Configuration: After handling the message, the code updates the payload of the message (msg.payload) to contain the updated GPIO pin, direction, and value. Then it sends the modified message using node.send().
- nodes.registerType(‘rock-4c-gpio’, Rock4CGPIONode): This line registers the custom node type with Node-RED. It associates the rock-4c-gpio name with the Rock4CGPIONode constructor function, allowing Node-RED to recognize and use this custom node in the flow editor.
In summary, this code defines a custom Node-RED node for Rock 4C+ GPIO control. It handles incoming messages, updates the GPIO pin configuration, controls the pin direction and value using the mraa-gpio command, and sends updated configurations and command outputs as messages to the next nodes in the flow.
Step 14: Create rock-4c-gpio.html
sudo nano /usr/local/lib/node_modules/node-red/node_modules/ node-red-contrib-rock-4c-gpio/rock-4c-gpio.html<script type="text/javascript">
RED.nodes.registerType('rock-4c-gpio', {
category: 'function',
color: '#a6bbcf',
defaults: {
name: { value: "" },
gpioPin: { value: "0", required: true },
direction: { value: "out", required: true },
value: { value: "0" }
},
inputs: 1,
outputs: 1,
icon: "node-red-node-rpi-gpio.png",
label: function () {
return this.name || "rock-4c-gpio";
},
oneditprepare: function () {
var node = this;
// Get the GPIO pin dropdown element
var gpioPinDropdown = document.getElementById("node-input-gpioPin");
            // Populate the GPIO pin dropdown with options
            for (var i = 0; i < 40; i++) {
                var option = document.createElement("option");
                option.text = i.toString();
                option.value = i.toString();
                gpioPinDropdown.appendChild(option);
            }

            // Set the selected value in the GPIO pin dropdown based on the node configuration
            gpioPinDropdown.value = node.gpioPin || "0";

            // Handle changes in the GPIO pin dropdown
            gpioPinDropdown.addEventListener("change", function () {
                node.changed = true;
            });

            // Get the direction dropdown element
            var directionDropdown = document.getElementById("node-input-direction");

            // Set the selected value in the direction dropdown based on the node configuration
            directionDropdown.value = node.direction || "out";

            // Handle changes in the direction dropdown
            directionDropdown.addEventListener("change", function () {
                node.changed = true;
            });

            // Get the value input element
            var valueInput = document.getElementById("node-input-value");

            // Set the value input based on the node configuration
            valueInput.value = node.value || "0";
// Handle changes in the value input
            valueInput.addEventListener("change", function () {
                node.changed = true;
            });
        },
        oneditsave: function () {
            var node = this;

            // Update node configuration properties if changed
            if (node.changed) {
                node.changed = false;
                node.gpioPin = document.getElementById("node-input-gpioPin").value;
                node.direction = document.getElementById("node-input-direction").value;
                node.value = document.getElementById("node-input-value").value;
            }
        }
    });
</script>

<script type="text/html" data-template-name="rock-4c-gpio">
    <div class="form-row">
        <label for="node-input-gpioPin"><i class="fa fa-map-pin"></i> GPIO Pin</label>
        <select id="node-input-gpioPin">
            <!-- GPIO pin options are dynamically populated via JavaScript -->
        </select>
    </div>
    <div class="form-row">
        <label for="node-input-direction"><i class="fa fa-long-arrow-up"></i> Direction</label>
        <select id="node-input-direction">
            <option value="out">Output</option>
            <option value="in">Input</option>
        </select>
    </div>
    <div class="form-row">
        <label for="node-input-value"><i class="fa fa-toggle-on"></i> Value</label>
        <input type="text" id="node-input-value">
    </div>
</script>
Let’s break it down section by section:
- Script block for RED.nodes.registerType(‘rock-4c-gpio’, { … }):
- category, color, defaults, inputs, outputs, icon: These properties define various attributes of the custom node, such as its category, color, default values for properties, number of inputs/outputs, and icon to be displayed in the Node-RED editor.
- label: This function determines the label to be displayed on the node in the Node-RED editor. If the node has a name, it is displayed; otherwise, a default label (“rock-4c-gpio”) is used.
- oneditprepare: This function is executed when the node properties panel is opened for editing. It sets up the necessary HTML elements, populates the GPIO pin dropdown, and attaches event listeners to handle changes in the configuration options.
- oneditsave: This function is executed when the node properties are saved. It updates the node’s configuration properties (gpioPin, direction, value) based on the values entered by the user in the properties panel.
- Script block for the node properties template:
- data-template-name: This attribute specifies the name of the template, which is “rock-4c-gpio”.
- HTML structure: This section defines the structure and content of the node properties panel. It includes form rows with labels and input elements for the GPIO pin, direction, and value.
In summary, the code defines a custom Node-RED node called “rock-4c-gpio”. It specifies its appearance, default properties, and behavior within the Node-RED editor. The oneditprepare function sets up the HTML elements and event listeners for the node’s configuration options. The oneditsave function updates the node’s configuration based on the user’s input. The HTML template defines the structure of the node properties panel, including input fields for GPIO pin, direction, and value.
Step 15: Relaunch node-red and setup hardware
Relaunch node-red as shown in steps 4, 5 and 8
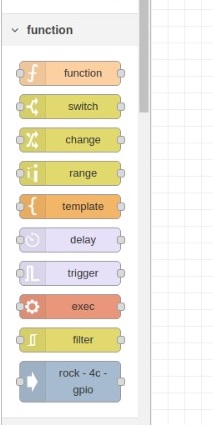
Step 16: Check for the ROCK GPIO function
The “rock-4c-gpio” function is available at the bottom
Step 17: Setup gpio flow
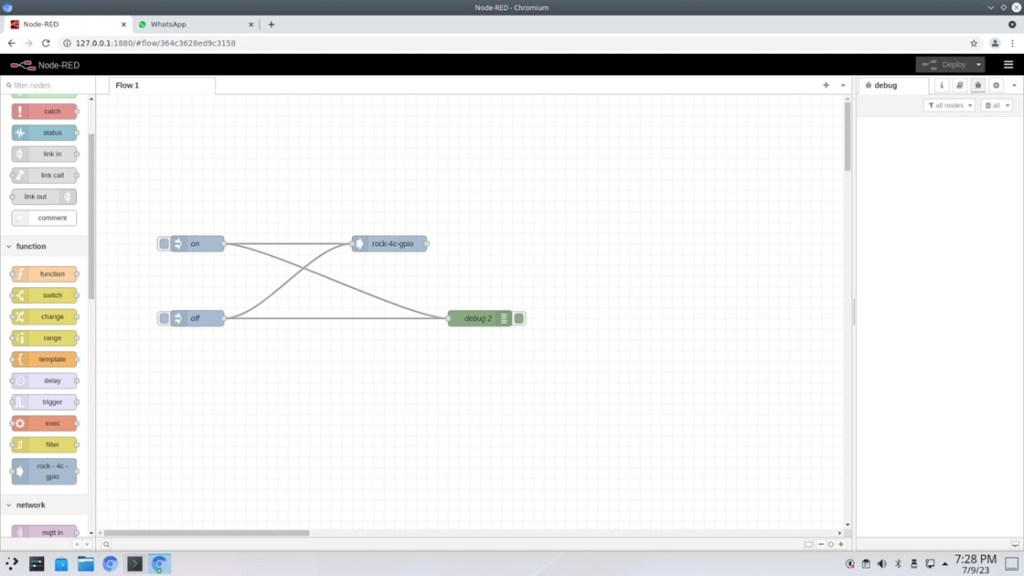
The flow uses the following functions:
- Inject function for sending on message
- Inject function for sending off message
- Rock-4c-gpio function to write or read from gpio pins
- A debug function to read the received messages
Step 18: Configure inject function ON
Double click on the first inject function and set payload to 1 and name to ‘on’
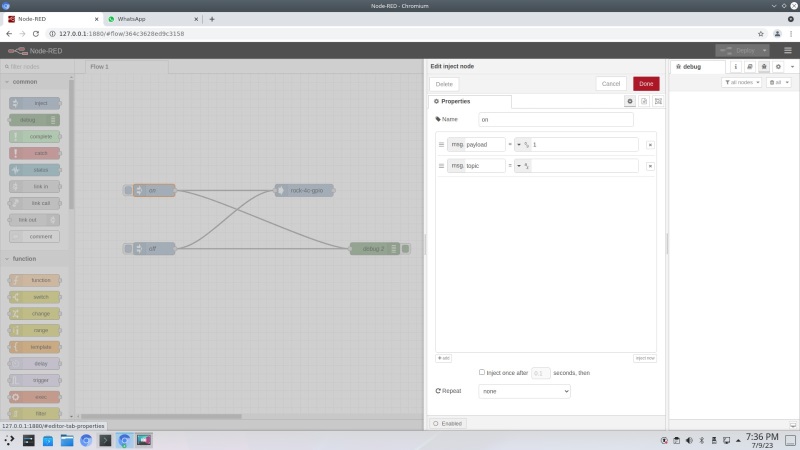
Click on done.
Step 19: Configure inject function OFF
Double click on the first inject function and set payload to 0 and name to ‘off’
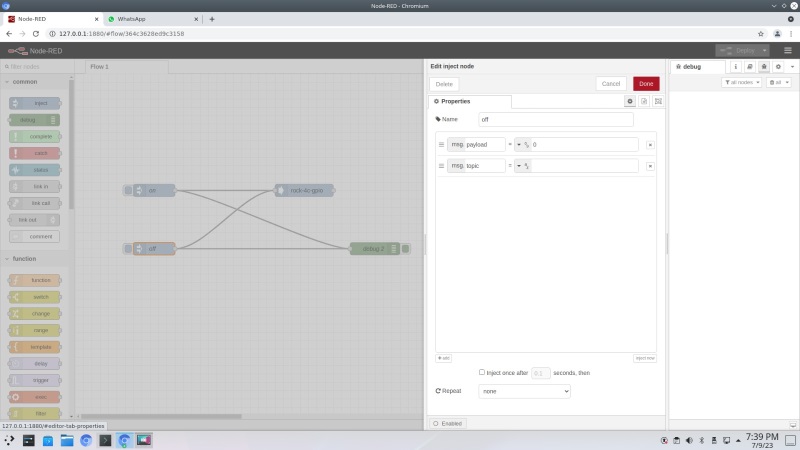
Click on done.
Step 20: Configure rock-4c-gpio
Double click on the rock-4c-gpio function and set pin to the one that need to be controlled the direction to ‘Input’ or ‘Output’. In this case, pin 16 and Output are selected.
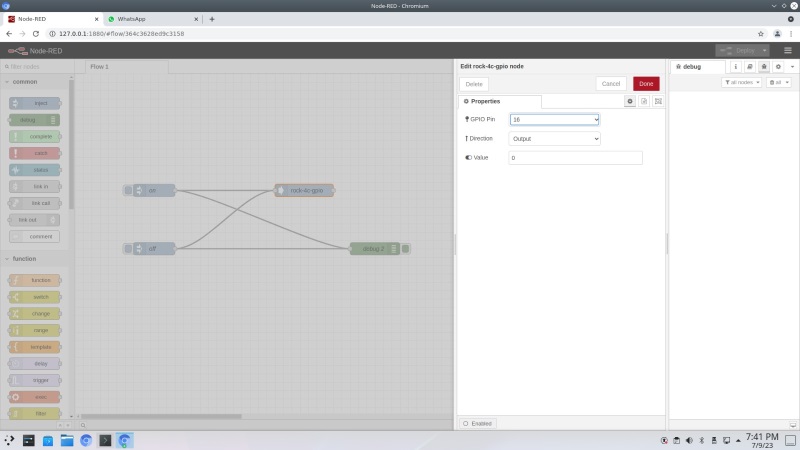
Click on done.
Step 21: Deploy the flow
After any change the flow needs to be deployed. Click on the deploy on the top right corner.
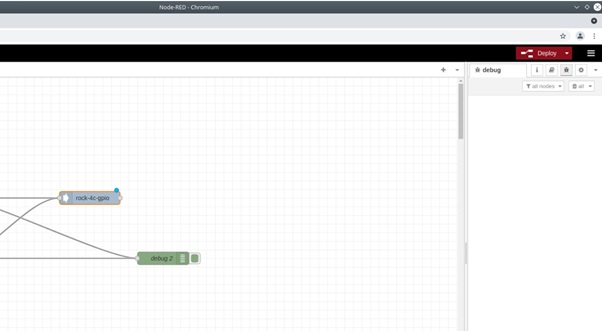
A blue circle is shown on the component that is modified and needs deployment and the deploy button on the top right turns red.
Click on that and the flow is deployed.
Step 22: Test the flow
Click on ‘ON’ and ‘OFF’ functions and the LED connected on PIN 16 should toggle. The flow works for read operations as well when the direction is set to ‘Input’.
Summary
If you have followed the steps above, you should have successfully installed, executed and controlled the GPIO pins from a node-red flow.
![]()


Let’s invent the future together
What’s your challenge? From augmented reality to machine learning and automation, send us your questions, problems or ideas… We have the solution to help you design the world. Get in touch today.
Looking for something else? Discover our Blogs, Getting Started Guides and Projects for more inspiration!
Like what you read? Why not show your appreciation by giving some love.
From a quick tap to smashing that love button and show how much you enjoyed this project.

