This project guides you step by step through setting up a working bird monitoring video camera that can capture still images and identify bird species visiting a bird table, using artificial intelligence (AI) and video image classification.
Most of the main components are provided in the OKdo Raspberry Pi AI Starter Kit with Coral USB Accelerator. We also used a THine camera extension kit to simplify mounting a camera outdoors.
Although the project uses advanced AI techniques, you should be able to follow the steps if this is your first AI experience.
We cover setting up the Raspberry Pi and Pi Camera module, adding the Coral USB Accelerator and supporting software and providing Python code to run a pre-trained bird classification AI model. In addition, we go into the details of installing the hardware outside using a THine camera extension kit and how to access the Raspberry Pi desktop using Real VNC remotely.
If you want to dig deeper into how the system works, the Python code is Open Source. Therefore, if you are looking for interesting and practical Python AI project ideas, this is a perfect one to start with!
We also provide links to the excellent Coral documentation where you can learn all about re-training the AI model with your captured images, to take the project to the next level.
Note: The camera requires Raspberry Pi OS (Legacy) with desktop.
Step 1: Raspberry Pi OS
The first step is setting up a suitable Linux operating system for the Raspberry Pi. We chose to install the full version of Raspberry Pi OS as this has support for the Raspberry Pi camera and Real VNC remote desktop software built-in, making it easy to access the Pi camera and capture images remotely.
Tip: You may be able to use the SD card that came with the AI Kit, but we recommend starting with a clean installation by following this step.
- Download the Raspberry Pi OS with desktop from the official Raspberry Pi downloads page to your host computer:
https://www.raspberrypi.org/software/operating-systems/#raspberry-pi-os-32-bit
- Flash a 16GB or larger SD card using Balena Etcher:
- Insert the SD card into the Raspberry Pi and temporarily connect the camera, a monitor, mouse and keyboard. Do not connect the Coral USB Accelerator yet.
- Power up the Raspberry Pi and follow the onscreen setup instructions, including changing the default password, connecting to Wifi and updating the system.
- Restart the Raspberry Pi when requested.
Step 2: Camera setup
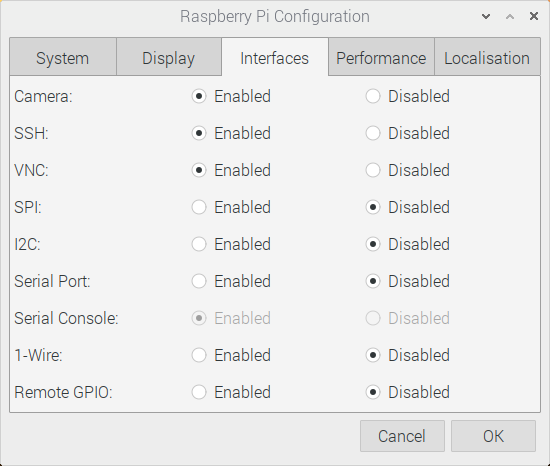
The camera interface needs enabling to use the camera module. At the same time, we enable SSH to allow remote access using Terminal and VNC to enable remote access to the Desktop.
- From the desktop menu, select Preferences -> Raspberry Pi Configuration
- In the Interfaces tab, enable Camera, SSH and VNC
- Click OK and allow the Raspberry Pi to reboot.
When the Pi has rebooted, check the camera is working by taking a test shot.
- Open the Terminal and execute the following command:
raspistill -o test-shot.jpgThe image will be saved to your current directory, and you can open it from the File Manager by double-clicking.
Step 3: Edge TPU runtime
Follow the next few steps using the command line in Terminal to install support for the Coral USB Accelerator and AI components.
Edge TPU runtime provides a software library that runs on the Raspberry Pi and allows it to interact with the Coral UBS Accelerator to run lightning-fast AI applications.
- Enter the following command (all on one line) into the Terminal:
echo "deb https://packages.cloud.google.com/apt coral-edgetpu-stable main" | sudo tee /etc/apt/sources.list.d/coral-edgetpu.list- Add the key signature to the repository (don’t forget the “-” character at the end!):
curl https://packages.cloud.google.com/apt/doc/apt-key.gpg | sudo apt-key add -- Update the system repo index:
sudo apt update- Now install the latest Edge TPU runtime:
sudo apt-get install libedgetpu1-stdStep 4: Coral USB Accelerator
Now it’s time to connect the Coral USB Accelerator to the Raspberry Pi:
- Using the USB-C cable supplied, attach one end to the Coral.
- Attach the other end to one of the Blue USB 3.0 ports on the Raspberry Pi, which allows the fastest transfer speeds.
Tip: If you’ve already attached the Coral before this step, detach and reattach it.
Step 5: PyCoral library
Google provides a custom Python library for Coral called PyCoral. It’s built on the Open Source TensorFlow Lite and designed to speed up development and provide extra functionality for the Coral USB Accelerator.
- Install PyCoral by entering the following command in the Terminal:
sudo apt-get install python3-pycoralStep 6: Birdcam code
Now the Raspberry Pi, Coral USB Accelerator and Camera are all set up, you can install the Python code to run the Birdcam. It has been adapted from the Coral example code provided by Google using a pre-trained AI bird classification model compiled to run on Coral.
The model can identify over 900 bird species and allows the creation of a working system quickly and easily without having to build your own AI model.
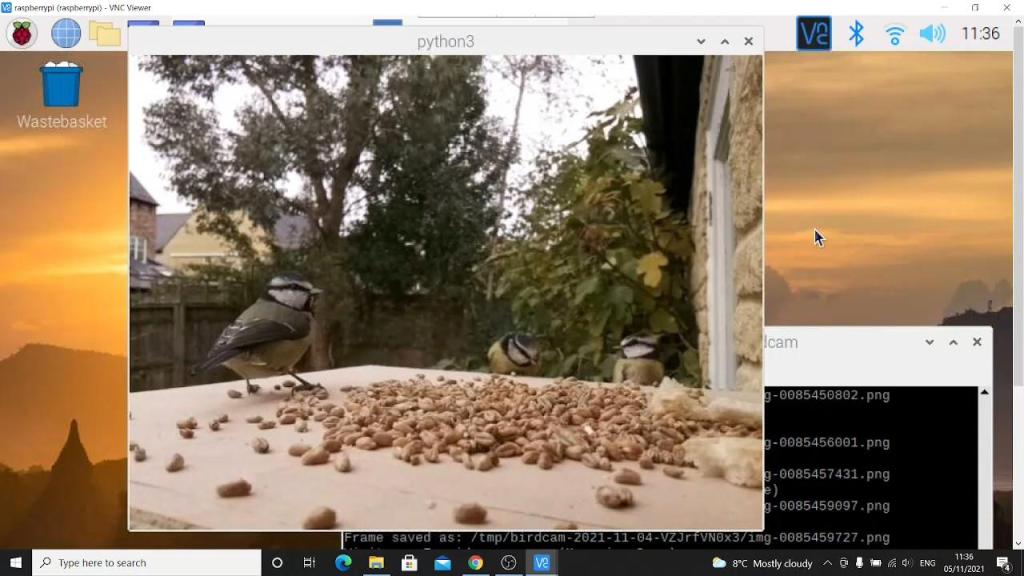
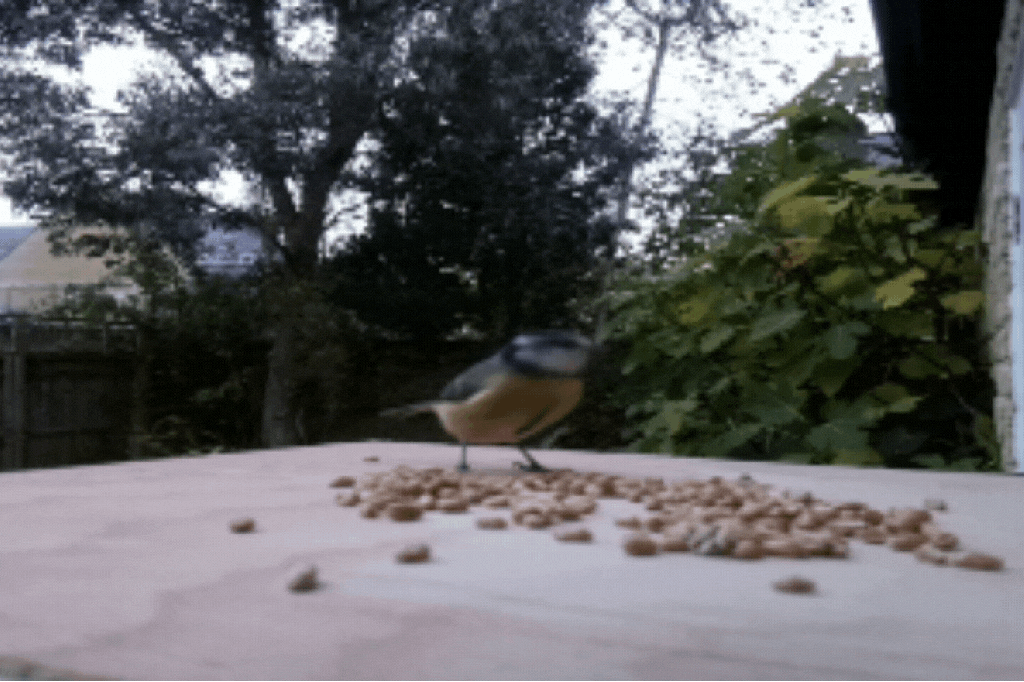
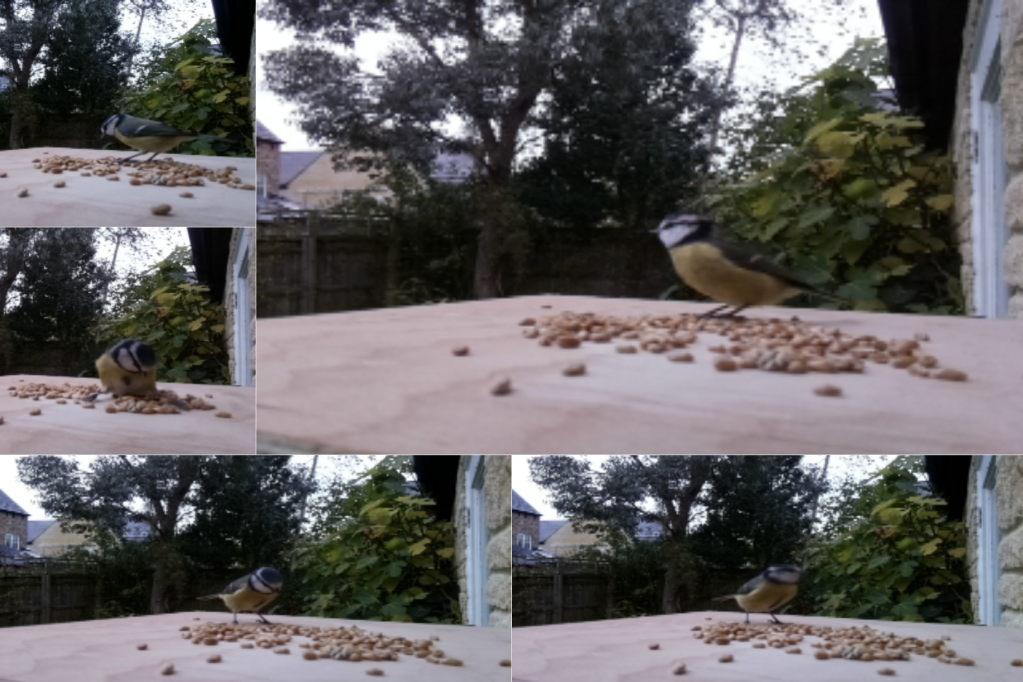
Birdcam constantly monitors your bird table using a video processing pipeline running at 30 frames per second (Fps). Each frame is analysed by Coral using its AI classification model. If it identifies a bird it can recognise, it saves the frame as an image to the Raspberry Pi. It also logs the visit so that you can compare the pictures captured against the log to see if AI identified the bird correctly.
We have had good results recognising common European birds visiting our bird table in Oxfordshire, UK, but further training of the model would be necessary for even better results. This is the next step in the Birdcam development. Find a link to information about training AI models in the summary.
- Clone the Birdcam code from the OKdo Github repo with the following commands:
cd ~
git clone https://github.com/LetsOKdo/pi-coral-ai-birdcam.git
cd ~/pi-coral-ai-birdcam- Install the software dependencies:
bash birdcam/install_requirements.sh- Run the birdcam classification application:
bash birdcam.shThe software will startup, and a window will open displaying the camera video feed. When a bird visits the table, Birdcam will try to identify it, and any results are output to the Terminal along with the path to the saved image file. The visit is also recorded in a log file in the same directory.
- Use CTRL-C to stop the birdcam application.
Step 7: Testing
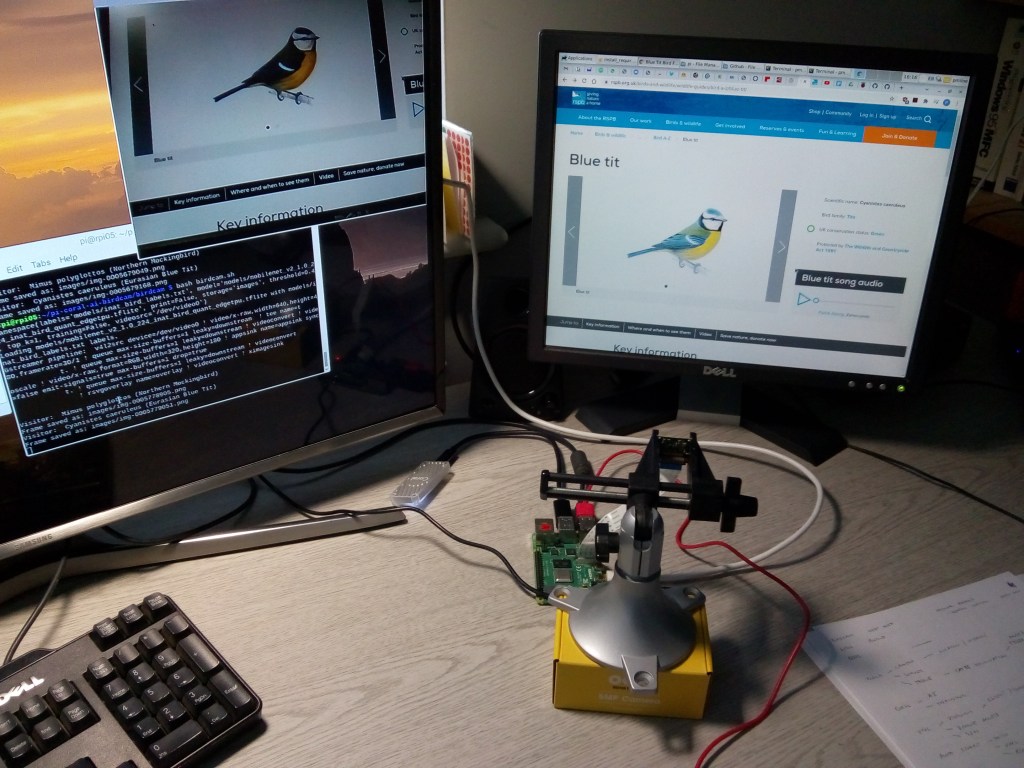
To test Birdcam was working and find the best positioning for the camera, we started Birdcam and showed it images of birds from the RSPB website displayed on our host computer.
Birdcam was fairly accurate with its identification of common bird species giving us confidence that it would work when relocated outside.
We found that the camera needed to be about 25cm from the subject for the best results.
Step 8: Remote access
Once everything is working, you can set up remote access. When Birdcam is relocated outside without a monitor attached, you can still access the desktop from another computer connected to the network.
- In Terminal start raspi-config to set a specific screen resolution:
sudo raspi-config- Select Display Options -> Resolution
- Select Mode 16 1024 x 768
- Select Finish and accept the Reboot option
- Remove monitor, keyboard and mouse.
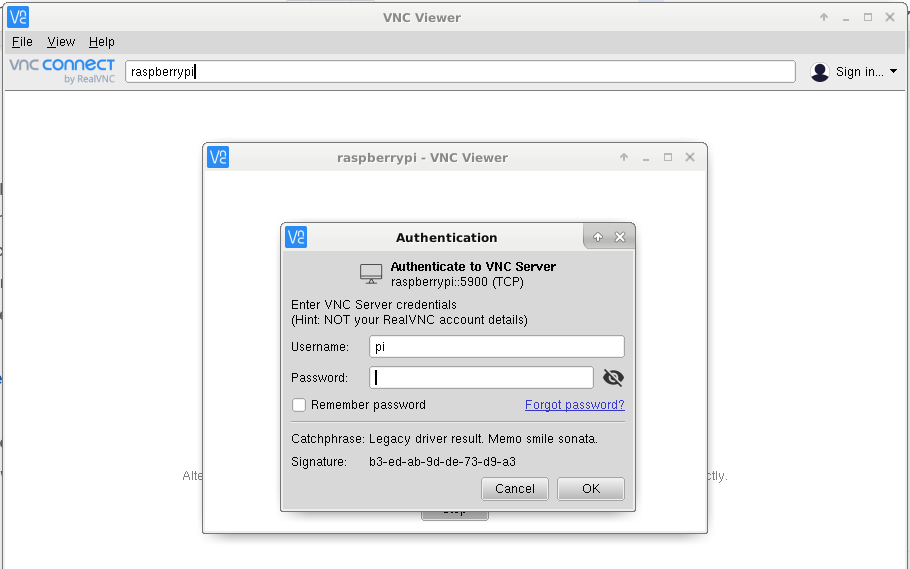
To access the remote desktop, you need to install the Real VNC Viewer on your host computer. You can find instructions on how to do this for PC / Mac / Linux here.
To make the remote connection using VNC Viewer, you will need the hostname of the Raspberry Pi and the pi username and password:
- Start VNC Viewer
- Enter the hostname for your Raspberry Pi (default is raspberrypi)
- In the Authentication dialogue box, enter the pi user and password (set when you set up your system).
The Pi Desktop should open in a window on your host computer, and you can now control it remotely.
Tip: If VNC Viewer doesn’t connect using the hostname, use the IP address which you can obtain from your Router’s admin page.
Step 9: Installation
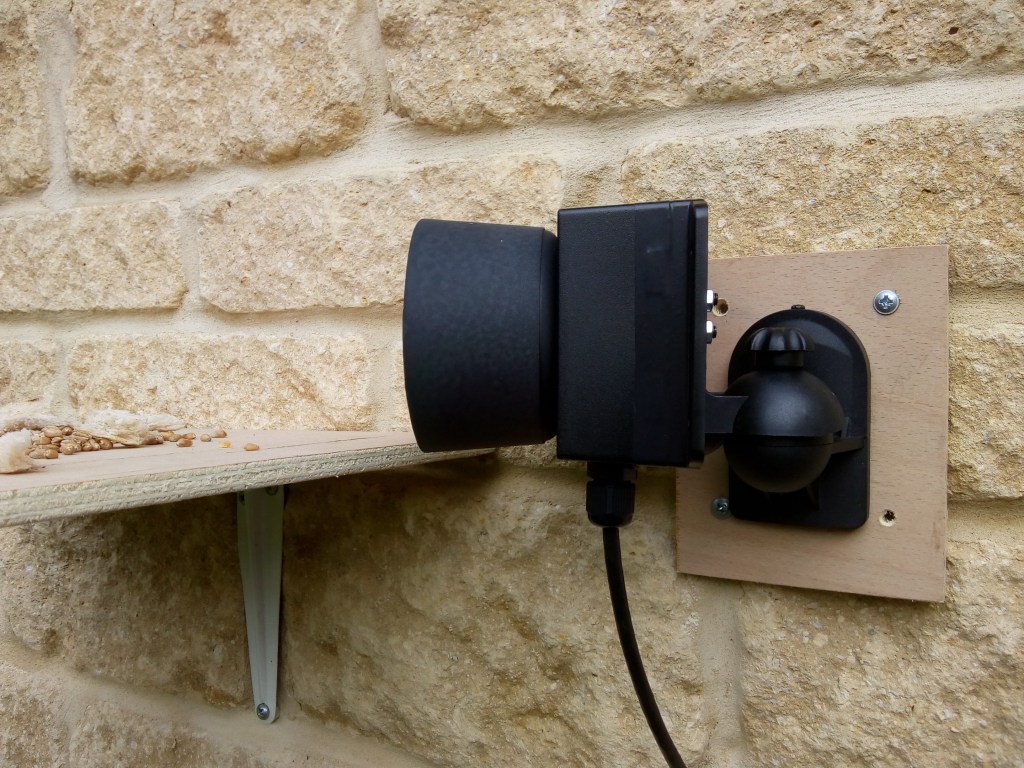
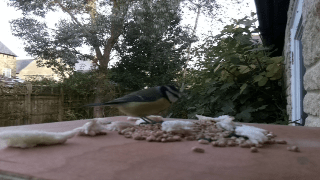
We cut a bird table from 8mm marine plywood about 30cm x 30cm square and fixed it to the outside wall of a garage using a shelf bracket.
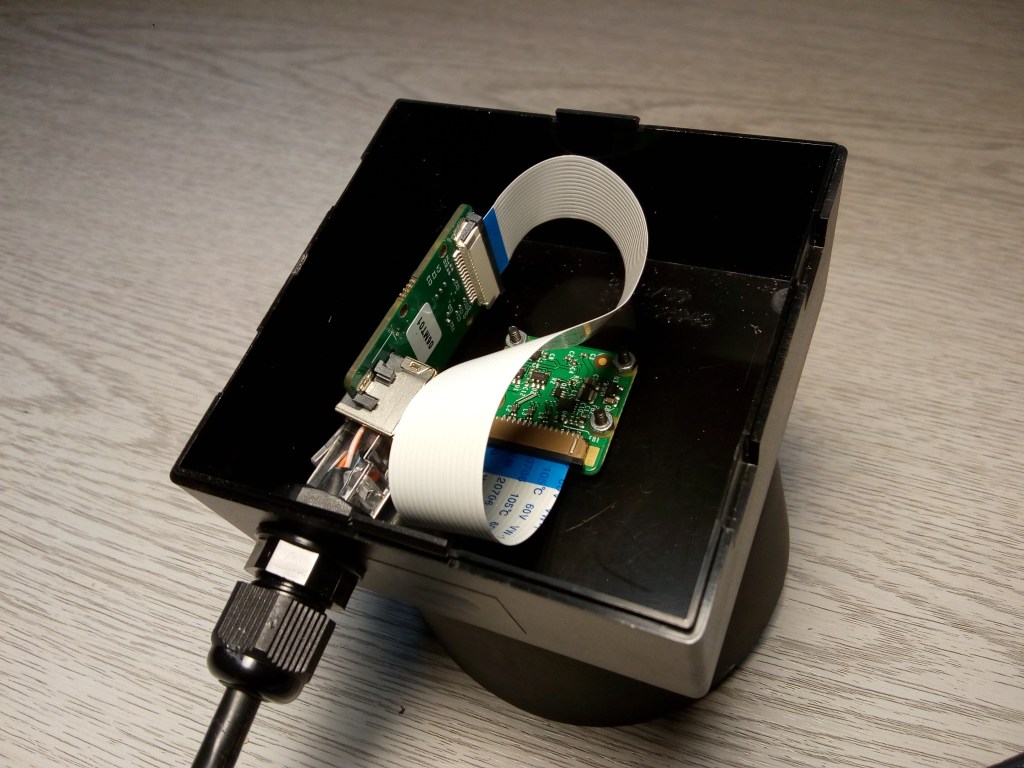
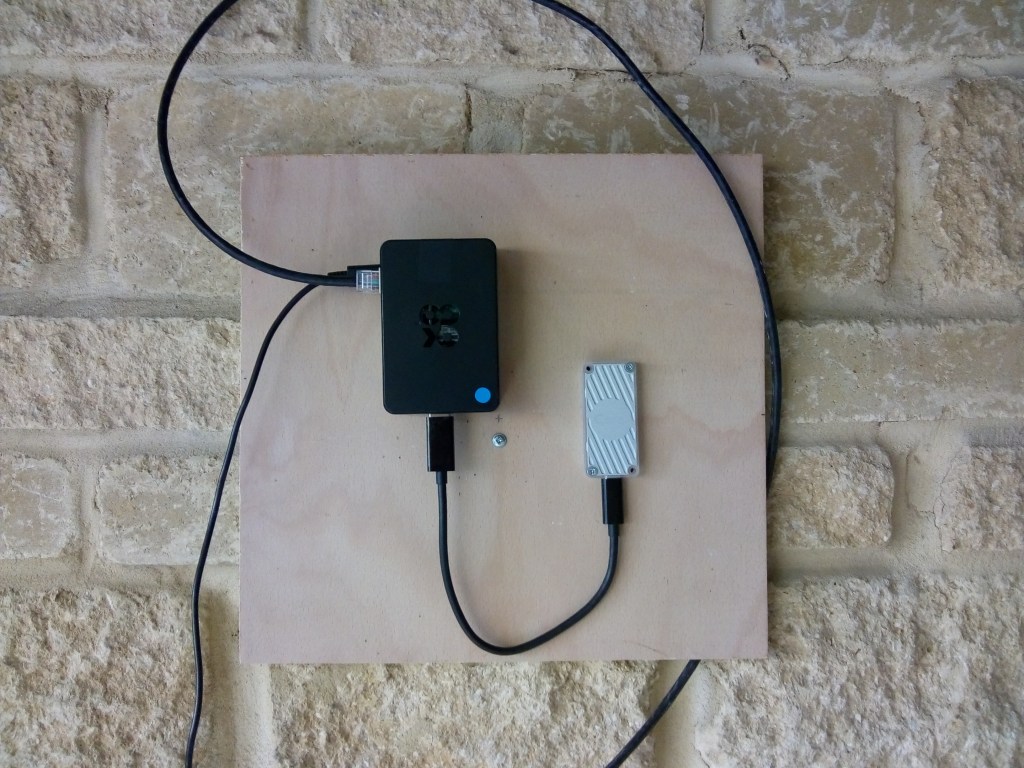
To make installation of the Birdcam easier, we used a THine camera extension kit. That allowed us to mount the camera outside and run a Cat 5e ethernet cable to the inside of the garage where we could keep the Raspberry Pi and Coral USB Accelerator safely and securely away from the elements.
We mounted the camera and THine transmitter module inside a black ABS enclosure (80mm x 80mm x 43mm) by cutting out a square hole for the camera lens and drilling 4 mounting holes for mounting bolts. A hole was drilled in the bottom of the enclosure to fit a cable entry gland for the ethernet cable. The cable fed through and terminated with an RJ45 connector.
Then, to protect the camera lens from the elements, we cut down an ABS food container and spray-painted black before being hot-glued to the front of the enclosure.
Tip: Use an RJ45 crimp tool to terminate your Cat 5e cable using the same connection standard at each end.
Next, we drilled the back of the enclosure and attached it to a universal speaker mount with 2 bolts to enable adjustment of the camera. We sealed the bolts with hot glue and wrapped the enclosure joint with PVC adhesive tape. We then fixed the mount to the wall using screws and a plywood fixing plate.
We fitted the THine extension HAT to the Raspberry Pi’s GPIO header and modified the case to accept the unit, which was bolted to a plywood mounting plate. The Coral USB Accelerator was connected and mounted to the plate with bolts and the whole assembly fixed to a wall inside the garage.
The other end of the Cat 5e cable was terminated with an RJ45 connector and coupled to the THine receiver on the Pi. Power was supplied using the included power supply.
Although the Raspberry Pi is situated in an outbuilding, it could still attach to the local Wifi network and maintain a solid connection several metres away from the router, which was sited indoors.
Step 10: Running remotely
With everything sited and fixed in place, Birdcam can now be powered up, and the software started from the VNC Viewer session on the remote computer.
Once it’s running, the video window opens so you can view the camera video feed and access any captured images and the log file by using the File Manager. The print output in Terminal also shows the bird species of the latest visitors.
- Open Terminal and start the birdcam:
cd ~/pi-coral-ai-birdcam
bash birdcam.sh- Open File Manager to check the log and for captured images of birds. These are stored in a system-generated directory under /tmp named birdcam-yyyy-mm-dd-XXXXXXXXXX, which changes each time the system is restarted.
Additionally, the log file shows the time of each bird visit and the species and captured image filename so that you can check the accuracy of each sighting.
2021-10-25 08:42:34,745-Image: 0170383502 Results: Cyanistes caeruleus (Eurasian Blue Tit)- Save the contents of this directory to a USB drive before shutting down the system if you want to save its contents.
When you have finished viewing Birdcam, just close the VNC Viewer, which will disconnect the session, but it will leave Birdcam running. You can reconnect again at any time.
Tip: If you find that the camera keeps identifying the background as a bird, a quick fix is to add the full name to the exclusion list in bird_classify.py or learn how to re-train the model.
if __name__ == '__main__':
    EXCLUSIONS = ['background',
                 'Branta canadensis (Canada Goose)']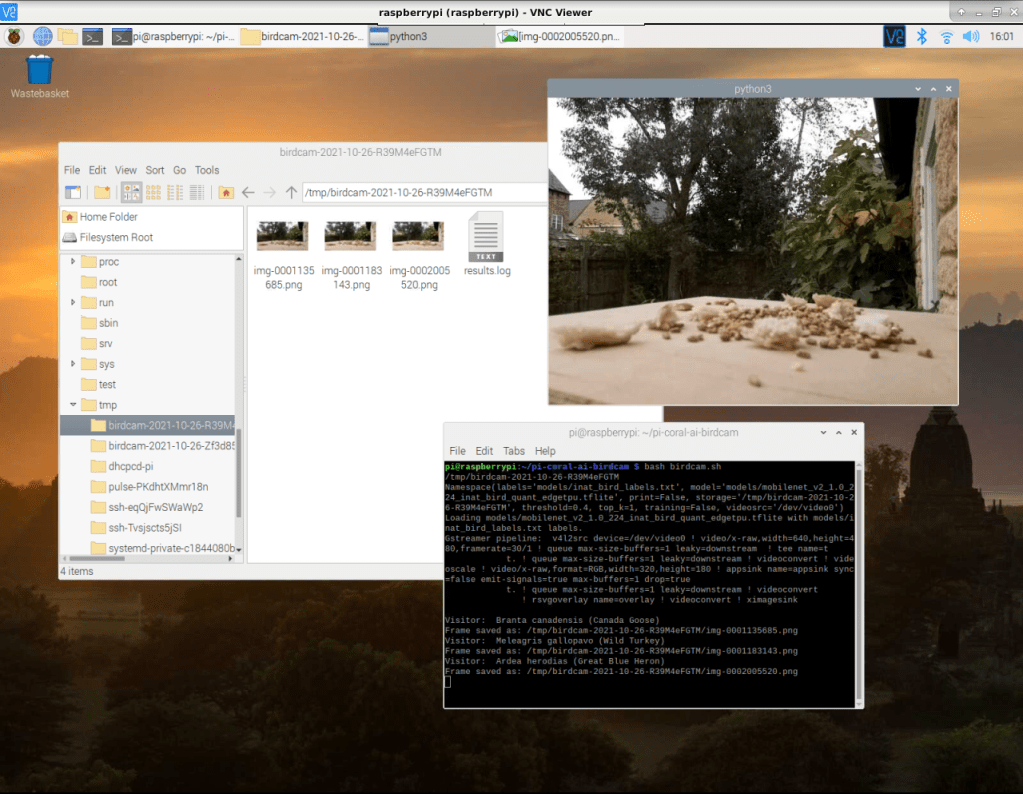
Step 11: Shutting down
It’s important to always shut down your Raspberry Pi properly before disconnecting the power supply, preventing the SD card from getting corrupted. You can do this from within the VNC session:
- Select Shutdown from the Pi Desktop.
- Wait until the green LED next to the red power LED on the Pi has stopped flashing completely before disconnecting the power.
- Close the VNC Viewer session on your host computer.
Summary
This guide has shown how to set up an AI bird monitoring video camera to identify visiting birds using a Raspberry Pi and Coral USB Accelerator.
The AI model has been pre-trained to recognise over 900 species of birds, and we have managed to capture images of some common UK birds using this model to demonstrate a practical application of video image classification with AI.
To improve the classification accuracy, you can further train the model using the images captured by your camera. Here you can find details of how to do this with Coral.
Find the original Coral example project here.
Are you looking for more exciting project ideas? Visit our Project Hub and discover our latest projects.

Like what you read? Why not show your appreciation by giving some love.
From a quick tap to smashing that love button and show how much you enjoyed this project.

