Get started with the OKdo Nano C100 Developer Kit and learn how to set up AI video facial recognition processing using a dual CSI camera setup with Python and OpenCV.
Author: Peter Milne, engineer and Linux advocate with more SBCs than an Apollo 11 landing craft.
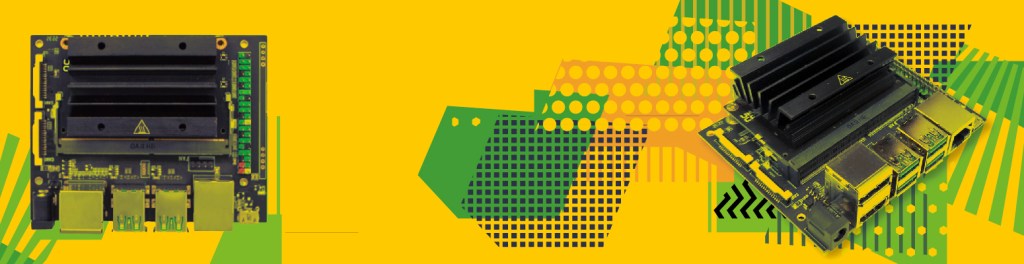
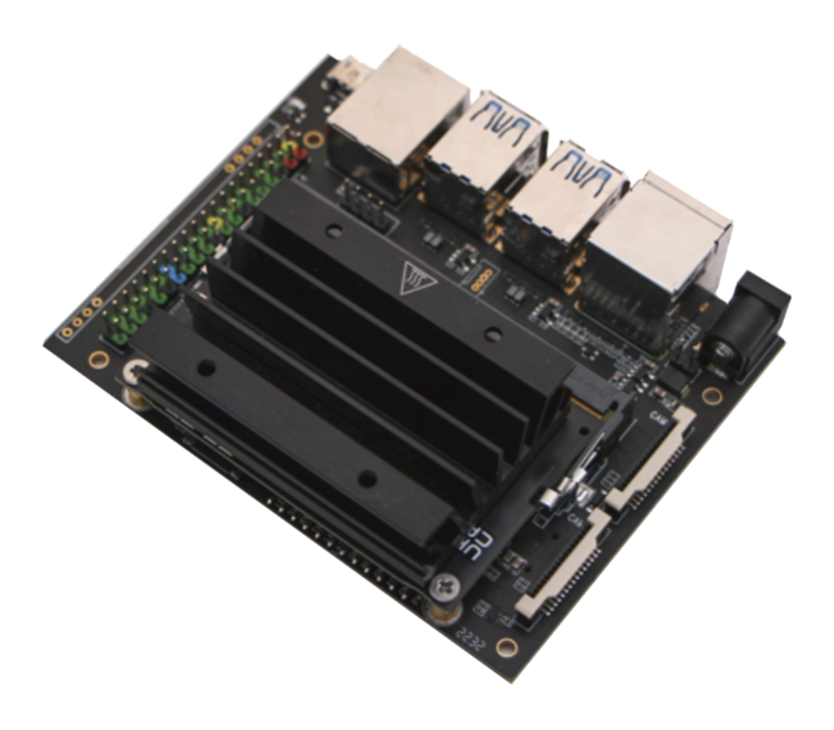
The OKdo Nano C100 Developer Kit is based on the NVIDIA® Jetson Nano™ module fitted to a custom development board.
This small, powerful, single-board computer makes AI accessible to makers, learners, and embedded developers. It lets you run multiple neural networks in parallel for applications like image classification, object detection, segmentation, and speech processing.
Key features include a quad-core ARM A57 CPU, 128-core NVIDIA Maxwell GPU, 4GB 64-bit LPDDR4 RAM, 16GB on-board eMMC storage, dual MIPI-CSI camera connectors, Gigabit Ethernet and a 40-pin GPIO header plus an M.2 E key slot for optional WiFi support.
OKdo provides an official OS image download via the OKdo Software & Downloads hub that is based on Ubuntu 18.04 LTS with NVIDIA Jetpack version 4.6.
This Getting Started will guide you through setting up your OKdo Nano C100 and demonstrates AI video facial recognition processing using a dual CSI camera setup with Python and OpenCV.
Let’s get started!
| Difficulty: Medium | Time: 2 Hrs | Steps: 9 | Credits: None | License: None |
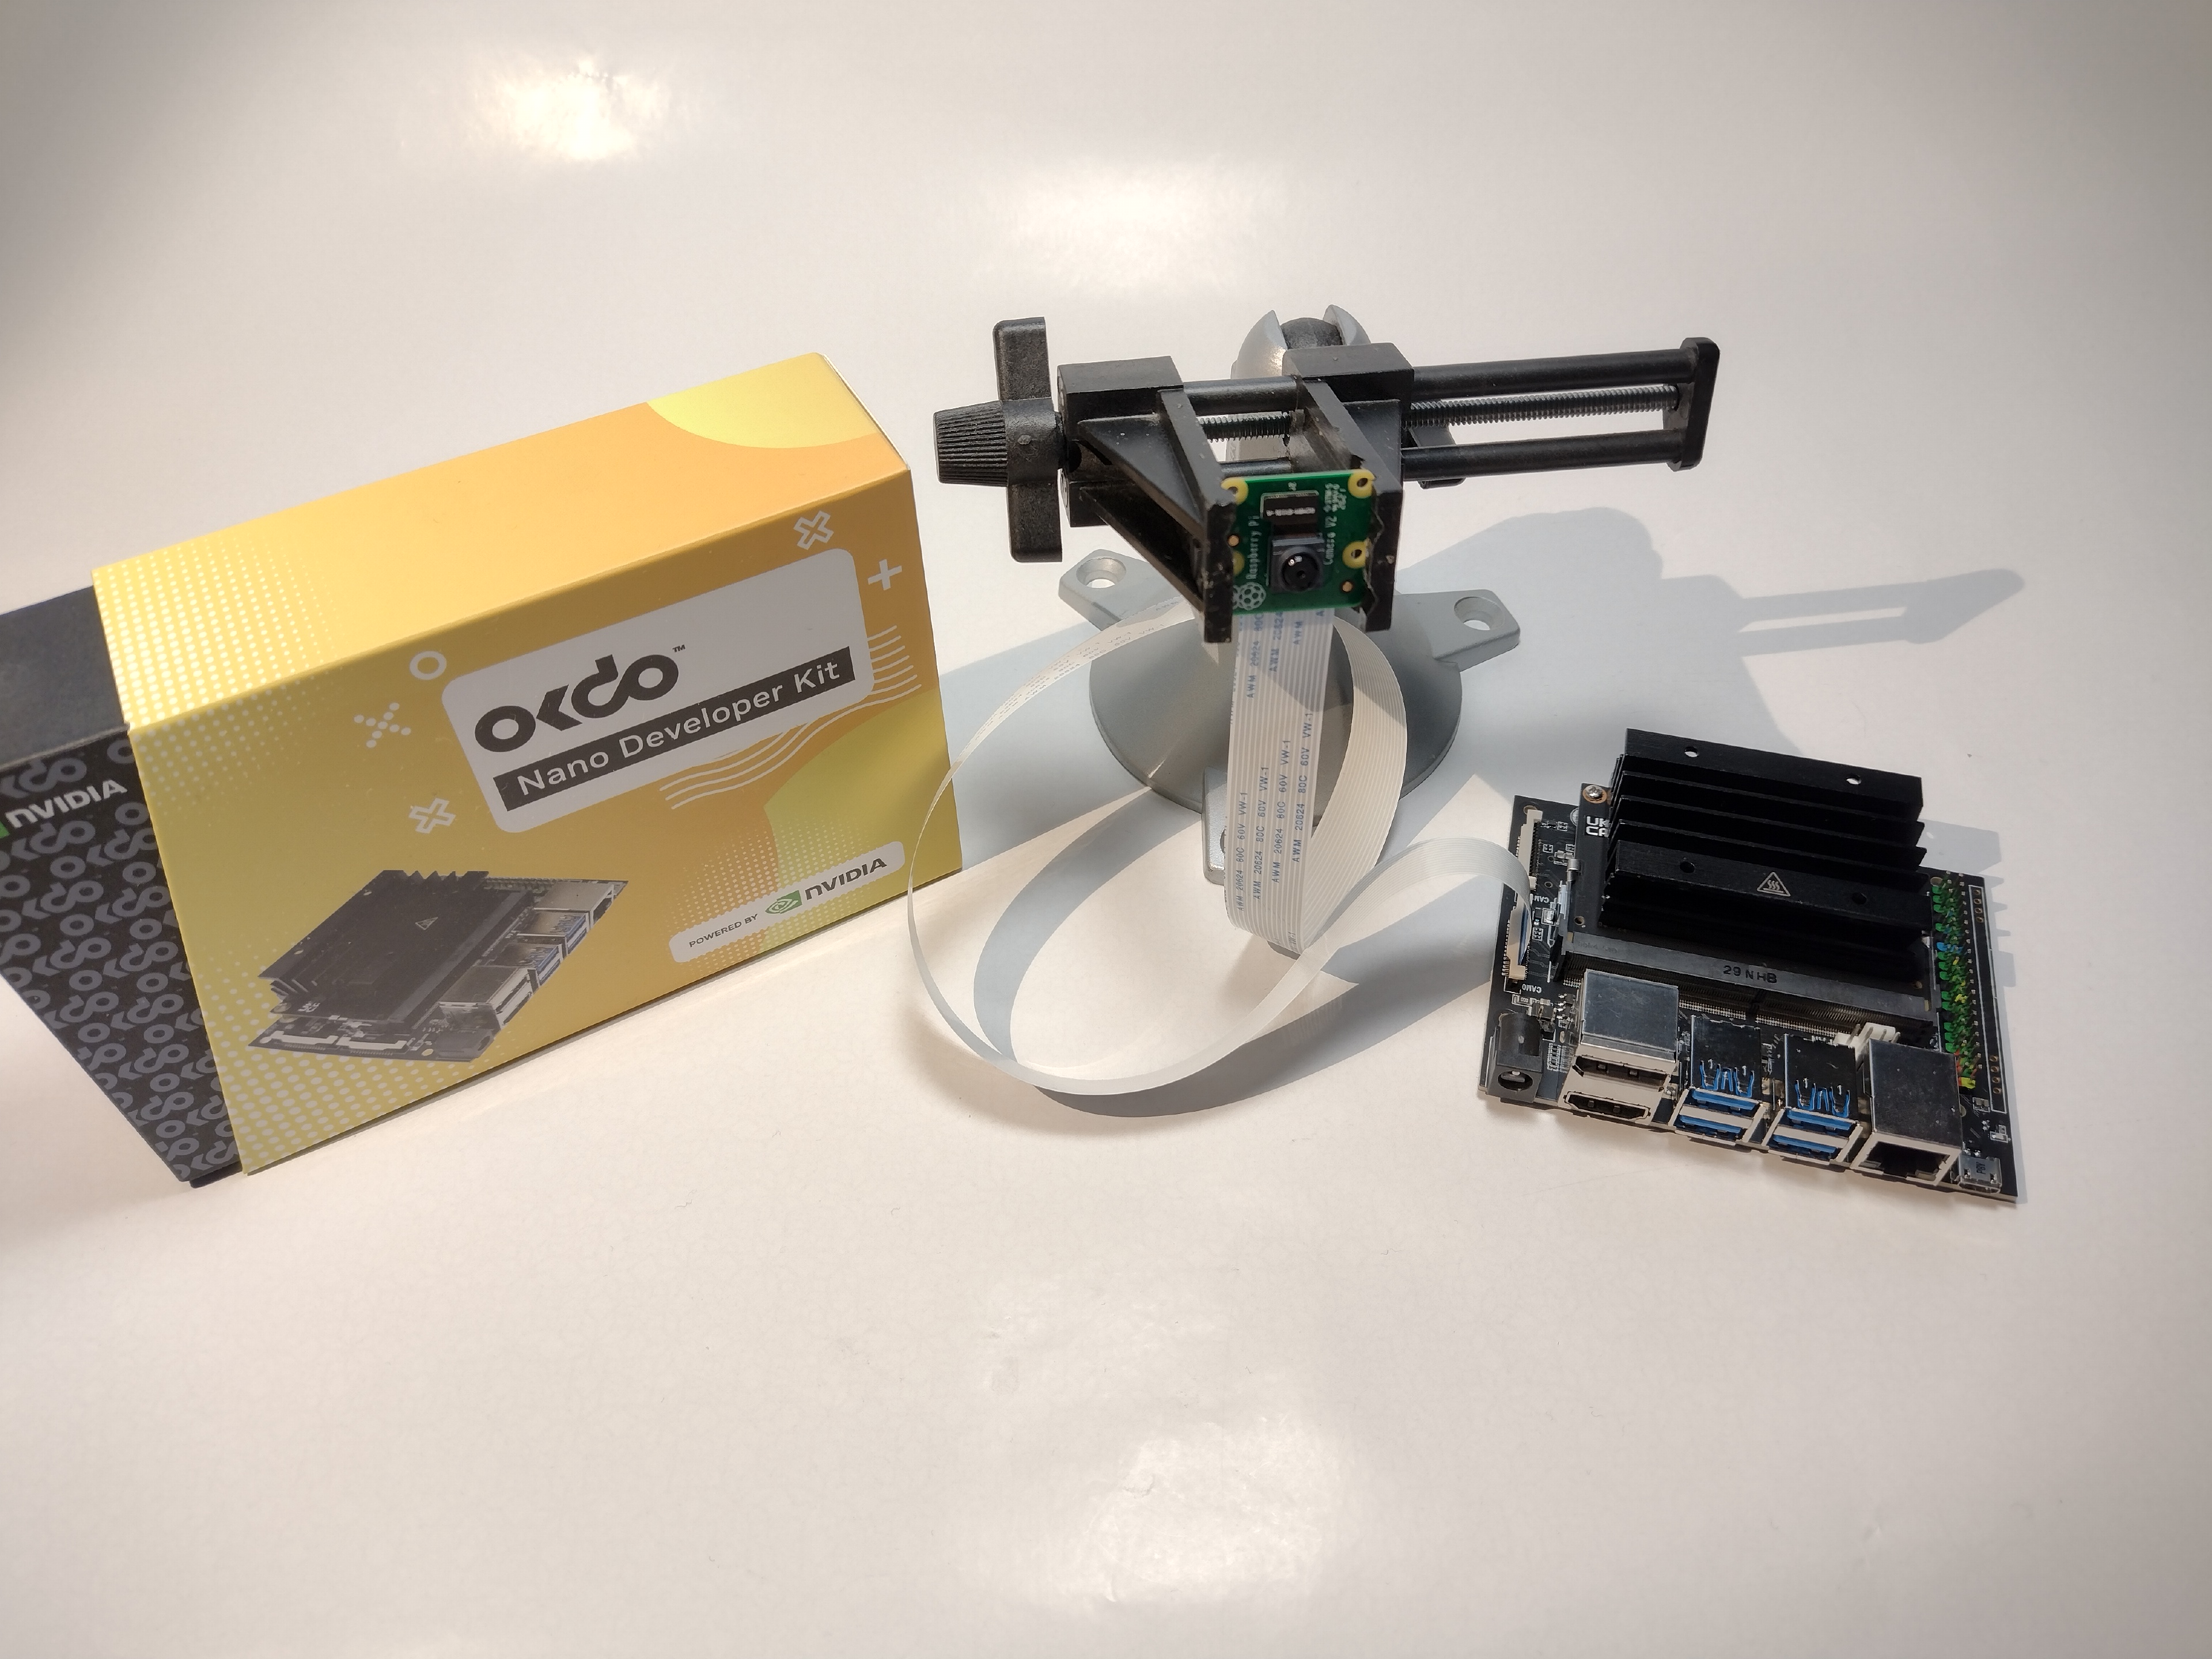
Parts Needed to Get Started with the OKdo Nano C100 Developer Kit & CSI Cameras
OKdo Nano C100 Developer Kit
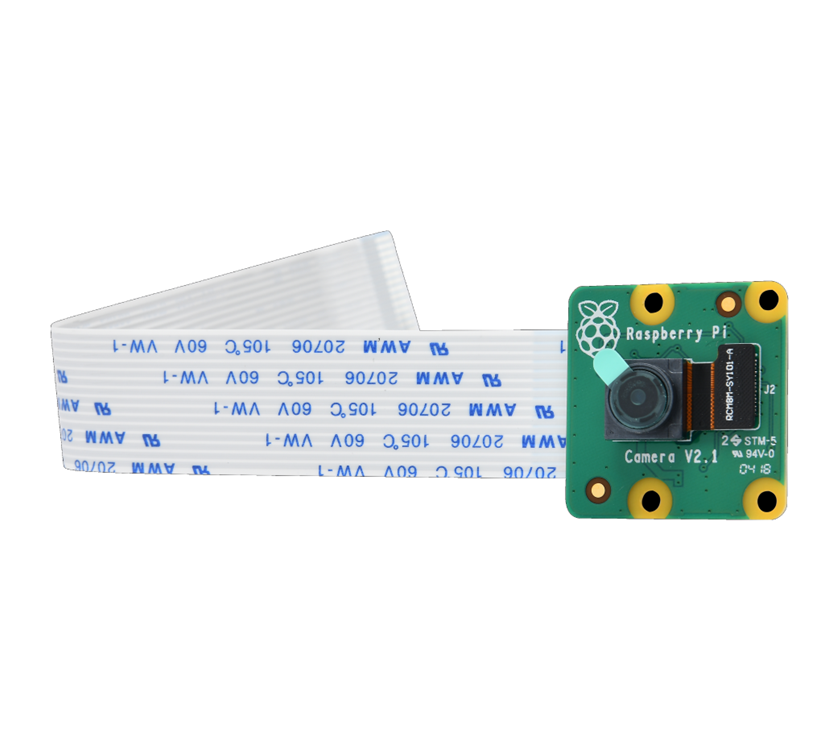
Official Raspberry Pi Camera V2.1
All parts needed to get started:
OKdo Nano C100 Developer Kit
Official Raspberry Pi Camera V2.1
M.2 Wireless Module A8 for ROCK 3A, ROCK 5B, WiFi 6, BT5.2
OKdo Multihead Plug-in AC/DC Adapter Universal Power Supply (PSU)
32 GB MicroSDHC Card Class 10 A1
Host computer Windows/Mac/Linux
HDMI monitor
USB keyboard
USB mouse
HDMI cable
Ethernet cable
Internet connection and router
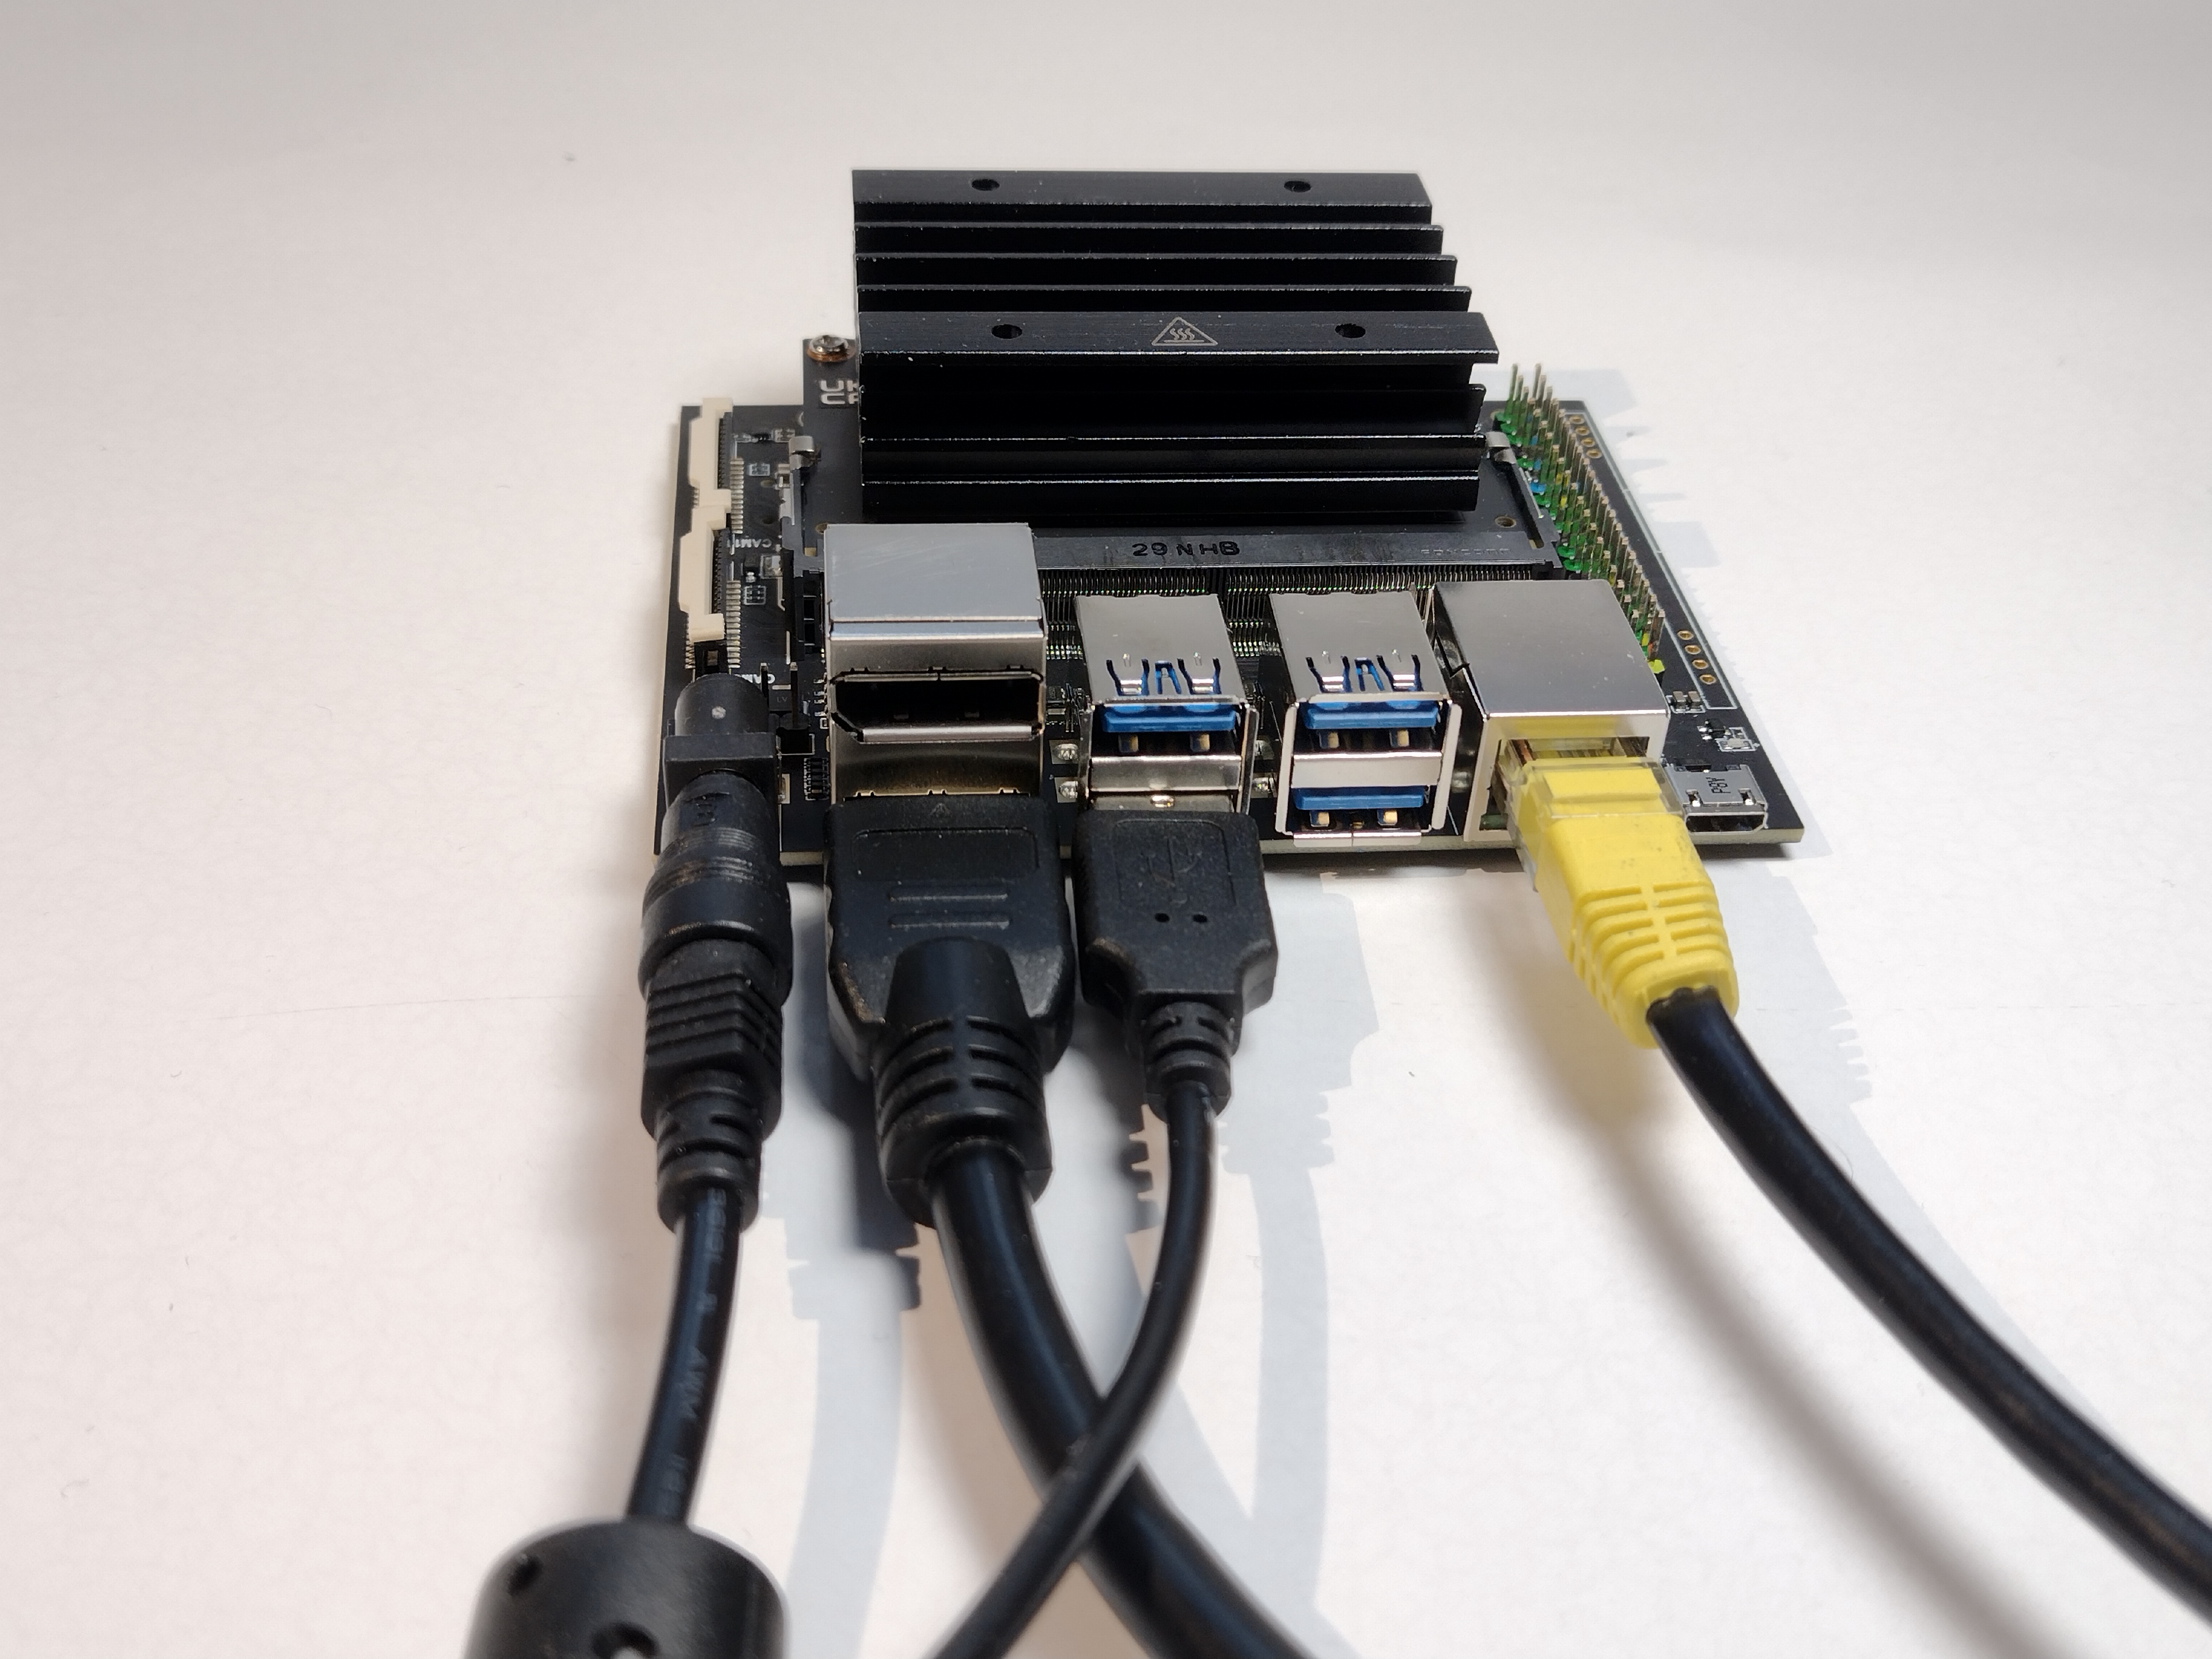
Step 1: Board Setup
Unbox the OKdo C100 Nano Developer Kit and attach the following cables and accessories. Cables, SD card and power supply are not included with the kit.
- Attach an HDMI monitor (full size connector), USB keyboard and mouse
- Ethernet is required if you want to update the OS
- Optionally fit an M.2 E key wireless module by removing the Nvidia Jetson module and fitting the wifi module to the base board before refitting the Jetson module
- Connect a USB mouse and keyboard
- Attach a good quality 5V / 4A (20W) power supply to the barrel jack (5.5mm by 2.1mm) but do not power on yet. The recommended power supply is the OKdo Multihead Plug-in AC/DC Adapter Universal Power Supply (PSU)
- The micro-USB port is for a serial console only
Warning: DO NOT place a jumper on the 2-pin header next to the barrel jack
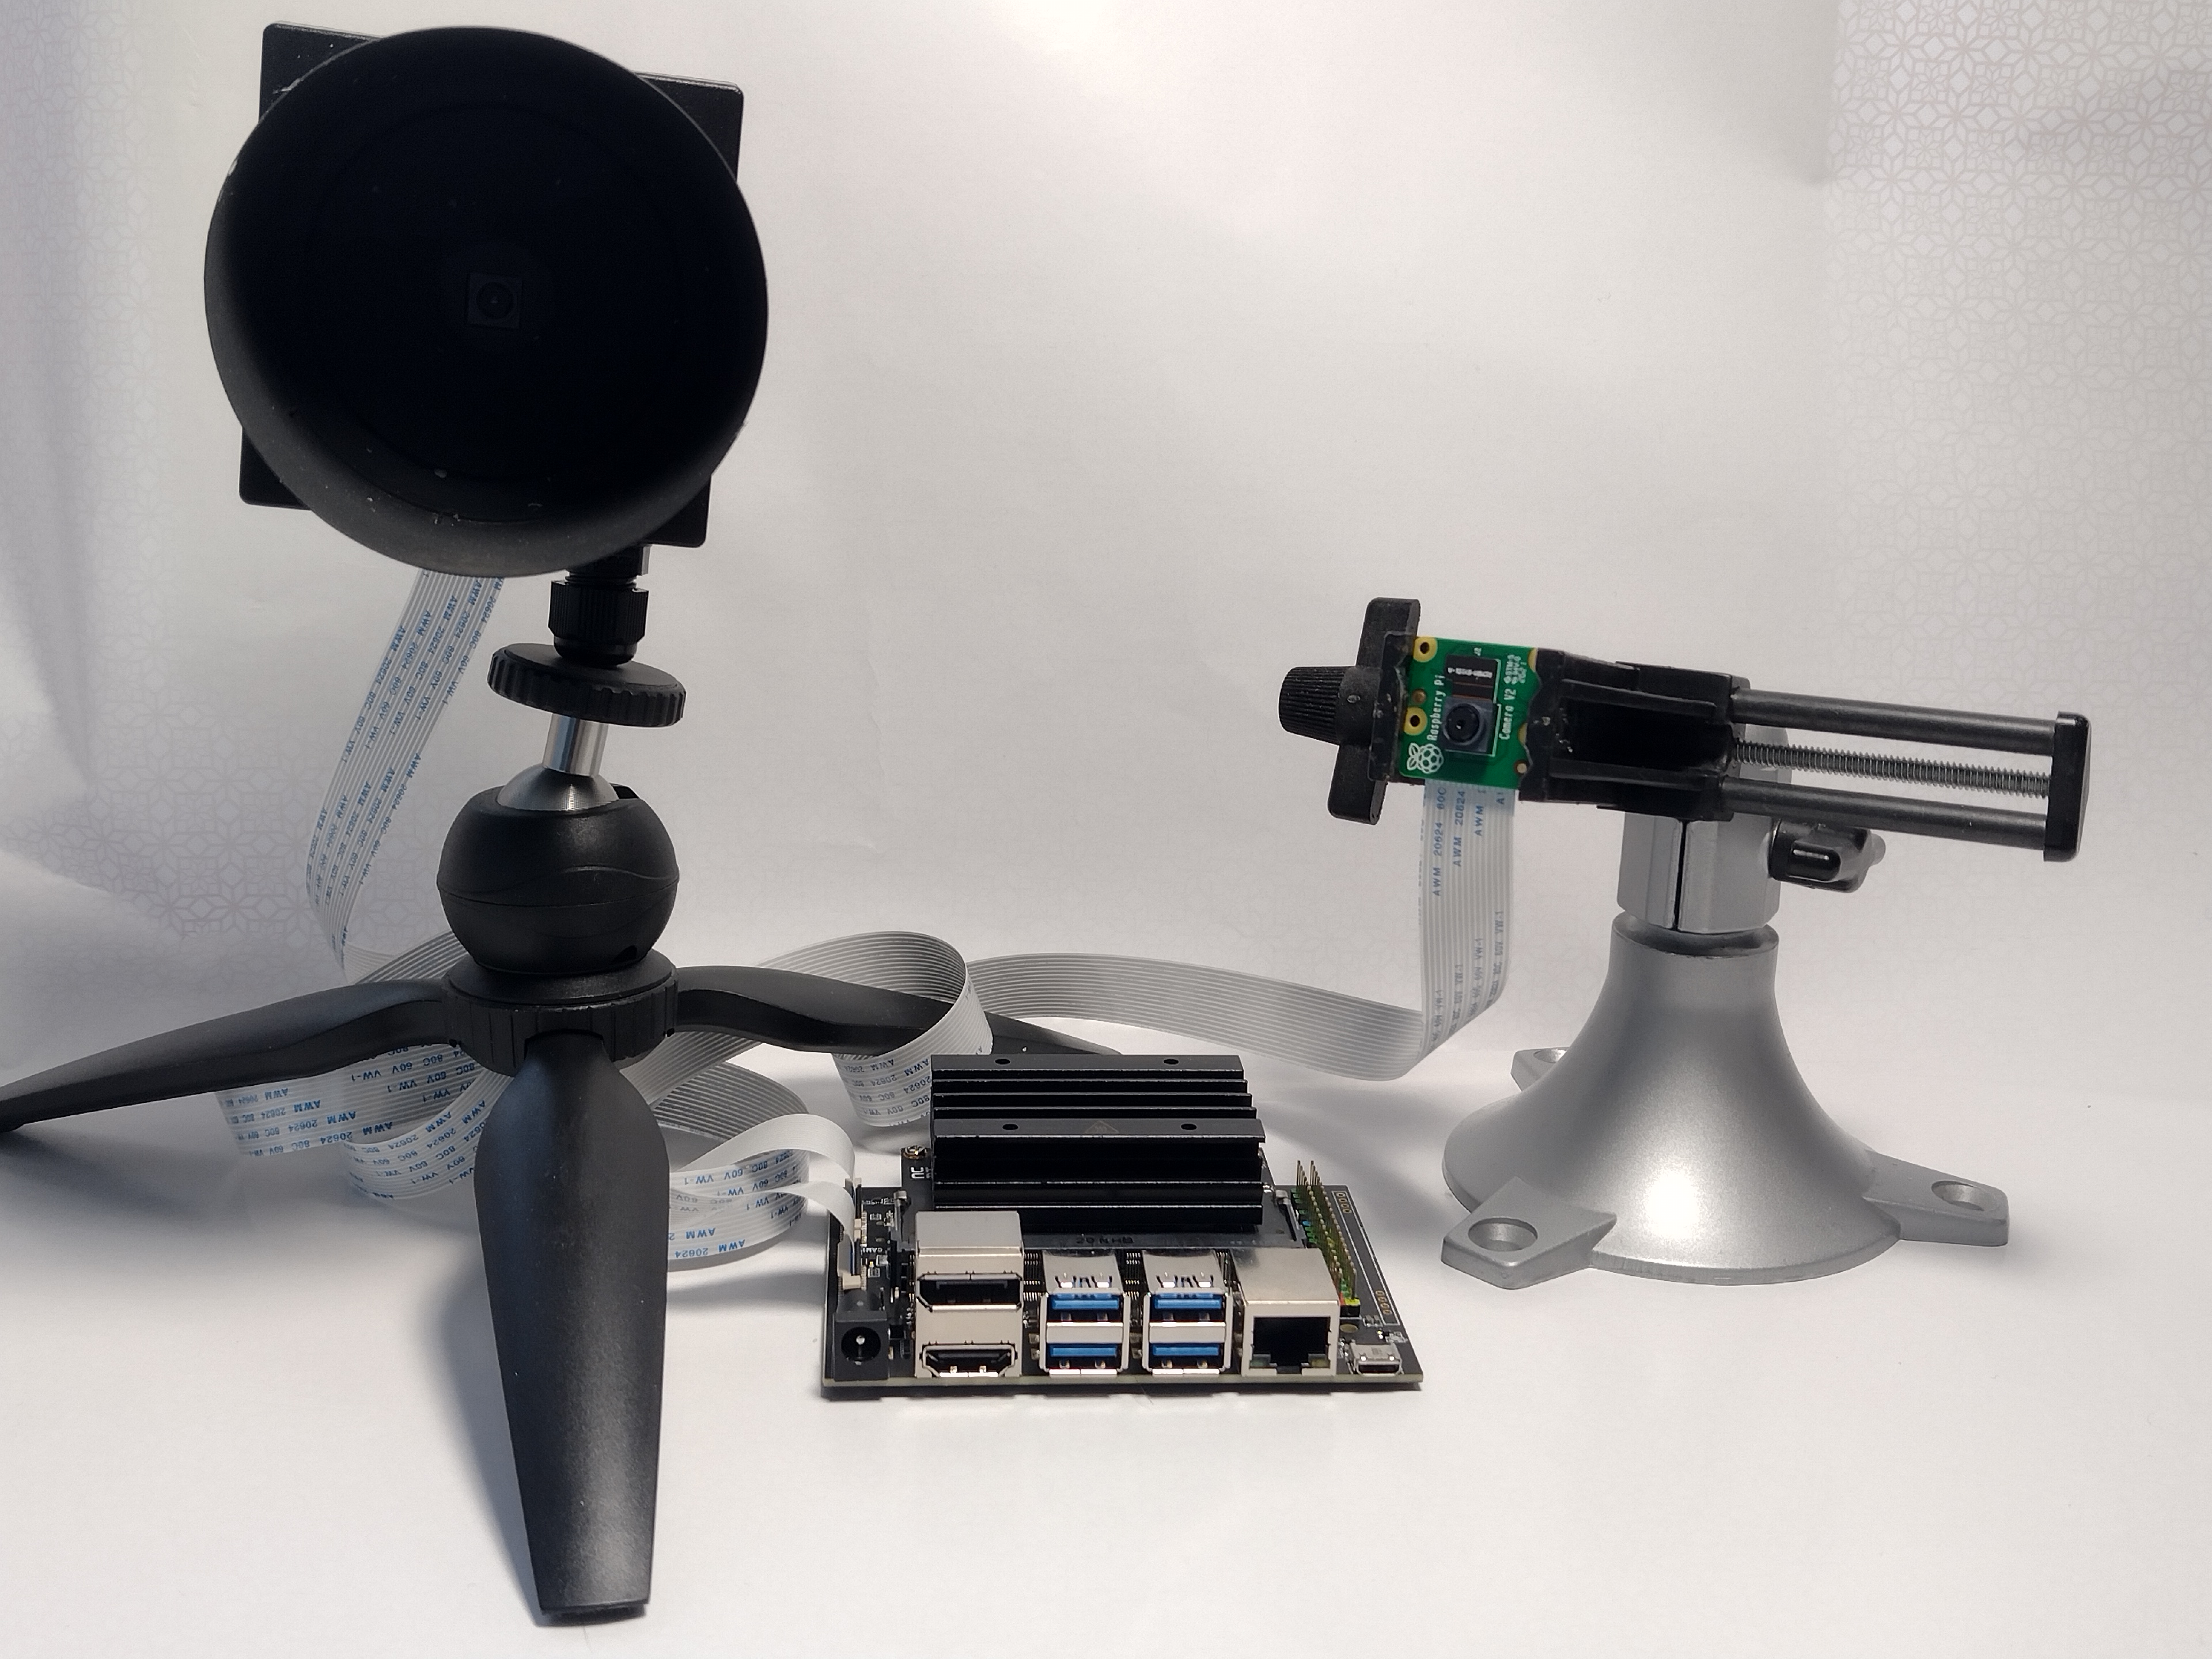
Step 2: Cameras
The Nano C100 has 2 MIPI-CSI camera ports and the software supports cameras based on imx219 (Raspberry Pi V2 camera) and imx477 sensors out of the box.
We are using two Pi V2 camera modules to showcase the board’s capabilities but you only need one to follow along.
- Open the CSI connector latch by lifting the tab.
- Slide the ribbon cable into the connector with the blue marking facing away from the heat sink. Gently push down on the latch to secure
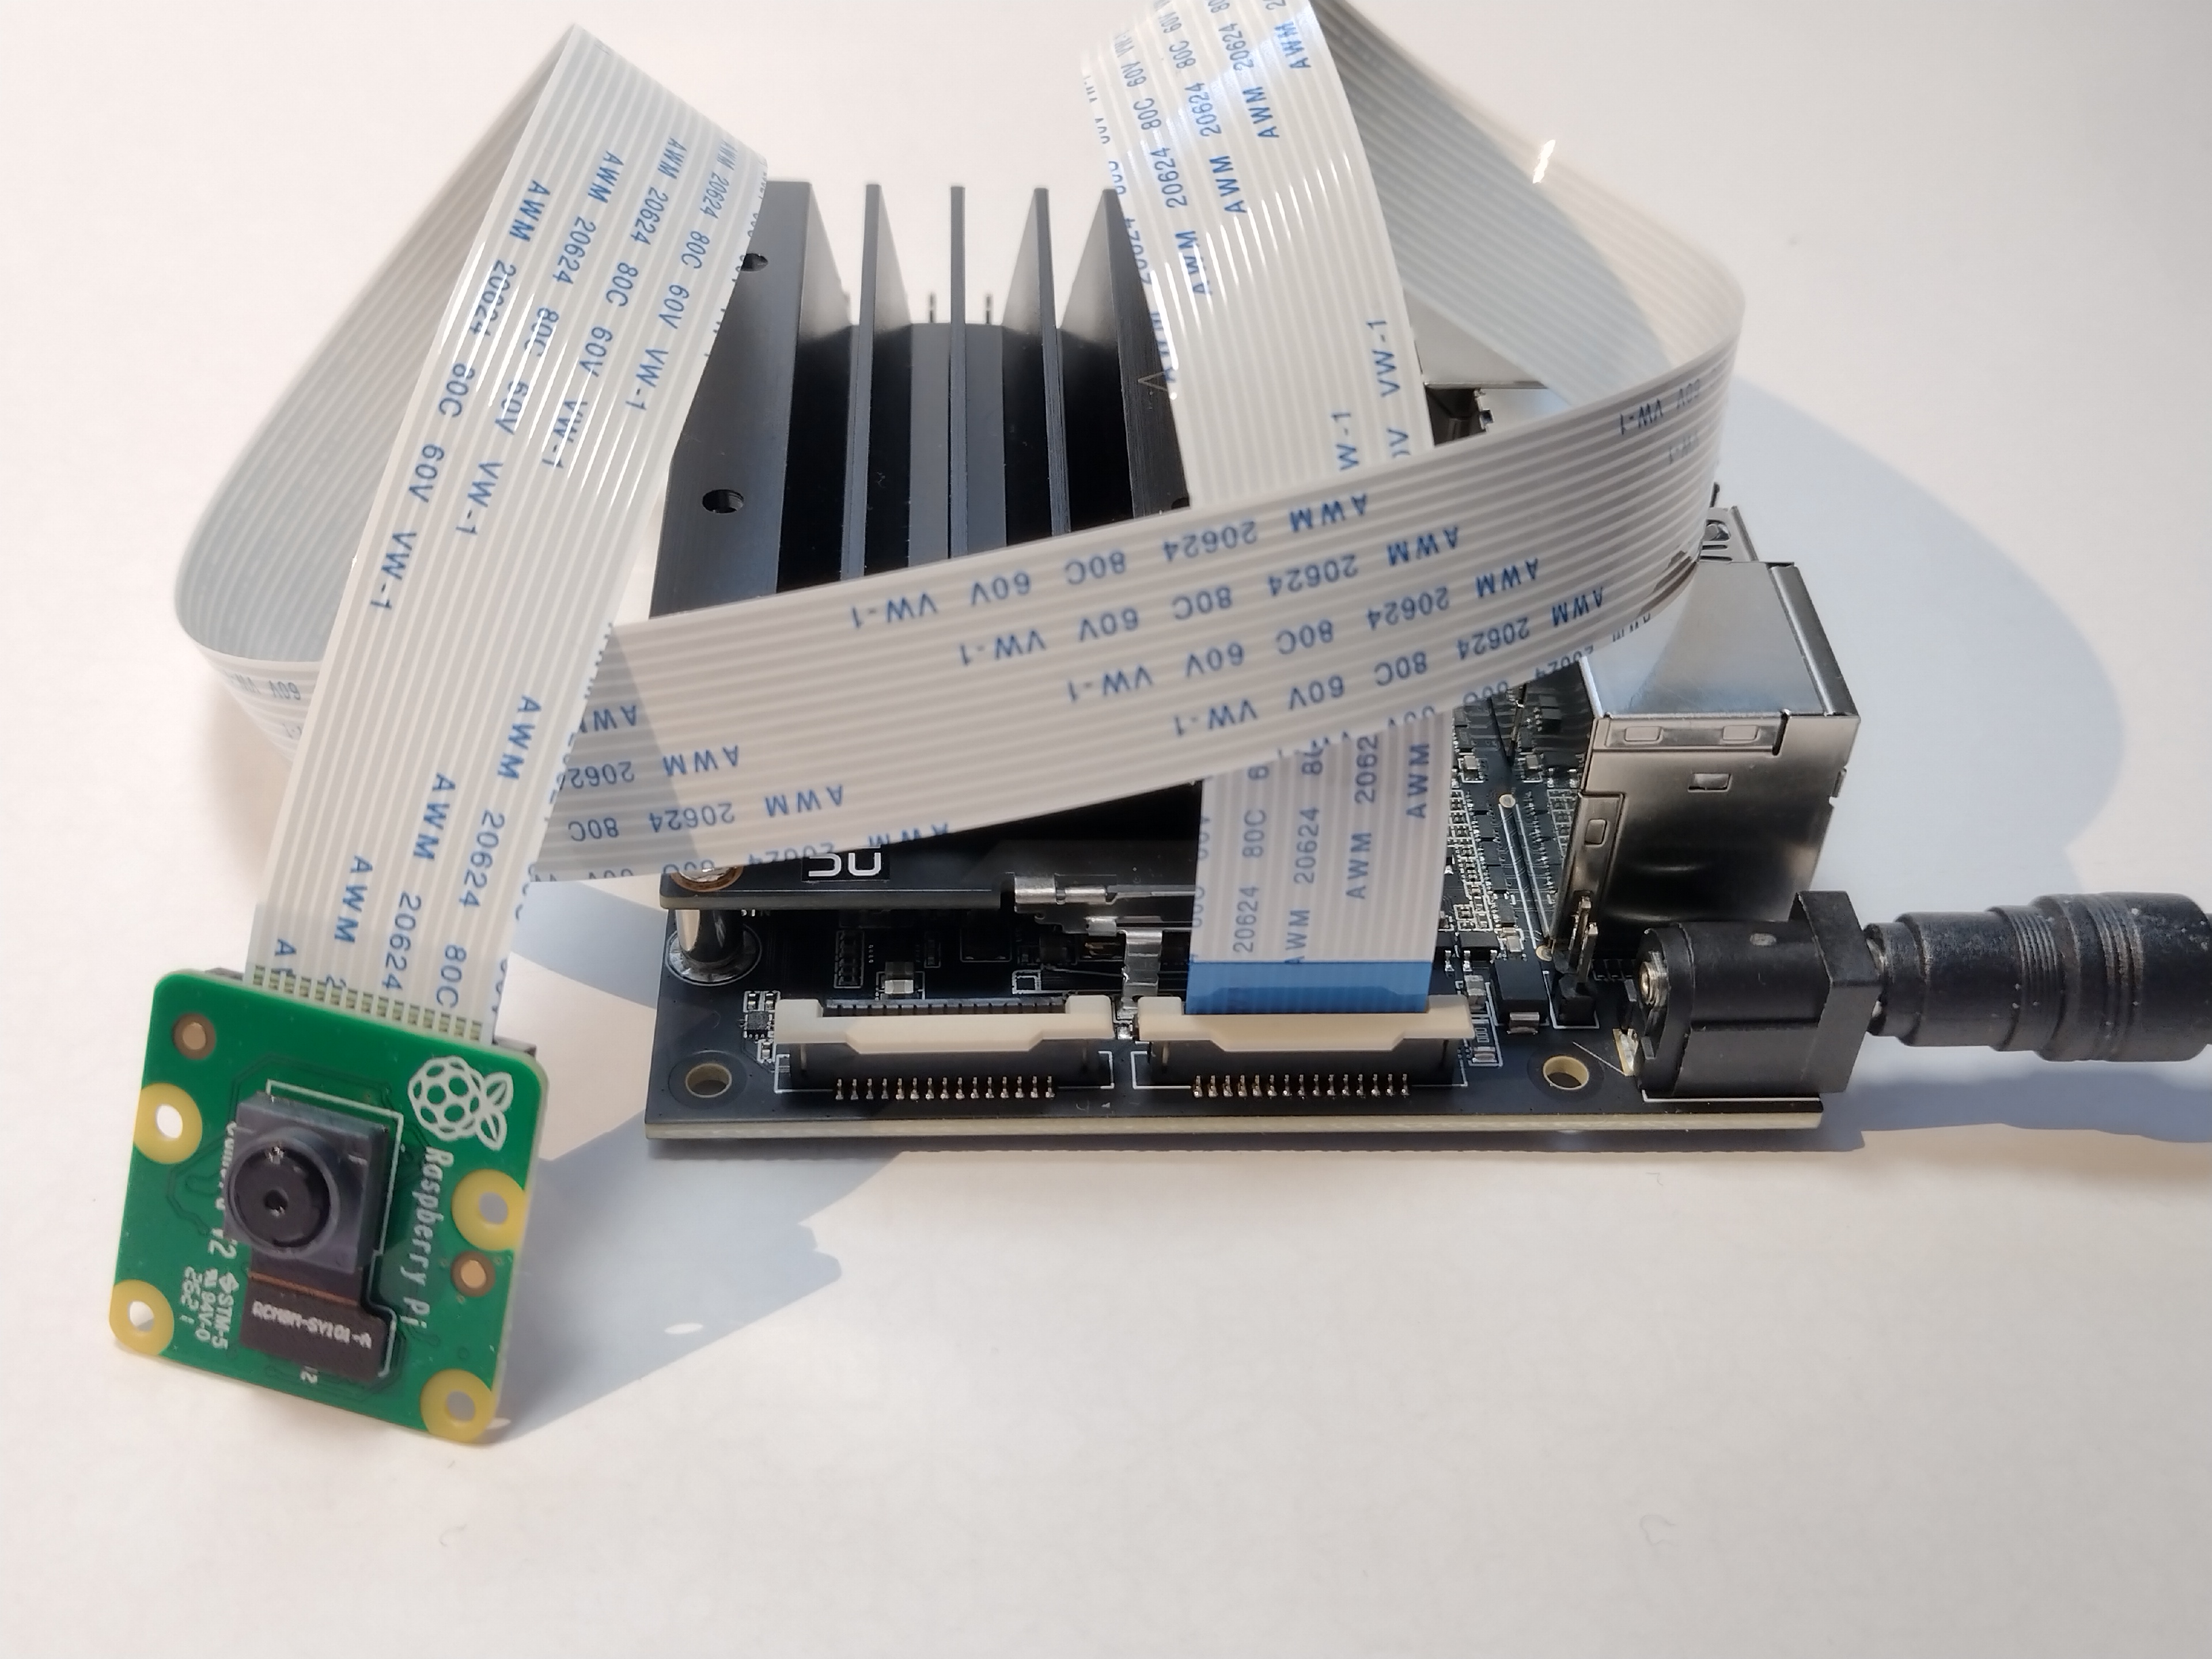
- Add a second camera if you have one
Here’s the dual camera setup used for the subsequent demos:
Step 3: Flash SD Card
The C100 uses the NVIDIA Jetson Nano module which comes with 16GB of on board eMMC storage but for development purposes we are going to flash the system image to micro SD card and boot from that. This increases the storage capacity for application development software.
You need a host PC (Mac / Windows or Linux) with a card reader or adapter to download and flash the image. Use a good quality microSD card 32GB or larger, Speed Class 10, A1 rated. We tested with a 32GB SanDisk Ultra.
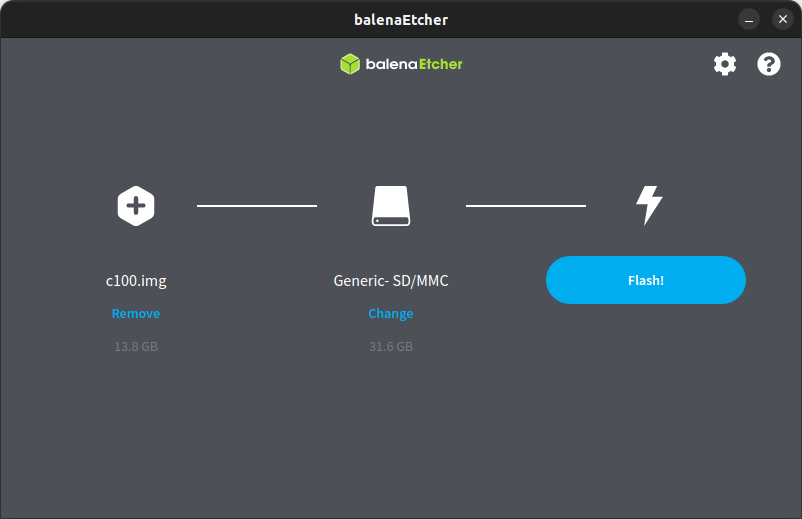
BalenaEtcher which runs on Linux / Mac / Windows PC’s is recommended for flashing and verifying the SD card image.
- Download the official OKdo Nano C100 Developer Kit OS image from the OKdo Software & Downloads hub
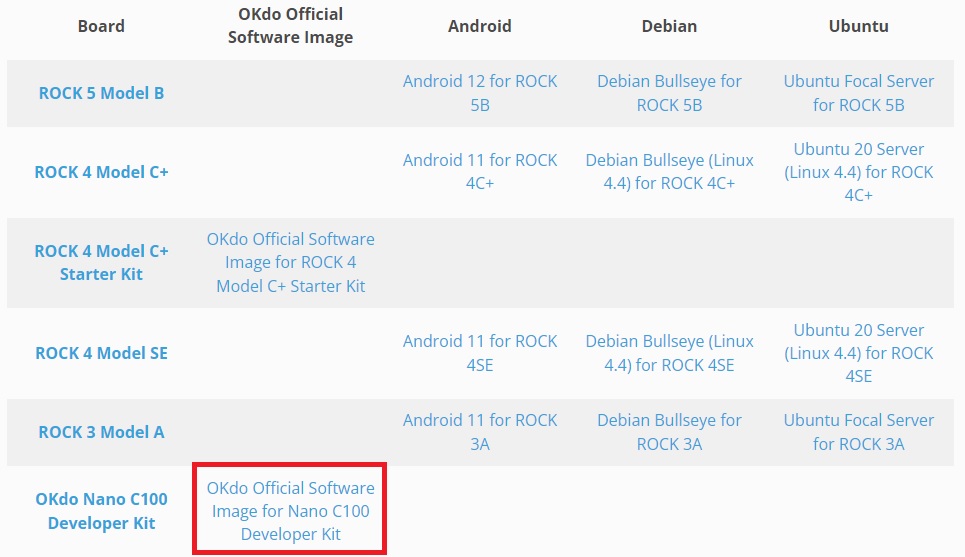
- The download filename is c100.img.xz
- Insert the microSD card into the host’s card reader
- Start balenaEtcher, select the C100 image and the SD card
- Select Flash and wait for the image to be written and verified – this is a coffee break command!
- Eject the SD card from the host and insert it into the C100 card slot under the Jetson Nano module
Warning: Be careful to select the correct drive!
Step 4: First Boot
The initial boot will take you through the setup sequence which includes accepting the NVIDIA end user licence, (EULA). Just follow the onscreen instructions and accept the default settings. This will give you the maximum software partition size and configure the module in MAX power mode.
- Plug in the power supply
- The green LED next to the micro USB connector will turn on
- Review and accept NVIDIA Jetson software EULA
- Select system language, keyboard layout, and time zone
- Create username, password, and computer name
- Accept APP partition size. It is recommended to use the max size suggested
- Accept MAX power setting
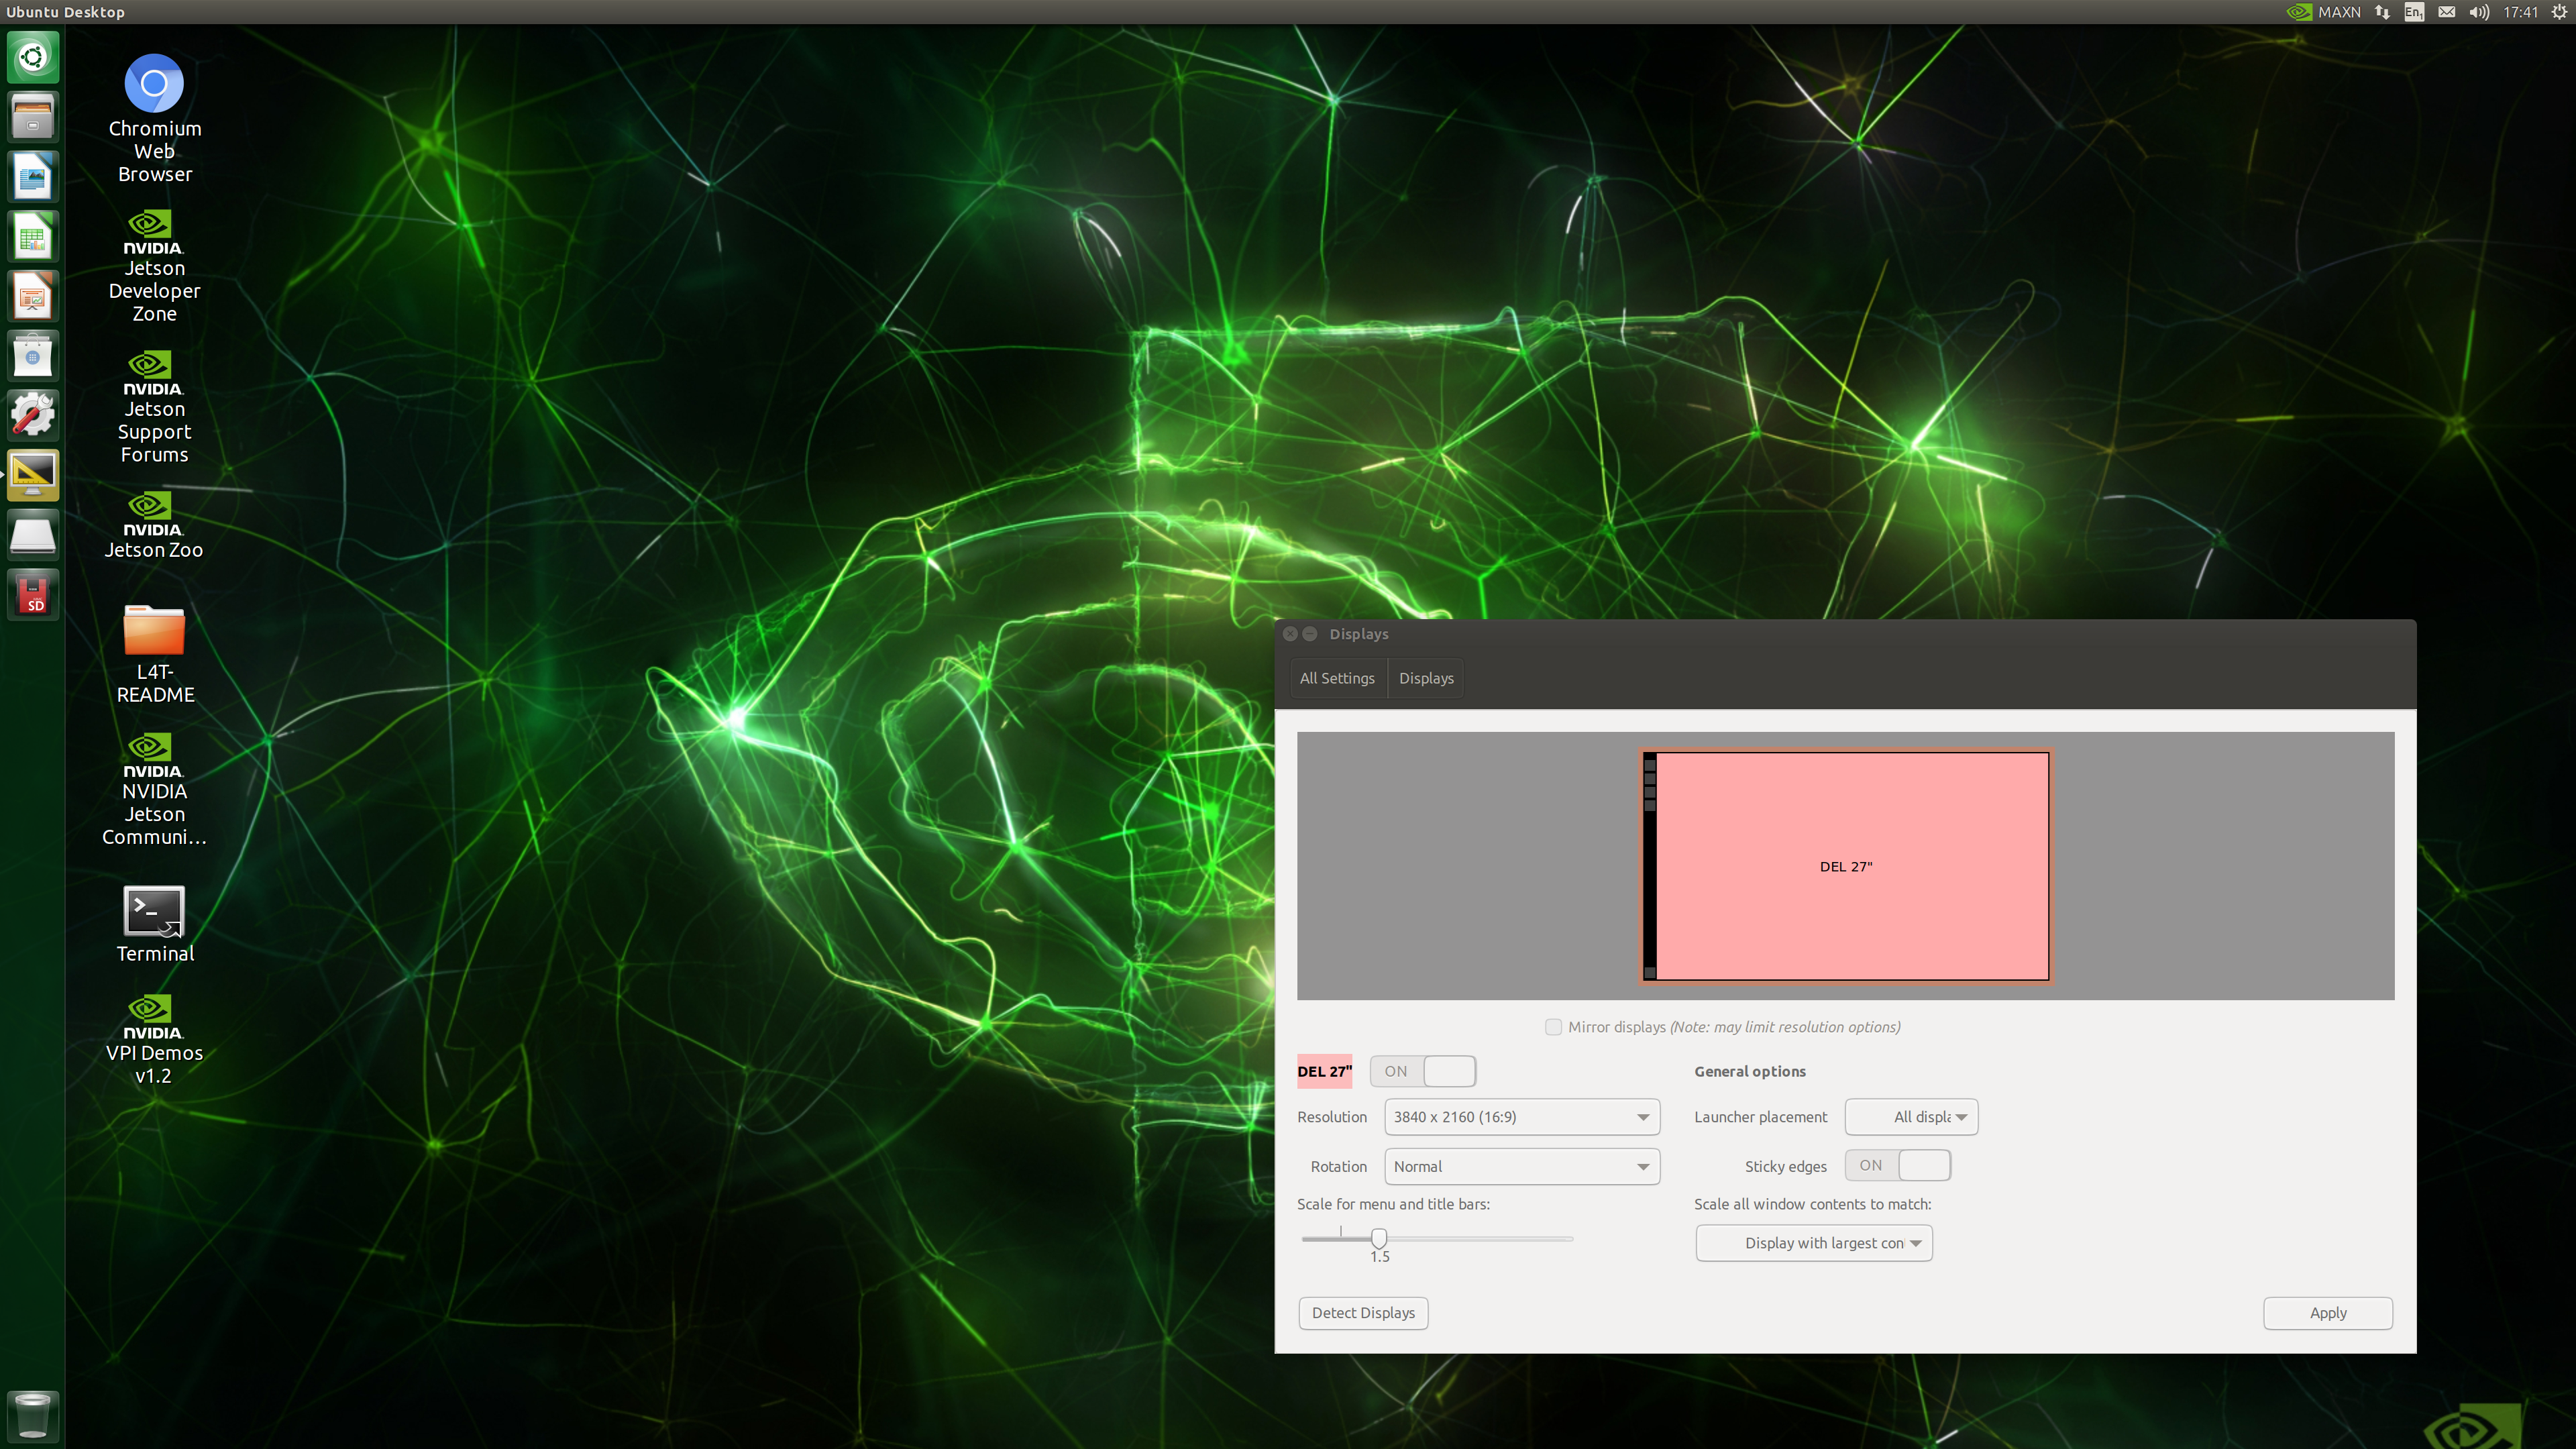
After a few seconds the Bionic desktop will appear. If you need to adjust the monitor settings click the Settings icon in the side-bar and change the Display settings to your liking.
Step 5: NVIDIA Jetpack
The image comes with NVIDIA’s Jetpack version 4.6 which installs a range of useful applications for developing AI applications. They are custom built and optimised to run on the Jetson Nano module and include:
Jetson Linux – bootloader, Linux kernel, Ubuntu desktop environment, and a complete set of libraries for acceleration of GPU computing, multimedia, graphics, and computer vision.
TensorRT – a high performance deep learning inference runtime for image classification, segmentation, and object detection neural networks.
CUDA Toolkit – provides a comprehensive development environment for C and C++ developers building GPU-accelerated applications.
Jetson Multimedia API package – provides low level APIs for flexible application development.
Full details about the NVIDIA Jetpack can be found on the Jetpack page on the NVIDIA website.
Tip: If you upgrade with the package manager you may experience nvidia-l4t-bootloader errors, check out this NVIDIA forum post for fixes.
You can check the current version of the Jetpack with the following command:
sudo apt-cache show nvidia-jetpack
Step 6: Camera Test
The next section runs some basic tests on your camera setup to check everything is working as expected.
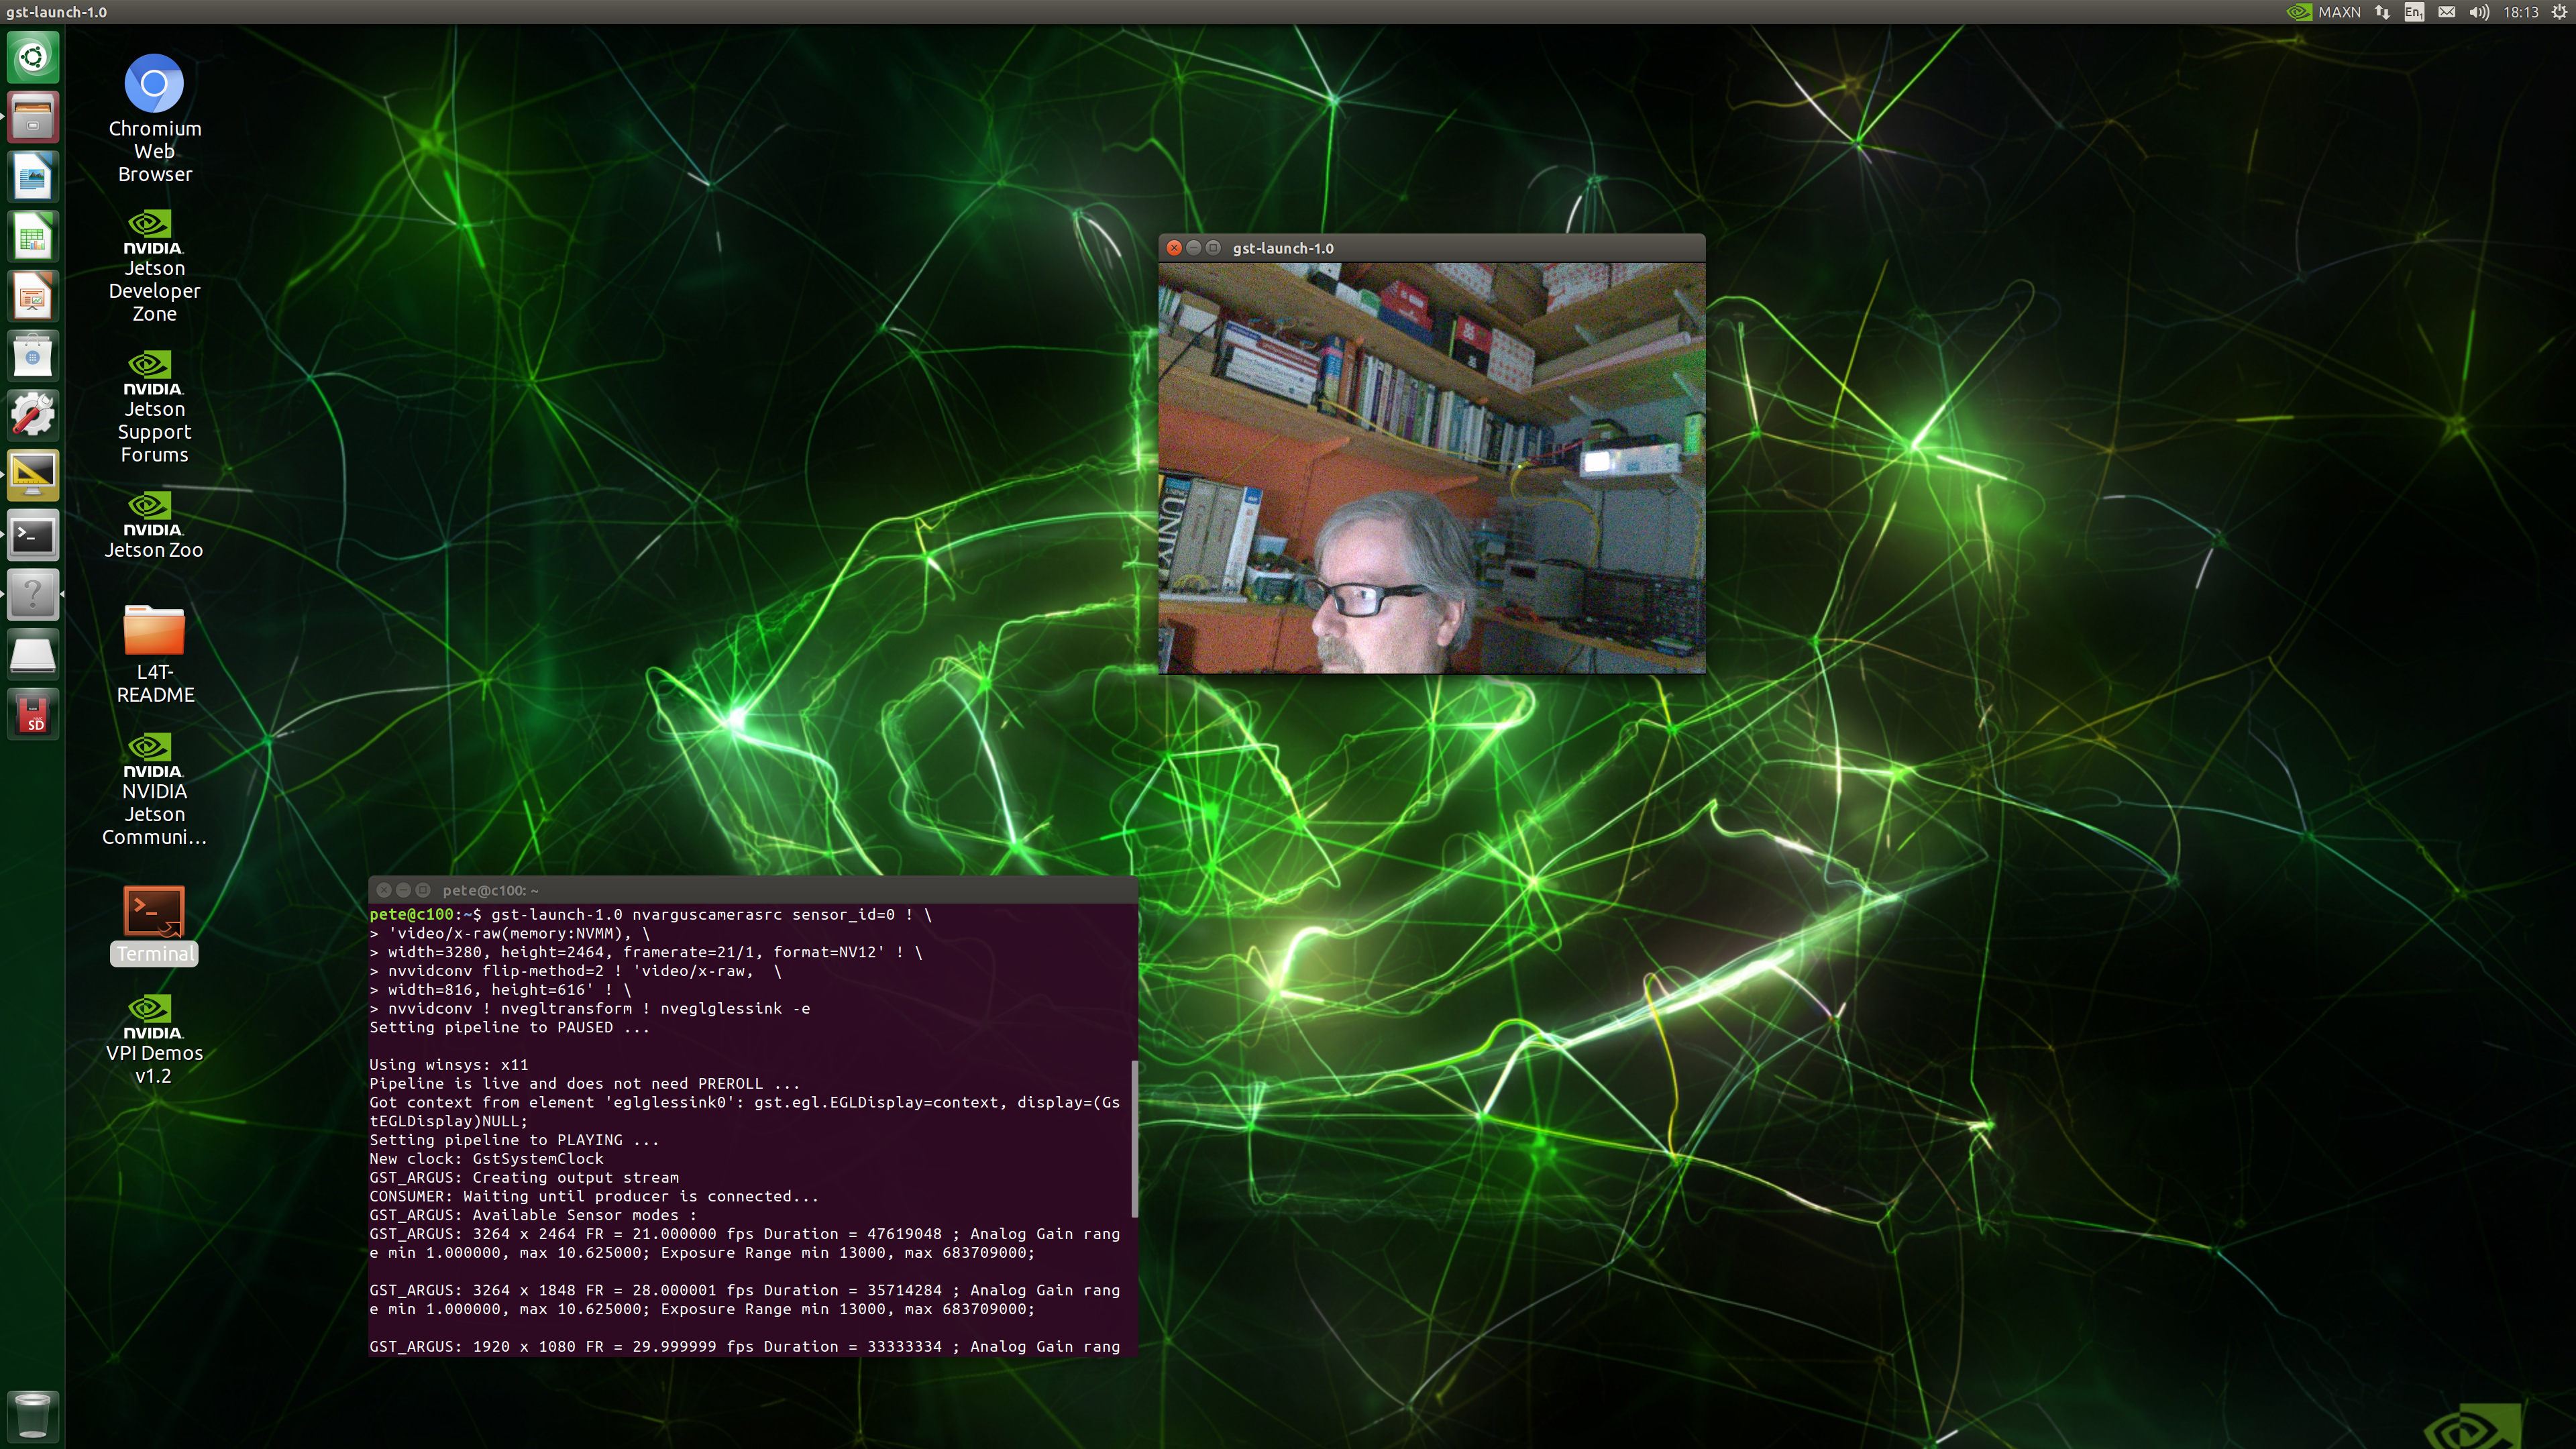
Test each camera using this Gstreamer pipeline in the Terminal. Set the sensor_id to 0 for the first camera and 1 for a second camera – this single command is split across several lines:
gst-launch-1.0 nvarguscamerasrc sensor_id=0 ! \
'video/x-raw(memory:NVMM), \
width=3280, height=2464, framerate=21/1, format=NV12' ! \
nvvidconv flip-method=2 ! 'video/x-raw,  \
width=816, height=616' ! \
nvvidconv ! nvegltransform ! nveglglessink -e
Depending on the orientation of your camera, you may need to adjust the flip-method index in the command line above. Here are the different settings:
flip-method: video flip methods
Default: 0, “none”
(0): none – Identity (no rotation)
(1): counterclockwise – Rotate counter-clockwise 90 degrees
(2): rotate-180 – Rotate 180 degrees
(3): clockwise – Rotate clockwise 90 degrees
(4): horizontal-flip – Flip horizontally
(5): upper-right-diagonal – Flip across upper right/lower left diagonal
(6): vertical-flip – Flip vertically
(7): upper-left-diagonal – Flip across upper left/low
The camera should display a video image in a new window. Press Ctrl + C to exit
Step 7: Python Image Processing
JetsonHacks.com have provided useful scripts demonstrating AI video processing features in Python and C++. Most of the tools you need are already installed in the image, like Python3, the C++ compiler and OpenCV so there isn’t much to setup to run impressive AI apps.
Open a Terminal from the desktop icon and execute the following commands:
Clone the CSI-Camera repository
git clone https://github.com/LetsOKdo/csi-camera.gitChange directory to csi-camera
cd csi-camera
Install libcanberra
sudo apt install libcanberra-gtk-module
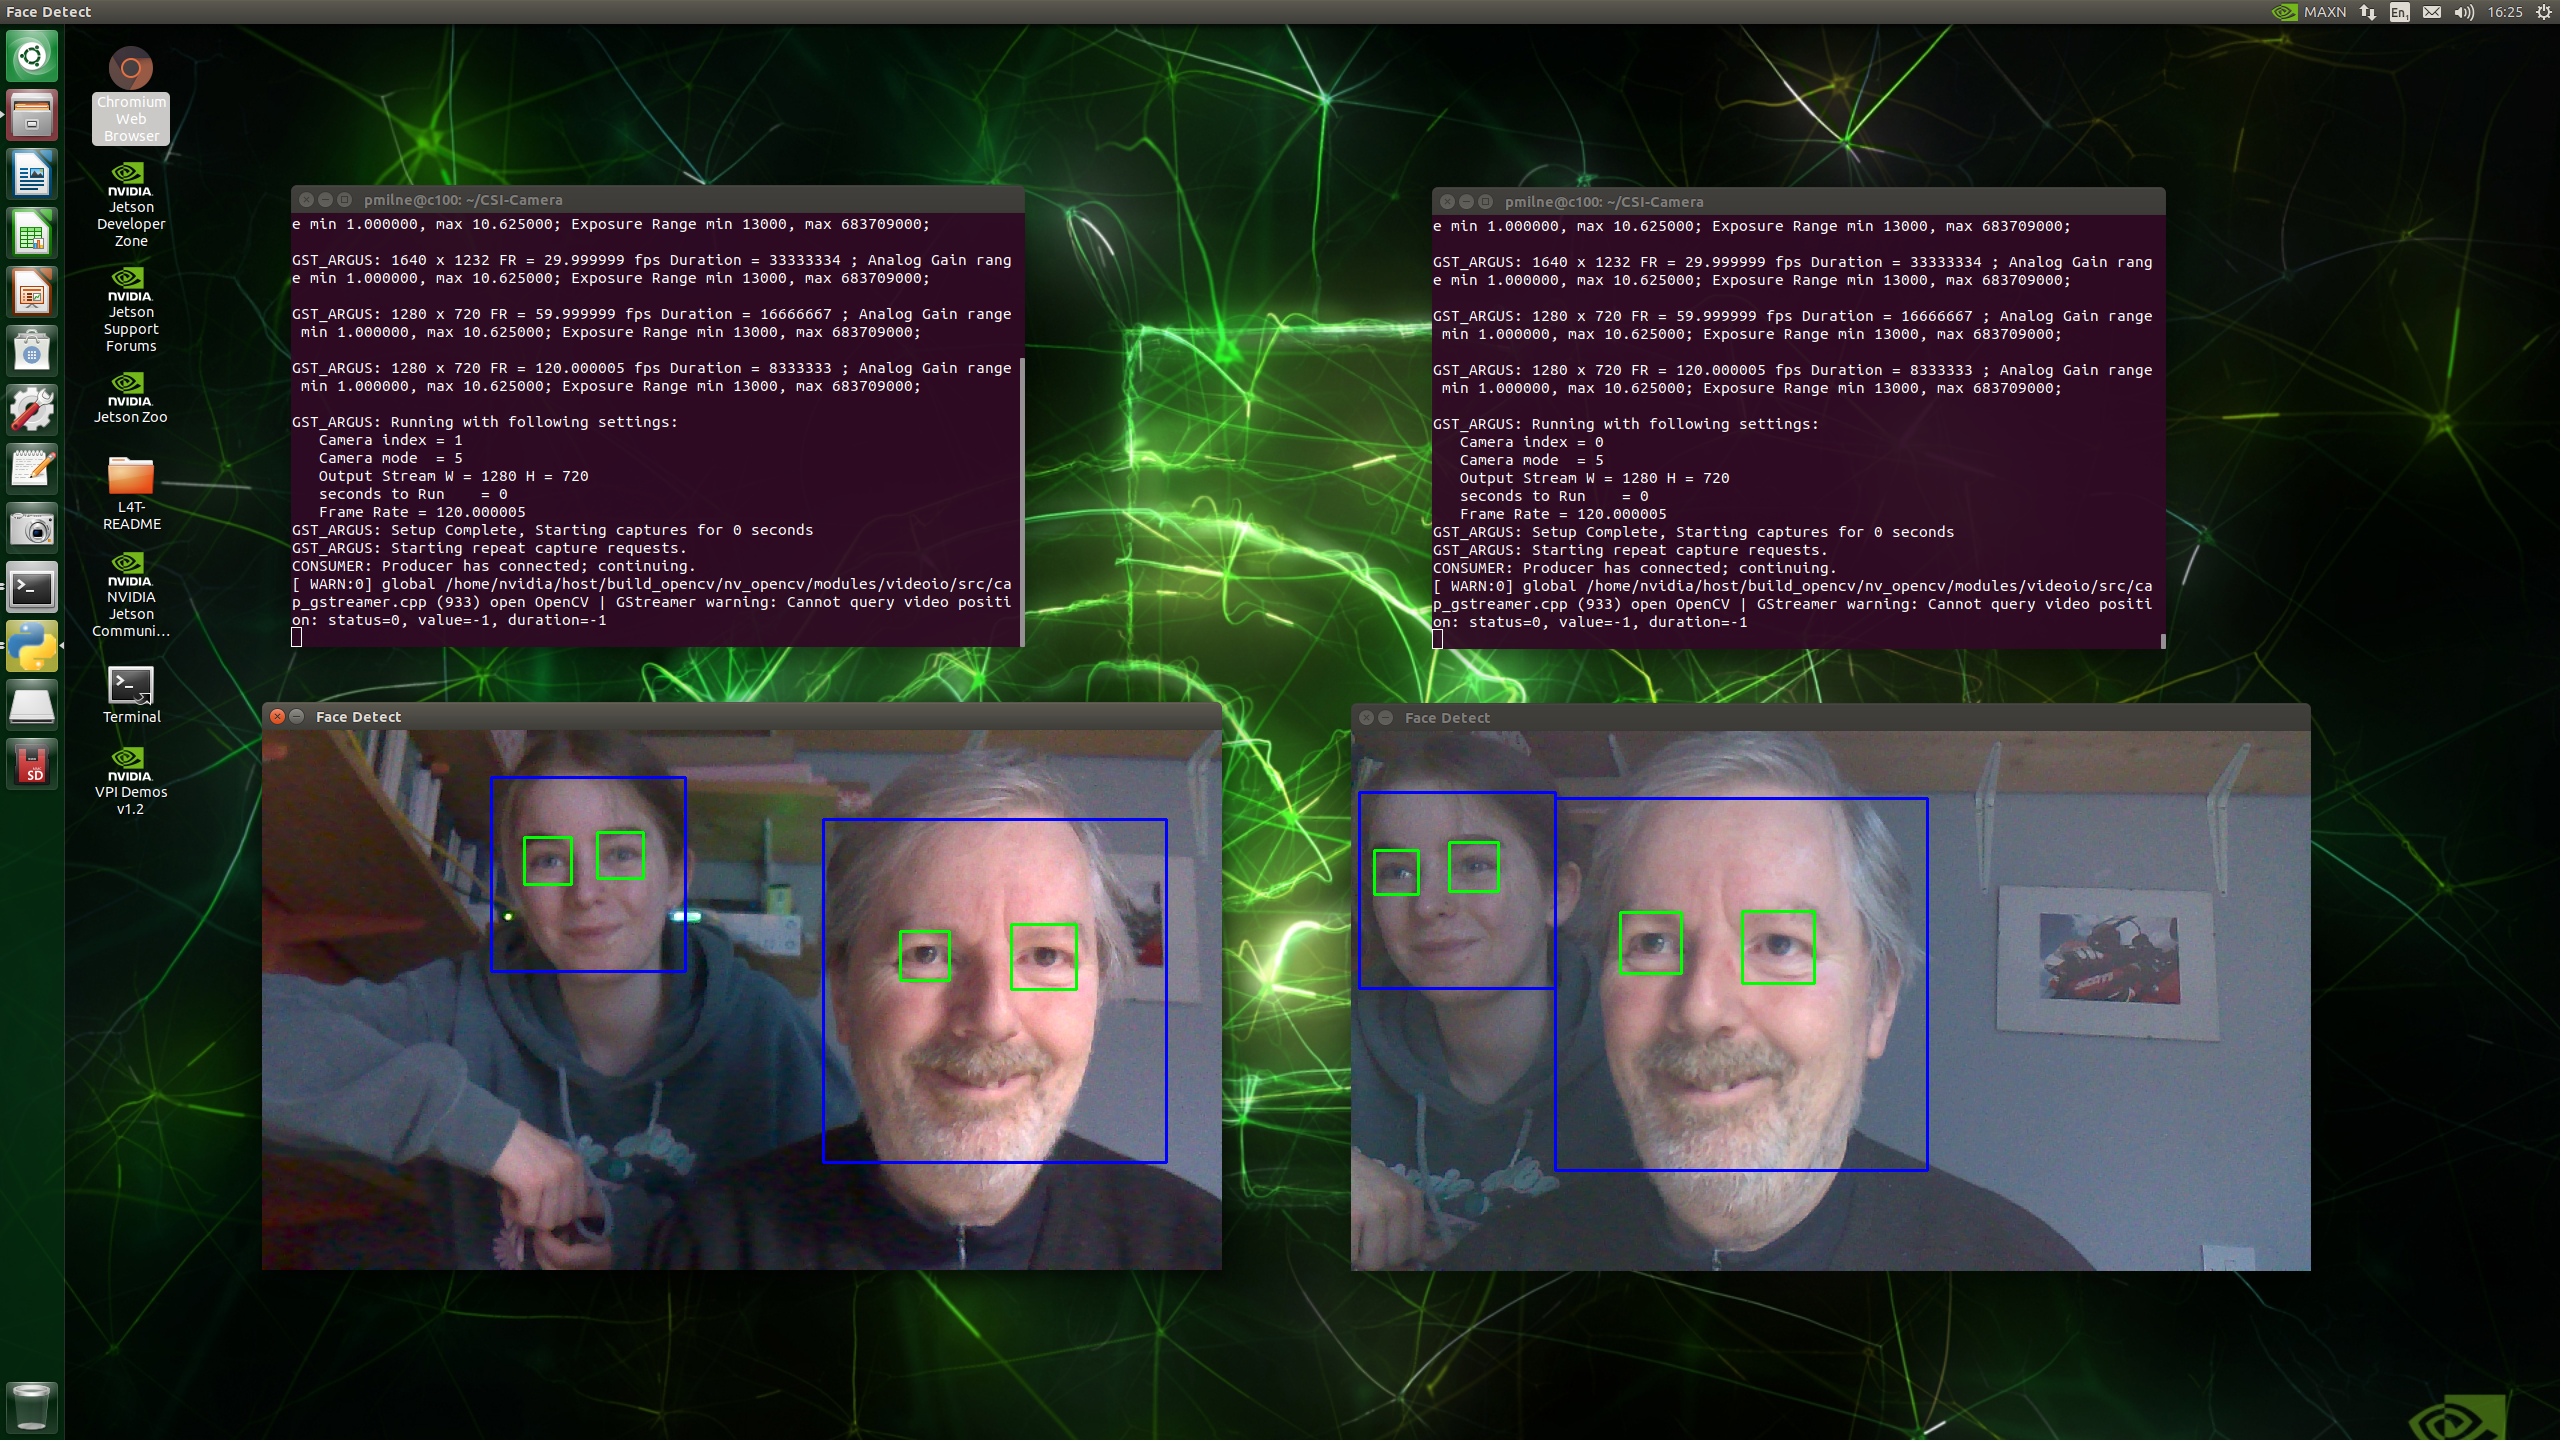
Step 8: Facial Recognition
This AI script uses Python3 and OpenCV libraries and a trained model to recognise and track faces and eye movement in live video streams.
It creates a Gstreamer pipeline similar to the one above and passes the video stream to a facial detection model that can recognise faces and eyes and this renders the tracking boxes in the video stream.
Run the face_detect.py script, in this example we are passing sensor_id=0 and flip_method=2
python3 face_detect.py 0 2Open a second terminal and run another instance of the script, this time passing sensor_id=1, for the second camera
python3 face_detect.py 1 2You should get two video frames both tracking faces and eye movements from different angles, in real-time!
Press CTRL + C to exit
Step 9: Safe Shutdown
Avoid corrupting the SD card image by shutting down the system correctly.
- Click the cog icon in the top right of the desktop and select Shutdown
- After a few seconds, the green power LED on the C100 will go off and the power connector can be removed
- The system is now powered off
Summary
Congratulations! You should have successfully set up and configured your OKdo Nano C100 Developer Kit. We also showed how to start developing powerful image processing applications with CSI camera modules using the software included in the NVIDIA Jetpack installed with the system image.
NVIDIA produce very high quality documentation for their products and you can find links to tutorials, how-to-guides and an active developer community to make your next steps: https://developer.nvidia.com/embedded/learn/tutorials
If you want to understand the details of how the facial recognition app works check out this series of videos called OpenCV 101
You may also find the OKdo C100 Datasheet useful.
Everything is ready now to start exploring the AI image processing capabilities of the C100.


LET’S INVENT THE FUTURE TOGETHER
What’s your challenge? From augmented reality to machine learning and automation, send us your questions, problems or ideas… we have the solution to help you design the world.
Visit our Blogs, Projects and Getting Started Guides for more inspiration!