Get started with the ROCK 4C+ Starter Kit, and learn how to build images based on Debian or Ubuntu with Linux Mainline 6.1 / 5.15.
Author: Peter Milne, engineer and Linux advocate with more SBCs than an Apollo 11 landing craft.
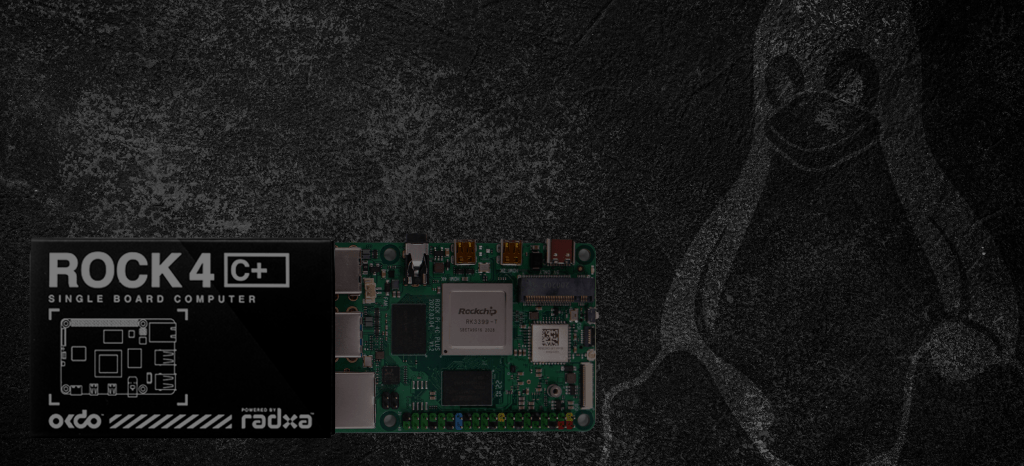
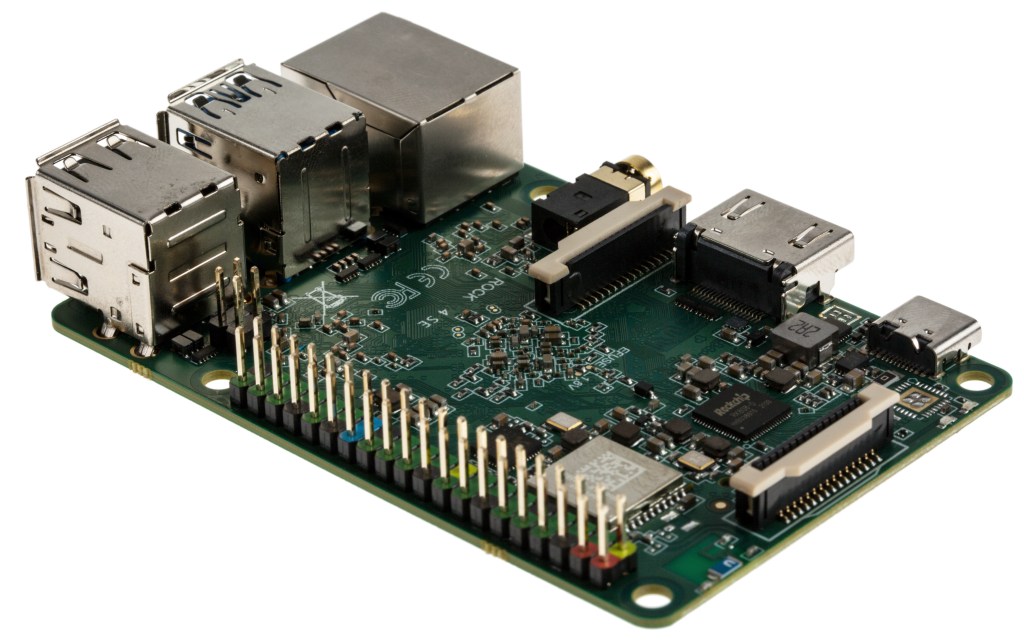
The ROCK 4C+ is an extremely practical single board computer that can run on several Officially supported 64-bit Operating Systems (OS) such as Debian, and Ubuntu plus several third party software images giving you plenty of options for your particular requirements.
In this Getting Started Guide we’ll show you how to build OS images for Debian or Ubuntu based on the latest Linux Mainline for your ROCK board, we use the Armbian build system to show you how to do this.
As the ROCK 4C+ SBC is now supported in Linux 6.1 we can add a new Board Support Package (BSP) to Armbian and use it to build OS images that can be flashed to SD cards.
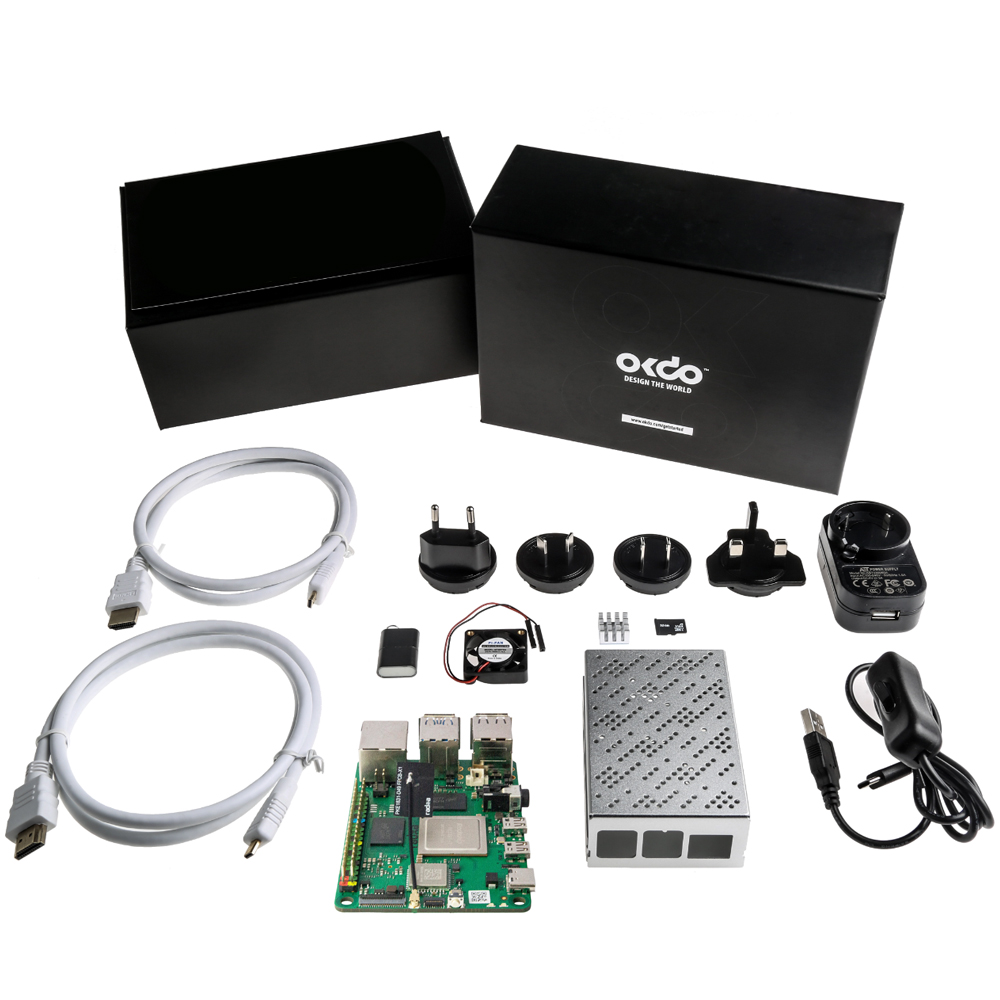
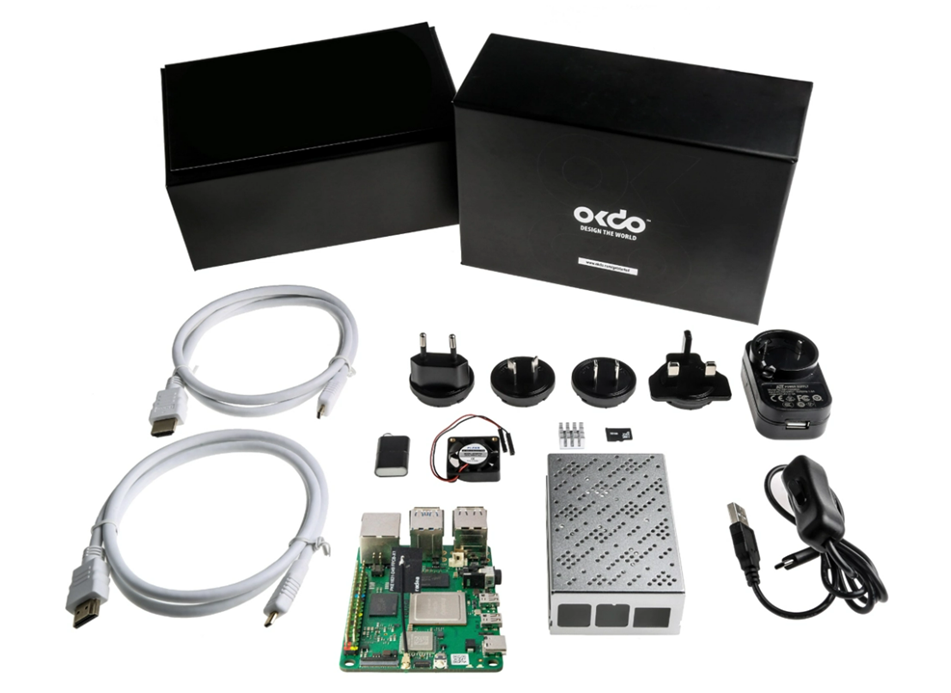
Q: What’s included in the ROCK 4C+ Starter Kit?
- ROCK 4 Model C+ 4GB single board computer.
- 5V/3A Universal Power supply
- USB to USB-C cable with in-line switch.
- 2 x 1M Micro HDMI to HDMI cables.
- 32GB MicroSD Card. (with preloaded Linux OS)
- MicroSD card to USB reader
- CPU heat sink and fan
- Metal enclosure
- Screwdriver
Q: What is Armbian used for?
Armbian can be used to build CLI or Desktop images based on Debian or Ubuntu with a choice of different desktop versions. It uses a simple menu-driven system to configure the build steps for the bootloader and linux kernel using mainline. It also handles creation of the root filesystem based on your chosen distro, before assembling the system image ready for flashing.
Minimum recommended system requirements to cross-compile the system are a quad-core X86_64 Linux host with at least 4GM RAM with official support for Ubuntu Jammy (22.04) only. There are builds using VirtualBox and Docker for Windows and Mac hosts but these are unofficially-supported so your mileage may vary.
We tested on a Dell XPS Intel i7, 4.7GHz, 12 Cores, 32GB RAM, 1TB NVMe SSD running Ubuntu 22.04
Let’s get started!
| Difficulty: Pro | Time: 4 Hrs | Steps: 7 | Credits: Armbian | License: GPL-2.0 License |
Resources:
Parts Needed to Get Started with ROCK 4+ Starter Kit on Linux Mainline:
ROCK 4C+ Starter Kit
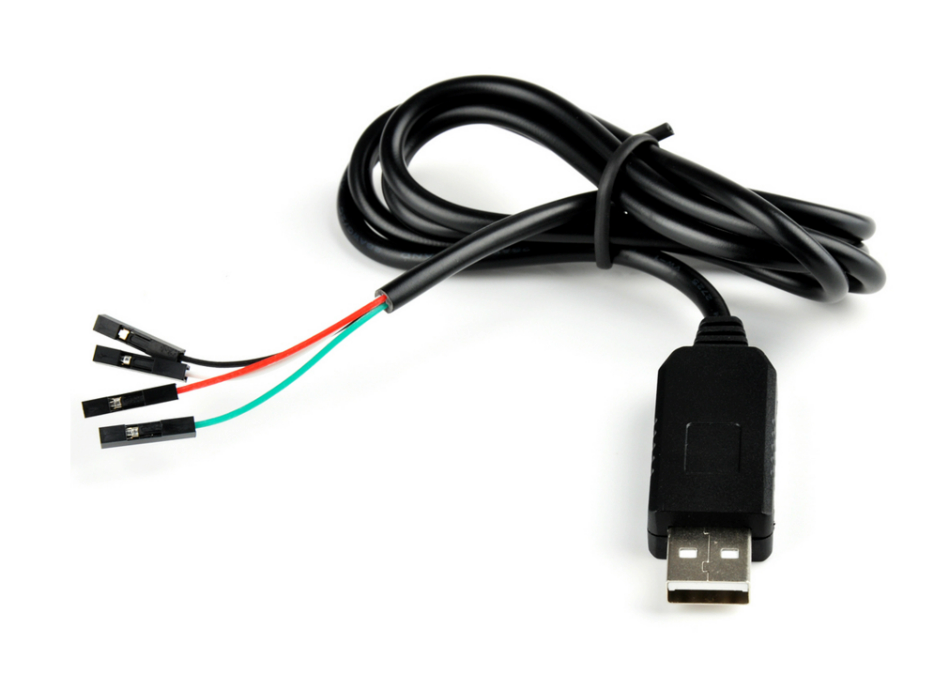
USB to TTL Serial Cable
All parts needed to get started:
OKdo ROCK 4 Model C+ 4GB Single Board Computer Starter Kit
USB to TTL Serial Cable
PC with Linux or Windows 10+
HDMI monitor
USB keyboard
USB mouse
Ethernet cable
Internet connection and router
Step 1: Armbian Install
Armbian is hosted on GitHub and detailed instructions on how to develop with it are provided on the Armbian website.
We forked the source to our own repo before installing it locally on our host:
$ git clone --depth 1 git@github.com:<your-github>/armbian-build.git
Cloning into 'armbian-build'...
…
Now change into the source directory and checkout your own branch and add the ignore changes file to stop Armbian overwriting any changes you make:
$ cd armbian-build/
$ git checkout -b add-rock-4cplus
$ touch .ignore_changes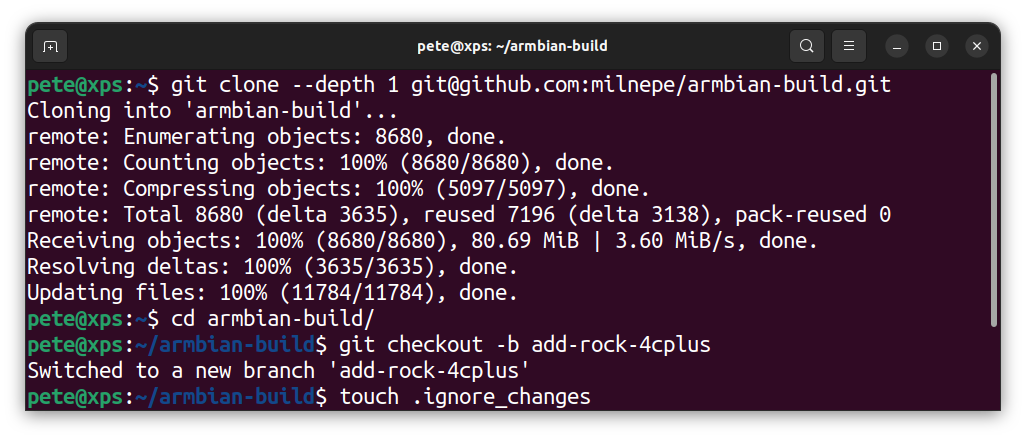
Step 2: Adding Board Support
The current Armbian version doesn’t have support for the ROCK 4C+ (RK3399-T) but it can be added as a new board using the device tree source (DTS) from Linux mainline.
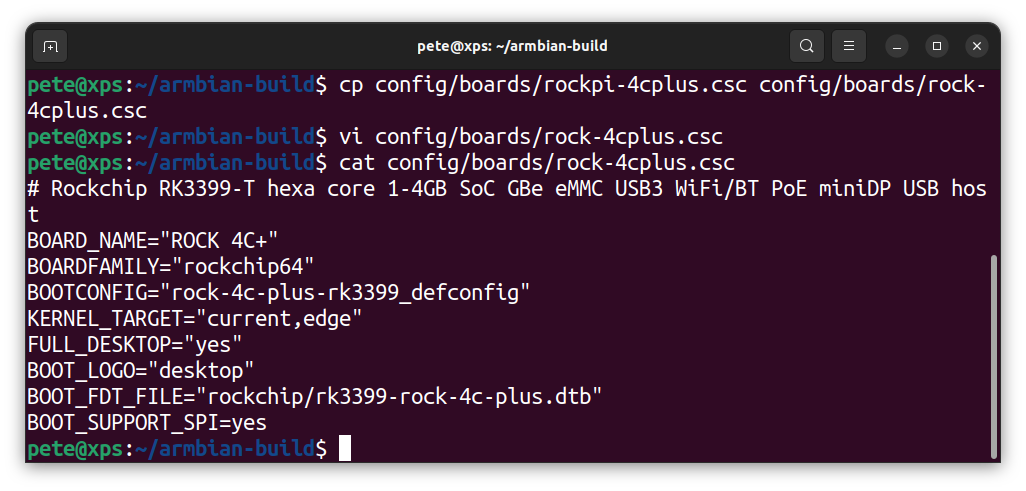
First create new board configuration file based on Rockpi 4C+ community supported board:
$ cp config/boards/rockpi-4cplus.csc config/boards/rock-4cplus.cscThen change the comment line, board name, BOOTCONFIG and BOOT_FDT_FILE entries so they look like this:
$ vi config/boards/rock-4cplus.csc
$ cat config/boards/rock-4cplus.csc
# Rockchip RK3399-T hexa core 1-4GB SoC GBe eMMC USB3 WiFi/BT PoE miniDP USB host
BOARD_NAME="ROCK 4C+"
BOARDFAMILY="rockchip64"
BOOTCONFIG="rock-4c-plus-rk3399_defconfig"
KERNEL_TARGET="current,edge"
FULL_DESKTOP="yes"
BOOT_LOGO="desktop"
BOOT_FDT_FILE="rockchip/rk3399-rock-4c-plus.dtb"
BOOT_SUPPORT_SPI=yes
Step 3: Create Patch
Armbian uses a menu system to configure builds and now that the ROCK 4C+ board support has been added, it will be available as an option.
u-boot is used to generate the bootloader and this doesn’t yet have support for the ROCK 4C+ so the build process needs to be run in patching the first time so changes can be made.
Patching stops the build process before compiling u-boot and again before compiling the kernel to allow changes to be made at both points. Patch files are then generated in the output/patch directory of the build root which can then be added to userpatches directory for use in subsequent builds.
To patch Armbian you need 2 terminal sessions open, one to run the build process and another where you do the patch changes.
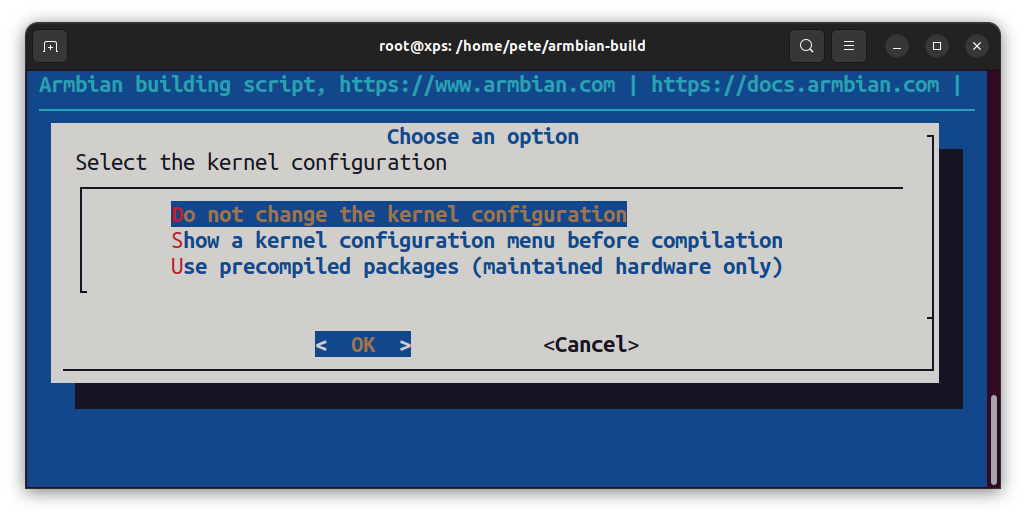
Open a terminal as sudo and run the build in patch mode, then configure a CLI image based on Debian with minimal packages – the most basic system that can be generated.
$ sudo ./compile.sh CREATE_PATCHES=yesThe menu system will be presented – there is no need to change the kernel config at this stage so choose the first option:
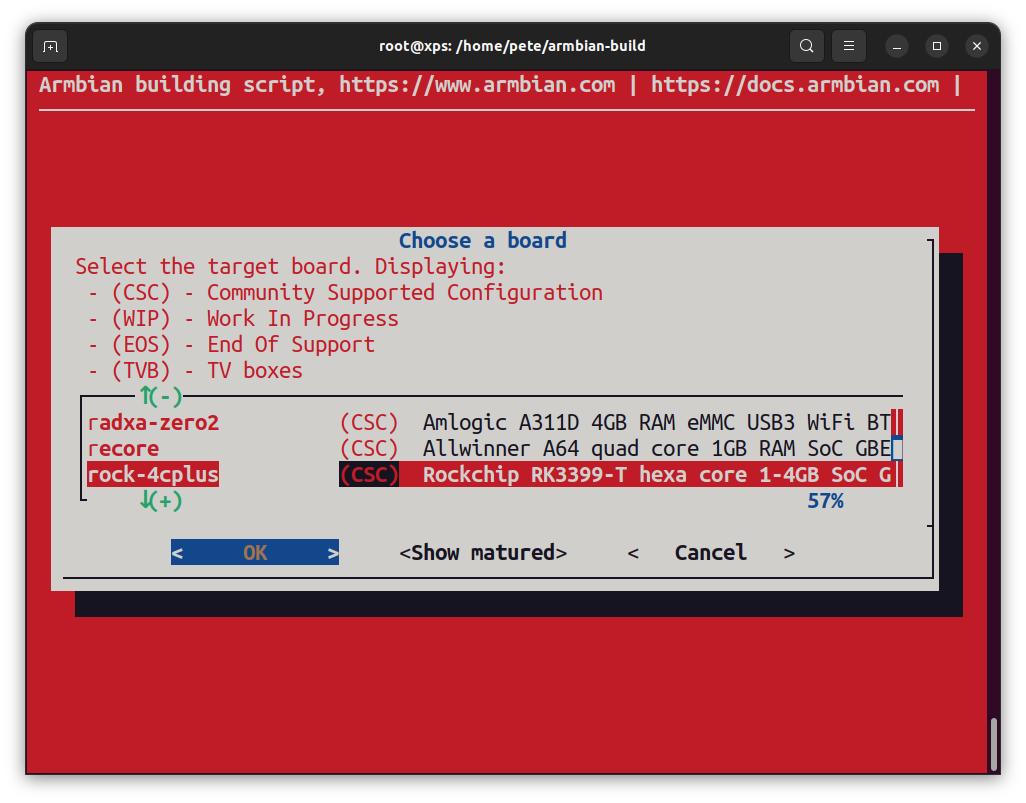
The next menu allows you to choose which board to build. Because we added our own BSP you need to select the < Show CSC / WIP / EOS / TVB > option and then accept the Expert Mode warning – the ROCK 4C+ board will now appear in the list of boards for selection:
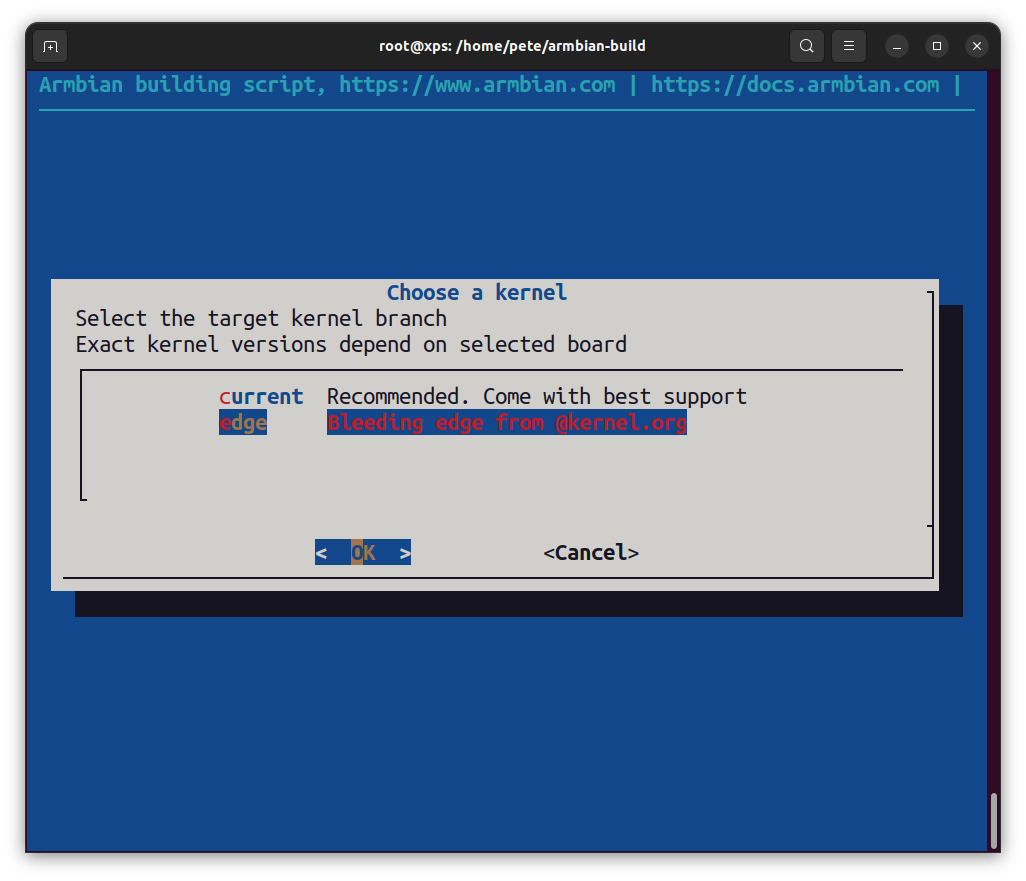
Now choose which kernel to build – select Edge which is the latest stable mainline kernel (6.1.y)
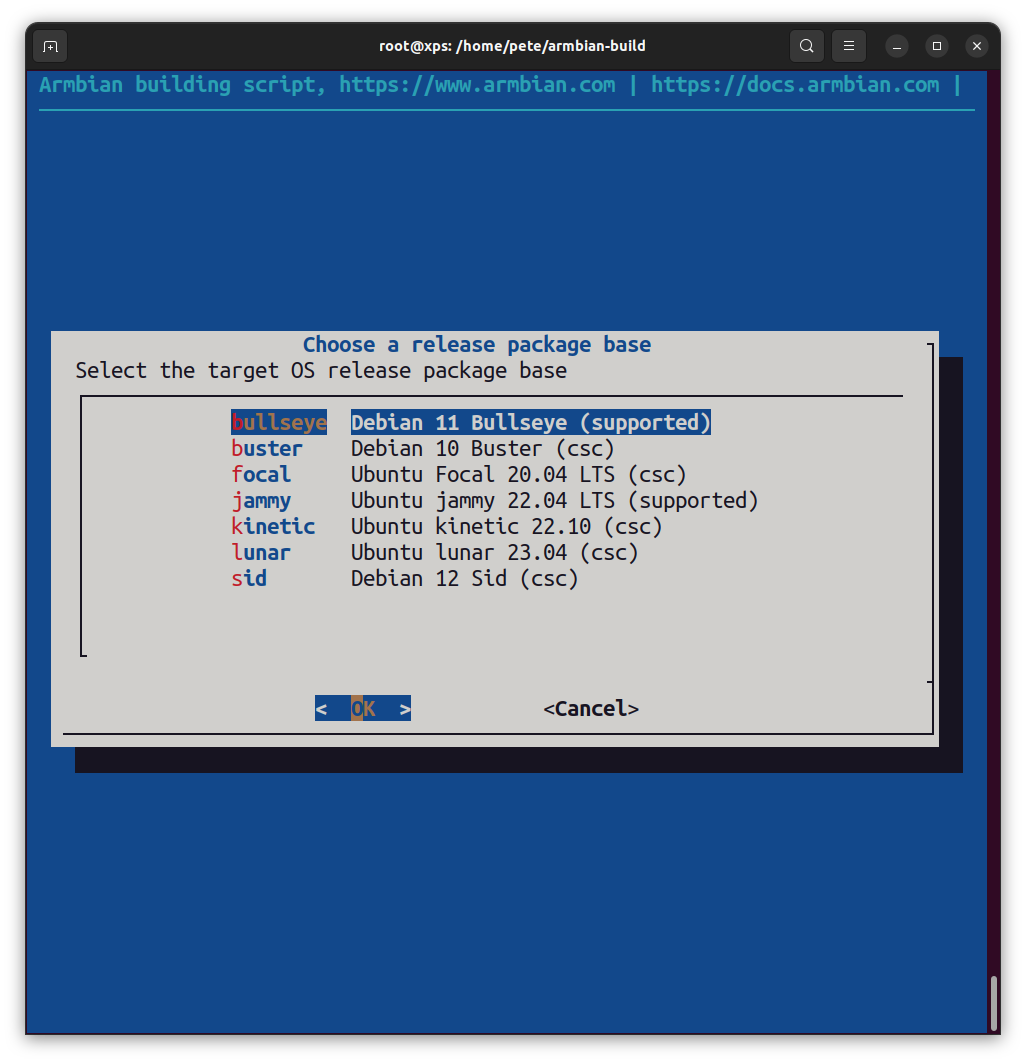
Now choose which release to base the image on. There are various versions of Debian or Ubuntu to choose from – pick Bullseye:
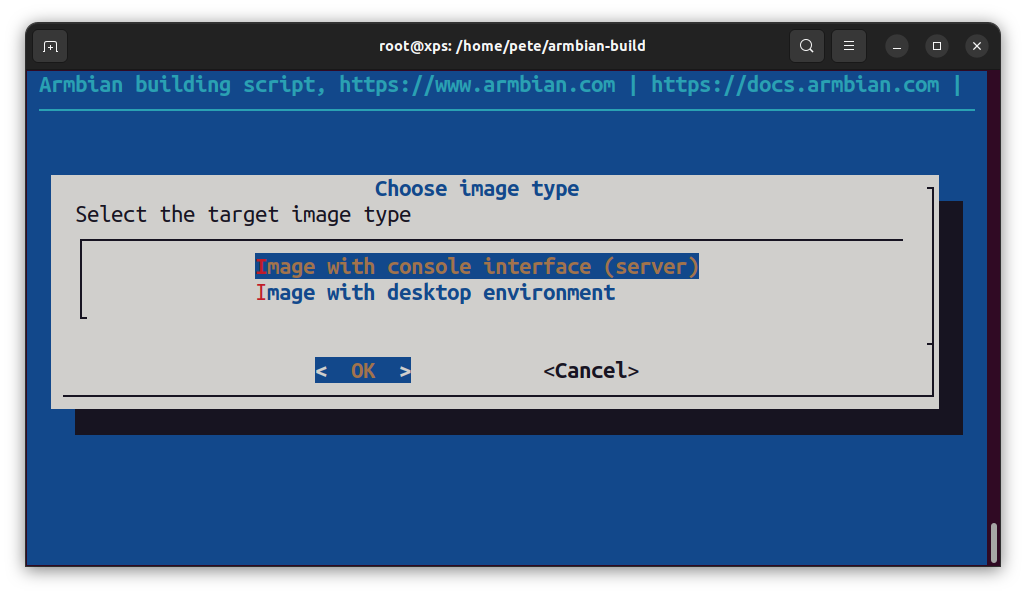
Then choose whether to build a CLI or Desktop image – pick CLI:
Then choose a minimal image which will only install a basic set of packages into the image:

The first time the build process is run Armbian downloads the toolchain and kernel archives so this can take some time – this only happens once.
The build will halt after u-boot has been setup so we can create a patch for the ROCK 4C+.
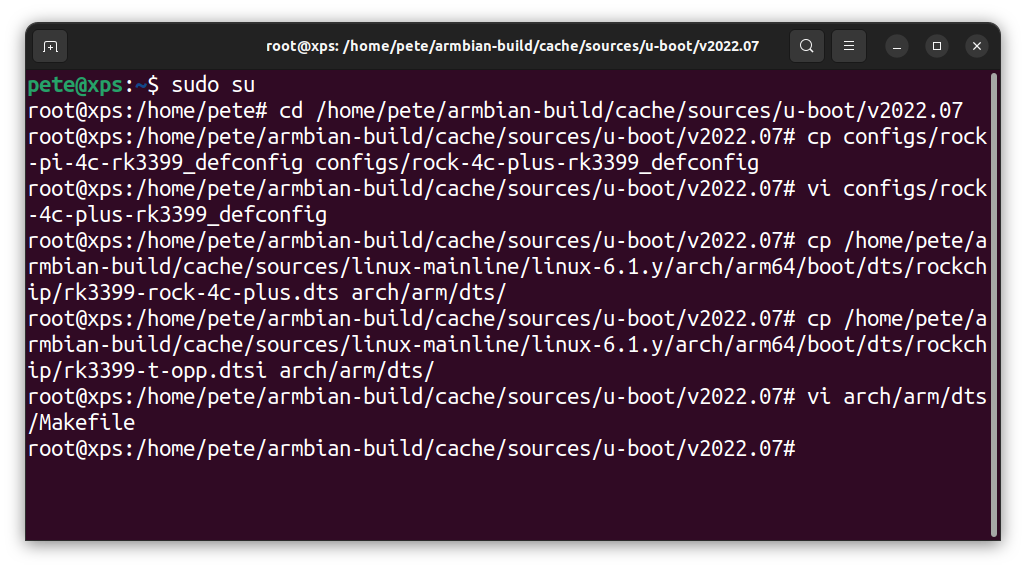
- Open a second terminal session, change to root and make the following changes to the u-boot tree:
- Create a new u-boot config in cache/sources/u-boot/v2022.07/configs by copying the rockpi-4c config:
$ sudo su
# cd cache/sources
# cp u-boot/v2022.07/configs/rock-pi-4c-rk3399_defconfig \
u-boot/v2022.07/configs/rock-4c-plus-rk3399_defconfig
- Edit the following lines in rock-4c-plus-rk3399_defconfig:
CONFIG_DEFAULT_DEVICE_TREE="rk3399-rock-4c-plus"
…
CONFIG_DEFAULT_FDT_FILE="rockchip/rk3399-rock-4c-plus.dtb"
- Now copy the rk3399-rock-4c-plus.dts device tree source from linux-mainline:
# cp
linux-mainline/linux-6.1.y/arch/arm64/boot/dts/rockchip/rk3399-rock-4c-plus.dts \
u-boot/v2022.07/arch/arm/dts/
- Copy the rk3399-t-opp.dtsi
# cp
linux-mainline/linux-6.1.y/arch/arm64/boot/dts/rockchip/rk3399-t-opp.dtsi \
u-boot/v2022.07/arch/arm/dts/- Now update the Makefile in u-boot/v2022.07/arch/arm/dts/ to add the board:
rk3399-rockpro64.dtb \
rk3399pro-rock-pi-n10.dtb \
rk3399-rock-4c-plus.dtb
…
Change back to the main terminal and press Enter to continue with the build. The u-boot patch will be found in output/patch/u-boot-rockchip64-edge.patch
When the build stops again at the kernel build step, just hit enter because the rock-4c-plus support is already in the Linux stable branch (Edge) so no changes to the kernel build are required.
When the build finishes it displays the complete build command-line which used that can be used to repeat the process:
$ sudo ./compile.sh BOARD=rock-4cplus BRANCH=edge RELEASE=bullseye BUILD_MINIMAL=yes BUILD_DESKTOP=no KERNEL_CONFIGURE=no COMPRESS_OUTPUTIMAGE=sha,gpg,img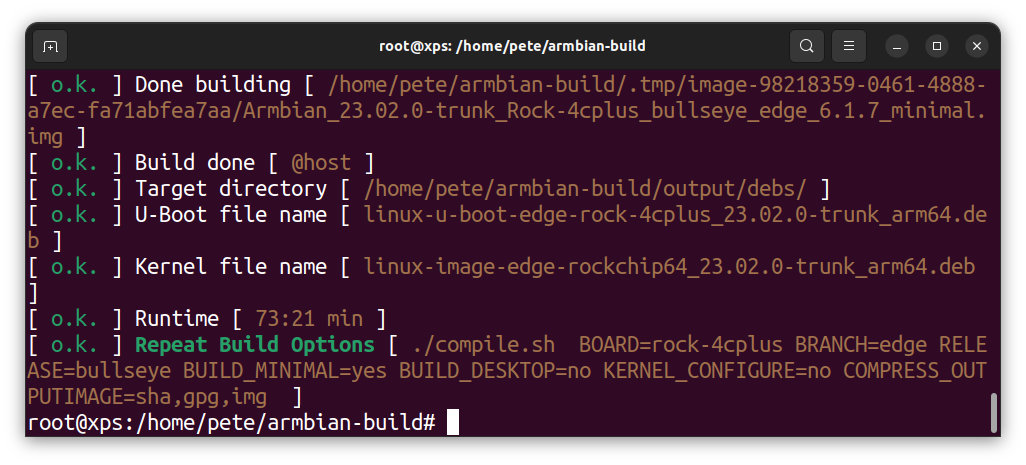
Now the generated patch files can be copied to a specific directory under userpatches in the build tree. You can check the log file in output/debug /output.log to find out where the u-boot script looks for its patch files when building the edge kernel:
$ cat output/debug /output.log
…
Displaying message: Started patching process for u-boot rockchip64-rock-4cplus-edge info
Displaying message: Looking for user patches in userpatches/u-boot/u-boot-rockchip64 info
…
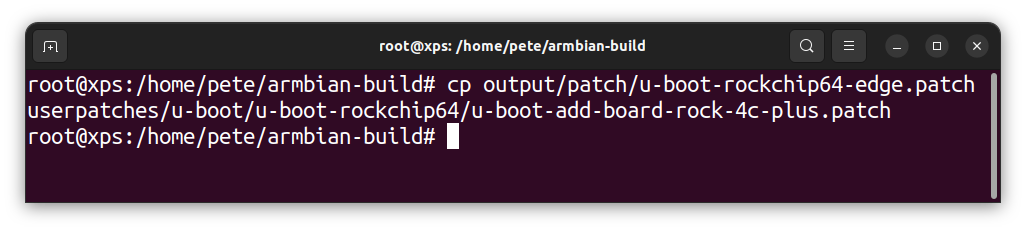
Copy the generated u-boot patch file to the userpatches/u-boot/u-boot-rockchip64 directory and rename it u-boot-add-board-rock-4c-plus.patch – the filename must end in .patch
Now any subsequent builds will patch these changes automatically.
Tip: If you patched the kernel build then there would be another patch file created in output/patch – this should be copied to userpatches/kernel/rockchip64-edge/ directory
Step 4: Flash SD
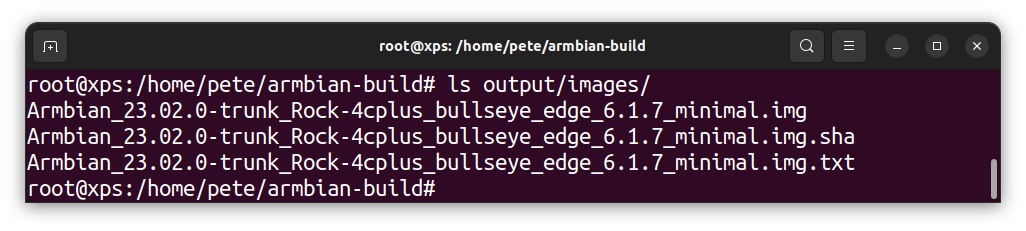
An uncompressed image along with a sha-sum and licence file are generated in output/images under the build root. Flash the image to a good quality SD card of at least 32GM.
We recommend the Open Source balenaEtcher, which is available for Windows, Mac or Linux. It also performs some validation checks on the flashed image:
- Visit the download page at balenaEtcher and install the version for your host operating system.
Step 5: Hardware Testing
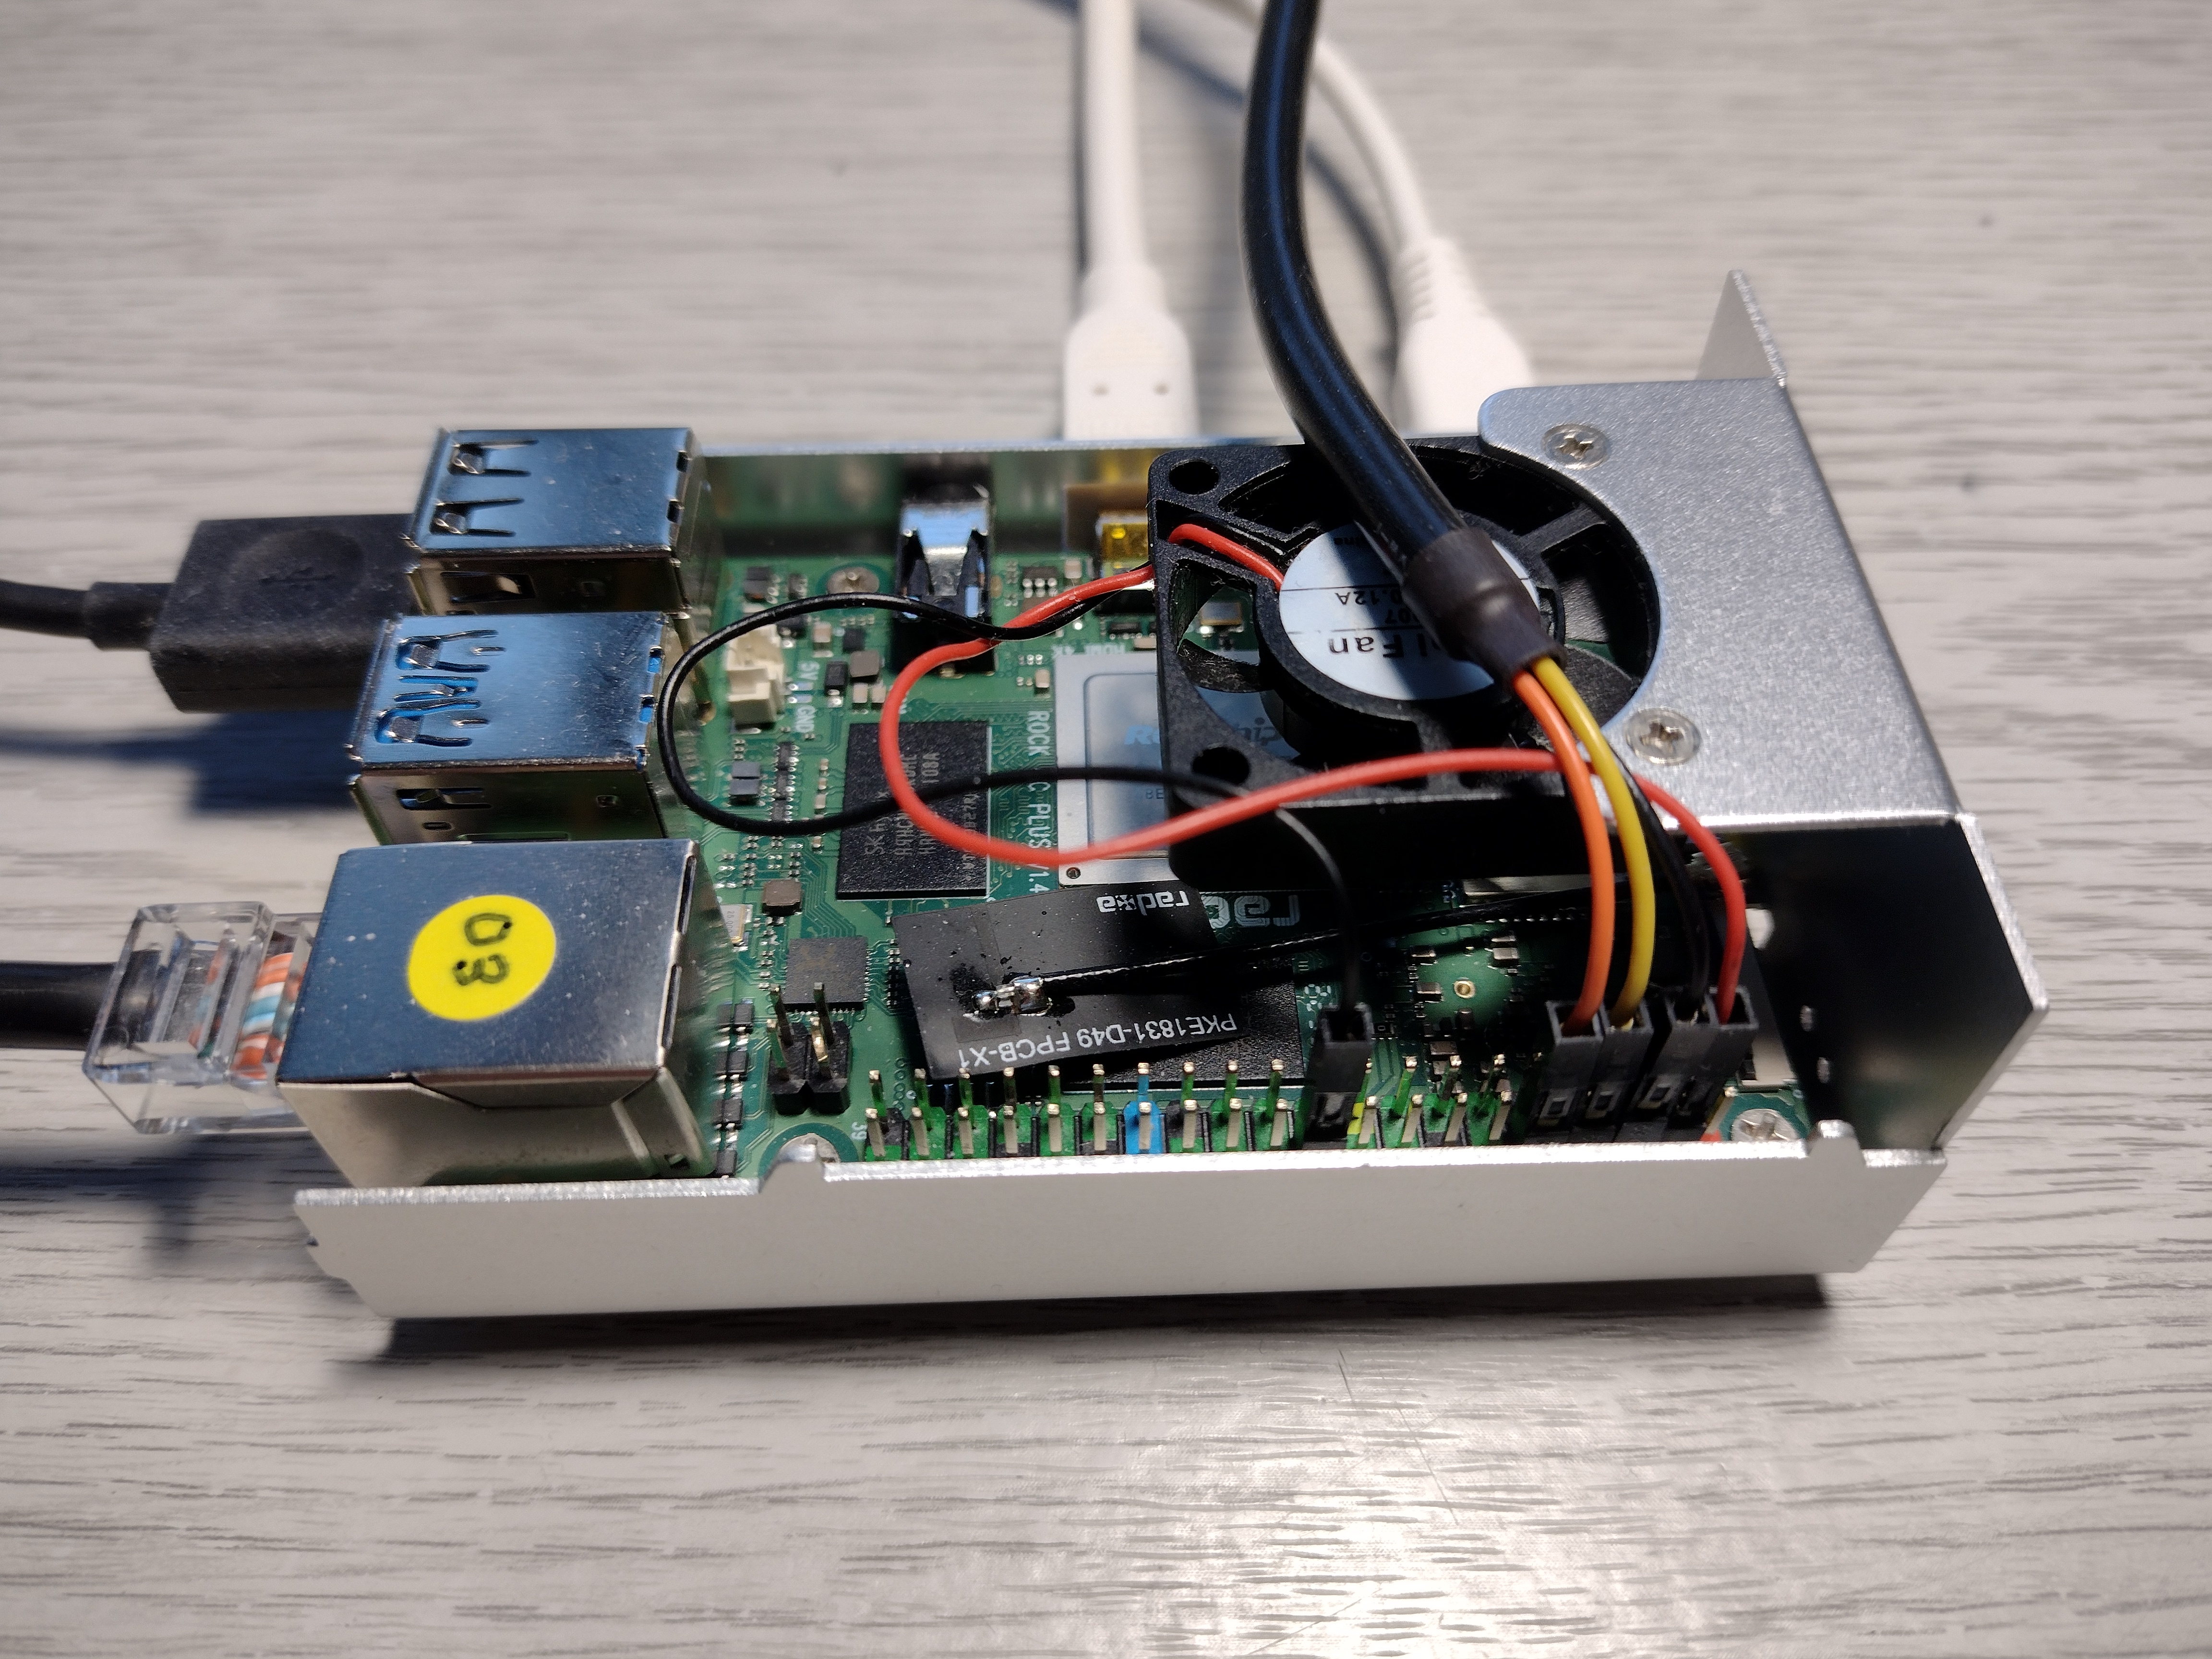
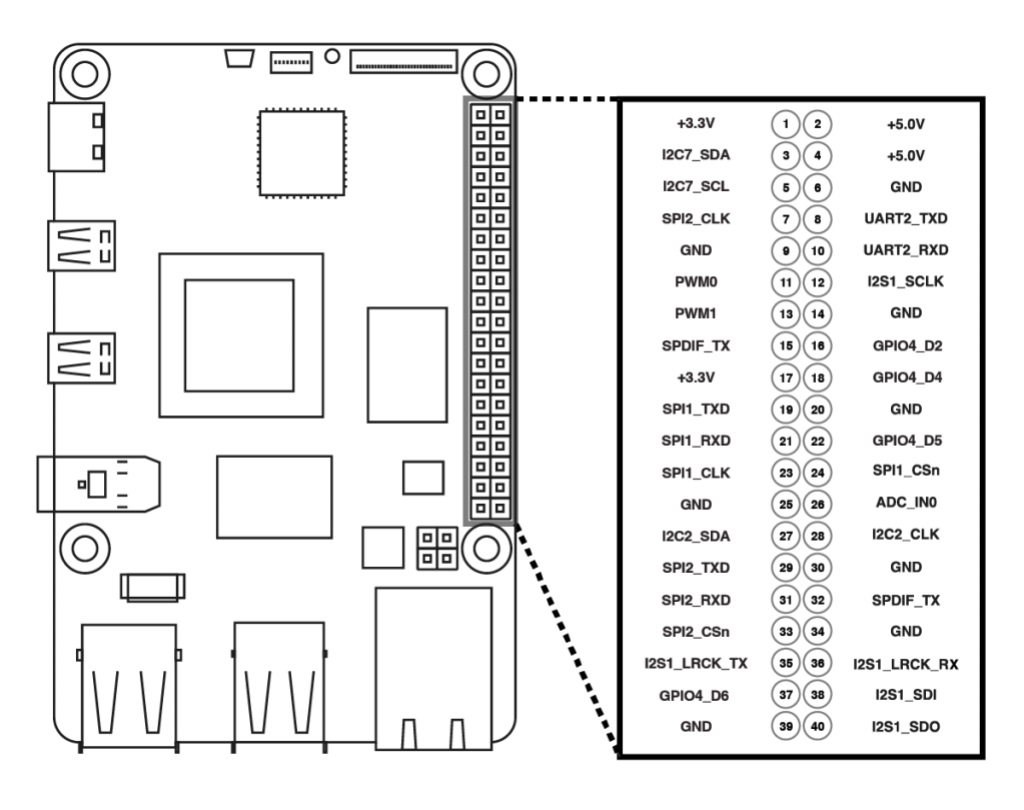
Insert the SD card into the ROCK 4C+ and connect up a keyboard, mouse, HDMI monitor, ethernet and power supply.
We recommend attaching a 3.3V serial-to-USB cable capable of 1.5M baud rate so that you can monitor the boot sequence:
| ROCK 4C+ GPIO Pin | GPIO Function | Cable Connector | Cable Function |
| Pin 6 | GND | Black | GND |
| Pin 8 | UART2_TX | Yellow | RXD |
| Pin 10 | UART2_RX | Orange | TXD |
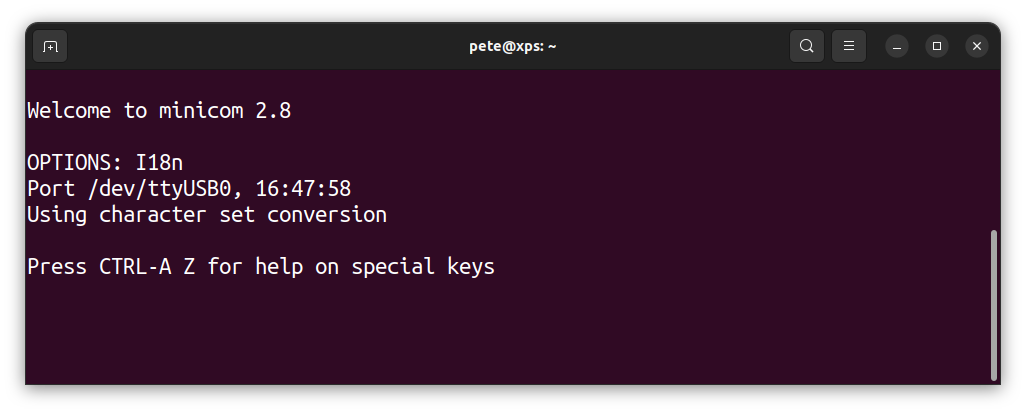
We use minicom which can be installed on the host using:
$ sudo apt install minicomTo run minicom without root privileges, make sure that your user is in the dialout group,
If not, run the following command to add your user to the dialout group, then log out and back in again:
$ sudo usermod -aG dialout $USER
With the USB-to-serial cable plugged into your host check which serial device it is attached to:
$ sudo dmesgIn our case the device is on ttyUSB0
Create a minicom configuration file in your home directory named .minirc.rock (note the preceding dot) with the following contents:
pu port	/dev/ttyUSB0
pu baudrate	1500000
pu bits	8
pu parity	N
pu stopbits	1
pu rtscts	No
Now start minicom in a Terminal on the host with:
$ minicom rock
Step 6: First Boot
Power on the ROCK and follow the output on the monitor or in the console.
You will be prompted to update the root password and add an optional default user with sudo privileges. If connected via ethernet the system will detect the timezone and prompt to set up a suitable locale.
When start sequence ends you will be left logged in as root where you can update the system:
$ apt update
$ apt upgrade -y
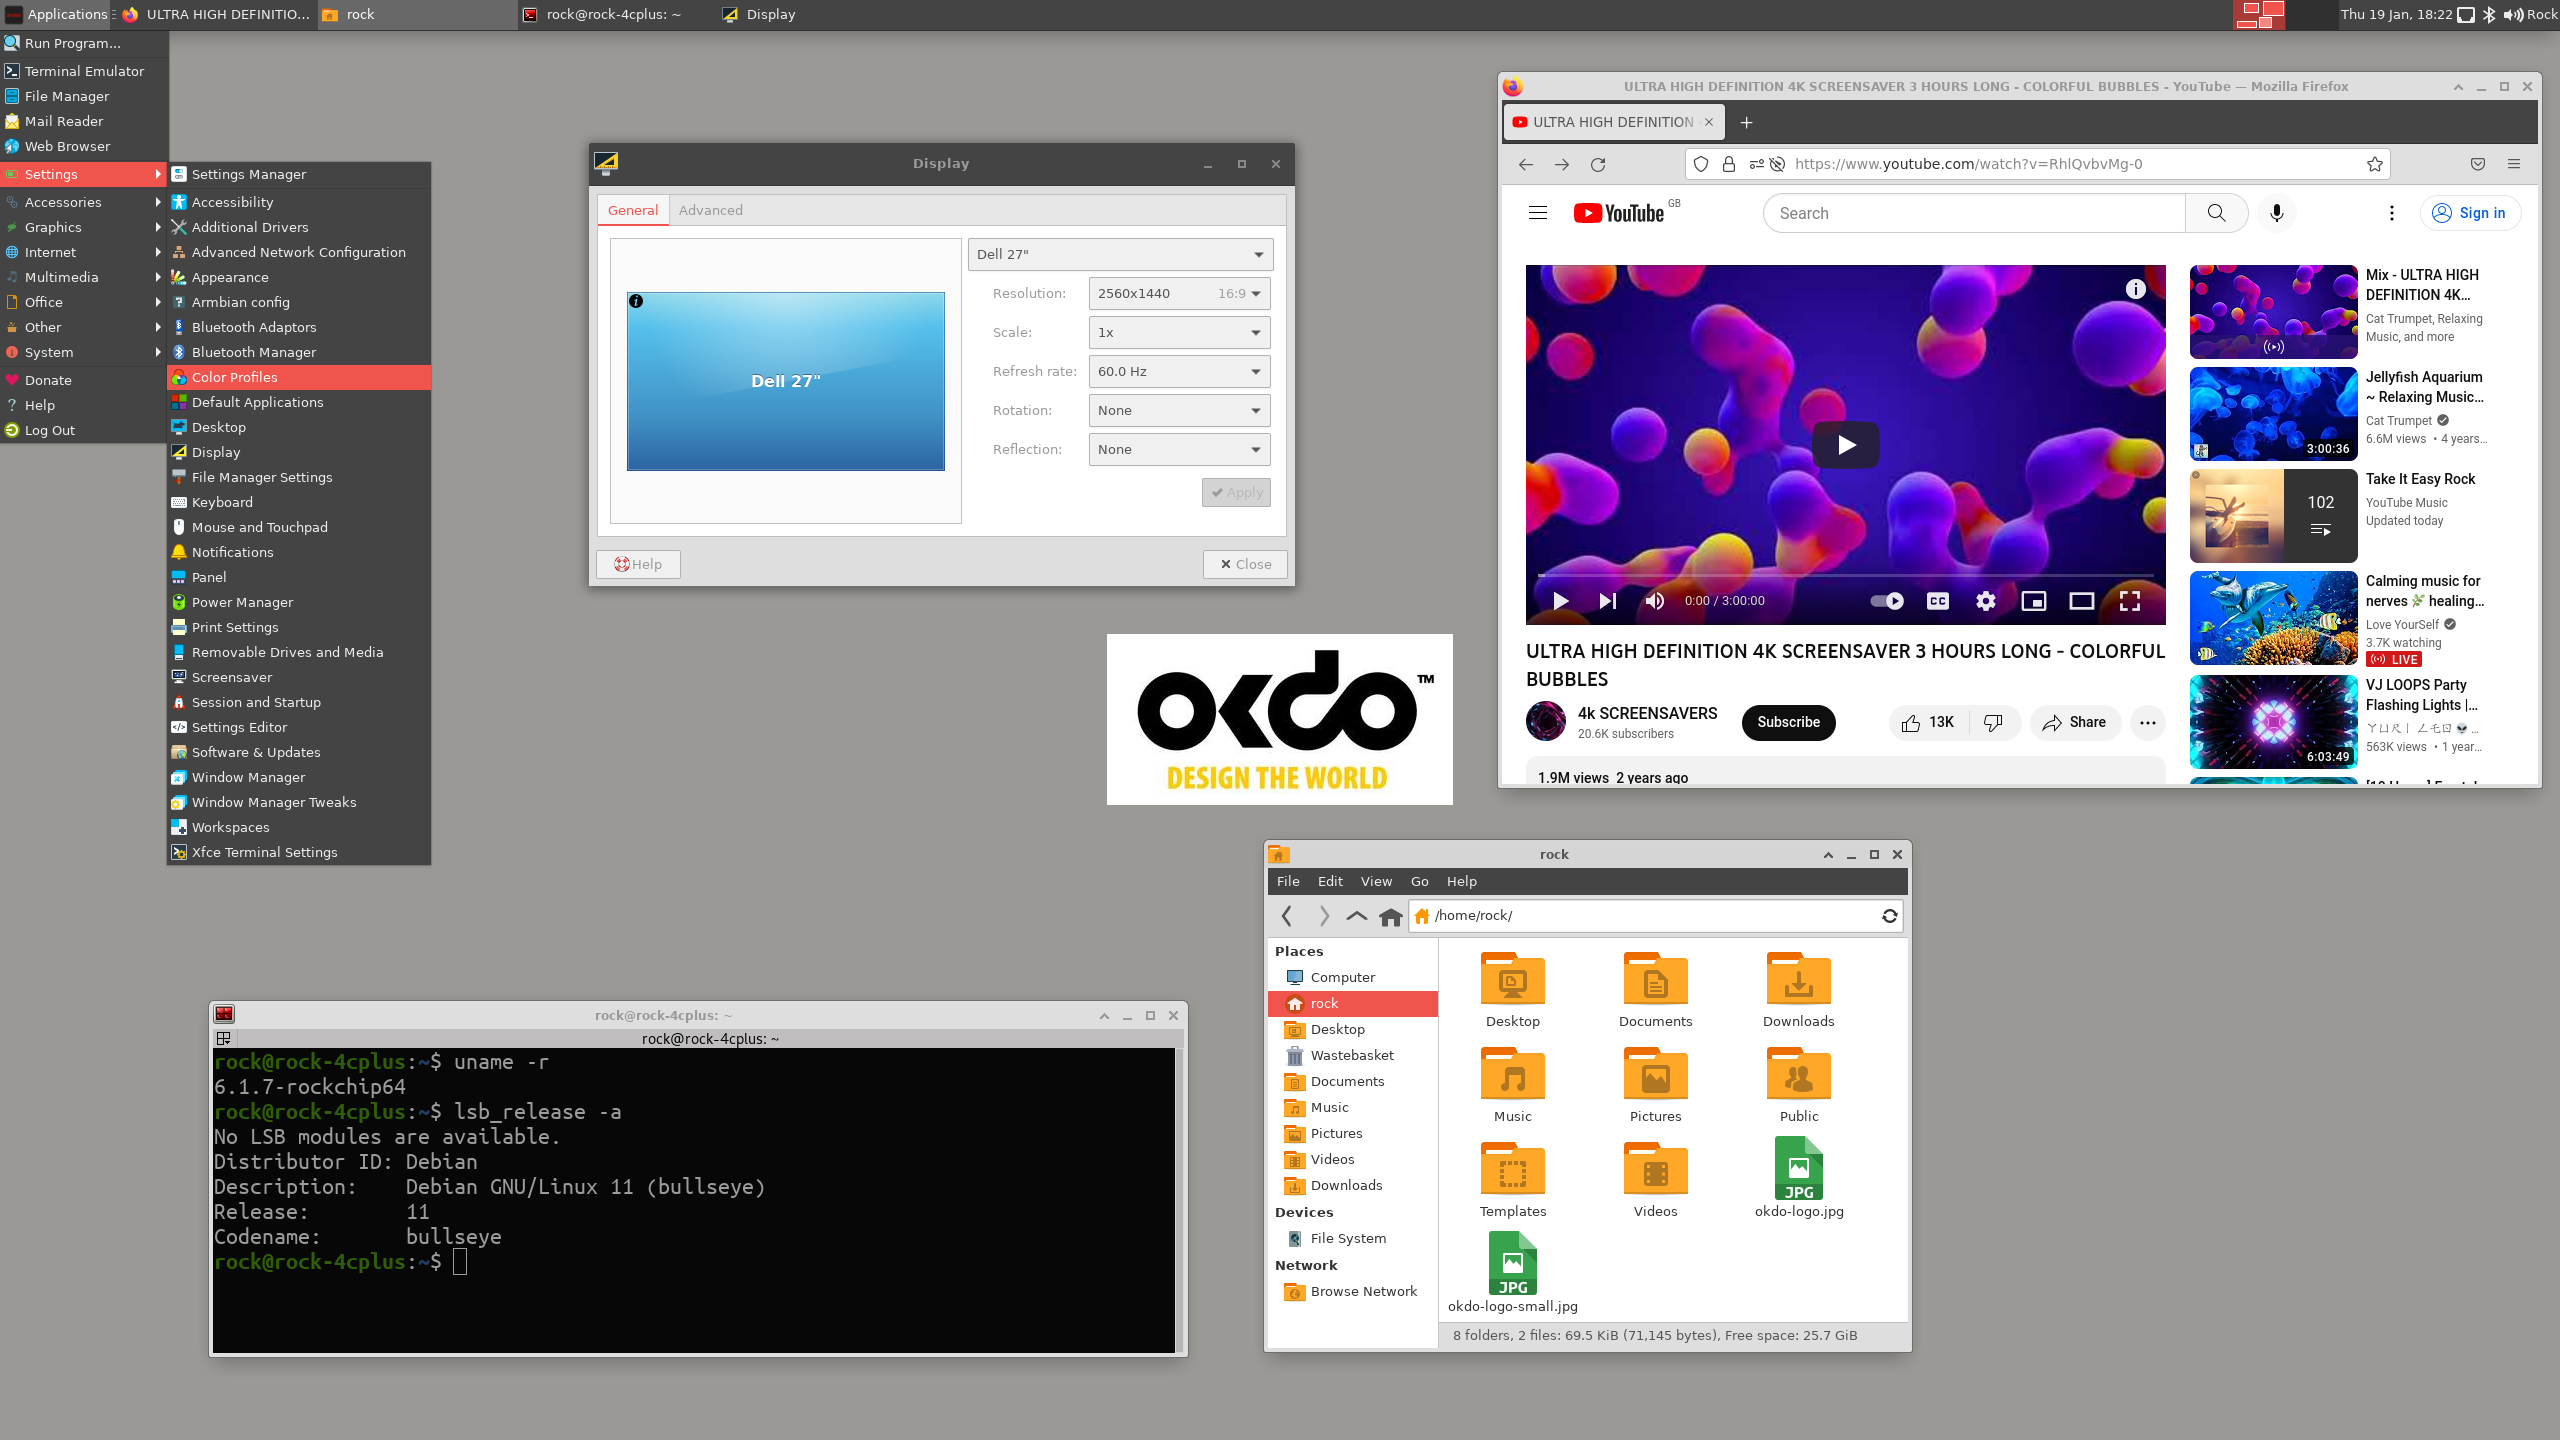
Then reboot and the next time log in as the default user where you will get the message of the day (MOTD) showing that you are running the mainline kernel:

Step 7: Going Further
Now that you have built a CLI version of the mainline kernel you can re-run the build and choose a desktop version based on either Debian or Ubuntu.
In the build directory run the compile command as sudo, this time without the patch argument:
$ sudo ./compile.shAt the menu prompts choose an Edge desktop build. This takes much longer as many more packages need to be downloaded and installed.
Here’s one we made earlier built on Debian Bullseye with Xfce4 desktop:
To build images based on the latest mainline kernel longterm release (5.15) in addition you also need to create a patch for the kernel.
Run the compile script in patch mode again and when the build stops at the u-boot step just press enter to skip this and continue to the kernel patching step. At this point do the following:
- Copy the device tree files rk3399-rock-4c-plus.dts and rk3399-t-opp.dtsi from the 6.1.y tree – cache/sources/linux-mainline/linux-6.1.y/arch/arm64/boot/dts/rockchip to the 5.15 tree – cache/sources/linux-mainline/linux-5.15.y/arch/arm64/boot/dts/rockchip
- Add an entry to the makefile – cache/sources/linux-mainline/linux-5.15.y/arch/arm64/boot/dts/rockchip/Makefile:
dtb-$(CONFIG_ARCH_ROCKCHIP) += rk3399-rock-4c-plus.dtb- A new patch will be generated in the output/patch directory which needs copying to the userpatches/kernel/rockchip64-current directory.
Now you will be able to build images based on either the mainline kernel (Edge) or the latest long term release (Current) when configuring the build menu.
Summary
In this project we showed how to build OS images for the ROCK 4C+ based on the latest Linux mainline kernel using the Armbian build system.
We stepped through the patching process in Armbian to add in a new board support for building images based on Debian or Ubuntu, including Desktop and Server versions.
Now you can create your own OS images based on the latest Linux kernel and current distro packages or add in your own software for custom systems.
You can find further information on the Armbian Developer Guide.

Excited to discover what other ROCK single-board computers, compute modules and accessories are available range?
Check out our ROCK shop!
ROCK Shop

LET’S INVENT THE FUTURE TOGETHER
What’s your challenge? From augmented reality to machine learning and automation, send us your questions, problems or ideas… we have the solution to help you design the world.
Visit our Blogs, Projects and Getting Started Guides for more inspiration!