The ROCK 4 SE’s Hexa core Arm processor makes it a strong candidate for robotic control systems and, paired with the LiDAR Module, gives your robot the capability to accurately sense nearby objects and provide positioning data for navigation in and around its environment.
In this project, we demonstrate how to interface the LiDAR Module to the ROCK 4. Following the 10 steps from this guide, you’ll learn how to natively build the Robot Operating System (ROS) project on the ROCK 4 SE SBC and set up the LiDAR module with its SDK to run tests that show what the ROCK / ROS / LiDAR combination is capable of, as a starting point for robotics projects.
This step-by-step guide is the perfect starting point for developing autonomous robots for smart agriculture, construction, logistics, automotive, pharmaceutical and many other industries. It’s a practical “know-how” tutorial showing you how to pare the ROCK 4 SE and the LiDAR HAT to design and develop various ROS robotics projects, including autonomous manufacturing robots, food delivery robots, agriculture drones, welding robots, painting robots, construction robots, industrial robotic arms, and many more!

Licence: Various
Step 1: Introduction
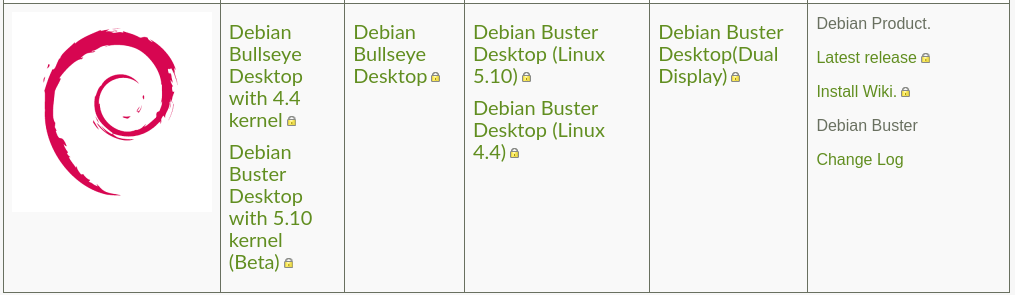
Robot Operating System (ROS) is a free, open-source software that defines the components, interfaces and tools for building advanced robots. It can be built and installed on the ROCK 4 and is compatible with the LiDAR Modules and its SDK. We tested ROS Melodic with a ROCK 4 SE board running Debian Buster with a 5.10 Linux kernel.
All the software is natively built and runs on the ROCK. You can SSH in remotely or use the Debian Desktop to open terminal sessions and run the Rviz visualisation package built into ROS.
Step 2: Install Debian Buster
Download and flash the Buster 5.10 kernel release to a high-quality branded SD card like SanDisk Ultra 32GB:
Follow the setup instructions here to configure the system, bring it up to date and configure WiFi.
Tip: SSH into the ROCK from another PC, so you can cut and paste the commands.
Step 3: Install ROS sources
Add the ROS sources to Apt.
- Add ROS official apt source to your distro:
sudo sh -c 'echo "deb http://packages.ros.org/ros/ubuntu $(lsb_release -sc) main" > /etc/apt/sources.list.d/ros-latest.list'- Add the keys:
sudo apt-key adv --keyserver 'hkp://keyserver.ubuntu.com:80' --recv-key C1CF6E31E6BADE8868B172B4F42ED6FBAB17C654- Refresh the sources:
sudo apt update- Install package dependencies:
sudo apt install -y python2.7 python-rosdep python-rosinstall-generator python-wstool python-rosinstall build-essential cmake- Rosdep initialisation and update:
sudo rosdep init && rosdep updateStep 4: Install Melodic Desktop
Ad Melodic desktop packages.
- Create a dedicated workspace to build ROS and change to that directory:
mkdir ~/ros_catkin_ws
cd ~/ros_catkin_ws
rosinstall_generator desktop --rosdistro melodic --deps --wet-only --tar > melodic-desktop-wet.rosinstall- Download all core ROS packages into the src directory:
wstool init -j8 src melodic-desktop-wet.rosinstallTip: If wstool init fails or is interrupted, you can resume the download by running this command:
wstool update -j4 -t src- Install all remaining dependencies using the rosdep tool:
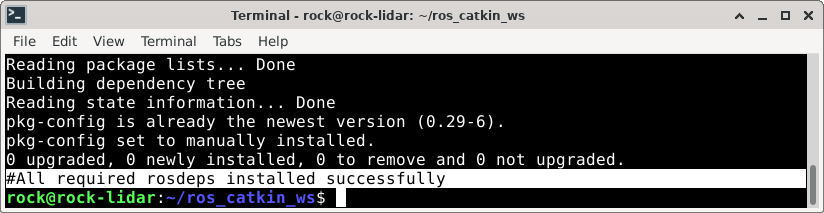
cd ~/ros_catkin_ws
rosdep install -y --from-paths src --ignore-src --rosdistro melodic -r --os=debian:buster
The installation should return with all dependencies if it was installed successfully.
Step 5: Build Melodic
This step builds and installs the ROS environment onto the ROCK’s OS. The terminal title updates with the progress showing the number of packages until completion – it takes about 120 mins to complete.
cd ~/ros_catkin_ws
sudo ./src/catkin/bin/catkin_make_isolated --install -DCMAKE_BUILD_TYPE=Release --install-space /opt/ros/melodic -j2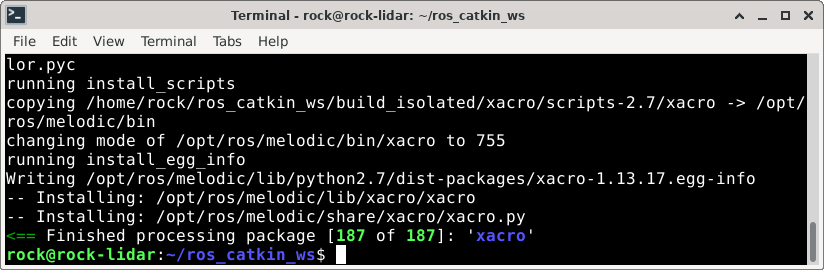
Step 6: ROS test
Here we set up the ROS environment and run a test of the ROS installation by sending messages between 2 ROS nodes.
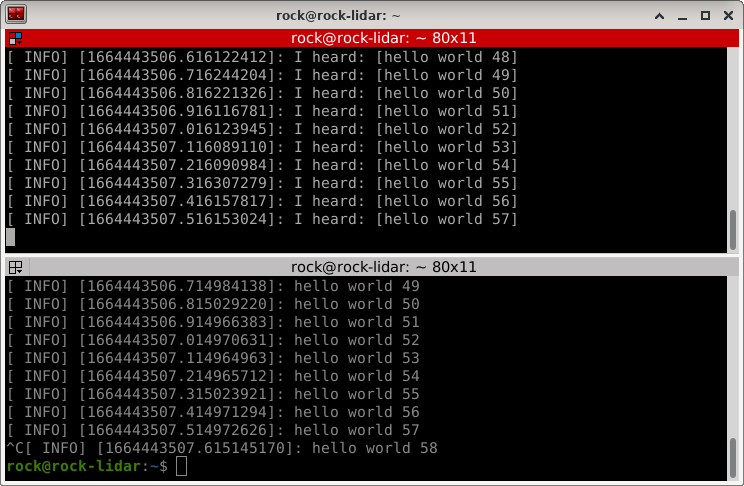
Roscore must be started first and left running. ROS Nodes publish and subscribe to messages, so a listener node is created to subscribe to the chatter topic, and a talker node is created that publishes messages on that topic.
- Set up the environment:
echo source /opt/ros/melodic/setup.bash >> ~/.bashrc
source ~/.bashrc- Start roscore and check it runs successfully – leave the session open:
roscore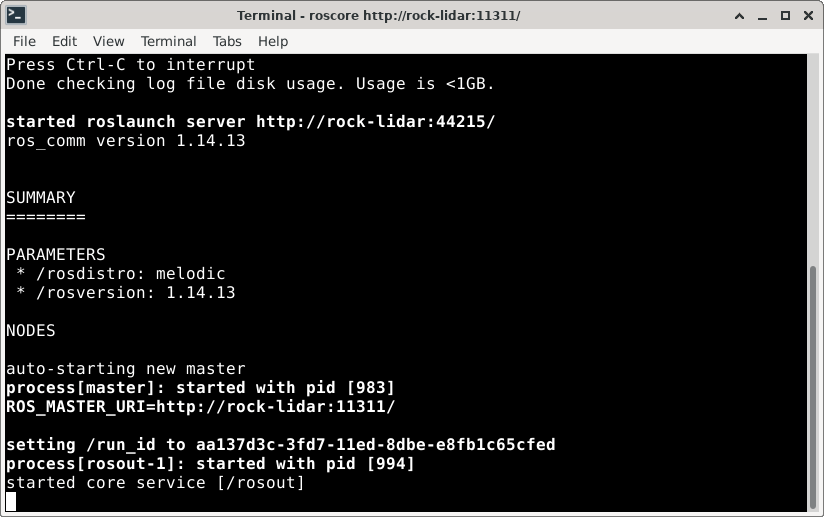
- Open a second terminal session and run the subscription node named listener:
rosrun roscpp_tutorials listener- Open a third terminal and run the publishing node named talker:
rosrun roscpp_tutorials talkerThe screenshot below shows the messages being received by the listener node from the talker node.
Tip: C++ code for the listener and talker nodes can be found here:
/home/rock/ros_catkin_ws/src/ros_tutorials/roscpp_tutorials/talker/
/home/rock/ros_catkin_ws/src/ros_tutorials/roscpp_tutorials/listener/
- Use Ctrl + C to stop each node and the roscore.
ROS is now installed and working on the ROCK.
Step 7: LiDAR SDK
This step downloads and builds the LiDAR SDK for ROS. The package source code is available from the following repositories:
- Clone the package source code:
cd ~
mkdir -p ldLiDAR_ros_ws/src
cd ~/ldLiDAR_ros_ws/src
git clone https://github.com/ldrobotSensorTeam/ldLiDAR_stl_ros.git- Or alternatively:
git clone https://gitee.com/ldrobotSensorTeam/ldLiDAR_stl_ros.git- Check the port_name value in the launch file ~/ldldiar_ros_ws/src/ldLiDAR_stl_ros/launch/ld06.launch is set to: /dev/ttyUSB0
vi ~/ldLiDAR_ros_ws/src/ldLiDAR_stl_ros/launch/ld06.launch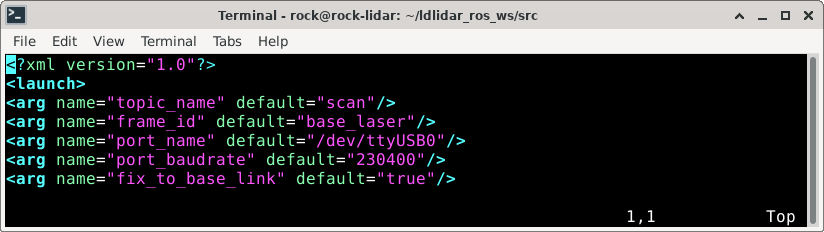
- Install the package-related dependencies under the workspace:
cd ~/ldLiDAR_ros_ws
rosdep install -y --from-paths src --ignore-src --rosdistro melodic -r --os=debian:buster- Build the package source:
cd ~/ldLiDAR_ros_ws
catkin_make
The LiDAR SDK package is now installed.
Step 8: LiDAR serial
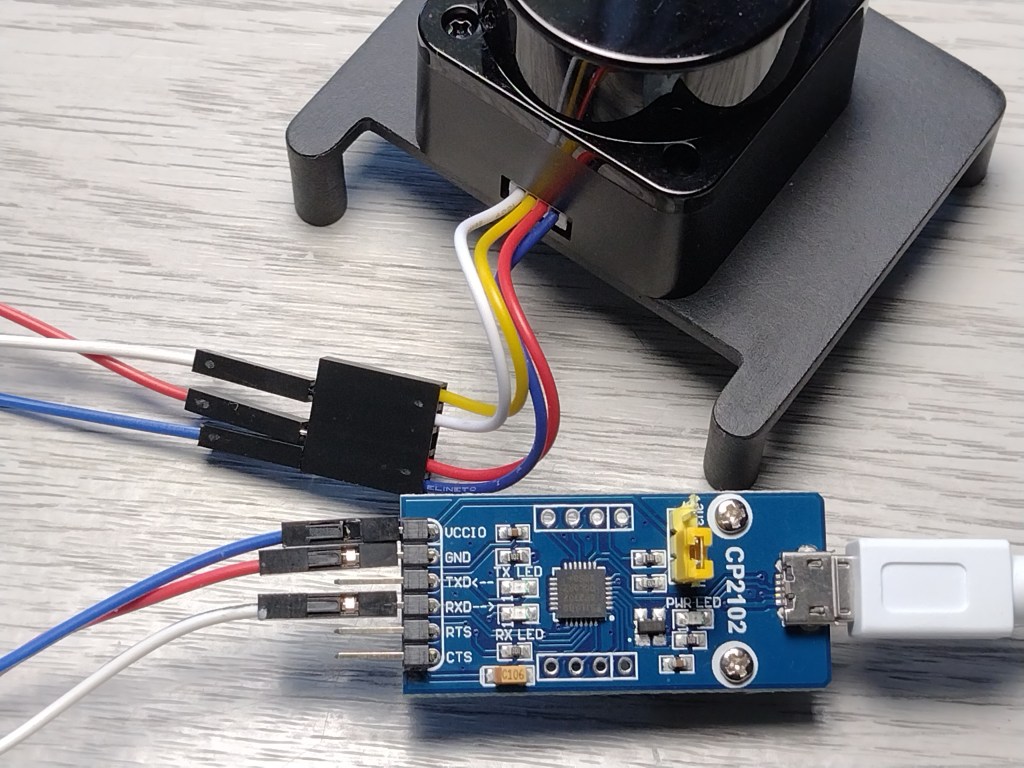
Connect the LiDAR module to the ROCK using a USB-to-Serial module. Use a module with a 5V output to power the LiDAR and TX / RX signals operating at 3.3V (CMOS) logic levels. We used a CP2102 bridge from Waveshare.
Tip: Measure the voltage levels of your USB-toSerial bridge with a voltmeter by connecting it to the ROCK before connecting it to the LiDAR. Do not exceed the Max values in the table below.
With the ROCK powered on:
- Connect the USB-to-Serial bridge to the lower USB3.0 port (Blue) on the ROCK
- Test voltages between GND to Power and GND to TX
- Disconnect the USB-toSerial bridge from the ROCK
- Connect the LiDAR Power, Ground and TX lines to the USB-to-Serial module
- The PWM connection, which controls motor speed, is not used in this example
- Plug in the USB-to-Serial connector to the ROCK.
The LiDAR will start running – a scanning blue light should be visible through the top of the module.
Warning: Check the connectors before plugging in the USB connector.
| LiDAR Pin | USB-to-Serial Bridge | Colour | Min | Typical | Max |
| Pin 1 (TX) | RXD | White | 0V | 3.3V | 3.5V |
| Pin 2 (PWM) | N/C | Yellow | 0V | – | 3.3V |
| Pin 3 (GND) | GND | Red | – | 0V | – |
| Pin 4 (5V) | 5V | Blue | 4.5V | 5V | 5.5V |
Step 9: LiDAR test
Now that ROS, the LiDAR SDK and the module are connected, we can test that everything is working.
- Set up the package environment:
echo source ~/ldLiDAR_ros_ws/devel/setup.bash >> ~/.bashrc
source ~/.bashrc- Add execute permissions to serial port:
sudo chmod 777 /dev/ttyUSB0- Start the LiDAR ROS node:
roslaunch ldLiDAR_stl_ros ld06.launch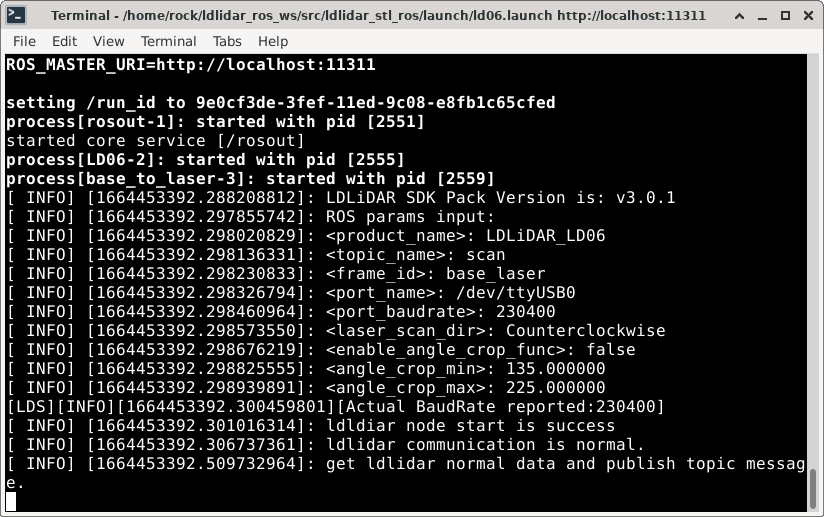
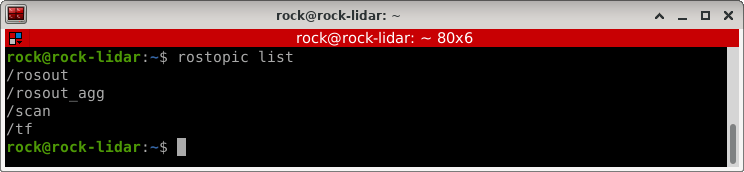
- Open another terminal to view the topic names published by the LiDAR node:
rostopic listThe scan topic should be listed.
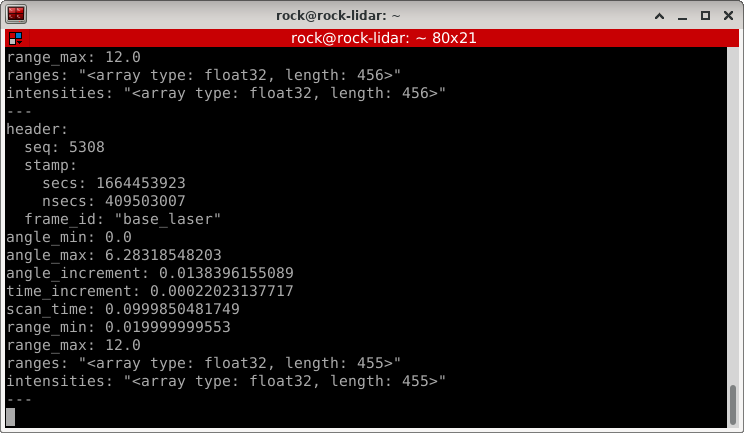
- Run the rostopic for the scan topic to view the content of the messages being published by the LiDAR node:
rostopic echo /scan --noarrYou should see the output from the LiDAR module updating as it scans.
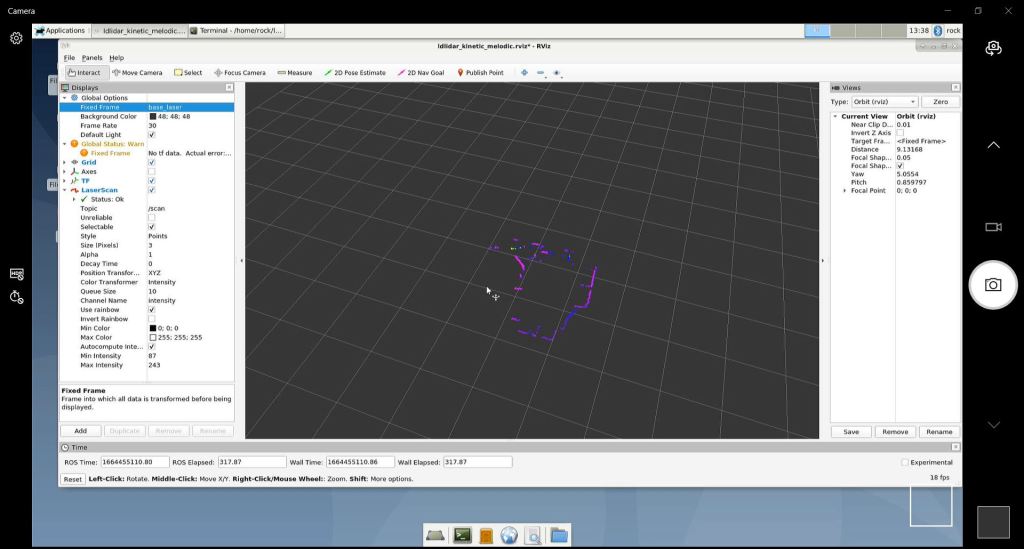
Step 10: Rviz test
You must run this test on the ROCK desktop. It uses the Rviz visualisation package built into ROS to display the point cloud being streamed from the LiDAR sensor.
- Connect a monitor, keyboard and mouse to the ROCK
- Login to the ROCK desktop
- Open a terminal and run the following commands to visualise the LiDAR scan using Rviz:
source ~/.bashrc
roslaunch ldLiDAR_stl_ros viewer_ld06_kinetic_melodic.launch
You will see the data points mapped onto the 2D plane of Rviz.
Summary
We have shown how to set up and use the OKdo LiDAR Module with the ROCK 4 to add LiDAR obstacle detection and autonomous navigation capabilities to robotics projects based on ROS.
The ROCK’s powerful processing capabilities and ability to connect to various sensors make it a strong contender for controlling your next autonomous robot application!
References
![]()
Ready to ROCK your next project? Browse our ROCK Shop to find out the range of incredible ROCK single-board computers – the perfect Raspberry Pi alternative, compute modules and accessories. Be one of the first to know:

Do you want to know more about ROCK and how we, here at OKdo, can help solve your problem? Talk to us, get in touch with our Sales team to find the perfect solution.

![]()
Visit our Blogs, Getting Started Guides and Projects for more inspiration!
Like what you read? Why not show your appreciation by giving some love.
From a quick tap to smashing that love button and show how much you enjoyed this project.

