Oh, no! Not another Pi audio project.
That’s right. It’s not another audio project. We spotted Frederick Vandenbosch’s crazy-looking spiral speaker project and thought, ‘Hey! Why shouldn’t speakers be as exciting and creative as the music they play?’
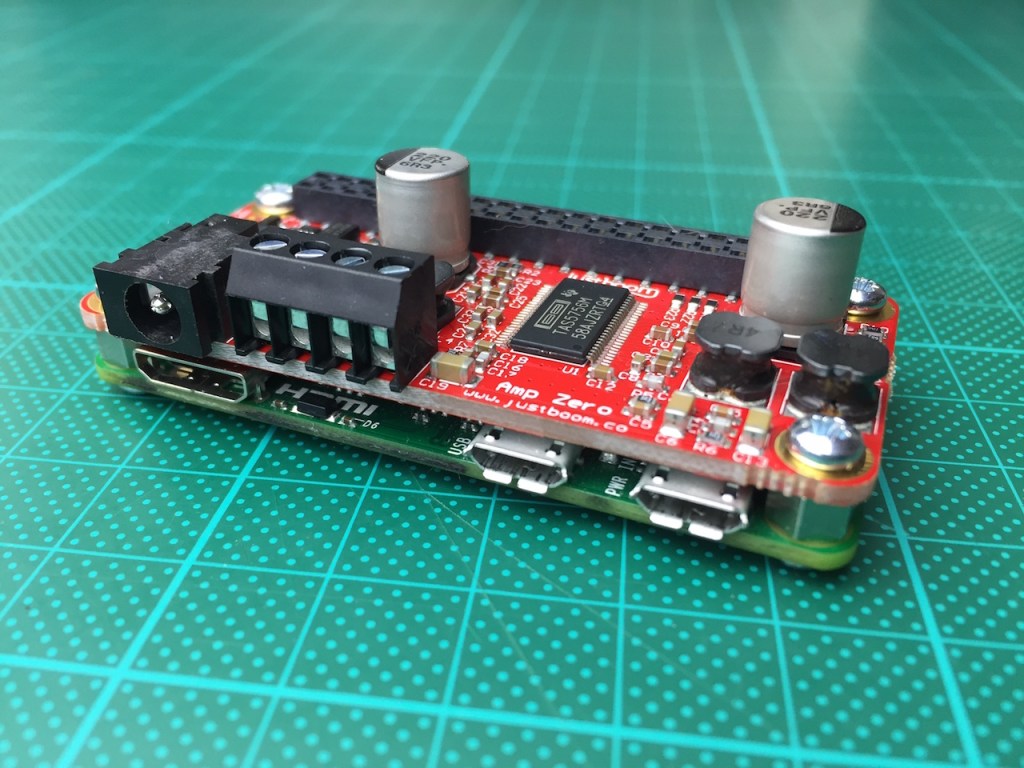
So we’re going to show you how to build the speaker and then send your minds reeling with some incredible possibilities for the enclosure. We’re big fans of the Justboom Amp Zero pHAT. It’s perfect for a DIY Pi Zero speaker build because it combines DAC (Digital to Analog Converter) and Amp (Amplifier).
So the Amp Zero is key, but to add a bit of visual oomph, a Scroll pHAT displays the sweet audio spectrum is all its glory.
You’ll need:
- Raspberry Pi Zero and cable kit
- Justboom Amp Zero pHAT
- Pimoroni Scroll pHAT
- Raspberry Pi wifi dongle
- Dayton Audio PS95-8 Speaker
Assemble the HAT
In the Justboom Amp Zero box you’ll find:
- Amp Zero pHAT
- DC barrel jack adapter
- IR receiver
- 4 spacers with screws
To connect the Amp Zero to a Pi Zero, you’ll need to solder standard male header pins on the Pi. After having screwed on the spacers, the pHAT slides on top of the header pins, onto the Pi Zero.
Configure The OS
We’re using the latest Raspbian image because we need the Scroll pHAT software and some custom scripts to run. It’s easy to enable support for the Amp Zero – just add or comment following lines in the /boot/config.txt file:
#dtparam=audio=on
dtoverlay=justboom-dac
Setup Scroll pHAT
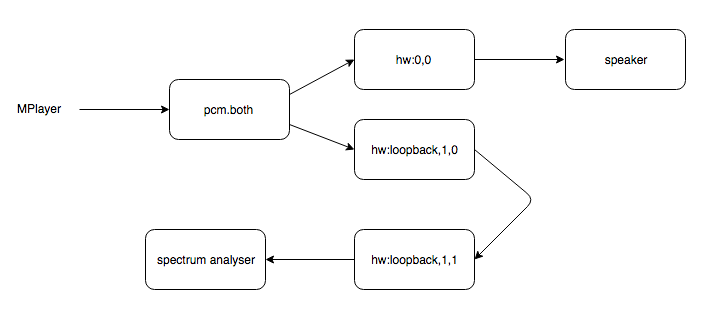
The Scroll pHAT is used to display the spectrum of the audio. To feed the spectrum analyser with an audio stream, we need to create a loopback device by modifying the ALSA config in /etc/asound.conf:
pcm.dac {
  type hw
  card 0
}

pcm.both {
    type route;
    slave.pcm {
        type multi;
        slaves.a.pcm "plughw:0,0"
        slaves.b.pcm "plughw:Loopback,1,0"
        slaves.a.channels 2;
        slaves.b.channels 2;
        bindings.0.slave a;
        bindings.0.channel 0;
        bindings.1.slave a;
        bindings.1.channel 1;

        bindings.2.slave b;
        bindings.2.channel 0;
        bindings.3.slave b;
        bindings.3.channel 1;
    }

    ttable.0.0 1;
    ttable.1.1 1;

    ttable.0.2 1;
    ttable.1.3 1;
}

pcm.!default {
        type plug
        slave.pcm "both"
}

ctl.!default {
        type hw
        card SB
}
So, by default, audio is sent to output device “both”, which consists of two outputs: the DAC and a loopback device. The loopback device’s counterpart will then be used to feed the stream to the spectrum analyser.
Setup Spectrum Analyzer
Next, you’ll need to get the modified code that visualises the spectrum on the Scroll pHAT from GitHub.
To take into account possible spectrum analyzer crashes, use this script to restart it in case it stops running running.
sudo modprobe snd-aloop

sleep 5

while true
do
  if ps aux | grep -v "grep" | grep "spectrum" 1>/dev/null;then
   sleep 1
  else
   sudo /home/pi/spectrum.py &
  fi

done
The Enclosure
And that’s the electronics sorted. Now it’s all the about the enclosure. To get those brain juices flowing, check out how Frederick made his wooden spiral enclosure for a spot of inspiration.

With your mind open to the possibilities for a creative enclosure, there’s no stopping you. But don’t forget to let us know what you build.
Like what you read? Why not show your appreciation by giving some love.
From a quick tap to smashing that love button and show how much you enjoyed this project.

