PaPiRus. Don’t you just love it? Both the HAT and Zero versions of this ePaper display gizmo will leave you with a smile so wide, friends will wonder what you’ve been up to. What’s not so much fun is putting the thing together. It’s not that you need a PhD in Control Engineering – but it certainly can’t harm to have a few handy tips to help get you to the end point.
So that’s what this is all about. Think of us as your PaPiRus wing man.
Here’s what we’ll be covering:
- Connecting the screen to the PaPiRus board
- Damaged screens
- Connecting the GPIO adapter
- Installing the pogo pin connector
- Installing the push buttons
- Barcode effect
- Software info
- Bi-adhesive pads
- Refresh rates and screen lifespan
- Full and partial updates
All set? Let’s walk like an Egyptian (PaPiRus – get it?)…
Connecting the screen to the PaPiRus board for HAT and Zero
This is pretty straightforward.
Start by popping open the connector at the back of the PaPiRus board. To do this, simply lift the dark brown clip on CN1 by rotating it over its hinges until perpendicular to the board. This clip will fasten onto the beige clip, so expect a tad of resistance.
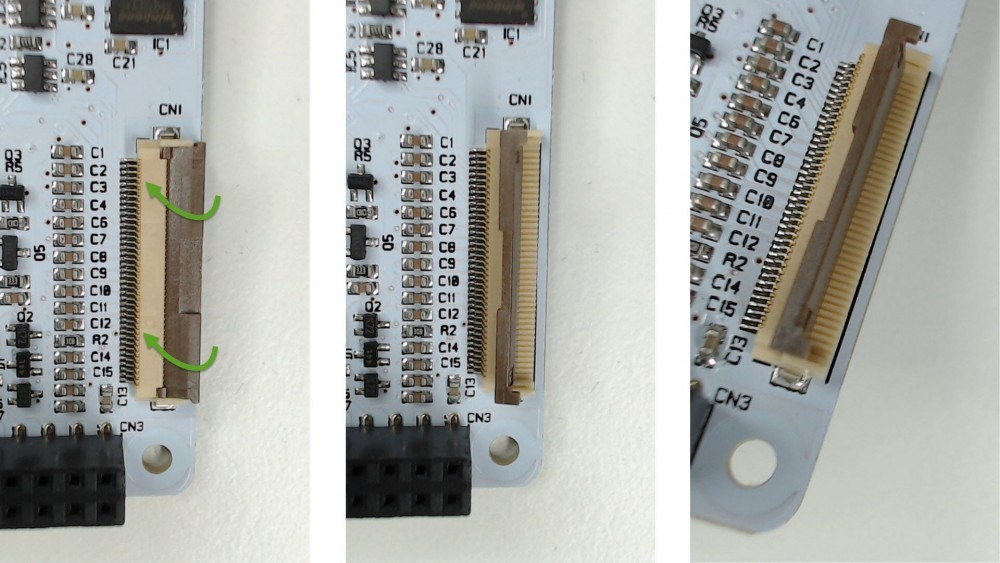
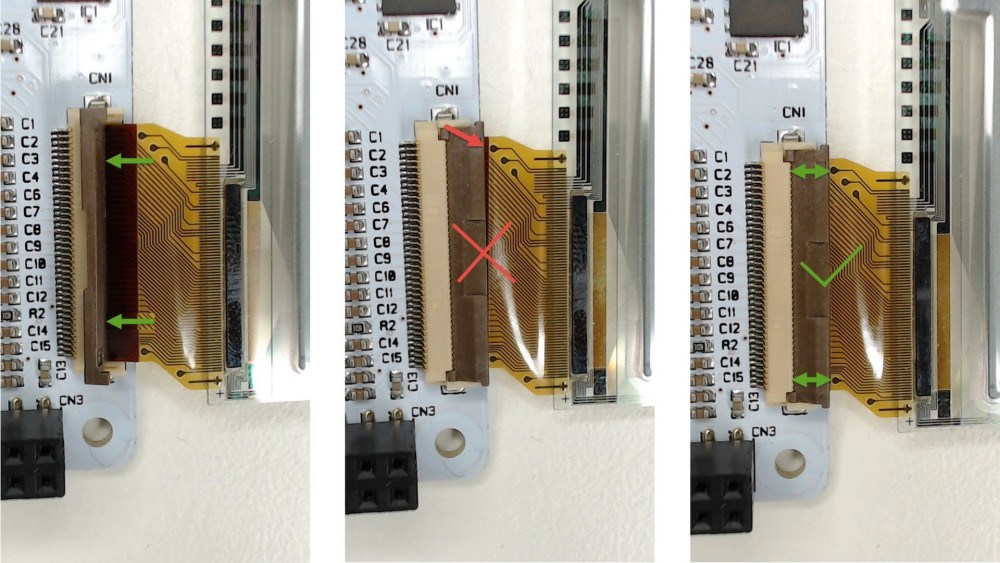
The cable terminal’s the same for every screen. With the connector open, slide the cable on the beige part of the connector and gently push it underneath the brown clip. Be sure the cable is inserted evenly so when the clip is rotated back the two dots are parallel with the connector.
Take your time to get this right, guys. Plugging the screen in CN1incorrectly is one of the main screw-ups that leave your screen showing nada.
Cable in the right position? Great, now rotate the brown clip back into its closed position. Again, you’ll feel a bit of resistance here but don’t fear – it’s perfectly normal.
Damaged screen?
If you’ve got butter fingers like us, you’ll know all about cracked screens. Even staring too hard seems to damage these fragile little blighters. So always leave it out of harm’s way until you really need to fit it.
The screens come with sticky pads to fit them to the board, but you can use a bit of Blue Tack to keep it in place whilst you’re still developing your idea. This way, you can easily lift the screen off before removing the PaPiRus from the Raspberry Pi without exerting too much pressure on the screen itself.
If your screens drawing a blank but the damage isn’t obvious, try running:
| papirus-test |
This tells you if everything’s working properly. If a broken screen is confirmed – or you simply fancy a different size screen – simply order a replacement screen by following this link.
Connecting the GP109 adapter
So far, everything’s been applicable to both the HAT and the Zero. Sorry Zero fans, this bit is only for HAT owners.
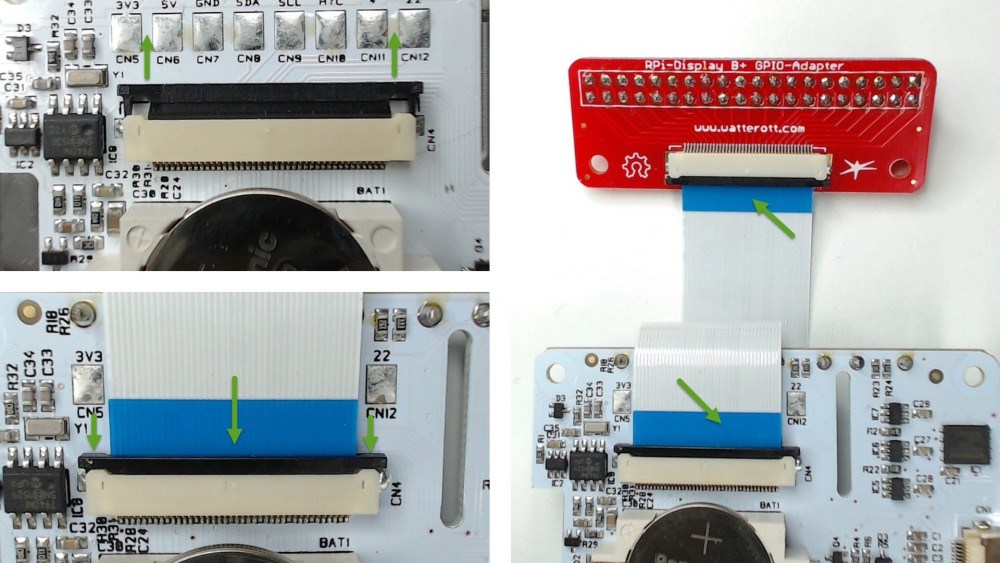
If you need to place your PaPiRus HAT board anywhere other than on the Raspberry Pi GPIO header, use the GPIO adapter which plugs in CN4.
This nifty device replicates the GPIO on a practical flat cable, giving you freedom to place your screen wherever you like.
Open the connector by sliding out the black clip. Stuff the flat cable all the way in, then place the black clip back in. Plug the flat cable in to make sure the blue part always faces up.
Installing the pogo pin connector
Want help installing your pogo pin connector? Let’s gogo…
But just before we do, these notes only apply to the PaPiRus HAT.
So…you’ll be fixing your pogo pin either on CN13 or CN15 (depending on whether you’ll be using your PaPiRus on a Raspberry Pi B+, 2B or a Raspberry Pi 3B.)
Place the pogo pin in either of those pads from underneath, like this:

Then get out your soldering iron, take a deep breath and solder your pogo pin onto the PCB (keeping it perfectly perpendicular). We try to use non lead free solder – it’s easier to work with. If you’ve a temperature adjustable solder station, set it to about 300°C.
Installing the push buttons
Sorry PaPiRus Zero owners, but we’re only talking to HAT owners here again.
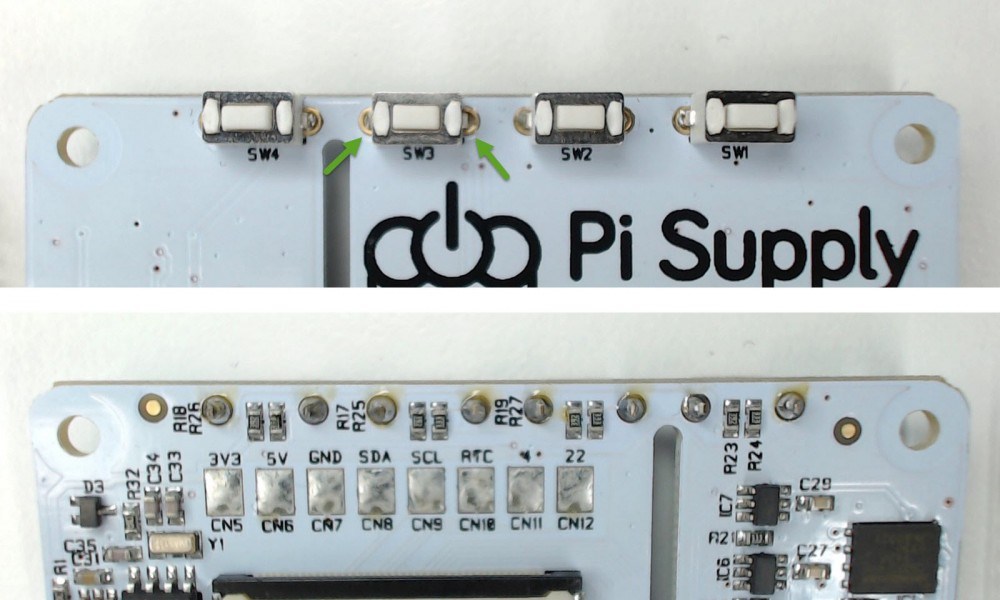
Place the buttons on the top side of the PCB with their little legs sticking all the way through – and make sure the bottom of the switch is touching the board.
Turn the PCB round and solder the feet. We’d make life easy and plump for lead free solder. And set your solder station to 300° C if you have a temperature controller.
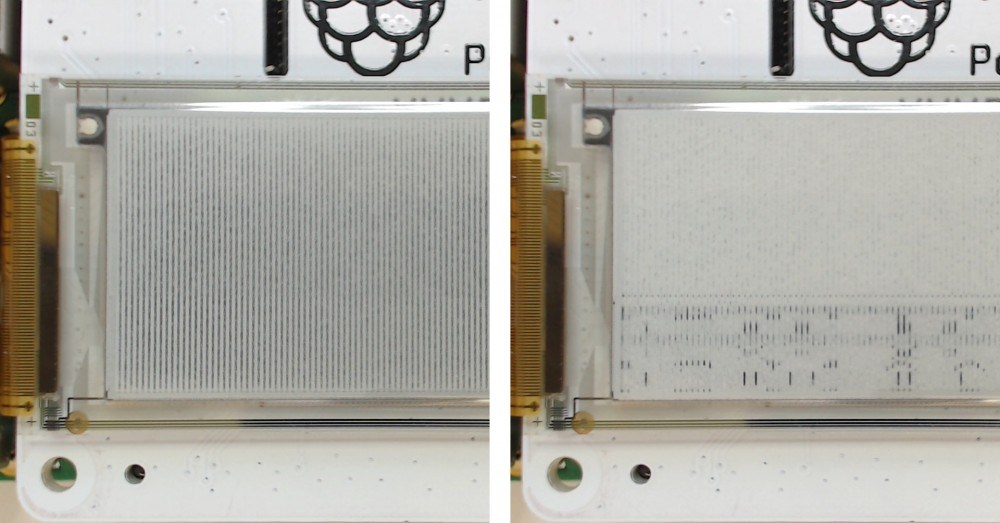
Barcode effect
Is your screen showing a barcode type of image? Don’t panic – it just means your screen size isn’t set up properly.
Here’s an easy fix: simply type…
| papirus-set <size of screen> |
Remember – the screen sizes are:
- 7″
- 6″
- 0″
- 9″
- 44″
You’ll need to know the size of your screen for the next bit (if in doubt, follow this link to check which screen you bought).
Now, for example to set a 2.0″ screen just type:
| papirus-set 2.0 |
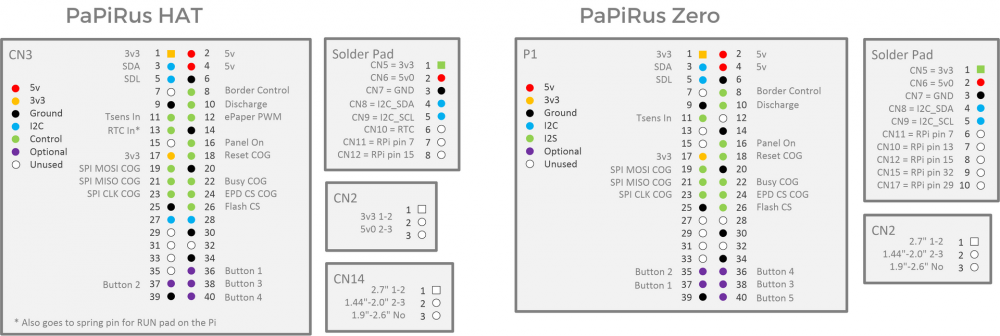
Which pins does PaPiRus use?
Easy – here’s our quick-see guide:
Where can I find info about the software?
Just turn to this GitHub repository. They keep up pretty detailed documentation, plus you’ll also find lots of stuff about the hardware etc.
What are the small two-sided sticky pads in the box for?
These pads let you fix the screen to the board. They stick like mad, so only use them when you’re pretty sure your configuration is spot on – trying to remove them will damaged your screen.
If you don’t want to commit yourself to using these pads while you’re playing around, try using blu-tack – it’ll keep everything nicely in place and you can remove it without damaging anything until you’re ready for the sticky pads.
Refresh rates and screen lifespan
Your typical ePaper refresh rate for a full-screen update is around 1 to 2 Hz (1 to 2 updates per second). This refresh rate really depends on things like temperature. At lower temperatures you have to drive the display more slowly or you can get ‘ghosting’ (you could also damage the display). By fiddling with the temperature variables you can get this level to ~15 Hz – but we wouldn’t recommend this because it could well slash the life of your display and cause other weird side-effects.
If you want to create some animations and really need to boost your refresh rate, try reducing the display area of screen by using partial updates…
Partial and full updates
Partial updates on just part of your screen can really speed up refresh rates. But you can’t do this forever and you will have to refresh the full screen every once in a while. It’s best to do a full refresh every few minutes. And we’d always recommend completely powering down the screen every few hours.
So there you go, PaPiRus fans. Whether you’re a HAT or Zero kind of guy, we hope this little guide will help you get up and running in no time. And you can’t say Pharaoh than that (ouch).
Like what you read? Why not show your appreciation by giving some love.
From a quick tap to smashing that love button and show how much you enjoyed this project.