IDLE (Integrated Development and Learning Environment) is a user-friendly Python IDE (Integrated Development Environment) available on Linux systems. It provides a simple and intuitive environment for writing, testing, and executing Python code.
IDLE offers a range of features that make it suitable for beginners and learners. It includes a code editor with syntax highlighting, indentation support, and code completion, which helps users write clean and error-free code. The editor also allows you to run code directly and see the output in the integrated Python shell.
The Python shell in IDLE provides an interactive command-line interface where you can execute Python statements, test code snippets, and explore Python’s functionality in real-time. It allows for quick prototyping and experimentation.
In addition to the editor and shell, IDLE supports basic debugging features. Users can set breakpoints, step through code, and inspect variables to understand and troubleshoot their programs.
IDLE is lightweight and typically comes pre-installed with Python on Linux systems. Its simplicity and accessibility make it a suitable choice for beginners or those learning Python programming on Linux.
Author: Pradeep Nandigama, Software Developer, OKdo
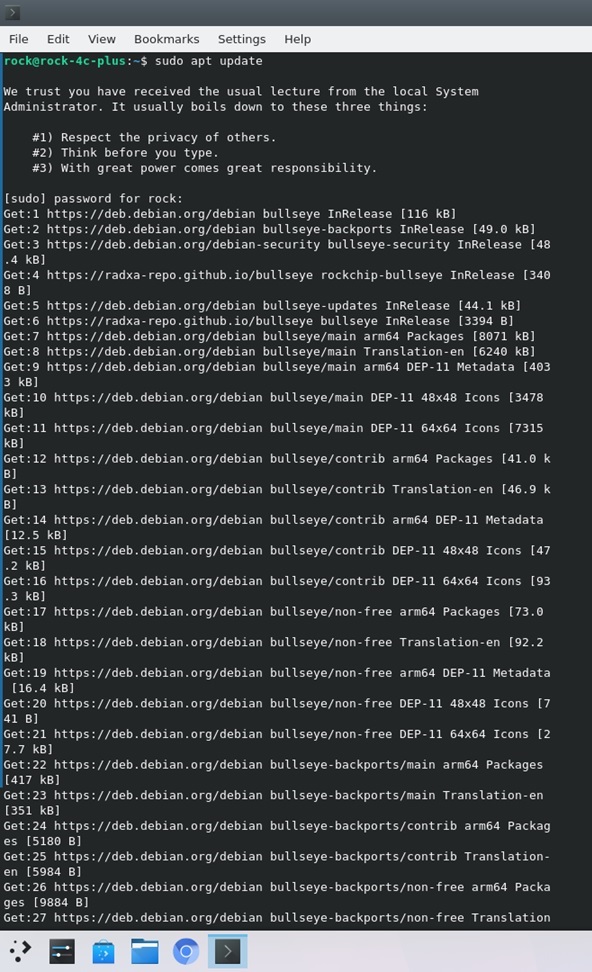
Step 1: Update package lists or repositories
Open a terminal and type the command below, enter password for sudo, if asked:
sudo apt updateThe command “sudo apt update” is used in Linux systems, particularly those using Debian-based distributions like Ubuntu, to update the package lists or repositories.
Here’s a breakdown of the command:
- “sudo”: It stands for “Super User Do” and is used to run a command with administrative privileges or as the “root” user. It allows you to execute commands that require elevated permissions.
- “apt”: It refers to the Advanced Package Tool, which is a package management system used in Debian-based Linux distributions. It provides a command-line interface for managing software packages, including installation, removal, and updating.
- “update”: It is an apt command used to update the package lists or repositories on your system. When you run “sudo apt update,” it retrieves the latest information about available packages from the software repositories configured on your system.
The process of running “sudo apt update” involves the following steps:
- Authentication: Since the command is executed with administrative privileges, you might be prompted to enter your password. This is to ensure that only authorized users can perform system-level operations.
- Package List Update: Once authenticated, the command connects to the configured software repositories and retrieves updated information about available packages. It checks for changes in the package lists and updates the local cache accordingly.
- Repository Synchronization: The command synchronizes the local package lists with the repositories, ensuring that your system has the latest information about package versions, dependencies, and security updates.
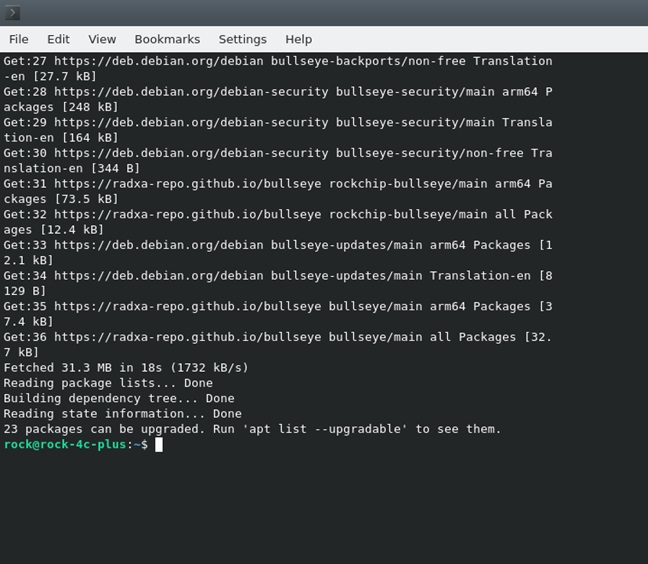
After running “sudo apt update,” you will see the output showing the progress of the update process, including the repositories being accessed and the packages being refreshed. Once completed, your package management system will be up to date and ready for package installation or upgrade using commands like “sudo apt install” or “sudo apt upgrade.”
It is a good practice to run “sudo apt update” regularly to keep your system updated with the latest software packages, security patches, and bug fixes provided by the distribution’s package maintainers.
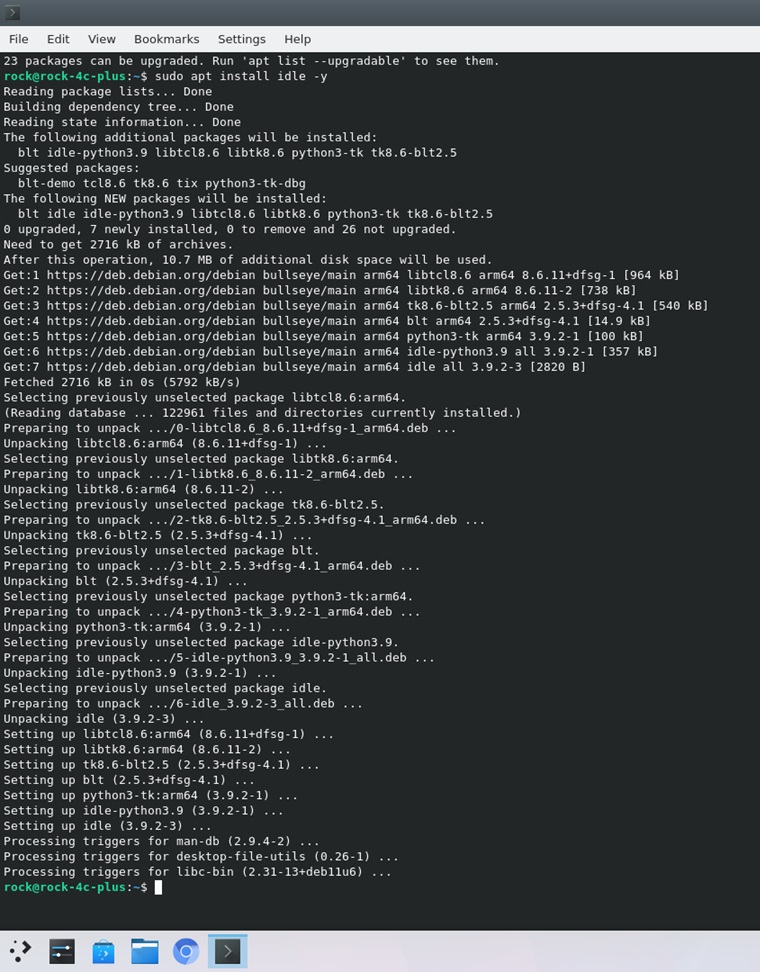
Step 2: Install idle
Open a terminal and type the command below, enter password for sudo, if asked:
sudo apt install idle -yThe command “sudo apt install idle -y” is used in Linux systems, particularly those using Debian-based distributions like Ubuntu, to install the IDLE (Integrated Development and Learning Environment) package.
Here’s a breakdown of the command:
- “sudo”: As explained in the previous step.
- “apt”: As explained in the previous step.
- “install”: It is an apt command used to install software packages on your system.
- “idle”: It is the name of the package that you want to install. In this case, “idle” refers to the IDLE package, which is the official Python IDE (Integrated Development Environment) that comes bundled with the Python programming language.
- “-y”: It is an option used with the “apt install” command to automatically answer “yes” to any prompts or confirmation messages that may appear during the installation process. This flag enables unattended installations, allowing the command to run without user intervention.
When you run the command “sudo apt install idle -y”, it installs the IDLE package on your system, including all its dependencies. The package manager retrieves the necessary files from the software repositories, resolves dependencies, and handles the installation process.
By including the “-y” flag, the command ensures that the installation proceeds without requiring manual confirmation for each step, allowing for automated installation scripts or unattended installations.
Step 3: Launch IDLE
After the installation is complete, you can use IDLE by launching it from the application menu or by running the “idle” command in the terminal. IDLE provides an interactive environment where you can write, test, and execute Python code, making it a useful tool for Python development and learning.
Open a terminal and type the command below:
idle
Step 4: Test “hello world” on command line
On the ‘idle’ command line interface opened previously, type as shown below and press enter:
print ("Hello World1")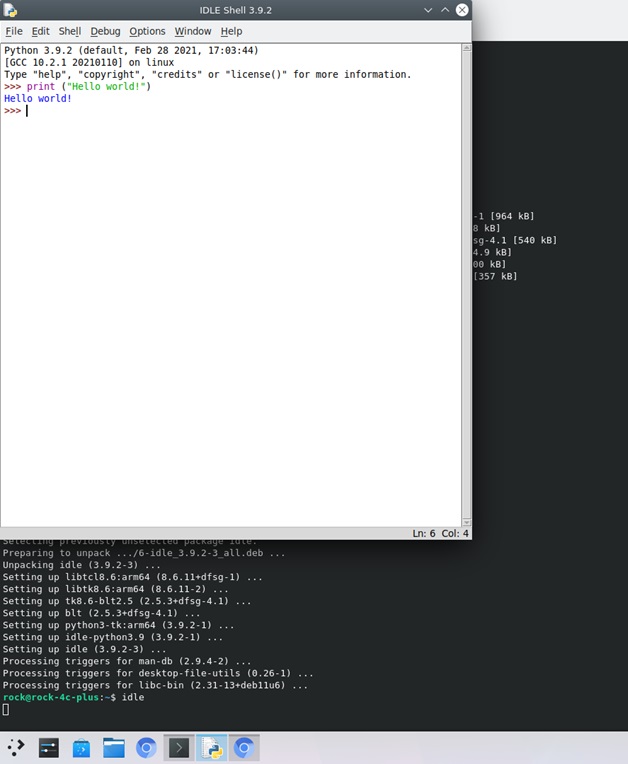
Step 5: Write code with a text editor
Launch ‘idle’ with python file name to edit and press enter:
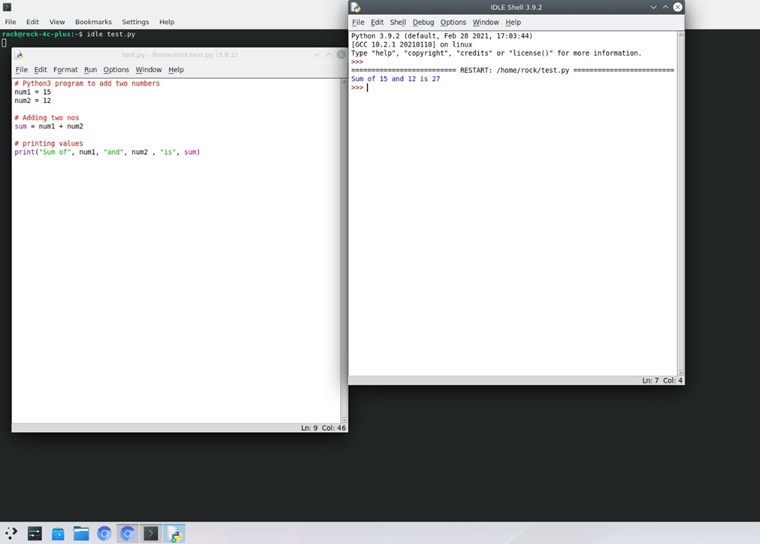
Idle test.pyThe test code here calculates the sum of two numbers:
# Python3 program to add two numbers
num1 = 15
num2 = 12

# Adding two nos
sum = num1 + num2

# printing values
print("Sum of", num1, "and", num2 , "is", sum)
Step 6: Execute the code
Press ‘F5’ on the keyboard to run the python code:
Step 7: Install libmraa for GPIO control
Please follow the instruction in the guide named “AN-00001_MRRA_INSTALLATION_IN_ROCK_4SE_C+_V1_18042023.docx”
Step 8: GPIO Mapping
ROCK 4 series has a 40-pin expansion header. Each pin is distinguished by color. For ROCK 4C+, the following pin-out is applicable for version 1.2 and later.
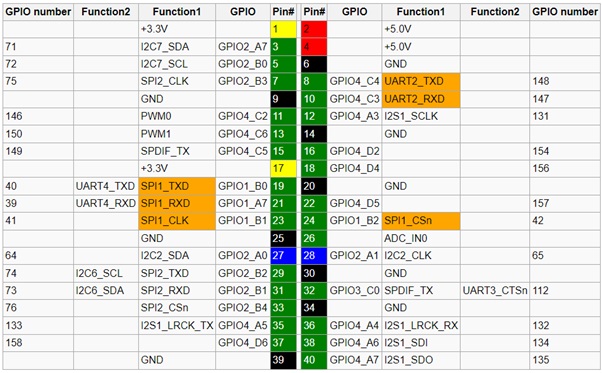
Notes about 40-pin Header
- Function marked with colour orange is the default function of this pin.
- Except Pins for power supply, all pins are routed directly to SoC RK3399.
- For pin 3, 5, 27, 28, 29 and 31, each pin is connected to the 3.0V supply through a 4.7K pull-up resistor.
- Pin 7 is routed directly to the pin of MIPI CSI on board.
SPI
- Pin 19, 21, 23, 24 also route to the pins of SPI flash on board. If the ROCK 4 model has SPI flash soldered on board, the SPI function is not available on GPIO header.
UART
- UART2 is enabled as U-boot and Linux serial console by default. Check Rockpi4/dev/serial-console to use. Check Rockpi4/hardware/devtree_overlays to disable serial console on UART2.
- UART2 & UART4 support a wide range of baud rate. It includes but not is not limited to the following baud rates. For instance, 115200bps. 500000bps, 1500000bps and so on.
- For v1.4 and later hardware, on board SPI flash is soldered, UART4 PINs are used as SPI function.
For I2C-2 and I2C-7
- We have do the test using the i2c device e2prom. We need to open the i2c device file, and then do the read or write operation.
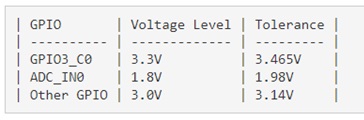
IO Voltage
RK3399 have three IO voltages, 1.8V/3.0V/3.3V. For ROCK Pi 4, below is the default voltage:
Step 9: Write test code in python to turn a GPIO pin “on” and “off”
Here’s an example code in Python that uses the libmraa library to control GPIO pins on a device:
import mraa
import time

# Define the GPIO pin number
gpio_pin = 16

# Initialize the GPIO pin
gpio = mraa.Gpio(gpio_pin)

# Toggle the GPIO pin on and off
while True:
   gpio.dir(mraa.DIR_OUT)
    gpio.write(1)  # Set the pin high
    time.sleep(1)  # Delay for 1 second
    gpio.write(0)  # Set the pin low
    time.sleep(1)  # Delay for 1 second
In this example, we first import the mraa library. Then, we define the GPIO pin number that we want to control (gpio_pin = 13). Next, we initialize the GPIO pin by creating a Gpio object with the specified pin number. We set the direction of the pin to output using gpio.dir(mraa.DIR_OUT). After that, we enter a loop where we toggle the GPIO pin on and off. We use gpio.write(1) to set the pin high (logic level 1), followed by a delay of 1 second using time.sleep(1). Then, we use gpio.write(0) to set the pin low (logic level 0), followed by another 1-second delay.
The loop continues indefinitely, toggling the GPIO pin on and off every second.
Step 10: GPIO hardware setup
Connect a LED to pin 16 GPIO to an LED via a 1k resistor as shown in the image.
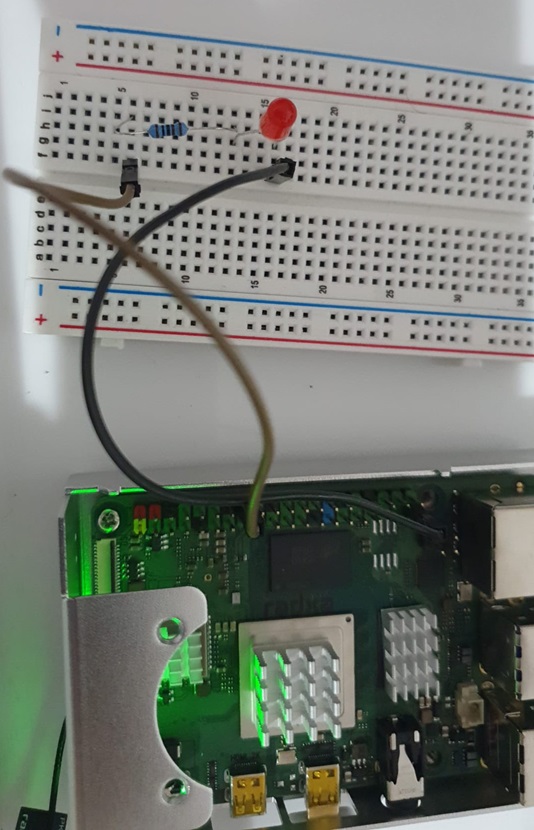
Step 11: Run the GPIO code in idle as shown in step 6
PLEASE NOTE: By default the ‘idle’ IDE should be run as root:
sudo idle gpio.py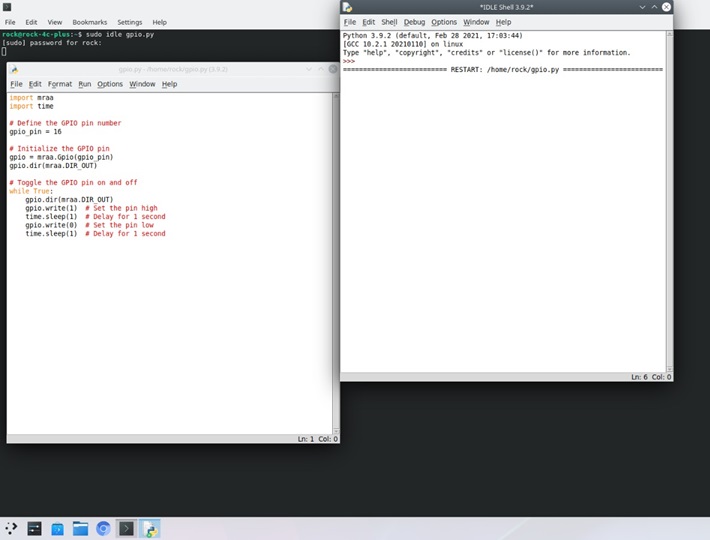
This will cause the LED to blink on and off every second.
Step 12: GPIO without sudo – Create group gpio
Use ‘groupadd’ command to create a group called ‘gpio’
sudo groupadd -f gpioStep 13: GPIO without sudo – Edit the udev rules file
- Open a terminal window and enter the following command to edit the udev rules file:
sudo nano /etc/udev/rules.d/10-gpio-permissions.rules- Add the following line to the file to grant permissions to the GPIO pins:
SUBSYSTEM=="gpio", PROGRAM="/bin/sh -c '
    chown -R root:gpio /sys/class/gpio && chmod -R 770 /sys/class/gpio;
    chown -R root:gpio /sys/devices/platform/soc/*.gpio/gpio && chmod -R 770 /sys/devices/platform/soc/*.gpio/gpio;
    chown -R root:gpio /sys$devpath && chmod -R 770 /sys$devpath
'"
Press ‘ctrl+o’ and ‘ctrl+x’ to save.
- Restart the udev service using the following command
sudo service udev restart- Make sure that the user running the Python script is a member of the gpio group. You can add the user to the gpio group using the following command:
sudo usermod -aG gpio <username>Replace <username> with the actual username of the user running the script. In ROCK boards, it will be either ‘rock’ or ‘radxa’ by default.
Log out and log back in to apply the group membership changes.
After following these steps, you should be able to run the Python code that uses libmraa without requiring sudo privileges. The user running the script will have the necessary permissions to access the GPIO pins.
Step 14: Run the GPIO code in idle as shown in step 10, without sudo
idle gpio.pyThis will cause the LED to blink on and off every second.
Summary
If you have followed the steps above, you will have successfully completed installation, execution, editing of python code and controlling of GPIO pins from inside IDLE IDE without a root access.
![]()


Let’s invent the future together
What’s your challenge? From augmented reality to machine learning and automation, send us your questions, problems or ideas… We have the solution to help you design the world. Get in touch today.
Like what you read? Why not show your appreciation by giving some love.
From a quick tap to smashing that love button and show how much you enjoyed this project.
