Is there anything as cool as a robot? Really, anything? We don’t think so. And whilst those walking, talking robots we dreamed of as kids are still a little way off (we don’t exactly see Robbie The Robots serving our every need) we are taking little steps towards robot Nirvana.
So you can imagine our excitement when we started a brand new project to build our very own robotic arm controller using nothing but Raspberry Pi and hand gestures.
Configure The Pi
Start by booting the Raspbian, then open a terminal session (Menu -> Accessories -> Terminal) and run:
| sudo raspi-config |
Choose the interfacing options then SSH to enable the SSH Server. The server is now running on your Raspberry Pi and you can use your favourite SSH client to connect to your Pi to go through the rest of the steps.
Whether you’re using Linux, Mac OS or Windows you can rely in some cases on readily available SSH clients or install a specialised program from the internet like Putty for Windows. You should be able to connect to your Pi by simply using its mDNS name raspberrypi.local. If this is a no-no, find its IP address by running:
| Ifconfig |
which you can run using a terminal window (like you did to run the configuration step) which will usually be in the form of 192.168.x.y.
Once we enabled the SSH server and had the IP address, we went back to our main computer and established a connection via our SSH client. Boom! We’re in.
Install Software
Next we needed to sort the updates and installations to prepare Raspbian to run all the software needed for the Flick HAT and the robotic arm. So we executed these commands and followed the installation prompts:
| sudo apt-get update
sudo apt-get install git sudo apt-get install subversion |
Installing these can take a little time, so stick the kettle on and have a brew.
All nicely installed?
Good. Now we needed to install the Flick Board software by running:
| curl -sSL https://pisupp.ly/flickcode | sudo bash |
Amongst other things, this created a directory in our home folder where all the software from Flick’s Github repository was safely stored. Feel free to explore the contents of the directory – you’ll discover some neat Python code examples and all the gen on Flick boards.
Now it’s time to finish the installation section. What we really needed were the various programs and software which let the Pi talk to the robotic arm.
To install the PyUsb library then:
| git clone https://github.com/walac/pyusb.git
cd pyusb sudo python setup.py install cd ~ |
This library provides easy USB access from Python and is a free contribution from Wander Lairson Costa aka walac which has kindly developed and made this library available on Github. (Thanks, guys, really appreciate it ;))
The next library we’ll need to install lets the Pi communicate to the Arm via USB. This little beauty has been created by Matt Dyson and once again kindly made available to everyone. (You’re a star, Matt.)
To install the RobotArmControl program use the following commands:
| svn co http://projects.mattdyson.org/projects/robotarm/armcontrol
sudo cp ~/armcontrol/RobotArm.py* /usr/local/bin/ |
Voila! Installation complete.
Finishing Up
Now it was the really fun bit – testing the whole setup and playing with our kit!
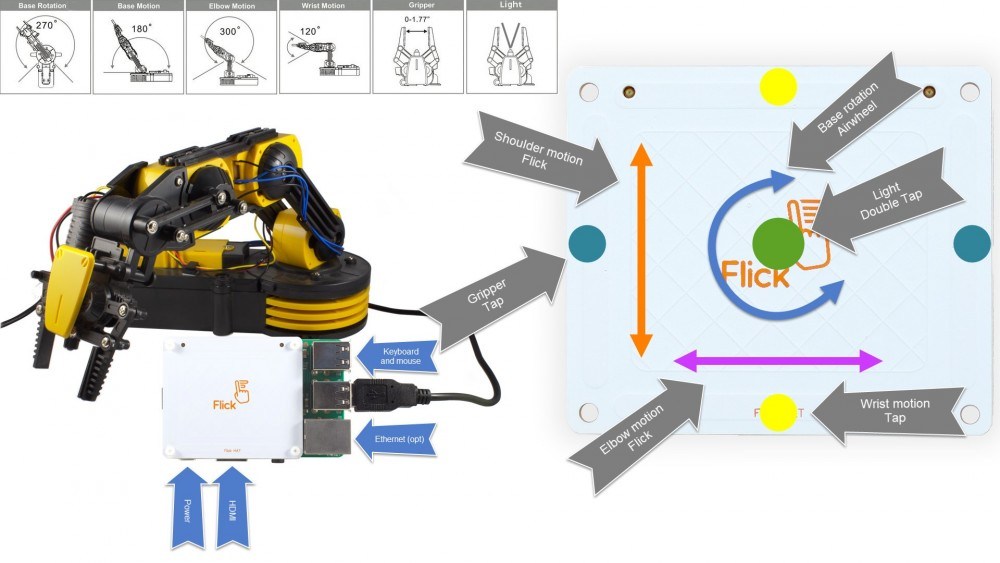
We began by plugging the USB cable from the robotic arm into one of the Raspberry Pi USB ports and switching the arm on. Then we ran the lines below to test each of the arm’s motors (this also checked that the installation which delivers communication to the arm was also OK)…
| sudo python ~/armcontrol/testRobotArm.py |
Have a problem, Houston? You might be using the wrong version of the robotic arm board. Just check through the foot note at the end to fix the problem.
Anyhow, once our test was finished the robotic arm returned to its starting position. Happy that our arm was working nicely and all the motors were connected in the right slot on the board, we then focused on the Flick board.
We used a demo script to make sure the board was been properly configured. This neat demo gave us all the info we needed about the board and let us test the full gamut of hand gestures. Running the script was easy – we just used:
| flick-demo |
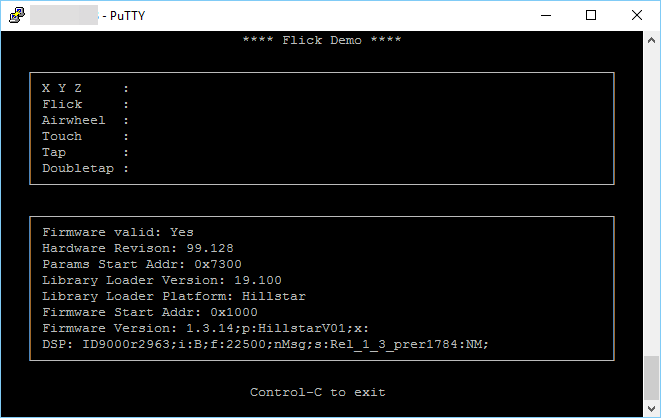
Then we moved our hand over the Flick board – and (stand back in amazement) the relevant inputs and values all appeared as if by magic.
Don’t worry if more than one gesture is triggered when you hover your hand over Flick. This is absolutely normal. That’s because something like a double tap is first of all a tap but also a touch in some cases.
Use this demo to train yourself and find out what’s the best way to operate the board. So, for instance, when you use your finger over the board, try to keep you hand fairly vertical or the rest of your hand will also be detected and lead to misreadings. To get really clear gestures use your finger as if it was a pen or a magic wand.
The only thing left to do now was to finally run the arm control demo which was displayed in a similar window. To do this, run this script which allows control of the Arm via the Flick board:
| sudo flick-armcontrol |
(In case you’re wondering – we had to use sudo because of the RobotArm library which needs direct access to the serial.)
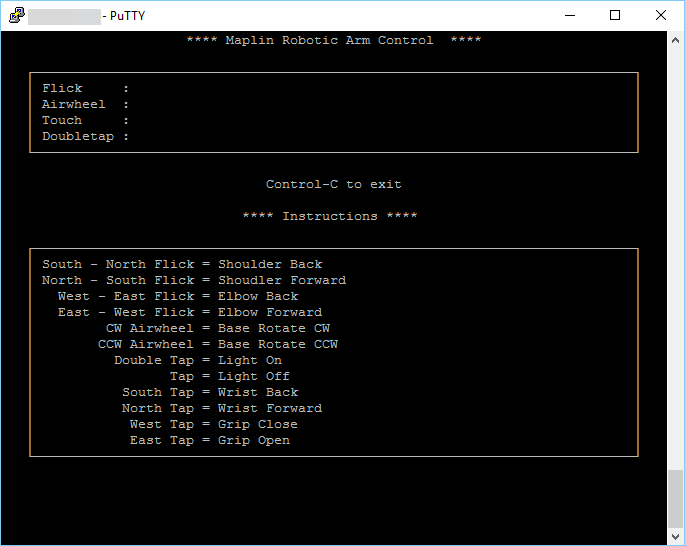
The on-screen info lets you know which gestures move different parts of your robotic arm. It’s as easy as that!
We’re still figuring out how to make our robotic hand give a thumbs up signal, but as soon as we do we’ll give ourselves a pat on the back. Actually, that’s got us thinking…
A foot note to our robotic hand project: if your script complains it’s not finding the robotic arm, first off check your batteries and that the arm’s switched ON (no s*#! Sherlock). If you’re still stuck, it may well be your board. We found out there are at least two batches of boards out there from the same manufacturer. The problem lies with the USB identifier which is either 1267:0000 or 1267:0001. You can make sure of which is yours by running
| Lsub |
You will get something similar to either of these lines in your output:
| Bus 001 Device 006: ID 1267:0000 Logic3 / SpectraVideo plc
Bus 001 Device 006: ID 1267:0001 Logic3 / SpectraVideo plc |
The RobotArm.py is preconfigured with the 0000 version. If your board is the other type then you will need to run:
| sudo nano /usr/local/bin/RobotArm.py |
and change the PRODUCT line to:
| # Product information for the arm
VENDOR = 0x1267 PRODUCT = 0x0001 |
save the file and exit.
So that testRobotArm.py is working you will need to also change that same line in the original armcontrol folder.
| sudo nano ~/armcontrol/RobotArm.py |
Like what you read? Why not show your appreciation by giving some love.
From a quick tap to smashing that love button and show how much you enjoyed this project.
