Whisper the words ‘CE marking’ to your average grease monkey and you can expect one of two reactions: they’ll either make a run for the nearest exit (if they’ve been through the process in a previous life, that is) or they’ll blink at you in blissful ignorance.
Make no mistake, CE marking can be a nightmare. Scratch the surface and you’ll soon be drowning in an ocean of official standards, wondering which apply to your product, how to go about testing — and whether you need to re-mortgage your house.
But fear not. With a little help from yours truly, you’ll discover how to make the whole process easy and stress-free. And all without taking a lump hammer to your piggy bank.
So read on and discover how to take an IoT gizmo from prototype, through testing and design revision to get the all-important CE marking so you can flog it to the big wide world.
For starters, let’s choose an imaginary product for our case study – say, an environmental sensor platform to be used with pycom modules that integrate a microcontroller with LoRa, WiFi, Bluetooth and SigFox (amongst other wireless systems). Sound good? We’re not talking an end-user product here, but like the pycom module, we’ll focus on a component for use in development and integration into an end-user product.
But even though our little gizmo won’t have the fancy enclosure or production firmware and service integration you’d expect with a consumer product, we can still put it through its paces and test it thoroughly – which will fill engineers and product designers with confidence that, when it comes to marking their product, they won’t have to go fixing issues caused by our design.
So what exactly is CE?

The initials originated from the phrase Conformité Européenne and showed that a product met the health, safety and environmental protection standards for products sold in the European Economic Area (EEA).
When we talk of ‘CE marking’ it’s easier to start by saying what it doesn’t mean: it ain’t a third party certification (for instance, government lab or industry organisation) – and it certainly doesn’t mean China Export (as some sellers still believe)!
This first point is key – CE marking is something you do to guarantee your product meets the appropriate standards. If you simply mark your product without the proper testing and get found out, you’ll be for the high jump. Worse still, you could even cause interference (EMI) or physical harm.
So what are the standards to meet for CE? This depends on the product. The applicable standards will vary masively depending on whether you’re producing a car, laptop, microwave oven or medical device.
Rather than get bogged down in detail now, we’ll explore the applicable standards in another blog. Right now we’ll stick to those standards that apply to Electro-Magnetic Compatibility (EMC) which make sure any emissions are within acceptable levels and we’re sufficiently immune to interference.
Let’s consider the hardware we’ll need.
Our environmental sensor platform is built around a Pycom LoPy (162-8047) module. This nifty little monkey integrates an ESP8266 (a pretty powerful 32-bit RISC microcontroller with WiFi) as well as supporting a bunch of low power wireless standards. It’s programmed via MicroPython, which provides a subset of the functionality found in the really novice-friendly Python language, with out-of-the-box support for integrated peripherals.
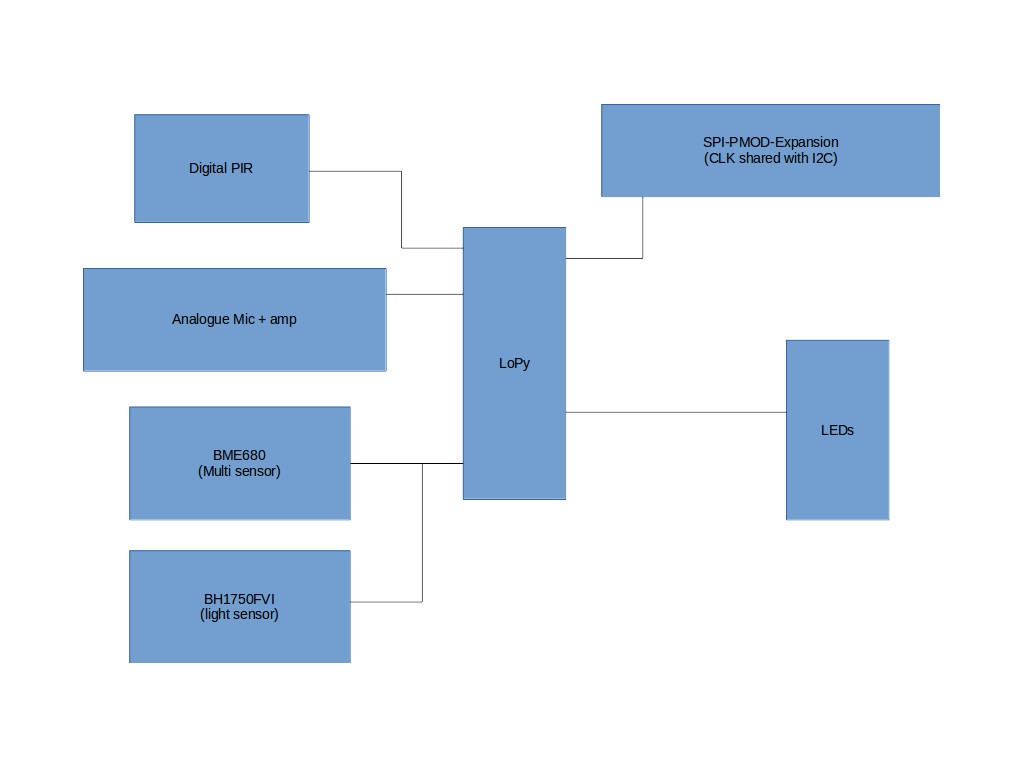
We can see above that our sensor platform extends the Pycom module with:
-
- Ambient light sensor connected via I2C.
-
- BME680 integrated environmental sensor connected via I2C.
-
- Sound level measurement via analogue input.
-
- PIR sensor connected via a simple digital GPIO.
-
- Pmod expansion.
-
- Status LEDs.
That makes a variety of peripherals with digital and analogue I/O, plus the capability for future expansion, which should give us an interesting mix when it comes to testing.
Let’s look at our prototypes.
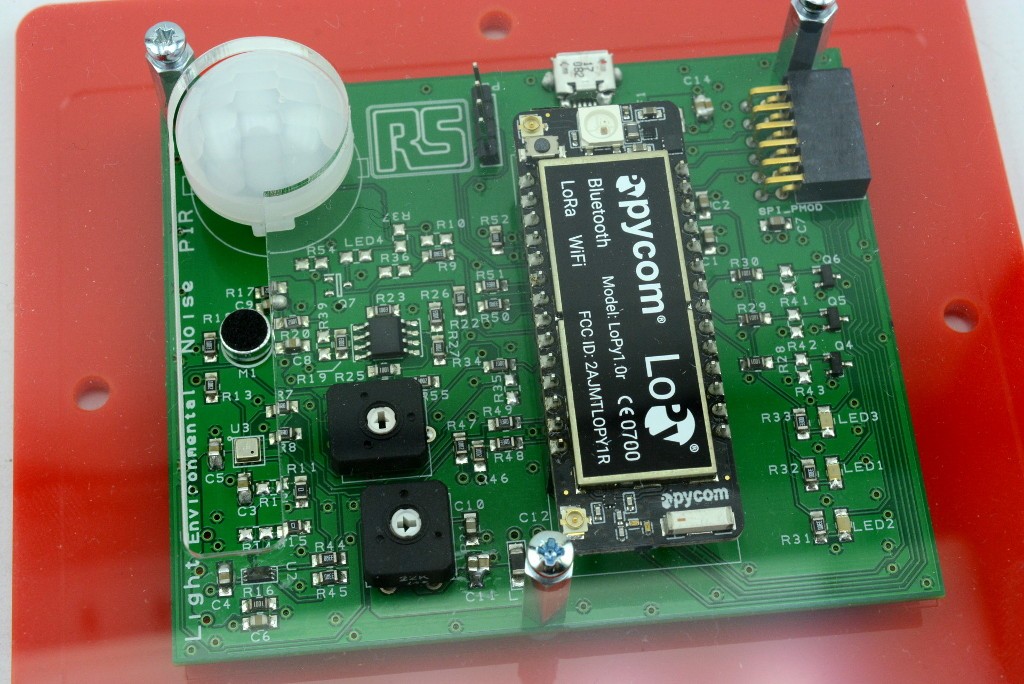
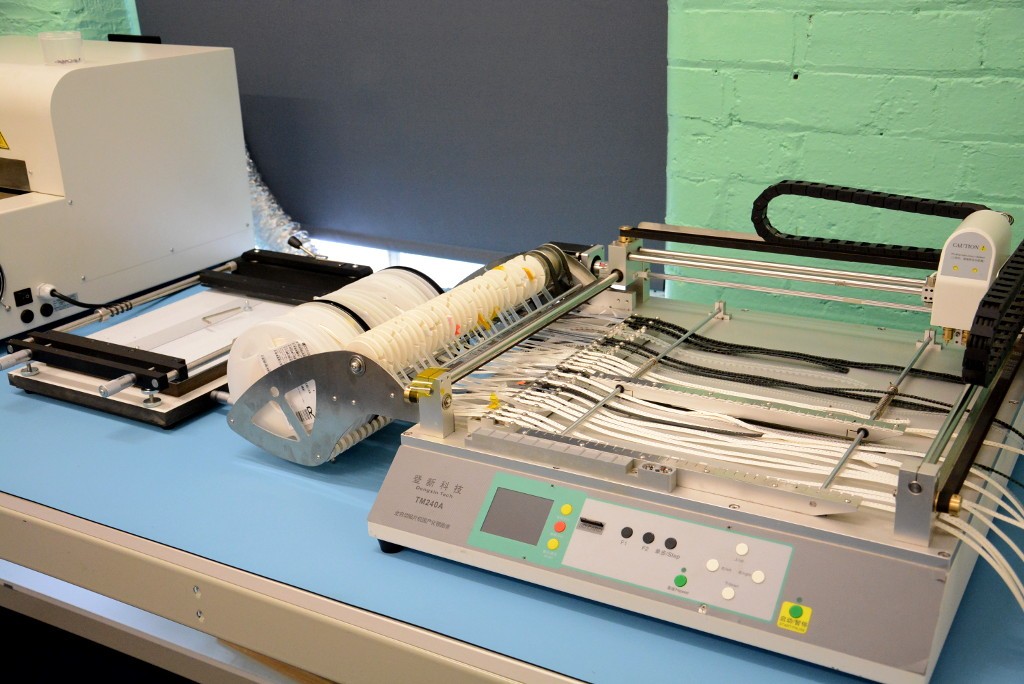
Our environmental sensor platform was originally developed as an IoT / smart building demo for use at RS Components HQ, with connectivity provided via LoRaWAN. The board was laid out using DesignSpark PCB and two CAD revisions were produced, with thirty of the second revision board being assembled in-house on a small pick-and-place machine.
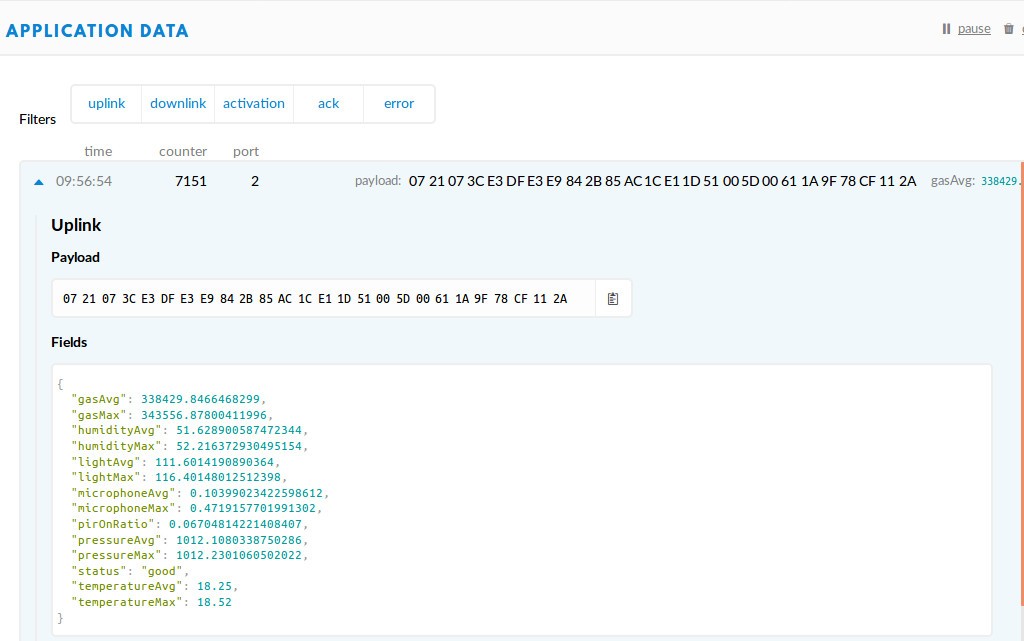
Most were installed whilst a handful were being used in development and testing. The installed ones have now been running happily for many months, sending data up to a dashboard via The Things Network measuring stuff like:
- Temperature (BME680)
- Humidity (BME680)
- Air pressure (BME680)
- Volatile Organic Compounds (BME680)
- Ambient light level (BH1750FVI)
- Sound level (mic + pre-amp + analogue input)
- PIR (Panasonic EKMC1603111)
So hallelujah! We have a solution that actually works.
But CE marking (and general sale of the sensor platform) was not something originally planned, so we may need to make some design tweaks to get it passed. With any luck, such changes will be relatively minor, since the original design was produced by a pro engineer who’s a stickler for best practices even if it’s just a prototype.
So on to the next phase – process.
OK, time to take a reality check. So far things have been fairly easy, but this is where it really helps to have a tame domain expert by your side. Seriously. They’ll advise on standards – and have access to the hard-to-get-hold-of calibrated equipment you’ll need for testing. Oh, and they’ll know how to use it properly too. Best of all, they’ll have the experience to pick up on problems and come up with brilliant solutions. Even if you don’t know any domain experts, go and make friends with one soon.
We’ll be working with Unit 3 Compliance, an EMC test service provider that specialises in pre-compliance and product design for EMC. The process we’ll follow is roughly:
-
- Initial design review (Unit 3 Compliance)
- New CAD revision and board build
- Pre-compliance EMC testing (Unit 3 Compliance)
- New CAD revision and board build if required
- Accredited lab testing
We could have gone straight to step 3, but there are some minor changes we want to make to the design – and we’d like to have some extra boards to do other stuff with, so doing another small manufacturing run also lets us review and tweak the design before testing.
Depending on how much we like risk, we could stop at step 3 (so long as the test results are OK) and many vendors may never actually use accredited lab services since it’s all extra cost. But let’s say we want the comfort blanket of a test report from an accredited lab.
Why not go straight to a lab? As well as adding expense, we like to think pre-compliance services give a more cost-effective way of identifying issues and sorting them out. After all, if you’re unlucky you may well face a raft of design tweaks and retests before it passes muster with the relevant standards. Far better for this to be done via a pre-compliance than an accredited lab.
So there we are. Part One of sorting out how to CE mark an IoT gizmo.
In Part Two we’ll say something about the outputs – and we’ll be sharing various design materials and firmware, together with test results, along the way. This will culminate in the publication of the final PCB database as open source hardware, allowing anyone to manufacture or make use of this as the basis of their own derivative designs.
So watch this space – and let us guide you further through the CE marking minefield…
Like what you read? Why not show your appreciation by giving some love.
From a quick tap to smashing that love button and show how much you enjoyed this project.
