Are you ashamed of your Access Point? (Come on, admit it – after all, you’re amongst friends now.) OK, let us get the ball rolling by saying loud and clear: WE WERE ASHAMED OF OURS. But that was before we created a pro looking Access Point with a Raspberry Pi.
We’ve never looked back. Our self-esteem has improved. We have more confidence in social settings. In fact we’re now the coolest guys in the Pi gang. So if you’d like to know how to achieve this transformation, stay tuned…
Right. We’re going to show you how to build an awesome Access Point with your Pi. It’s actually super easy since the Pi 3 comes with Wi-F on board. So there’s no excuse for sticking with that so-so AP.
To begin with, a few housekeeping points. We’ll be using the new Raspberry Pi 3 and the Pi Supply boards PaPiRus and Pi PoE for this demo, but you can still achieve the end result without these. Our setup also assumes you’re working on an updated version of Rasbian Jessie full and you know your way around nano and a few configuration files.
Oh, and you’ll also need to try your hand at a teeny bit of soldering.
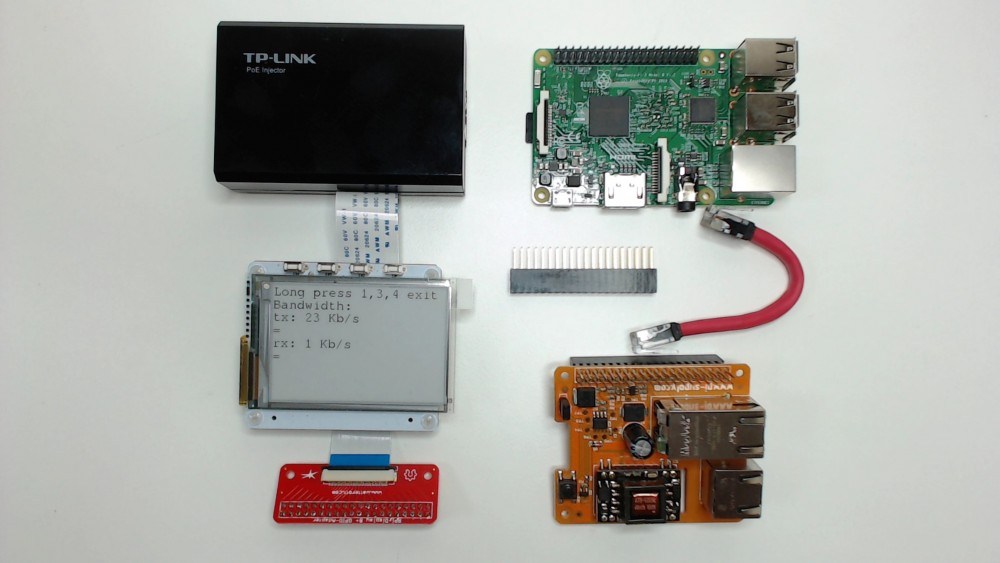
Here’s what you’ll need:
- Raspberry Pi 3
- PaPiRus with 2.7″ display
- Pi PoE
- 40 pin male header
- GPIO adapter (optional)
- TP-Link TL-POE150S or other PoE injector
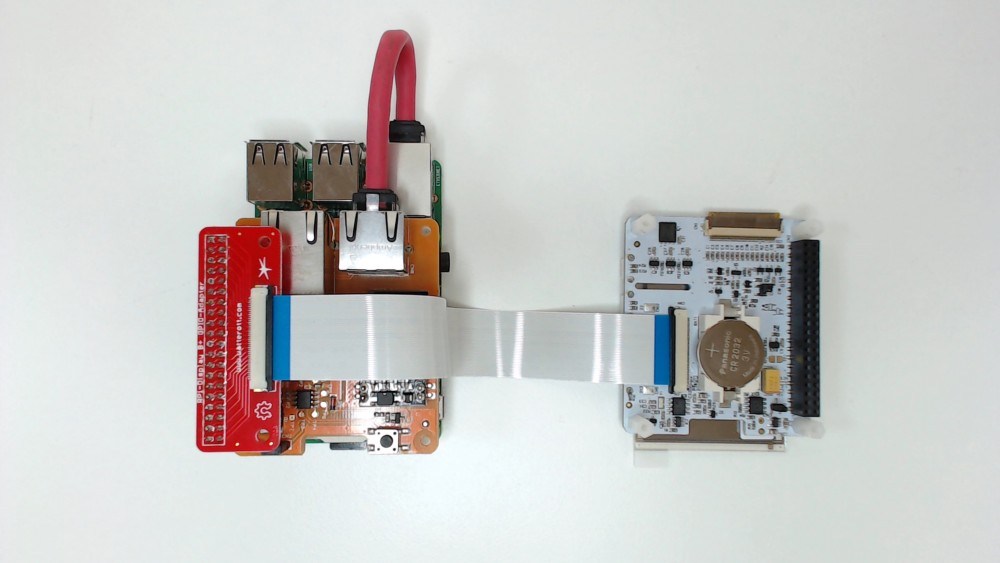
The additional header lets us install the PaPiRus on top of the Pi PoE or – as we did – via the GPIO adapter.
Your infrastructure may well already be able to deliver Power over Ethernet, but if it doesn’t you’ll need to use a PoE injector like the TP-Link TL-POE150S.
Assemble the parts
We connected everything up as shown, making sure the flat cable for the PaPiRus is connected the right way around.
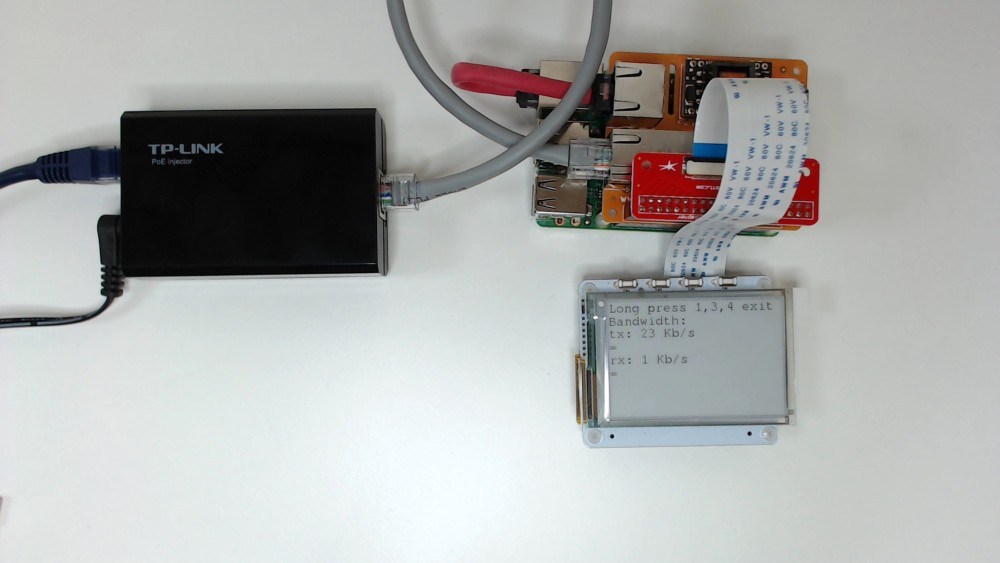
Then, with everything connected and ready to be fired, we gave a long press on the Pi PoE module switch to power up the system.
Prepare access point
We started by connecting up a monitor, keyboard, mouse, Ethernet cable and starting Raspbian.
We expanded the filesystem via
| 1 | sudo raspi-config |
Then chose Expand filesystem and waited before restarting.
Since we were in raspi-config we took the opportunity to enable SPI (which we’d need for the PaPiRus later on).
Now we chose ‘Advanced Options’, SPI and accepted to load the modules at boot.
Update the OS
Making sure you have the newest system software is always a good idea when starting a new project so let’s get it updated now.
| 1 | sudo apt-get update && sudo apt-get upgrade |
Install access point software
So far so good. At this point we were ready to install and configure hostapd – we used this to create the AP part of our system.
| 1 | sudo apt-get install hostapd |
Setup your config files
Next we needed to create the configuration file. As this file doesn’t exist we had to create a brand new one.
Don’t worry, you don’t have to create it from scratch, you can download the supporting code for GitHub – which also contains the templates for the configuration files.
| 1 | git clone https://github.com/francesco-vannini/PaPiRus-AP.git |
We edited the hostapd.conf template file
| 1 | sudo nano PaPiRus-AP/hostapd.conf |
and replaced the values below with our own:
| 1
2 3 4 |
# This is the name of the network
ssid=<your SSID> # The network passphrase wpa_passphrase=<wpa password> |
Now we copied the file hostapd.conf to the right directory.
| 1 | sudo cp PaPiRus-AP/hostapd.conf /etc/hostapd |
At this point we needed to edit the following file to make hostapd using the above configuration at startup.
| 1 | sudo nano /etc/default/hostapd |
We changed it by adding:
| 1 | DAEMON_CONF=”/etc/hostapd/hostapd.conf” |
Before finally starting the service:
| 1 | sudo systemctl start hostapd |
At this point we disabled dhcpcd because we really didn’t want this configuration to depend on services that automatically alter our network settings –
| 1 | sudo systemctl disable dhcpcd |
Bridge your connections
Now we needed to install bridge-utils that let us merge the Ethernet and the Wireless interfaces.
| 1 | sudo apt-get install bridge-utils |
And this is where we could configure our networking using the template provided:
| 1 | sudo nano PaPiRus-AP/interfaces |
before changing it to:
| 1
2 3 4 5 |
address <your AP IP address>
netmask <your home/office network mask> gateway <your home/office gateway IP address> dns-search <your internal domain (delete this line if you don’t have one)> dns-nameservers <your home/office DNS server (typically it will be the same as your gateway)> |
to backup our existing file
| 1 | sudo mv /etc/network/interfaces /etc/network/interfaces.bck |
and copy the new one
| 1 | sudo cp PaPiRus-AP/interfaces /etc/network/ |
Test the AP
Now it was time to reboot our Pi – and, as if by magic, we found a new AP with the SSID we chose!
So we then connected via the br0 IP that we specified…and…
…bingo! Our brilliant new Access Point was ready.
Any devices now connecting to it should get their IP from the DHCP on our home/office router – and be able to browse the internet. How cool is that?
Still heady from our success, we now began the task of preparing PaPiRus.
Install PaPiRus drivers
If you’re using the Pi PoE there are absolutely zilch software steps involved. Huraah. But since we were using PaPiRus we needed to install drivers and packages. These will also give us some ready-made examples we could use to test everything’s working before turning to the code that lets us manage the AP.
So we took a deep breath and installed the PaPiRus software by running the following command from our home folder:
| 1 | curl -sSL https://goo.gl/i1Imel | sudo bash |
(Top tip: if you get lost during this part, you can simply get back to your home directory by executing cd~ .)
Our installation was pretty quick and resolved various dependencies for the packages needed to use the PaPiRus screen.
This should be it. Run:
| 1 | sudo papirus-clock |
If all is well you should see a nice clock on your PaPiRus. And there it was in all its ticking glory! With mounting excitement, we knew we were now just one step away from getting our AP ready for business…
Run the management script
We created some demo code to display various information about the AP on the PaPiRus. By using the four switches we could access network stats and basic information about the AP configuration. Here’s how we did it.
Run:
| 1 | sudo python PaPiRus-AP/APInfo.py & |
Our PaPiRus screen now sprang to life and displayed our SSID and AP IP address. By pressing switch 2 we got to see some bandwidth stuff – and by pressing switch 3 we saw a detailed view of the AP networking setup. Easy.
We now had a very swish and portable Access Point to flash around and impress the guys at Raspberry Pi Jams or hackatons or wherever our Pi adventure takes us next.
We picked up some useful tips along the way with this project, so in a spirit of generosity we thought we’d share them with you. How nice are we?
For starters, there are a couple of methods you can use to create an AP at the OS level. In our view it depends on what you consider an AP to actually be. Without dwelling on this at length we decided to implement the AP as an ISO layer 2 device – which is a fancy way of saying there won’t be any routing, firewall or NAT involved here. The device will ‘merge’ the Ethernet network card and the Wi-Fi into a bridge and it will only have one IP address. In fact it’ll behave like a typical AP and not as a home Broadband Router.
And then there’s this little quandary: what if your router needs to have a DHCP enabled? Since the AP will not serve as a DHCP, it’s pretty essential you have one enabled on your router. The first part of the setup also needs the Pi to receive an IP from the router in order to get all the packages required off the internet.
That’s all we’ve got. So go create your awesome AP and show the world what a pro you truly are.
Like what you read? Why not show your appreciation by giving some love.
From a quick tap to smashing that love button and show how much you enjoyed this project.

