In this project you will use a magnetic door switch to trigger pre-recorded sound clips when the door is opened. A useful project to alert shopkeepers when customers enter or leave the premises or a way to play a royal trumpet fanfare when guests arrive, its principles are the same used in security systems, so there’s a lot of potential to extend this project.
1. Get your Pi ready
- You should start with a Raspberry Pi connected to mouse, keyboard and monitor, you can learn here how to do it using an Okdo Pi kit
- Connect your speaker to the Pi with a 3.5mm audio jack cable
- Ensure that you have the latest version of Raspbian installed on your Pi. You can learn here how to do it directly from your Pi using Terminal and here using a micro SD card.
2. Playing sounds
- Power up your Pi 4
- Raspbian should automatically detect your speakers. Check this by right clicking on the speaker icon in the top right hand corner of the Menu Bar. There should be green tick against your audio output. If not then select the appropriate output.

- Go to http://freesound.org and download three sound files you want to use in your project or use your own sounds.
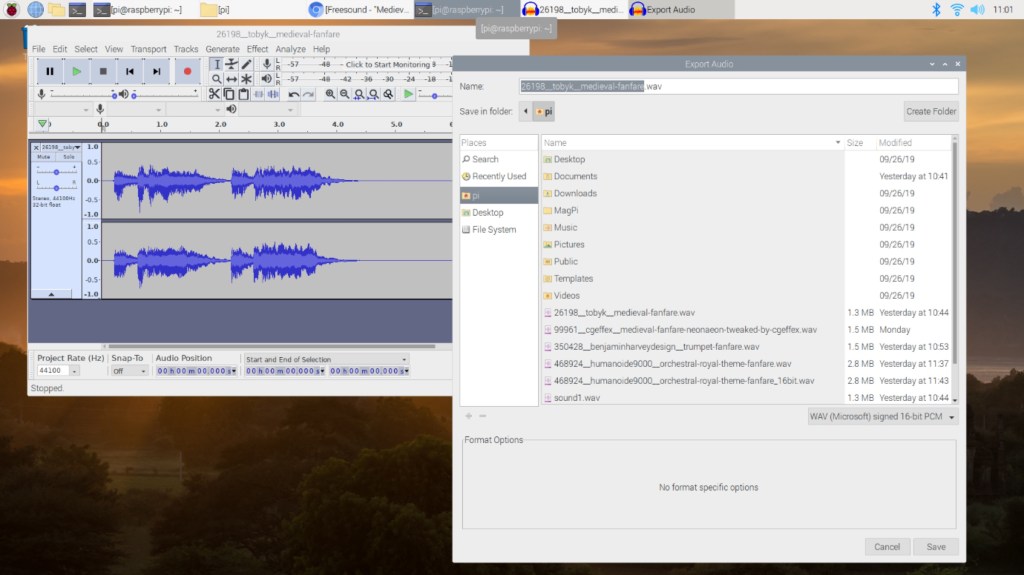
- Convert your sounds to .wav format if they are not so already.
You can convert your sounds with Audacity, a free, open source, cross-platform audio software. You can install it on your Pi directly from Terminal by typing the following command and pressing return:
sudo apt install audacityOnce installed you can open your sound files and export them in 16 bit Wave format by going to File > Export > Export as WAV format
- Once you have 3 suitable sound clips in .wav format place them in your Pi’s home directory,
- Create aliases for the sound clips by opening Terminal and using the In command. Doing this makes it easier to swap sound clips in the Python code that we’ll be using. Use the command below 3 times, one for each of your sound files, replacing name_of_music_clip1.wav with the name of your sound file and using sound1.wav, sound2.wav and sound3.wav for each of your sound files respectively
ln -sf name_of_music_clip1.wav sound1.wavYou should now have 3 aliases for your sound clips located in your home directory.
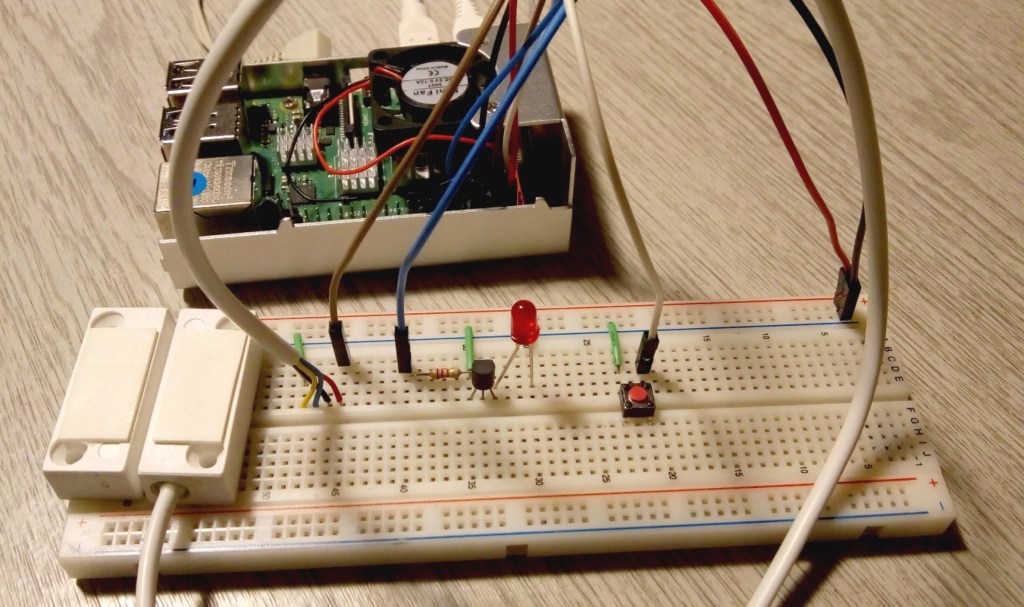
3. Build the circuit
Before starting to build the circuit make sure you know how the wires are connected to the Reed Switch. The one used in this example had 4 wires, Red and Yellow wires were connected to the switch, the Black and Blue wires were not used. The Reed Switch’s datasheet will contain the details or use a multi-meter to test for continuity.
The circuit has 3 main components, the button A which activates the circuit, the LED B which indicates if it’s active and the reed switch C which detects when the door opens.
Always build your circuit with the Pi switched off and check it carefully before powering on. Never connect any of the GPIO pins directly to the +5V rail as this will damage the Pi
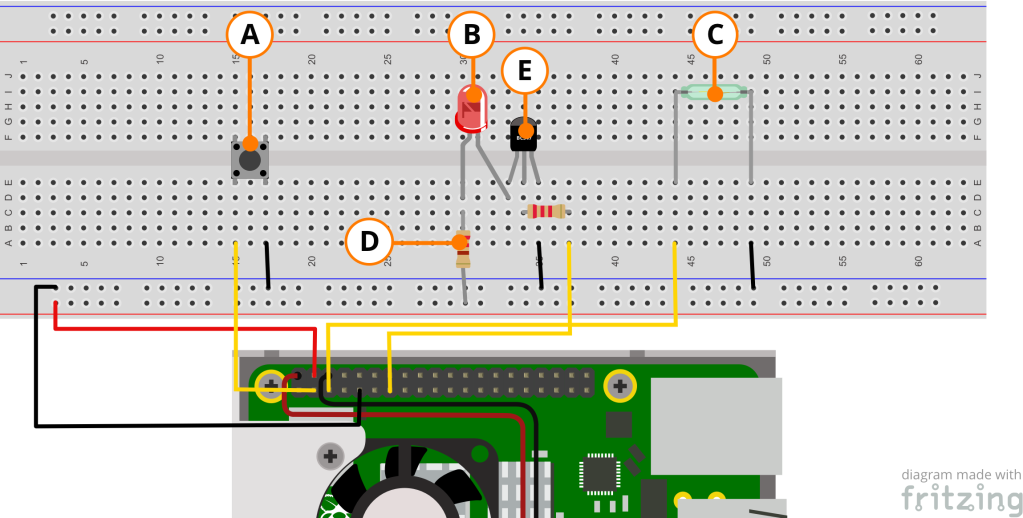
- The button A acts as an input and is connected to ground on the breadboard rail on one side and pin 3 (2nd pin on the bottom row) of the Pi. This Pin has a built-in pull-up resistor so an external one is not required
- The LED B anode (positive) is connected to +5V on the Positive rail via a 220 Ohm resistor D and the cathode (negative) is connected to the collector pin of the transistor E. The LED indicates when the system is active and acts as an output. LED’s draw a relatively high current so in order to have a bright LED and not damage the Pi, a BC547 NPN transistor is used as a switch.
- The transistor base pin is connected to a 2.2k Ohm resistor which is connected to pin 13 (7th pin on the bottom row) on the Pi. Only a very small current flows through this when the transistor is switched on.
- The emitter pin of the transistor is connected to ground
Check the datasheet for your transistor to see if it uses the same pinouts as the one shown in the diagram. If not, make sure to connect the collector, base and emitter pins as described.
- The reed switch acts as an input and is connected to the ground rail on one side and pin 5 (3rd on the bottom row) on the Pi. This pin also has a built in pull-up resistor so an external one is not necessary. Only 2 of the 4 wires of the reed switch are connected
- Finally connect the +5V pin 4 (2nd on the top row of the Pi) to the positive rail of the breadboard and the ground pin 9 (5th on the bottom row of the Pi) to the ground rail
4. Python code
The project uses the Python 3 Gpiozero library and Pygame to play the music.
- Open Thonny Python IDE from main menu > Programming > Thonny Python IDE, paste the code below into a new tab and save the file as room_music.py
#!/usr/bin/env python3
"""Play a random sound clip activated by a switch.
The system is activated / deactivated by pressing a button"""

from gpiozero import Button, LED
from signal import pause
import pygame.mixer
from pygame.mixer import Sound
import random- Press Run on Thonny’s menu bar and you are ready to test.
- Activate the system by pressing the button on the breadboard, this should light up the LED.
- Open the reed switch and one of your music clips should play at random. The bottom “Shell” pane of Thonny shows the status as each action takes place.
If you get any errors check that the indentation of your code is correct as Python relies on correct indentation
Understanding the code
Line 1 is a standard header and makes the script executable in Python 3. Line 2 to 3 is the Doc string and describes the code. It’s good practice to add these.
Lines 5 to 7 set up the Python libraries being used. The GPIO inputs and outputs are managed by gpiozero and pygame.mixer handles playing the music.
Lines 11 to 13 name the LED, Button and Reed Switch and create software objects that represent them. The Reed Switch acts like a button that is normally closed.
Line 15 is a flag that holds the system status which is checked by the activate() and on_open() functions. It is Global in scope so that both these functions can read its value and update it.
Line 17 initialises a pygame mixer object to handle playing the music clips.
Lines 20 to 31 define the activate() function. It gets called each time the Button is pressed. It turns the LED on when the Button is pressed and off when it is pressed again. It also prints out messages to show the system status which is useful for debugging.
Lines 34 to 41 define the on_open() function. This gets called when the Reed Switch is opened and it triggers pygame to play the music clip. The playback is asynchronous so if you close the switch while the music is still playing, you will see the status change, even though the clip has not finished. This style of programming makes the system very reactive so that no opening / closing events are missed.
Lines 44 to 46 define the on_close() function which gets called when the Reed Switch closes. This just updates the status to illustrate how this is achieved.
Lines 49 to 51 are doing the work to capture the button events. They setup call back references to the above functions and this is what triggers them.
Finally line 53 stops the script from ending, so that it continues to run until the program is stopped.
5. Starting on boot
When everything has been tested and is working as expected, the last step is to make the code run each time the Pi boots up.
- Open Text Editor from Main Menu > Accessories > Text Editor, paste the following code and save the file as room-music.service
[Unit]
Description=Sound Switch
After=multi-user.target

[Service]
ExecStart=/usr/bin/python3 -u room_music.py
WorkingDirectory=/home/pi
Restart=always
User=pi

[Install]
WantedBy=multi-user.target

[room-music.service – systemd service file]- Copy the file to the systemd services directory. This sets up the Python script to run every time the Pi boots. The code runs in the background as a systemd service so you don’t need a keyboard and monitor attached.
- Enable the service so that it starts automatically. by opening Terminal and typing the following commands followed by Return after each one
sudo cp room-music.service /etc/system/systemsudo systemctl enable room-music.service - You can now attach the reed switch to a doorway and remove the monitor and keyboard from your Pi
You should now be greeted with music each time you open the door.
The switch circuit and Python code illustrate how to use sensor inputs to trigger outputs like the LED and the music player. With some basic components and a few lines of Python code it’s possible to create a fairly sophisticated project.
All of these techniques can be taken and used in other more advanced systems.
By extending the code, rather than play music, the system could raise an alarm and even be connected to the cloud to send alerts as an IoT enabled security system.
You can replace the reed switch with an ultrasonic sensor or an RFID tag to have different ways to detect activity. There are lots of possibilities…
Like what you read? Why not show your appreciation by giving some love.
From a quick tap to smashing that love button and show how much you enjoyed this project.

