One of the emerging uses of Machine Learning (ML) is monitoring and enhancing existing equipment without altering or directly connecting to it.
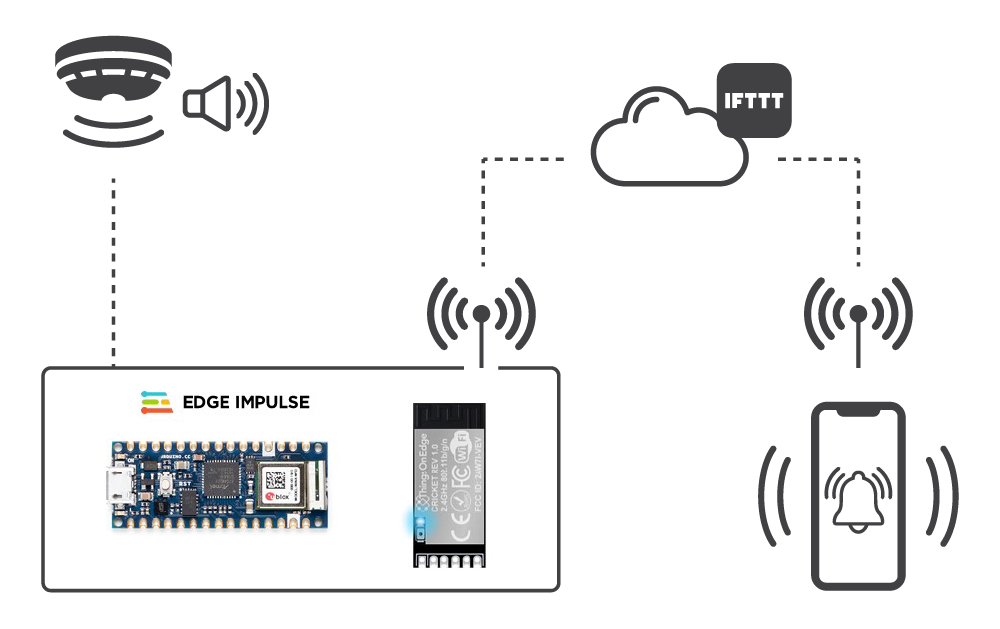
This project shows how to detect an audible smoke alarm using an embedded ML model running on an Arduino microcontroller. When the alarm goes off, the Arduino’s microphone detects the audio signal, which triggers a Things On Edge Cricket module. The Cricket connects via WiFi to the IFTTT cloud service, which sends a push notification to an app on your mobile phone. The process is very reliable and takes only a few seconds, all without tampering with the alarm.
The ML elements are developed using Edge Impulse, a leading ML platform for building all kinds of ML applications that can run on low-powered MCUs. The Cricket module allows easy IoT integration to mobile notification services without programming, and the system can be deployed anywhere in a building with a wireless network.
Step 1: Edge Impulse
Edge Impulse Studio is a development environment that steps you through the process of creating and deploying several different Machine Learning models for your target device.
Visit Edge Impulse and create a Developer account, log in and create a new project. We called ours an “alarm-classifier”.
Step 2: Connecting to Edge Impulse
We chose the Arduino Nano 33 BLE Sense as it has a built-in microphone and is directly supported by Edge Impulse Studio. It can connect directly to the Studio using the Edge Impulse CLI tool, and once the ML model has been developed, an Arduino library can be generated. This requires minimal programming to make the project work.
Full details of how to connect the Arduino to the Studio are covered in the following link, so we will only cover them briefly – the software is available for Linux / Windows / Mac:
docs.edgeimpulse.com/docs/arduino-nano-33-ble-sense
- Install the Edge Impulse CLI for your operating system:
docs.edgeimpulse.com/docs/cli-overview
- Install the Arduino CLI for your operating system:
- Connect the Arduino to your PC using a USB cable
- Download the latest Edge Impulse firmware for the Arduino and unzip it to a directory on your PC:
cdn.edgeimpulse.com/firmware/arduino-nano-33-ble-sense.zip
- Flash the firmware onto the Arduino using the script for your operating system in the firmware directory
flash_linux.sh , flash_windows.bat or flash_mac.command
- Start the Edge Impulse Daemon from a command terminal on your PC – the first time you do this, it will ask for your Studio credentials and project name.
edge-impulse-daemon
Note: We had to use some of the workarounds listed here to get the daemon to run on our Debian Linux host.
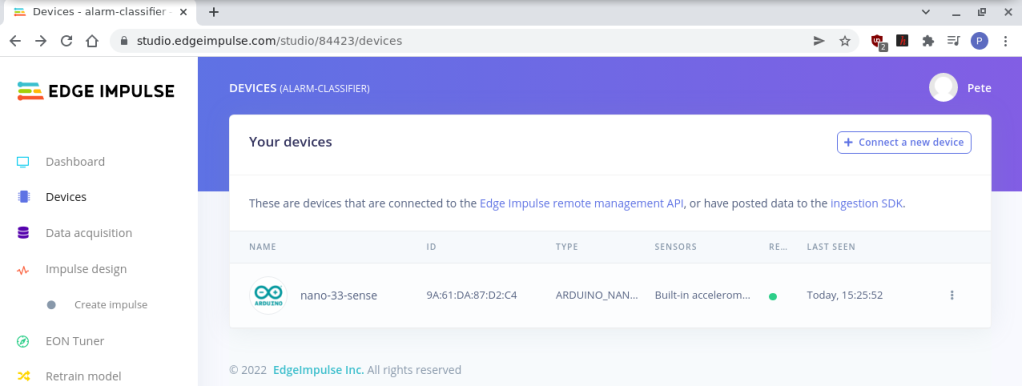
7. If you open the Studio and log in, then go to the Devices tab for your project, you will see that your board is now connected and ready to start acquiring data samples.
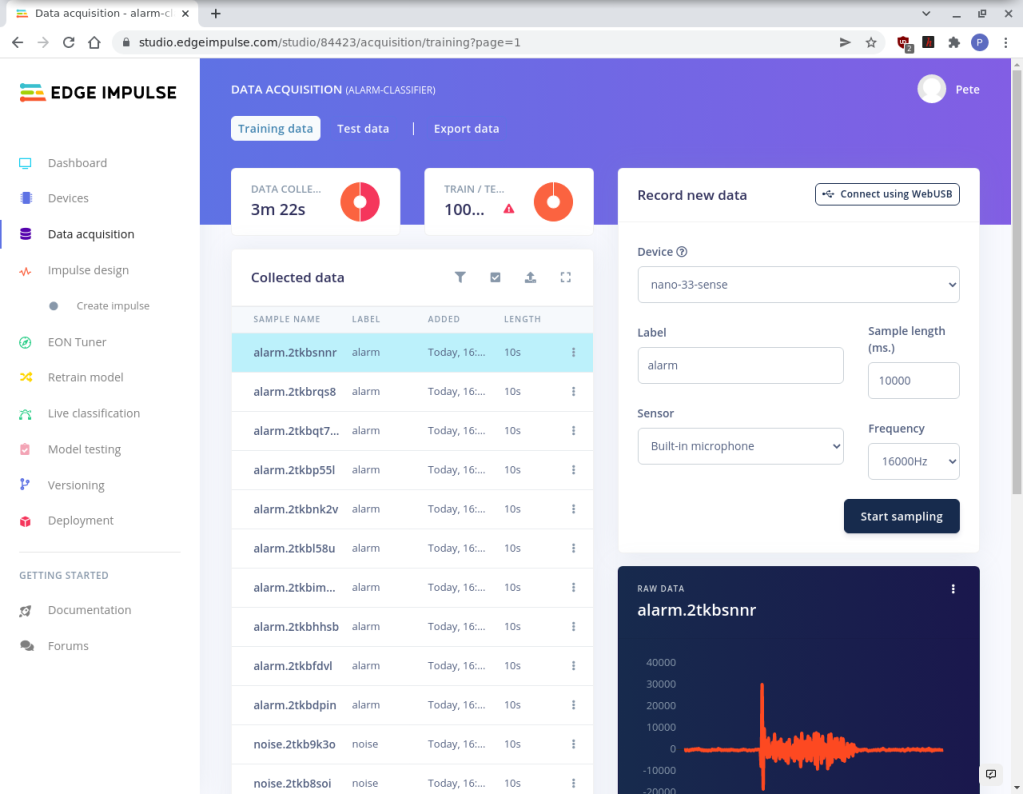
Step 3: Data Acquisition
Now that the Arduino is connected, we can begin to collect audio samples to build the ML model. We need to collect 2 types of audio samples for training and testing the model; a set of normal background noise samples and, of course, a set of the alarm sounding.
- Click the Data Acquisition tab in the Studio and choose Training Data.
- Set the Device to your Arduino board and set the Sensor to Built-in-microphone. Give the sample a label, either noise (for background noise) or alarm (for the alarm).
- Click Start Sampling and collect 10 – 20 noise samples and 10 – 20 alarm samples of 10 seconds each.
Try to gather lots of different audio samples of sounds that are typically going on in the background so that the model has a good variety.
Note: Our alarm only sounded for about 4 seconds, so we reduced the sample time of these samples.
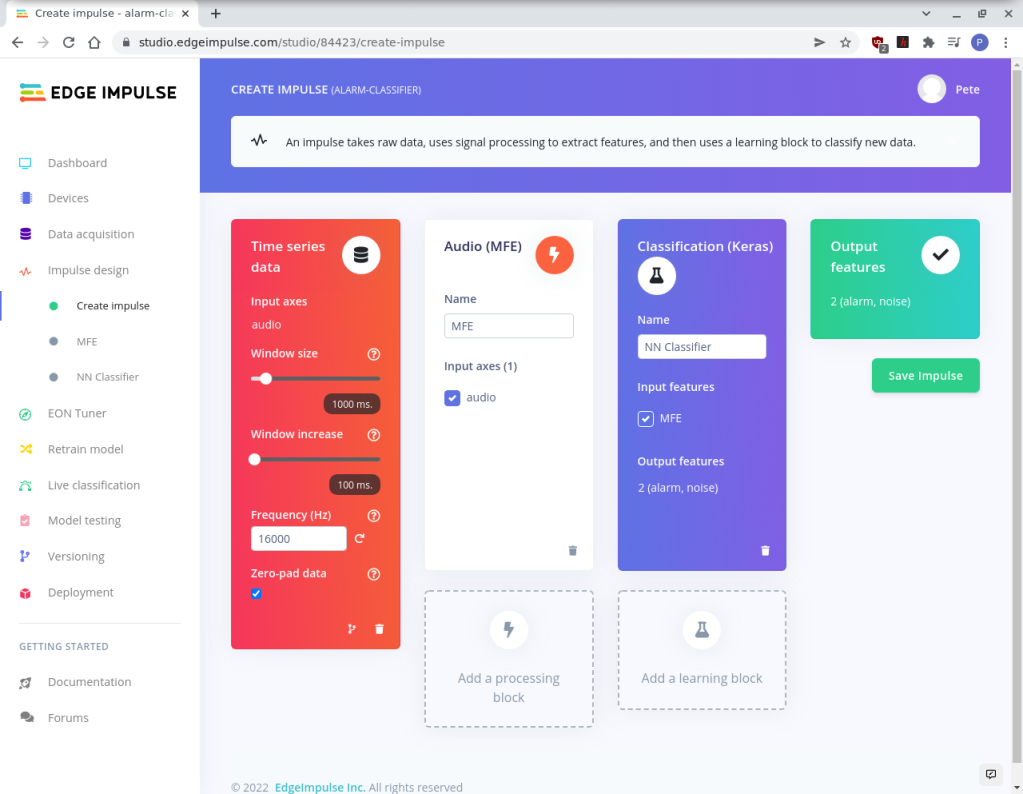
Step 4: Impulse Design
Now that we have a good set of raw audio data for background noise and the alarm sounding, we can configure an appropriate Impulse for creating our ML model. The Studio steps through the process, and we found that most of the default settings were fine for our purpose, but feel free to experiment!
- Click the Create Impulse option.
- In the Time Series Data block set the Window Size to 1000ms and the Window Increase to 100ms.
- Click the Add Processing block and select Audio (MFE), which is the recommendation for non-voice audio processing.
- Click Add learning block and select Classification (Keras), which is great for recognising audio.
- Save the Impulse when you have finished.
Now the Impulse is configured, the model can be generated using the data you have collected.
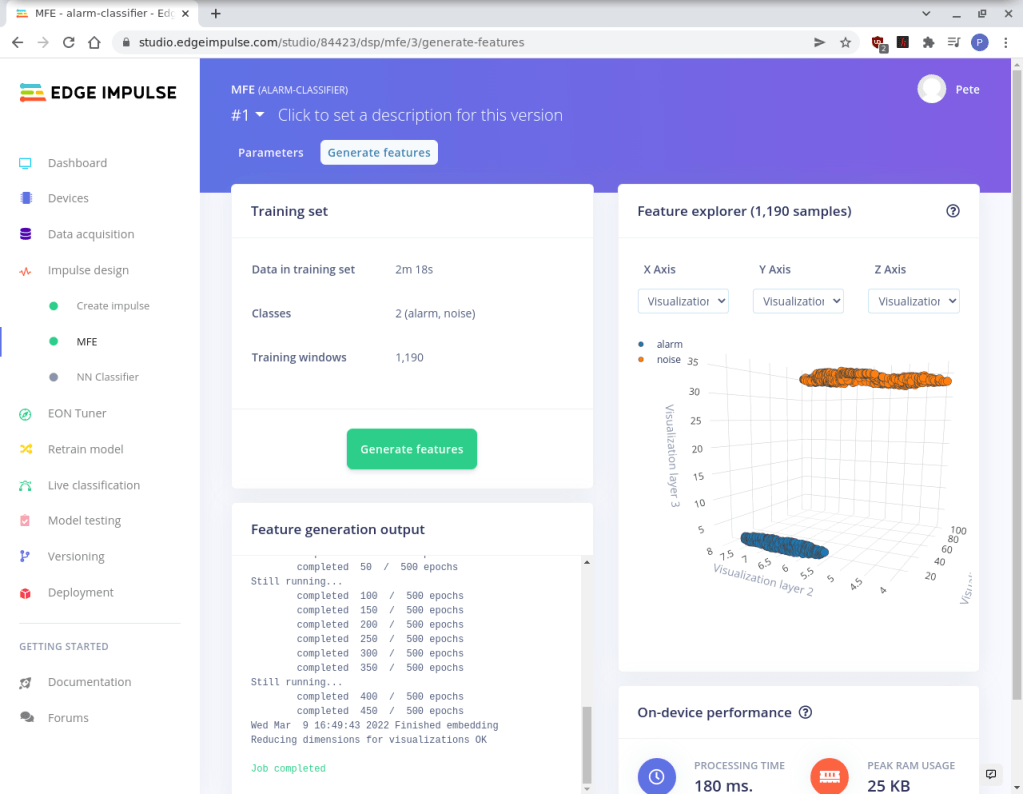
Step 5: Generating Features
This step uses the Impulse settings to generate a feature set for the ML model. It may take a few minutes, depending on the number of data samples analysed.
- Click MFE in Impulse Design – we left the settings as default.
- Click Generate Features.
After the step has been completed, the features are visualised in 3D in the Feature Explorer. We are looking for a clean separation of the 2 data classes (noise & alarm) for a good quality model.
Tip: If you find that your data classes are mixed up, go back and check the samples and labels.
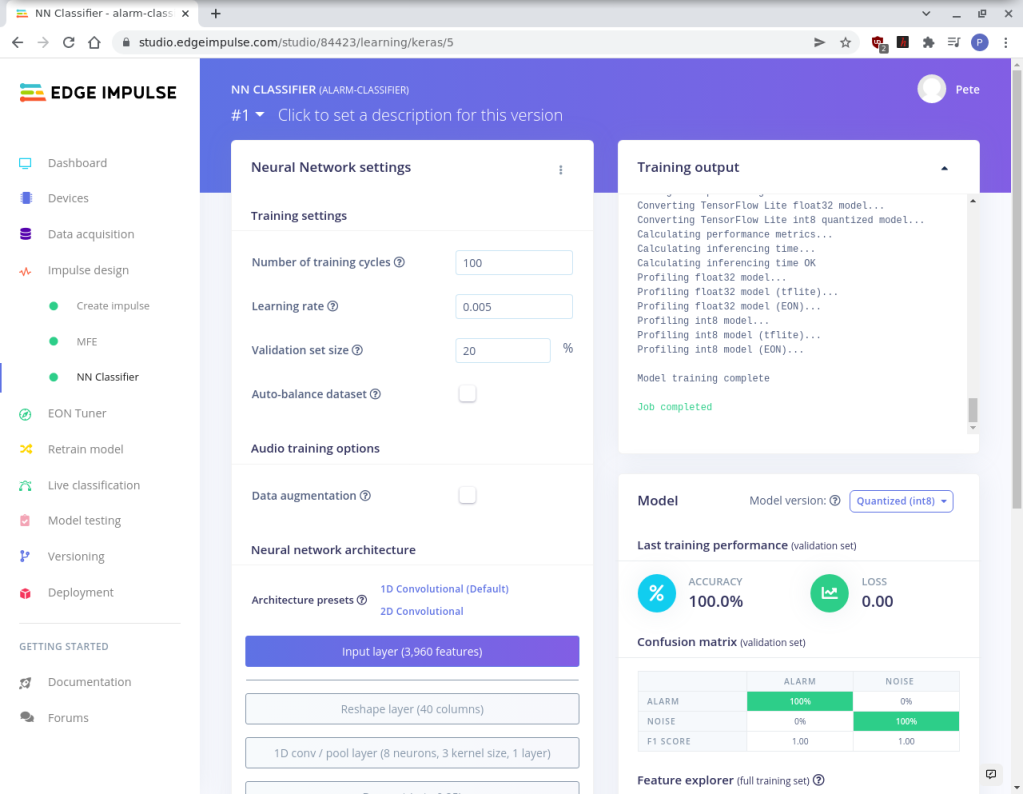
Step 6: Training a Model
This next step uses the Training data set you collected to create the Neural Network and tune its performance. It can take several minutes, depending on the size of the data.
- Click NN classifier from the Impulse Design tab
- Click Start Training.
After it has completed, you can view the Confusion Matrix to see how many times the model predicted the correct data type according to the labels.
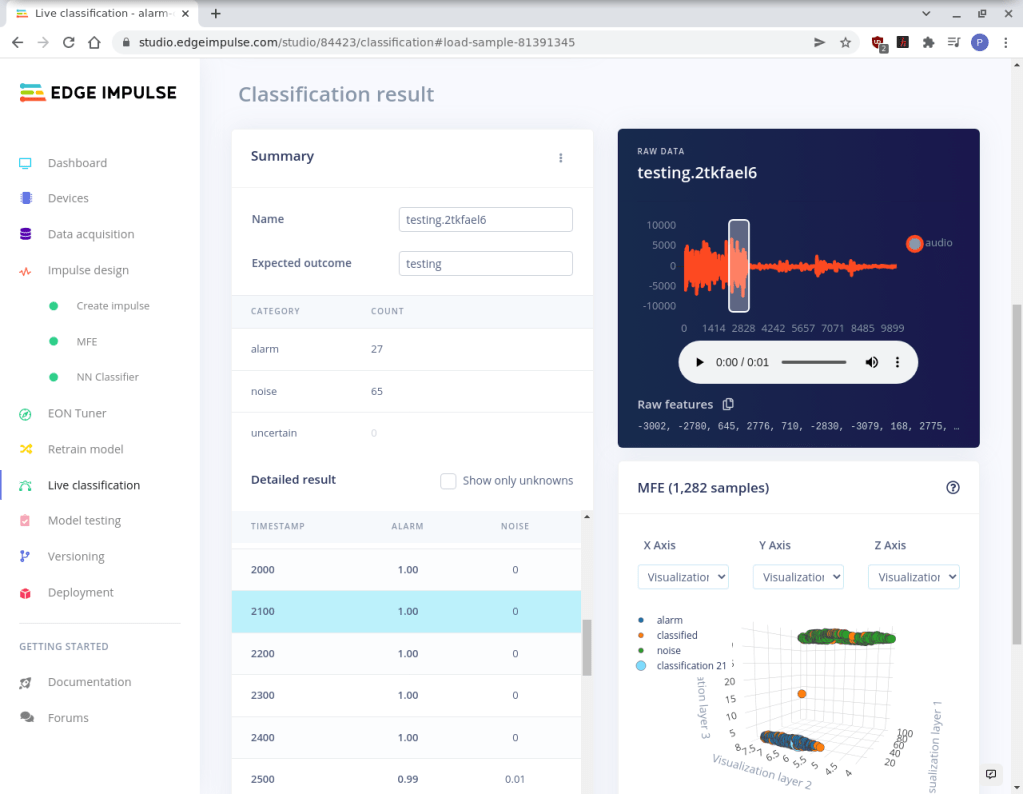
Step 7: Model Testing
Now that the model is created and trained with the labelled training data, it’s time to collect some more live samples and test if the model is working with data it’s not seen before.
- Click the Live Classification tab and generate noise and alarm samples.
When the audio has been analysed, click the sample and see if the results are as expected.
If everything is working well, the Edge Impulse daemon can be closed, and the model can be deployed to your Arduino.
Step 8: Deploying
The advantage of using one of the supported Arduino boards is that Edge Impulse Studio can generate an Arduino compatible C++ library which can be installed in the Arduino IDE. All you need to do is write a small amount of code to customise it for your application.
If you don’t already have the Arduino IDE installed on your system, install it first.
- Also, install the Arduino MBED OS Nano Boards package using the Boards Manager in the IDE.
- In Edge Impulse Studio, click the Deploy tab and select Arduino Library.
- Click Build – this takes about 5 minutes.
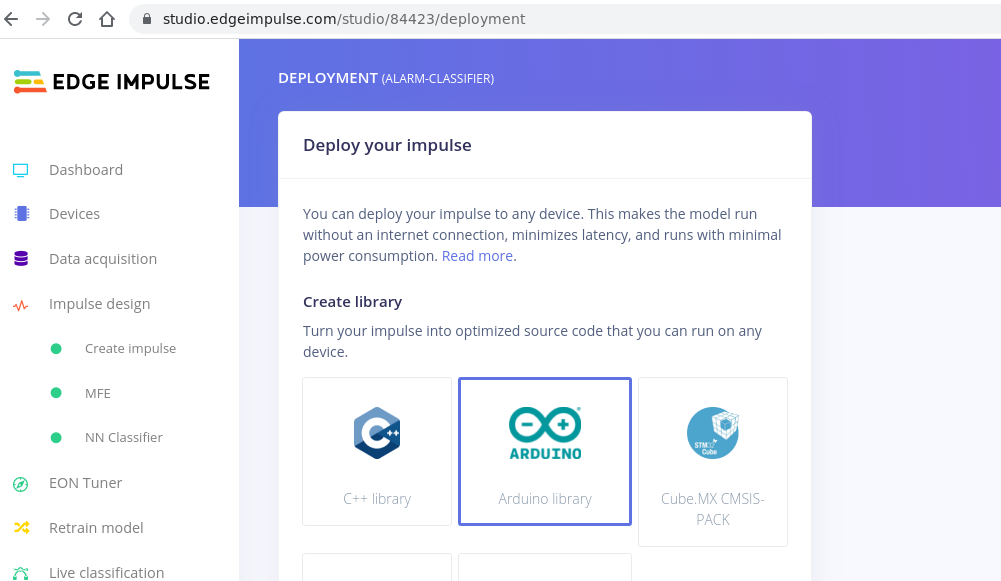
A file manager pop-up will appear for you to download the .zip containing the Arduino library.
- In the Arduino IDE select Sketch -> Include Library -> Add .zip and navigate the file you just downloaded – this will install the library.
- Now, select File -> Examples -> you-project-name_interface -> nano_ble33_sense_microphone_continuous.
This will load code that continuously monitors the microphone using your ML model.
- From the tools’ menu, select the Arduino Nano 33 BLE board and click Upload to flash the code in the usual way.
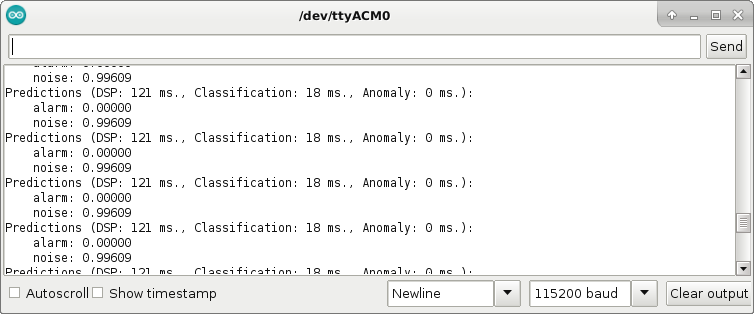
Open the Serial Monitor, and you will see the output as the audio is continuously classified as either noise or alarm.
Step 10: Customisation
Now that the basic code is running and recognising the alarm sound, we can customise it to turn on the Arduino’s LED and send one of the GPIO pins high when it hears the alarm. This will be used to wake up the Cricket module and send a push notification to IFTTT.
First, we define macros for the classification string for the alarm sound, the confidence level used in the evaluation of the classification and the GPIO pin used for the wake-up pin:
#define ALARM_KEY "alarm"
#define CONFIDENCE_FACTOR 0.99
#define WAKE_PIN 2  // D2
In the main loop, add a new flag variable:
bool is_alarm = false;In the for loop comparing classification results, set the flag to true if the alarm is detected at a level above our confidence factor – this can be changed according to your environment:
  for (size_t ix = 0; ix < EI_CLASSIFIER_LABEL_COUNT; ix++) {
      ei_printf("    %s: %.5fn", result.classification[ix].label, result.classification[ix].value);
      if (strcmp(result.classification[ix].label, ALARM_KEY) == 0 &&
          result.classification[ix].value > CONFIDENCE_FACTOR) {
        is_alarm = true;  // Trigger alarm
      }
    }
Then, add a function call that will be triggered by the alarm:
    if (is_alarm) {
      heard_alarm();
      while(1);
    }
Finally, define the function to set the wake pin and turn on the LED:
static void heard_alarm() {
  digitalWrite(LED_BUILTIN, HIGH);
  digitalWrite(WAKE_PIN, HIGH);
  delay(500);
  digitalWrite(WAKE_PIN, LOW);
}
Now, when the alarm sounds, the onboard LED will turn on and the wake-up pin will go high for use by the Cricket module.
You can find the full code in the OKdo Github repo.
Step 11: IFTTT
There are lots of cloud services available for integrating IoT devices and services, but we chose IFTTT. They have a free tier for developers and a huge number of services that can be connected easily.
IFTTT allows you to create an app that connects the Cricket module to a phone notification service in just a few clicks. There are 2 parts to the setup; the first is the IF This part in IFTTT. This creates a trigger when something happens:
- Go to IFTTT and log in or create an account if you don’t have one.
- Click the Create button to begin creating your App.
- Click the If This button to add a service that will be triggered.
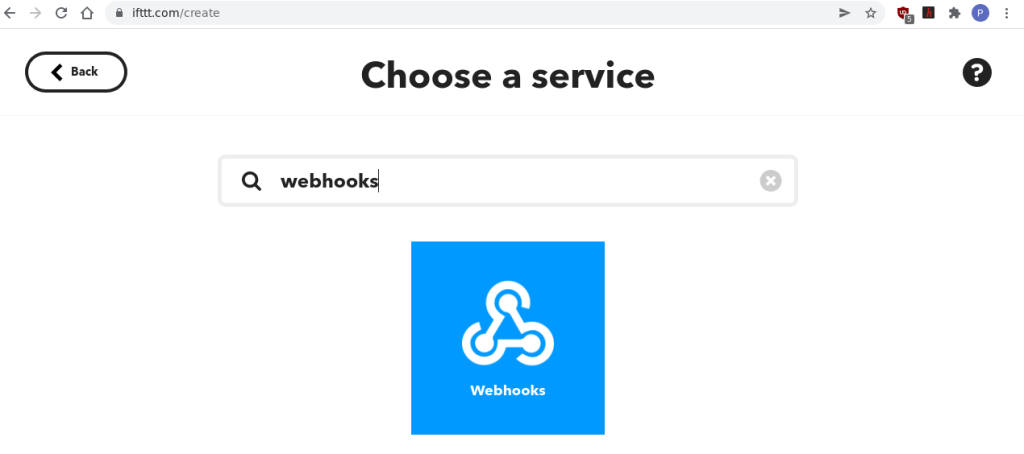
- Search for Webhooks in the search box and click the Webhooks icon.
- Click Receive a web request with a JSON payload on the Triggers page.
- Give the Event a name, we called ours “smoke_alarm”.
When you are returned to the Create page again, click the Then That (IFTTT) button to add a service for the action that will be triggered.
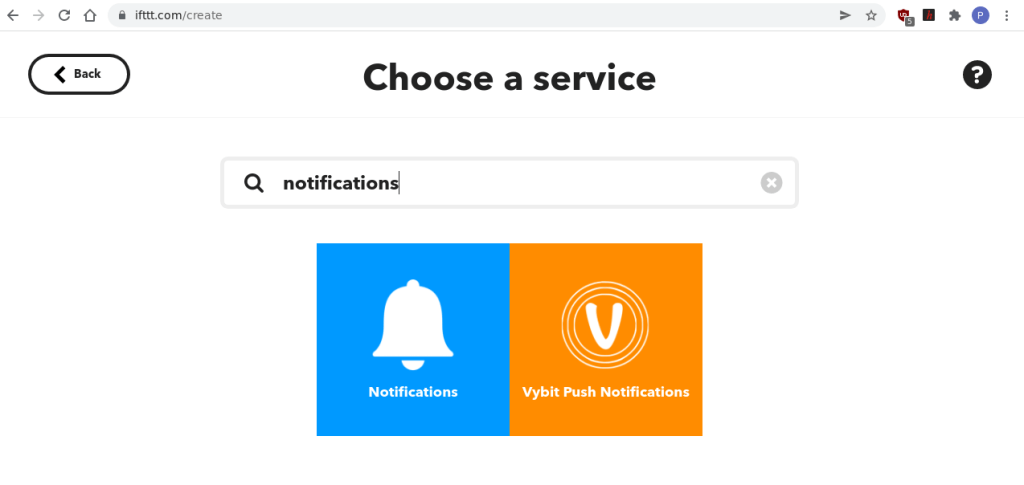
- Click the service called Notifications with the bell icon.
- On the Choose an action page, click Send a notification from the IFTTT app – this will allow you to receive a notification on your phone using the IFTTT app.
- Click Create action.
Your App should now be created and be visible on the My Applets page.
Now that the cloud setup is complete, install the dedicated IFTTT app on your phone from your App Store. When you log in, the notification service will show as Connected.
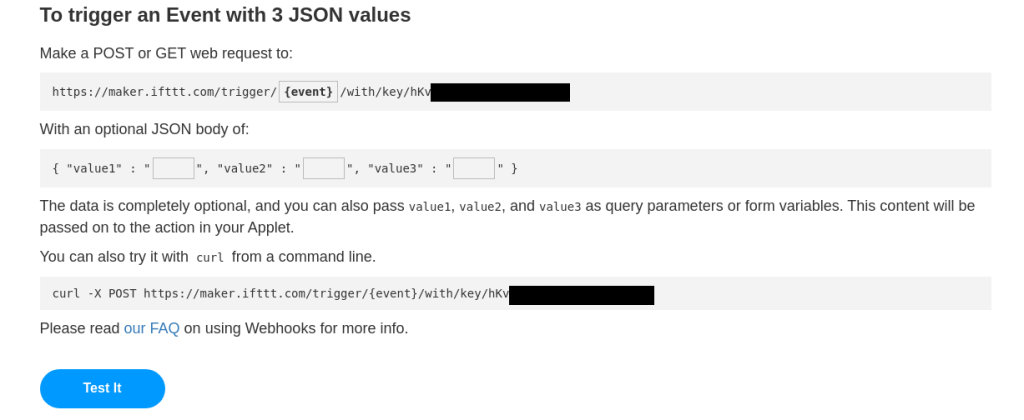
To test your integration and generate a URL request string, visit ifttt.com/maker_webhooks.
Click on Documentation – this will show your API key and examples of URLs that you can use to trigger your app.
The URL we need is taken from the section To trigger an Event with 3 JSON values
- Click on the event and change this to your event name
- Click the Test button and you should get a notification on your phone.
Step 12: Cricket
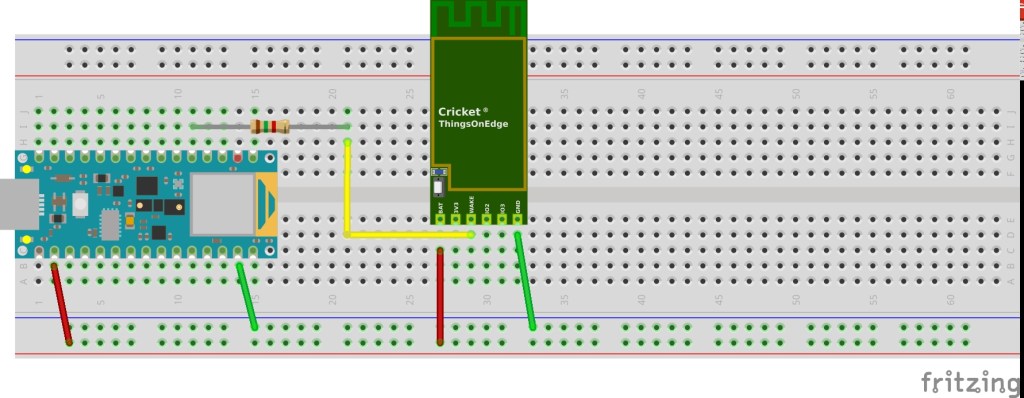
Build the circuit on a breadboard by soldering header pins to the Arduino and Cricket. Then connect the GND pins on both modules to the GND rail. Connect the Arduino 3.3V output to the power rail and the Cricket Batt pin. Connect pin D2 of the Arduino via a 1.5k Ohm resistor to the Wake pin on the Cricket. The circuit is powered using the Arduino’s USB connector:
The Cricket module is very well documented here.
- Hold down the button on the module for 5 seconds until it starts blinking
- Using your WiFi connection app on your PC connect to the toe_device hotspot
- Open your browser at http://192.168.4.1 if it doesn’t already
- Enter your Wifi credentials
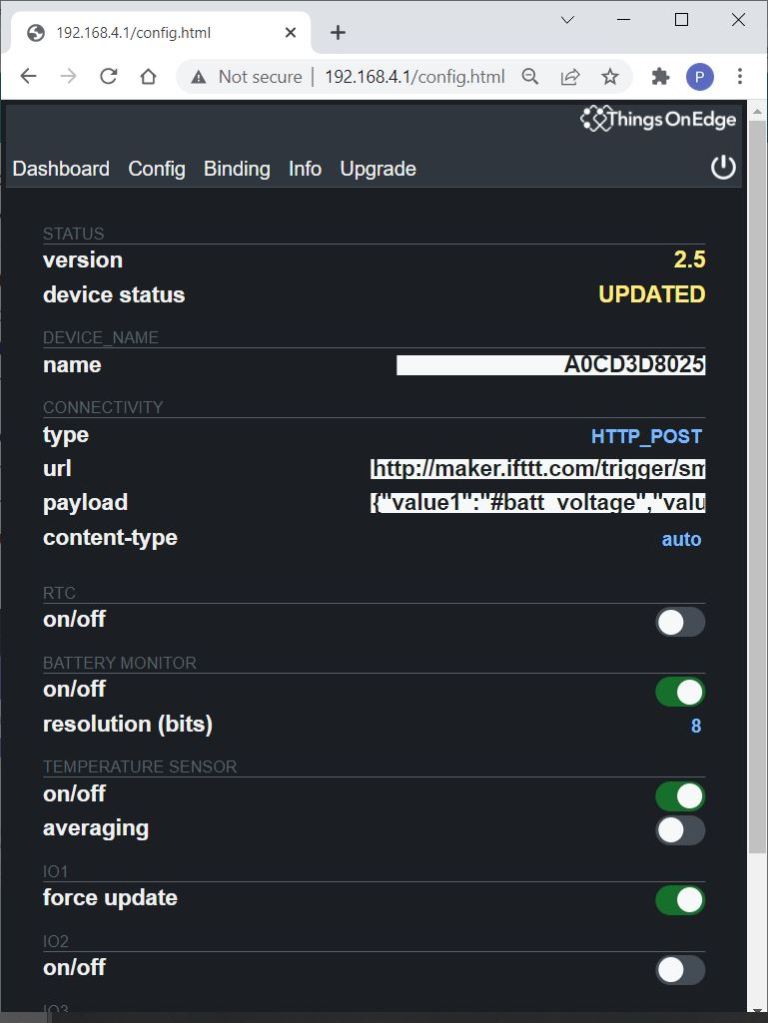
- Click the Config Tab
- Click Connectivity Type and select HTTP_POST
Enter the URL obtained from the previous step – ours was:
https://maker.ifttt.com/trigger/smoke_alarm/with/key/hK….
We also sent a JSON payload with the message:
{“value1″:”#batt_voltage”,”value2″:”#temp”}
The content-type can be set to Auto
Set the following configuration features ON:
- Battery monitor: ON
- Temperature Sensor: ON
- Force updates on – IO1 Wake Up: ON
- Enable caching: ON
When everything is configured click the start button in the top right-hand corner of the page.
All the components of our IoT Smoke Alarm are finally connected together, so you can test the system by pressing the test button on your alarm. A few seconds later, you should get a push notification on your phone!
Summary
This project demonstrates how even small “edge” devices like the Arduino Nano 33 BLE paired with the Things On Edge Cricket can be used to create powerful IoT applications using Machine Learning and integrated cloud services like IFTTT.
ML is complex, but it can be deployed effectively using the Edge Impulse Studio tools on supported devices. The workflow is very well documented and has a relatively shallow learning curve accessible with minimum programming effort.
We hope that this guide helps you to imagine how you can deploy ML on your edge devices!
Here are some useful links to helpful resources: Arduino Pro, Things On Edge, Edge Impulse, OKdo GitHub project page.


Like what you read? Why not show your appreciation by giving some love.
From a quick tap to smashing that love button and show how much you enjoyed this project.

