Flask is a popular web development framework using Python for creating dynamic web apps. This project shows you how to run a Flask server on a Pi 4 that can host a dynamic website running on your home, school or office network.
As an example app, the project obtains historical climate statistics from the Met Office web service in the UK. It allows the user to choose a particular Weather Station to obtain climate statistics from and then filters the data to show the temperature and rainfall information for the same month in each year using the historical record.
The web app runs in a browser or any mobile device connected to the network.
1. Get your Pi ready
- You should start with a switched-on Raspberry Pi connected to mouse, keyboard and monitor, you can learn here how to do it using an Okdo Pi kit
2. Set up Flask
Python 3 and the Flask server are installed by default in the standard Raspberry Pi operating system, Raspbian.
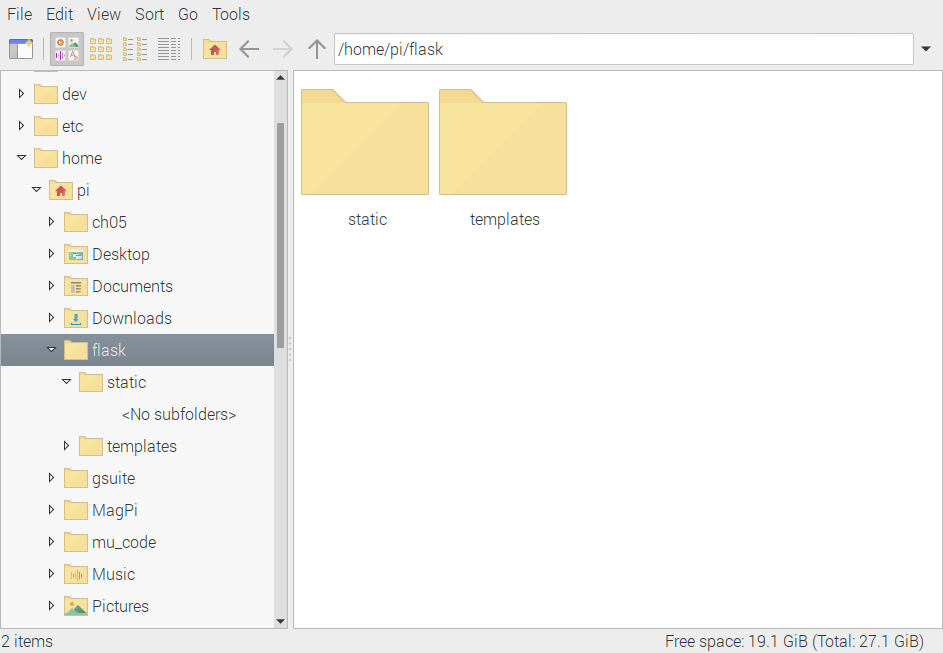
- Create a directory structure to store the Python scripts and resources that the web app needs. Flask requires a very specific structure to work.
- Open the File Manager by clicking on the Folder icon in the Menu Bar of your Pi
- Create a top level directory in which all the other files and directories will be stored. This can have any name, we used “flask” and placed it in the “pi” users “home” directory. Then create two sub-directories which must be named static and templates. The structure should look like the image below:
3. Functions
Flask apps are based around Python functions that handle the dynamic elements of your app. They can be developed and tested separately and then incorporated into the main app.
- Open the Geany programming editor from the Main Menu > Programming > Geany then in a new tab copy the Python code below and save the file as stations.py in the flask directory.
import requests
import datetime

base = 'https://www.metoffice.gov.uk/pub/data/weather/uk/climate/stationdata/'

stations = {'Aberporth': 'aberporth', 'Oxford': 'oxford',
            'Heathrow': 'heathrow', 'Wick Airport': 'wickairport'}

months = {'January': 1, 'February': 2, 'March': 3, 'April': 4, 'May': 5,
          'June': 6, 'July': 7, 'August': 8, 'September': 9, 'October': 10,
          'November': 11, 'December': 12}


def get_url(station) -> str:
    """Return the station URL from the name"""
    url = base + station + 'data.txt'
    return url


def get_data(from_year=2000, for_month=1, station='heathrow') -> list:
    """Return a filtered list of data from the station, for the month, from each year
    upto current year"""

    current_year = datetime.datetime.now().year

    # Get all station data
    data_str = requests.get(get_url(station)).text
    # Convert into list where each item is list by year and month
    data_lst = [d.split() for d in data_str.splitlines()]
    # Filter list by year and month
    filter_lst = [data_mth for data_mth in data_lst for year in range(from_year, current_year + 1)
              if data_mth[0] == str(year) and data_mth[1] == str(for_month)]

    return filter_lst


if __name__ == '__main__':
    data = get_data(2018, 1)
    for d in data:
        print(d)
“stations.py” is a Python module which contains the definition of data structures and functions to help manage the weather station information and convert month names into an index for each month.
The app gets its data from the Met Office website. Each weather station has a different URL so there’s a function get_url() that generates the correct URL from the name of the station.
The get_data() function retrieves data from the weather station URL and processes it. It uses Python’s powerful text processing capabilities to convert the text based response into a Python list. The list itself contains values for the same month of the year, starting from the selected year, up until the present one. It’s this list of climate data that will be displayed as a table in the web app.
4. Base templates
Flask uses Templates to define HTML code for the look and feel of the web app. Templates are the mechanism by which static and dynamic elements of the web app are combined.
- Create a base template by opening a new tab in the Geany editor, pasting the code below and saving as “base.html” in the “templates” directory. This will be used to define the overall look of the app and is used as a basis for the other Templates created later.
<!doctype html>
<html>
    <head>
        <title>{{ title }}</title>
        <link rel="stylesheet" href="static/stylesheet.css"/>
    </head>
    <body style="background-image: url({{url_for('static', filename='background.jpg')}})">
        {% block body %}

        {% endblock %}
    </body>
</html>
5. Entry form
The starting page for the web app is an entry form that allows the user to enter the starting year for the data, the month to be filtered for each year and the weather station location. The form uses another template to define these HTML elements and allows the selections to be used in the Python code that follows.
- Open a new tab in Geany, paste the code below and save as entry.html in the templates directory. The drop-down boxes use definitions from the stations.py module to list out the month names and station names. The year is just an input text box with no validation in this case.
{% extends 'base.html' %}

{% block body %}

<h2>{{ title }}</h2>

<form method='POST' action='/search'>
<table>
<p>Use this form to submit a search request:</p>
<tr><td>Starting Year:</td><td><input name='from_year' type='TEXT' value='2000'></td></tr>
<tr><td>Month</td><td><select name='month' type='TEXT'>
    {% for month in months %}
    <option value="{{ month }}" SELECTED>{{ month }}</option>"
    {% endfor %}
</select></td></tr>
<tr><td>Weather station</td><td><select name='station'>
    {% for station in stations %}
    <option value= "{{ station }}" SELECTED>{{ station }}</option>"
    {% endfor %}
</select></td></tr>
</table>
<p><input value='Search' type='SUBMIT'></p>
</form>

{% endblock %}
6. Results template
The data that’s returned after clicking the Search Button in the Entry Form is displayed in another HTML page. This has a table displaying the search terms used and then builds a table for each row of the data fetched by the get_data() function.
- Open a new tab in Geany, paste in the template code below and save as results.html in the templates directory.
{% extends 'base.html' %}

{% block body %}

<h2>Monthly climate results from {{ station }} weather station</h2>

<p>You submitted the following data:</p>
<table>
<tr><td>From Year</td><td>{{ year }}</td></tr>
<tr><td>Month</td><td>{{ month }}</td></tr>
<tr><td>Weather station</td><td>{{ station }}</td></tr>
</table>

<p>When the year is "{{ year }}" and month is "{{ month }}", the following
results are returned from "{{ station }}" weather station:</p>

<table>
<tr><td>Year</td><td>Month</td><td>Max Temp (C)<td>Min Temp (C)</td><td>Frost (Days)</td><td>Rain (mm)</td><td>Sun (Hr)</td></td></tr>
{% for row in results %}
<tr>
  {% for item in row %}
  <td> {{item}} </td>
  {% endfor %}
</tr>
{% endfor %}
</table>

{% endblock %}
7. Static files
The templates uses static files for the background image and for the CSS stylesheet.
- Open a new tab in Geany, paste in the following stylesheet code and save as stylesheet.css in the static directory.
body {
  font-family:      Verdana, Geneva, Arial, sans-serif;
  font-size:        medium;
  margin-top:       5%;
  margin-bottom:    5%;
  margin-left:      10%;
  margin-right:     10%;
  border:           1px dotted gray;
  padding:          10px 10px 10px 10px;
}
h2 {
  font-size:        150%;
  color:            maroon;
}
table {
  margin-left:      20px;
  margin-right:     20px;
  caption-side:     bottom;
  background-color: #fafcff;
  border:           1px solid #909090;
  color:            #2a2a2a;
  padding:          5px 5px 2px;
  border-collapse:  collapse;
}
td, th {
  padding:          5px;
  text-align:       left;
  border:           thin dotted gray;
}
- For the background image, copy a high-resolution jpeg image to the static directory and name it background.jpg The one used in the example came from www.pexels.com/search/weather
8. Flask application
The main Flask application file is quite simple. It imports all the required Flask modules and then defines a function for each of the web pages used in the app. Each function uses a Python decorator that defines the url path to a page. These paths are appended to the base url when the app runs.
The entry_page() function takes as its arguments the name of the template, and passes in the title for the page and the weather station name and month data structures. These are used by the drop-down boxes to show a list of values.
The do_search() function retrieves the search parameters and passes them to the get_data() function that retrieves the station data and filters the results. These are then displayed in a dynamic table.
Finally the call to app.run sets the host argument to 0.0.0.0 – this will allow any device on the network to access the web app. The debug argument is set to true which allows the code to be changed without restarting Flask.
- Open a new tab in Geany, paste in the code below and save as climate_search.py in the flask directory.
from flask import Flask, render_template, request
import stations

app = Flask(__name__)

@app.route('/')
def entry_page():
    return render_template('entry.html',
                           title='Welcome to Met Office historical climate data search',
                           stations=stations.stations,
                           months=stations.months,)


@app.route('/search', methods=['POST'])
def do_search():
    the_year = request.form['from_year']
    the_month = request.form['month']
    the_station = request.form['station']
    the_results = stations.get_data(int(the_year),
                                            stations.months[the_month],
                                            stations.stations[the_station])
    return render_template('results.html',
                            year=the_year,
                            month=the_month,
                            station=the_station,
                            results=the_results)

if __name__ == '__main__':
    app.run(host='0.0.0.0', debug=True)
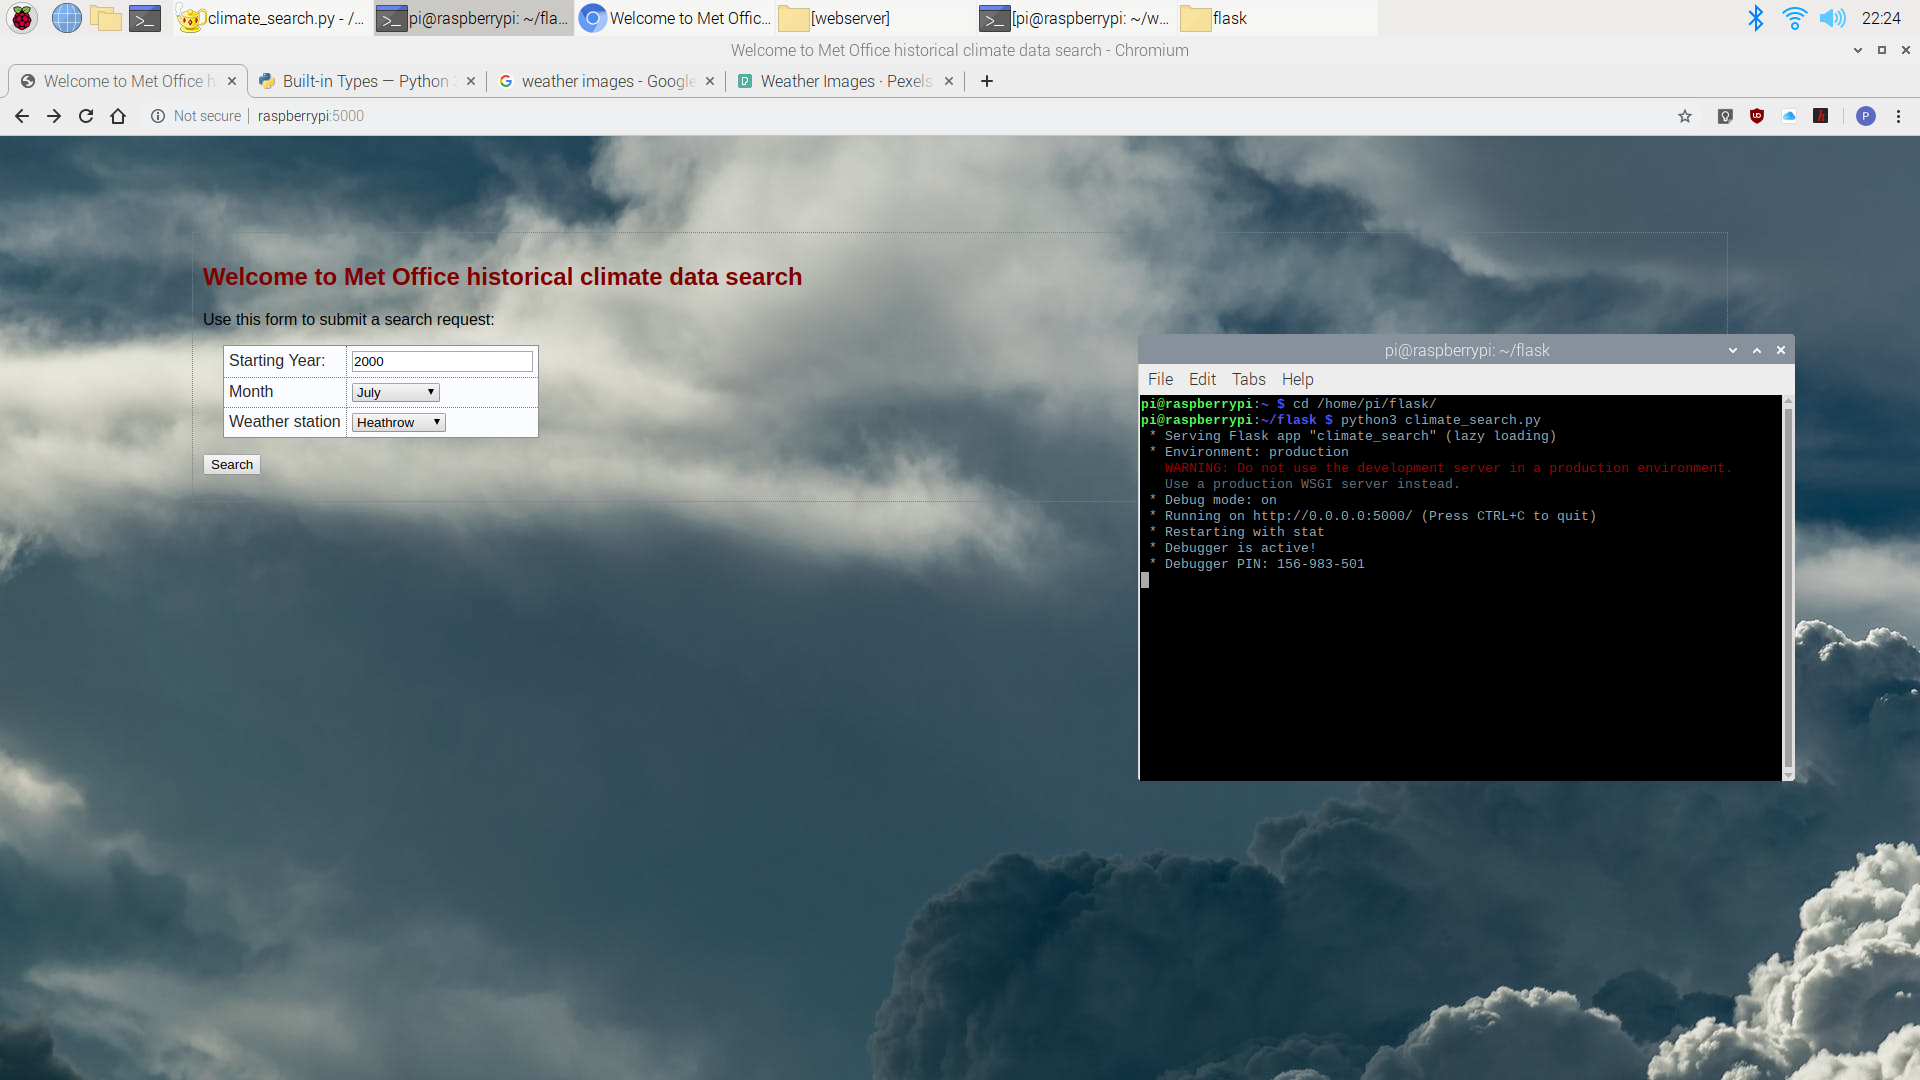
9. Running flask
- Open Terminal from the Teminal icon in the Menu Bar
- Change directory to the “flask” directory by entering the following command and pressing Return:
cd /home/pi/flask- Run the app with the following command:
python3 climate_search.pyYou should get a message informing you that the Flask server is running at URL http://0.0.0.0:5000
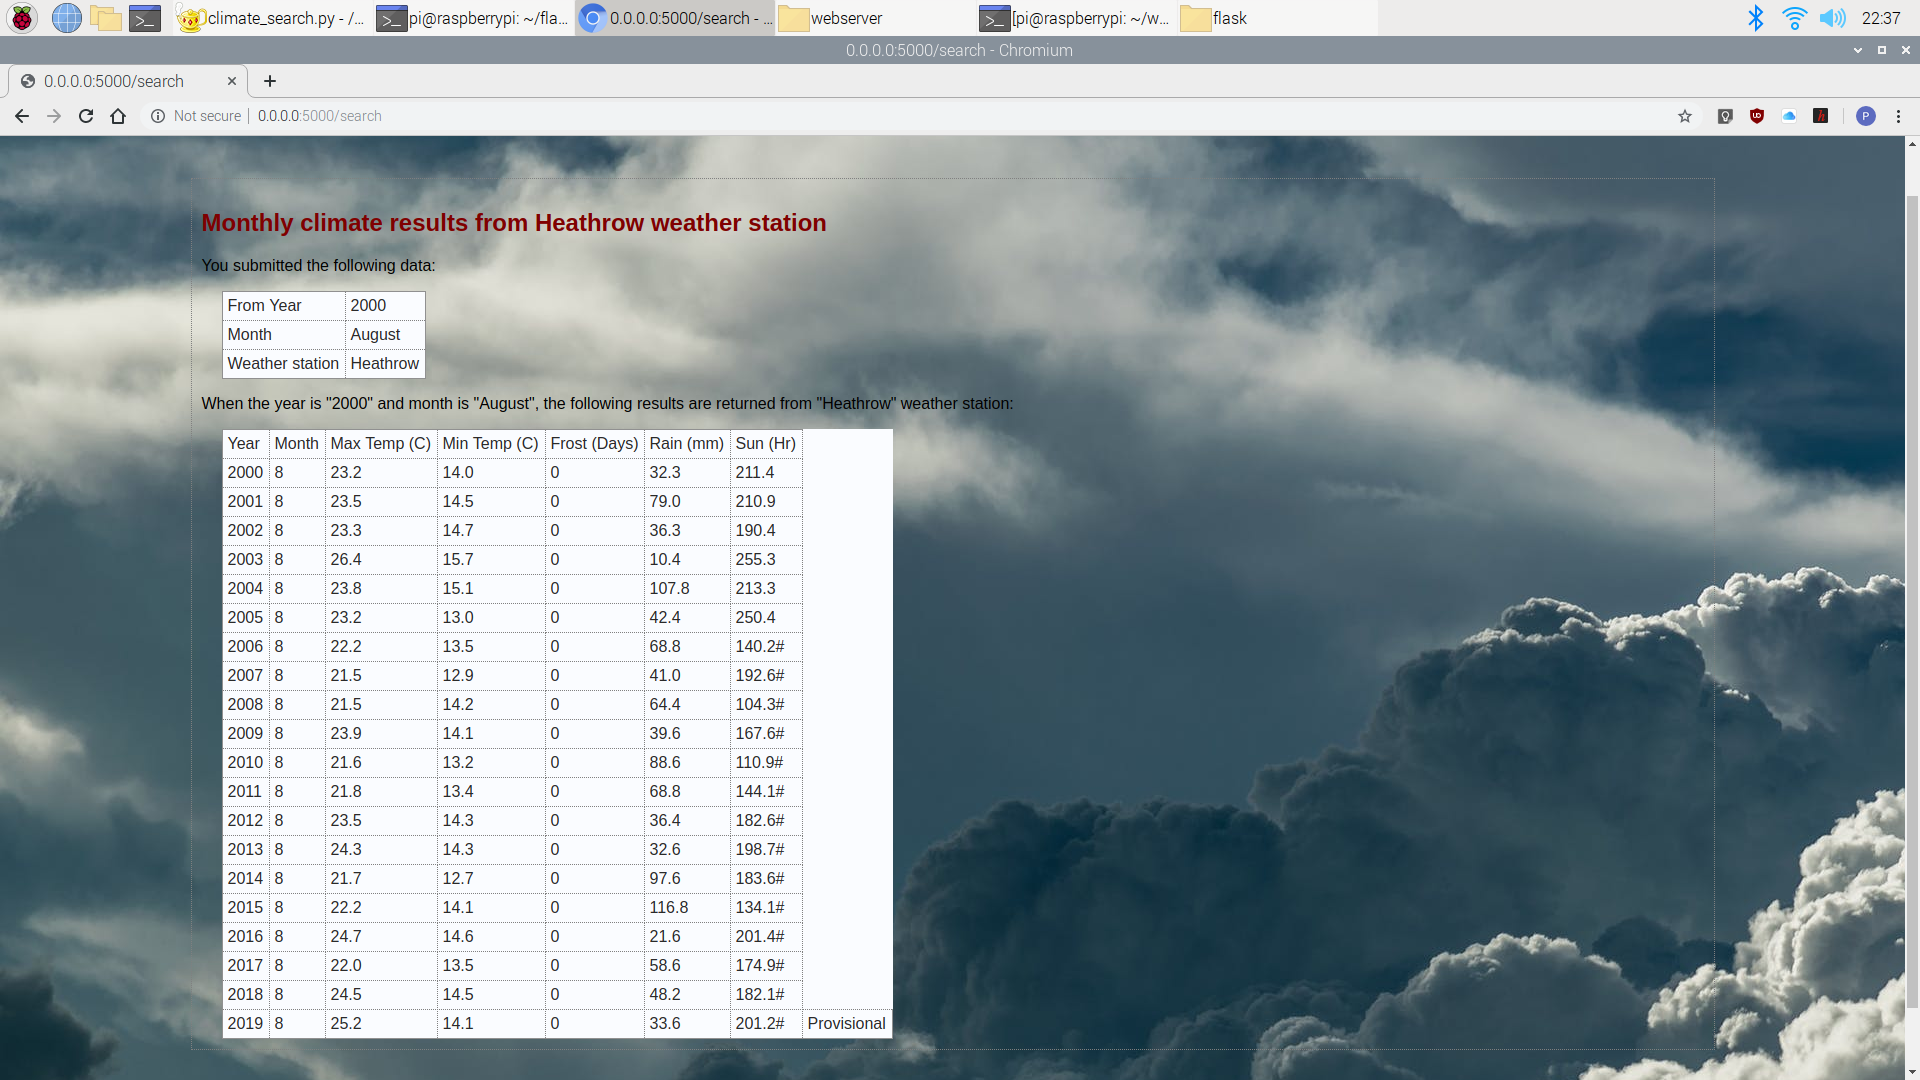
10. Accessing the web app
- Open a browser on any device on your network and enter the following URL into the search box: http://0.0.0.0:5000
You should be presented with the entry page to the app where you can set your search parameters and click the search button. The data should be retrieved from the weather station and filtered by the same month for each year in the selection. Some of the stations have historical records dating back to the 1800’s!
If you have any errors the web page will display a listing with the error message and the line number in the file where the error occurs. Look at the last line in the listing and trace back to fix the error, then refresh the browser.
Summary
The principles used on this project can be adapted to build your own dynamic web apps that can display whatever information you want. Once the basic site us up and running it can be extended by adding further Python functions, templates and Flask route definitions to build out the site.
There are web hosting services like Pythonanywhere.com that can host your Flask apps securely, so once everything is running and tested to your satisfaction, upload the code to a production server to launch your own internet site.
Like what you read? Why not show your appreciation by giving some love.
From a quick tap to smashing that love button and show how much you enjoyed this project.

