Looking for a way to enhance your morning routine? Maybe an electronic dashboard is what you need. Get the weather, news and even commute time all while combing your hair. This project using a Raspberry Pi, the official Raspberry Pi touch screen and a few other materials, can be completed in a weekend but provides plenty of room to grow and customize.
To add the Magic part to this project we place the touchscreen display behind a two way mirror. When the monitor is off or black it looks like a mirror. When lit you can see right through the mirror making white text on a black background appear to float on the mirror surface.
To build this project we will use Magic Mirror an open source application from Michael Teeuw. MagicMirror is information dashboard app written in Node.js that runs on a Raspberry Pi. Both the data and look are customizable with standard web technologies like Javascript and CSS. MagicMirror comes with a set of built in modules for things like the weather, calendars and news but also has a large community of third party modules for things like tracking your commute, integration with smart home devices like Amazon Alexa. With a little JavaScript knowledge you can even write your own modules.
Installing Raspbian
Magic Mirror runs on the standard installation of Raspian Stretch, that includes the Pixel Desktop GUI. I used Raspbian Stretch with desktop (but without the recommended software which we won’t need.)
To set up the Pi SD card image you can use the PiBakery application (https://www.pibakery.org/). PiBakery uses a blocks-based interface to script the initial boot (and potentially every boot). This is great for getting basic system settings like WiFi, software update and region settings up and running automatically. Once you are satisfied with the settings you can burn the image to the SD card right from PiBakery. I also like balenaEtcher (https://www.balena.io/etcher/) for flashing SD card images. Once your SD card is ready insert it into the Pi and you are ready to set up the hardware.
Setting Up The Raspberry Pi Touchscreen
Attach the wide ribbon cable on the touchscreen to the connector on the underside of the display board. You will need to gently pull out the clamp before inserting the ribbon cable, once you are sure it seated correctly gently but firmly press the clamp back in place. Flip the control board over and connect the much smaller ribbon cable coming off the touchscreen to the connector on the front of the board by first pullout out the clamp inserting the cable and wpressing the clamp back in place to hold.
You can now use the provided standoffs to mount the display board to the back of the touchscreen. Be sure to be gentle with the ribbon cables as you flip it over. Attach the loose ribbon cable to to the connector on the side of the control board.
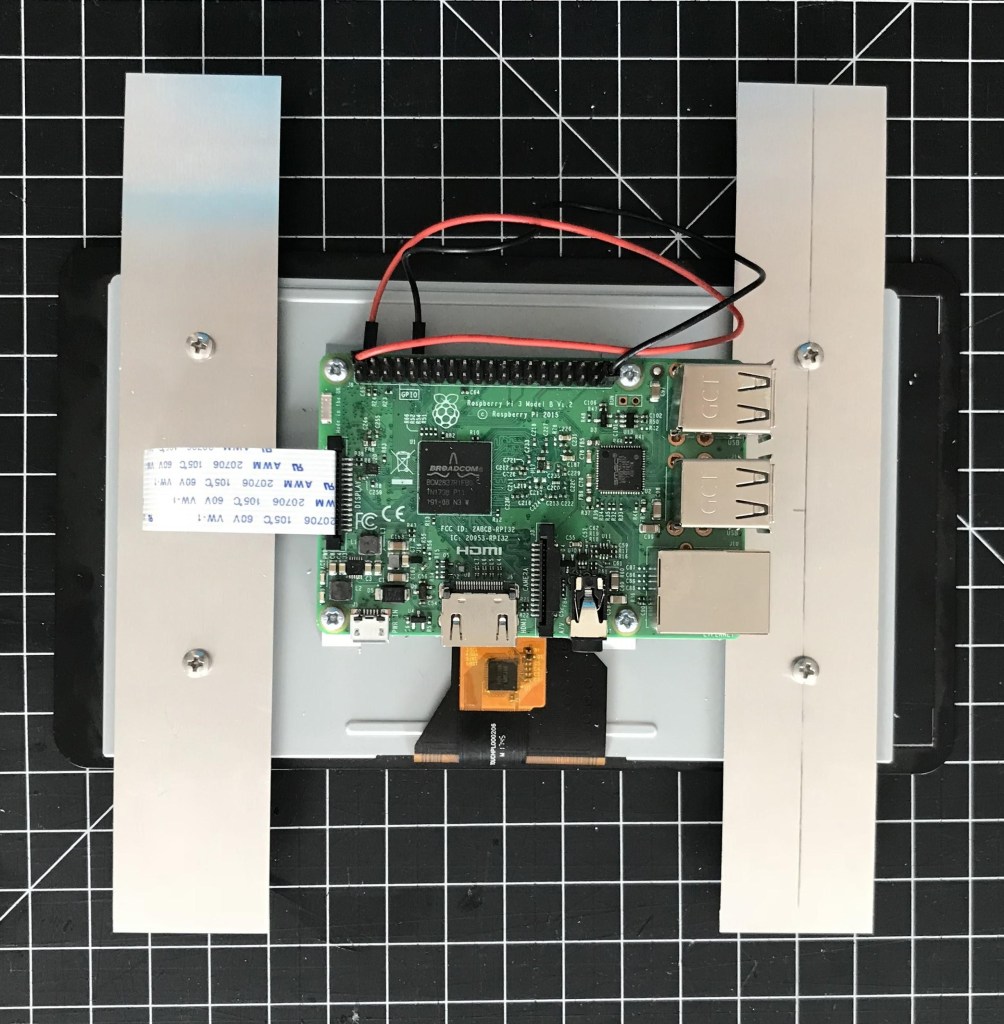
Use the screws to mount the Raspberry Pi on top of the standoffs. You can now wrap the ribbon cable from the control board over and attach it to the matching connector on the Raspberry Pi.
Use the black jumper cable to go from the GND pin on the control board to the GND pin on the Pi ( Pin 6). Use the red jumper cable to go from the 5V pin on the control board to the 5V pin on the Raspberry Pi (Pin 2 or 4 ) Now that these are connected you should only need to supply power to either the Pi or the control board.
Before we setup the frame lets attach power to the Pi along with a keyboard. You can either also attach a mouse or use the touchscreen to continue the Pi’s setup. After a second or two you should see the Pi boot up.
Configure Your Pi
If you created your SD card image using Pi Bakery you could write the command to install Magic Mirror into the first-boot script. You may want to make sure that the basics like WiFi are up and running before installing Magic Mirror and adjusting Before you install Magic Mirror it is worth getting a few other things setup.
Display configurations
For this project I placed the screen horizontally (landscape) at the bottom of the mirror. You may choose to place it vertically. Do do this change either the lcd_rotate setting inside /boot/config.txt (if you are using the Raspberry Pi touchscreen) or display_rotate for other screens: 0 for no rotation, 1 for 90°, 2, for 180° (upside down) or 3 for 270°.
You can use the GUI text editor or type ‘nano /boot/config.txt’ from the terminal.
Add this line in /boot/config.txt
#No rotation for landscape mode
lcd_rotate=0
Install Magic Mirror
If you installed using Pi Bakery you could write the command to install MagicMirror into the first-boot script. You may want to make sure that the basics like WiFi are up and running before installing Magic Mirror. Once your Pi is running and connected to the internet, open up a terminal window to run the following commands.
First make sure your software is up to date:
sudo apt-get update
sudo apt-get upgrade -Y
Now we are ready to install Magic Mirror with this command:
bash -c "$(curl -sL https://raw.githubusercontent.com/MichMich/MagicMirror/master/installers/raspberry.sh)
When the installation asked “Do you want use pm2 for auto starting of your MagicMirror” press Y for yes. pm2 is a service that both auto starts MagicMirror but checks to make sure it hasn’t crashed and will automatically restart it.
Reboot your Pi with sudo reboot and Magic Mirror should start automatically.
Configure Magic Mirror
By default magic mirror has some pre-installed modules it gives you. Including a new feed, welcome message and a compliment generator (it is a mirror after all). All of this configurable and you can even create your own modules that will display information of your choice.
After reboot Magic Mirror takes over the screen. To get back to the desktop press CTRL-M, which will minimize Magic Mirror. If you quit Magic Mirror it will just respawn a few seconds later (pm2 at work). You should now be back to the Raspian GUI desktop.
From here we can use the text editor to edit ~/MagicMirror/config/config.js to change what modules we see. If you haven’t worked with JavaScript objects before it make look intimidating, but with some care you quickly understand how the file is laid out. Its always good to make a backup.
In the terminal you can make a copy with:
cp ~/MagicMirror/config/config.js ~/MagicMirror/config/config.js.backup
To start you can adjust some basic settings like time format, units and language.
language: "en", timeFormat: 24, units: "metric",
To edit these you will want to change the value within quotes. Just make sure to leave both the quotes and the comma at the end of each line. You can set either a 12 or 24 hour clock, use metric or imperial (U.S.) units and any number of languages.
Configuring the modules
The heart of the config.js file is the modules section. You can change setting for individual modules here.
modules: [

{

module: "alert",

},

{

module: "updatenotification",

position: "top_bar"

},
The modules parameter is a list contained inside a set of brackets ‘[ ]‘. Each individual module is surrounded by a set of curly braces ‘{ }‘ and followed by a comma (except for the last.) To add or remove any of the default modules make sure to remove everything including the curly braces and trailing comma for that module.
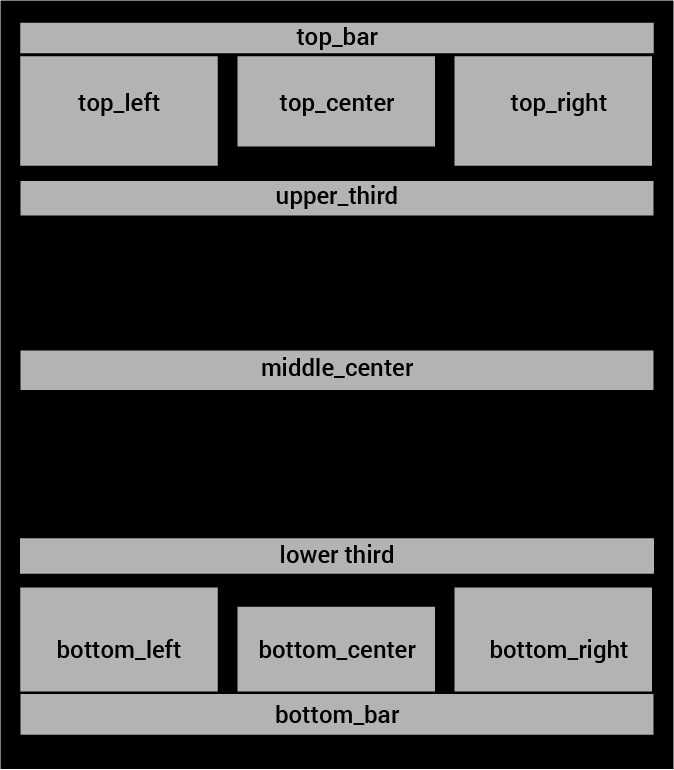
In addition to settings specific to that module most modules will have a parameter labeled ’position.’ This value is a predefined screen region where you can place modules. If two modules occupy the same region the first will appear on top followed by the next.
After you make changes you will likely want to reboot. You can also restart Magic Mirror from the terminal with:
pm2 restart mm
This illustration should help you identify the regions:
Additional configurations
For information on configuring the default modules you can checkout the documentation here: https://github.com/MichMich/MagicMirror#modules
You can also use a number of 3rd party modules that allow for all kinds of integrations, including Alexa, Google Maps, as well as for adding hardware like PIR sensors: https://github.com/MichMich/MagicMirror/wiki/3rd-party-modules
If none of these fit your needs perhaps you’ll want to create your own: https://github.com/MichMich/MagicMirror/blob/master/modules
Putting The Frame Together
Applying the mirror film
To make my mirror I used a roll of window mirror film. This is normally used to reduce heat inside your house by applying it to your windows. You can also order two-way mirrored acrylic online in custom sizes. This will result in a better mirror and is far easier to install but will be more expensive. Follow the instructions on the mirror film packaging to apply it to the frame glass/acrylic.
Cut the paper backing
Unless your screen covers the entire mirror area you will want to place a piece of black paper directly behind the acrylic. This will disappear behind the mirror. You will need a cut hole the size of the display or touchscreen. I made mine opening a little smaller than the screen so as to hide any edge.
Cut the frame back and install the screen.
My frame came with a press board back. I used a drill and small hand saw to cut out a hole exactly the width and height of the Raspberry Pi Touchscreen. I wanted a snug fit so the screen can move around at all.
To install the touchscreen. I cut two pieces of aluminum flashing about (2 to 4 inches) 5 to 10cm longer than the screen height. I then marked and drilled holes in the flashing the same distance as the mounting holes on the back of the touchscreen. I then used the mounting screws to attach the flashing to the touchscreen. Then I placed the screen in the whole and used duct tape to attach the flashing to the frame back.
Using the aluminum flashing created a snugged yet flexible fit holding the screen against the acrylic. It also lets me unscrew the touchscreen from the frame without removing the duct tape if I need to.
Finishing Up
You are now ready to power up and hang your screen. After first installing it behind the glass you may need to adjust the brightness. I attached a keyboard, and minimized Magic Mirror CTRL-M.
You can adjust the screen brightness with the command below. Replace VALUE with a number between 0 (darkest) and 255 (brightest) :
sudo bash -c "echo [VALUE] > /sys/class/backlight/rpi_backlight/brightness"
Just unplugging a Raspberry Pi without shutting it down can harm the SD image. You could plug a keyboard in to shut it down but I added a small button that I mounted to the bottom of the frame.
You can follow the instructions here to make the button both turn on and off your Pi: https://howchoo.com/g/mwnlytk3zmm/how-to-add-a-power-button-to-your-raspberry-pi
Magic Mirrors default setup up doesn’t make much use of the Touchscreen but you could modify it to give it some touch features. Keep in mind that the acrylic reduces the sensitivity of the touchscreen. The thinner the acrylic the better. I was able to use the touchscreen to wake the display when it went to sleep.
Magic Mirror is a big well documented project, with an active user base. Be sure to check out the website for more information.
Created by Kelly Egan
Like what you read? Why not show your appreciation by giving some love.
From a quick tap to smashing that love button and show how much you enjoyed this project.
