This project shows you how to train image recognition on a tiny Arduino Nicla Vision and perform real-time video capturing to create an AI ROCK SBC classifier. Nicla Vision is a tiny board at only 23 x 23 mm square. Its main feature is a 2MP colour camera integrated with a powerful STM32H747AII6 Dual ARM® Cortex® M7/M4 processor, capable of real-time video capturing and image classification for Machine Learning (ML) applications running right on the board.
It also has built-in dual WiFi and Bluetooth Low Energy for network connectivity and an array of additional sensors and connectors, making it a really flexible low-power industrial sensor platform in a small footprint:
- 16 MB SPI flash memory
- Omnidirectional MEMS microphone
- Time of Flight distance sensor
- 6-axis accelerometer and gyroscope
- Crypto chip for secure cloud communication
- 7V Li-po battery monitor and battery connector
- 16 GPIO pins (1xUART, 1xSPI, 1xI2C, 2xADC, 2xDigital)
- I2C expansion header connector
- micro USB 5V power connector

Multiple programming options for the board include:
- Arduino IDE (C++)
- MicroPython (OpenMV)
- STM32Cube IDE
In this project, we demonstrate how to build and test a complete Machine Vision application that has been trained to identify ROCK SBCs when they appear in the video stream.
We take you through the following steps, which can be adapted to your own edge imaging scenario:
- Setting up the Nicla Vision development environment
- Capturing video using OpenMV
- Creating ML models using EdgeImpulse
- Building the Nicla Vision firmware
- Programming the vision & ML control app in MicroPython
- Deploying and running the demo
You can see a video demonstration in this screen capture of OpenMV – keep an eye on the bottom left of the Serial Terminal to see the print line when a ROCK board is detected!
Step 1: Update the bootloader
Before doing anything else, Arduino recommends updating the bootloader, as this may well have been updated since your board shipped. This involves installing the Arduino IDE or using their Cloud service.
We used the latest Arduino IDE version 2.0.2 on an X86-64 PC running Debian Bullseye for this project, but it should run on a Mac or Windows PC, and the installation steps will be similar. See Arduino’s software page.
- Download the AppImage from the Arduino software page (or the version for your OS).
- Give the AppImage execute permissions:
chmod +x arduino-ide_2.0.2_Linux_64bit.AppImage- Add a new udev rule for the Nicla Vision in /etc/udev/rules.d
- Create the rule named 50-nicla.rule using your favourite editor – pay attention to the product id as it is not what you see when the board first enumerates on the USB bus:
cat /etc/udev/rules.d/50-nicla.rules
ATTRS{idProduct}=="035f", ATTRS{idVendor}=="2341", MODE="664", GROUP="dialout"- Check your user is a member of the dialout group:
id
uid=1000(pete) gid=1000(pete) groups=1000(pete),7(lp),20(dialout),24(cdrom),25(floppy),27(sudo),29(audio),30(dip),44(video),46(plugdev),108(netdev),115(lpadmin),118(scanner),998(docker)- If you aren’t, add yourself to the dialout group:
sudo usermod -aG dialout $USER- Now reboot.
- When you are back, start the Arduino IDE from a Terminal:
./arduino-ide_2.0.2_Linux_64bit.AppImage- Now you can connect your Nicla Vision to the host PC with a good quality microUSB cable
- Select the Nicla Vision from the board chooser at the top of the IDE window
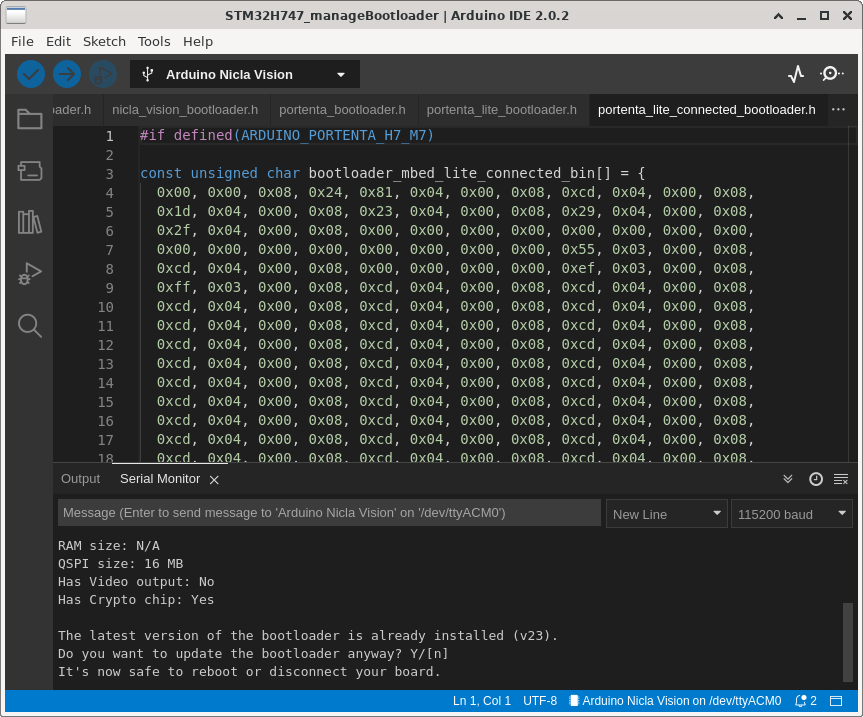
- From the menu choose File -> Examples -> STM32H747_System -> STM32H747_manageBootloader
- When the application opens, compile and build the image and flash the Nicla Vision using the menu option Sketch -> Upload
- In the Output tab at the bottom of the window, you should be able to see the flashing progress taking place.
- When the image has flashed successfully, open the Serial Monitor tab and follow the instructions output to the monitor to update the bootloader.
- After the process has finished, disconnect the Nicla Vision and close down the Arduino IDE.
That’s how to update the bootloader.
Tip: If you get problems, check the udev rules and unplug and plug your Nicla Vision.
Step 2: OpenMV Installation
In this step, we install the Open MV IDE programming environment that supports MicroPython on the Nicla Vision. This allows coding Python apps that control the camera to do things like object detection and image classification, trigger outputs and use the other sensors.
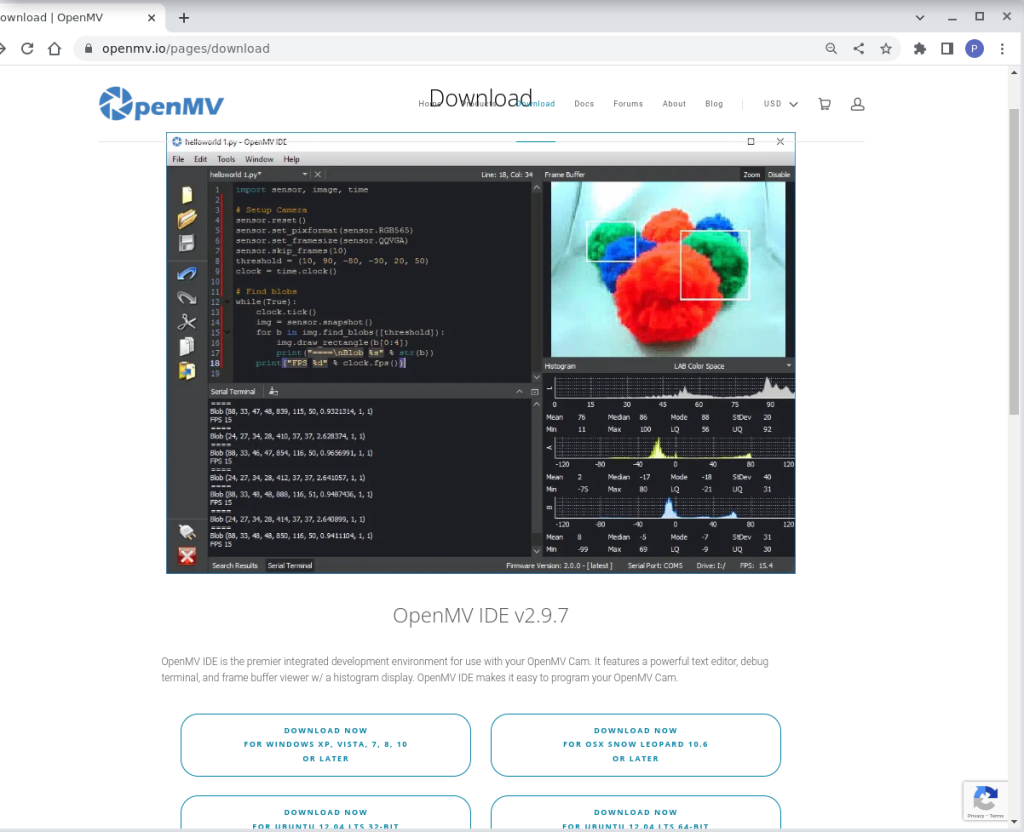
- Open the OpenMV download page in your browser and download the latest version for your operating system to the Downloads directory.
- Open a Terminal, change to the Downloads directory and give the download file execute permissions, then run the installer:
./openmv-ide-linux-x86_64-2.9.7.run- Follow the installer instruction in the dialogue box that opens and install the application in your home directory by accepting the defaults.
- Choose to open the application.
Step 3: OpenMV Machine Vision
You are now ready to connect the Nicla Vision to OpenMV and run a test to make sure everything is working as expected.
- With OpenMV running, connect your Nicla Vision to the host PC with a good-quality micro USB cable.
- Click the USB Connect icon in the bottom left-hand corner of the OpenMV IDE:

- The LED on the Nicla will start flashing green, indicating it’s in bootloader mode, and the connection dialogue will open.
- Select Install the latest firmware option but DO NOT select Erase internal file system.
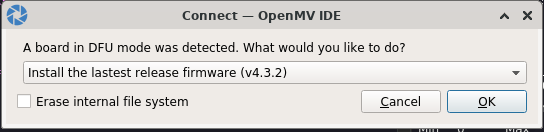
- The OpenMV firmware will now be flashed to the Nicla Vision.
- Close the dialogue when the flash completes.
- The LED on the Nicla should be blinking a blue heartbeat.
- Click OK, and you will be returned to the IDE, and the LED will turn off.
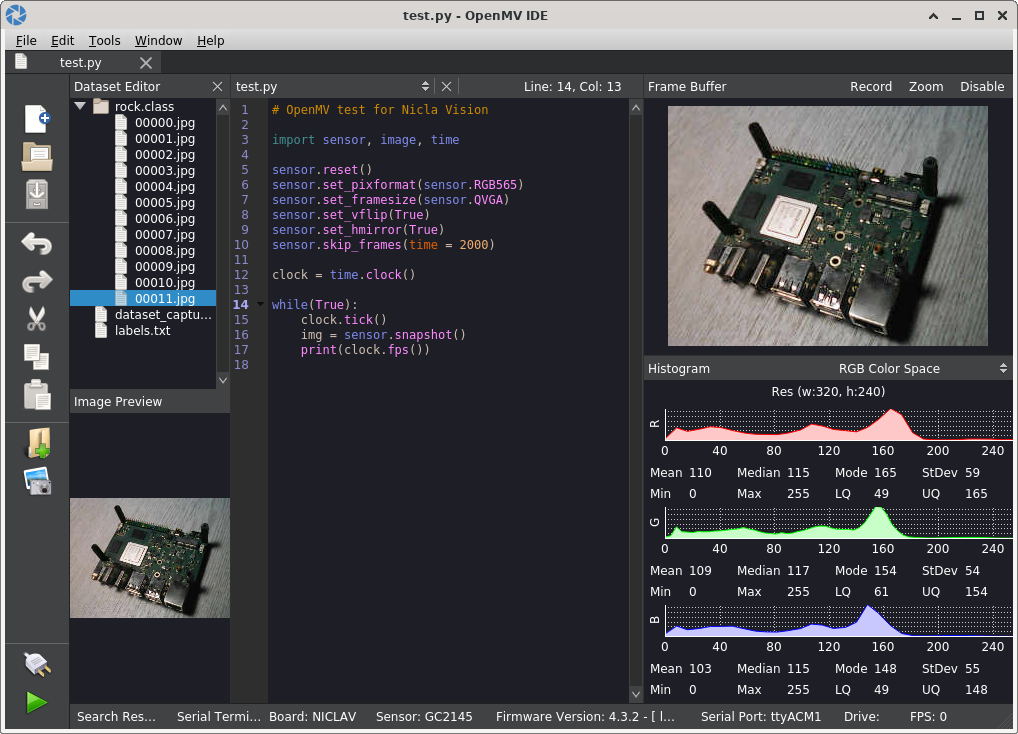
- Now from the main menu, select File -> New File and add the following code into the code editor window and save it as test.py – this will start the camera and display the feed in the IDE. We will also use it to capture frames for the ML model:
import sensor, image, time

sensor.reset()
sensor.set_pixformat(sensor.RGB565)
sensor.set_framesize(sensor.QVGA)
sensor.set_vflip(True)
sensor.set_hmirror(True)
sensor.skip_frames(time = 2000)

clock = time.clock()

while(True):
    clock.tick()
    img = sensor.snapshot()
print(clock.fps())- Click the green triangular start button below the connect button – the camera feed will display in the IDE window, as well as the dynamic colour balance.
- The start button turns to a red square, which you can click to stop the test.
Now the Nicla Vision is all set up and working with OpenMV.

Step 4: ML Data Set
The next steps are all about creating an image dataset to build our Machine Vision model with. This consists of capturing video frames from the camera stream and saving them into a data set.
We are going to train our model to recognize when it identifies ROCK 4SE and ROCK 5B boards in the video stream, so we need to capture lots of images of both these, which are our target and also some of the background. So we will end up with 3 data classes, ROCK-4, ROCK-5 and Background.
We will take about 50 images of each board and background from different angles and with different lighting. The more variety, the more accurate your model is likely to be.
- Create a directory somewhere on your PC filesystem to store the images – we called ours dataset.
- With your Nicla Vision connected in OpenMV, click the connect button again and start the camera using the start button.
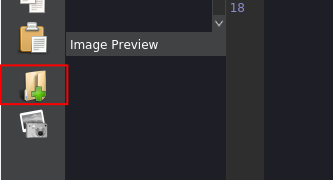
- From the menu, select Tools -> Dataset Editor -> New Dataset.
- The file chooser will open – choose the dataset directory, and the dataset_capture_script.py file opens in the code editor. Close this, as we already have a capture script setup from the test.
- Click the New Class button in the left-hand pane and give your class a name – we called ours rock – to collect the ROCK-4SE images.
- Now click the Capture Data button to capture your first object image.
- Move the camera to a different view and click the capture again.
- Keep repeating this with different views until you have about 40 – 50 different images of your target object.
- Once you have enough images of your first object, create a new data class and capture images of the next target and also the background, giving them separate class names.
Step 5: EdgeImpulse
To help with the process of creating the Machine Learning model, we will be using EdgeImpulse Studio. This contains a suite of tools used to create the model and generate a C++ library that can be used for inference and image classification, enabling Nicla to identify when target objects appear in its video stream.
EdgeImpulse has free accounts for developers, so visit their site and set one up if you don’t already have one.
- Once you have created an account, log in and create a new project – this will open the project setup dialogue where you can set the project name, select the type of project based on imaging and classify a single object.
- The project will open in the dashboard view with the activities available in the left-hand margin with the main window as the work area.
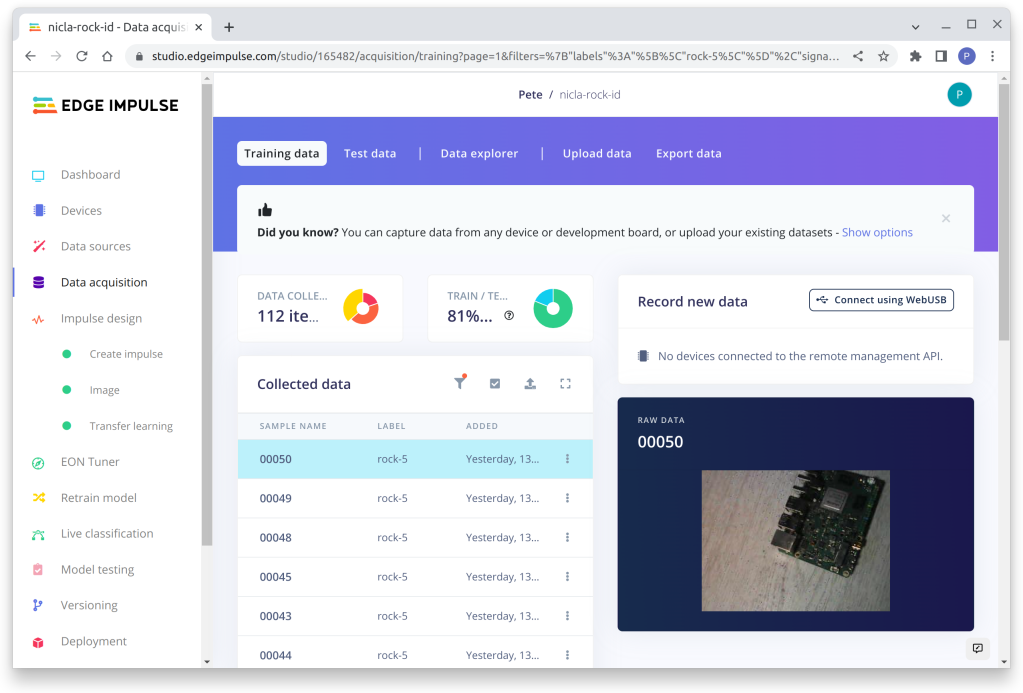
Step 6: Data Acquisition
Now that the project is created in EdgeImpulse, we need to upload the image data that we captured using the Nicla Vision camera.
- Click the Data Acquisition activity from the left-hand navigation panel.
- Click Choose Files and select the images from the rock target class from your dataset directory.
- Give the images a label and begin the upload.
- Repeat the process for each of your data classes.
You should now have all your data loaded into EdgeImpulse ready for processing. The data will be split into modelling data and test datasets automatically.
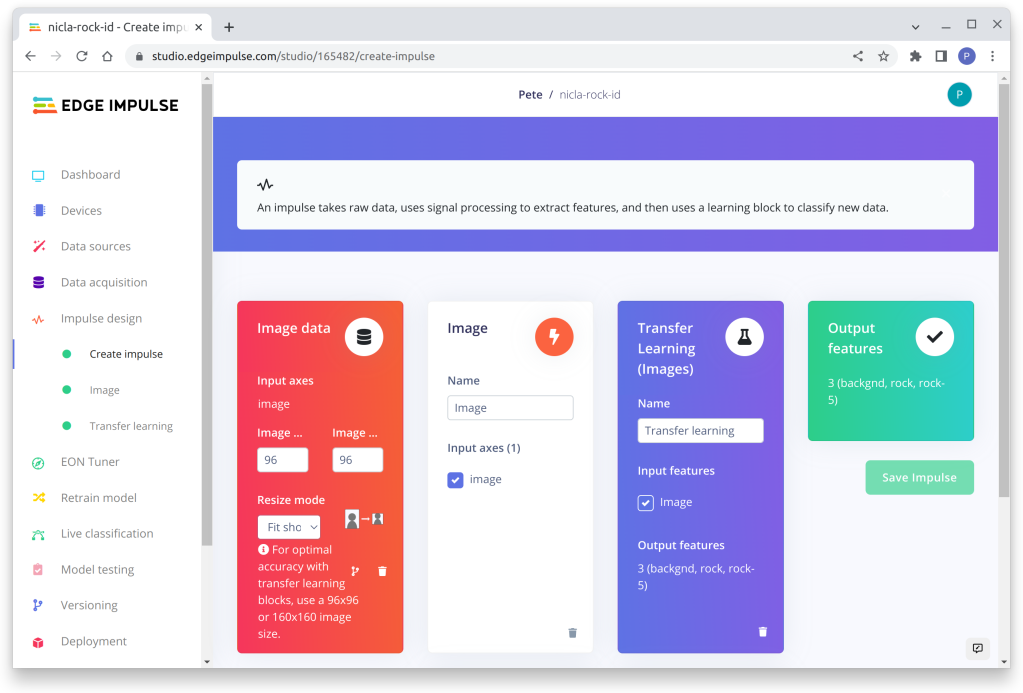
Step 7: Impulse
This next section is about creating an Impulse. This sets up all the parameters for building the ML model. EdgeImpulse guides you through this one stage at a time and, in the end, gives you an indication of how accurate your model is likely to be. Depending on what you are trying to detect, you may need to iterate through these steps trying different options to get the optimum performance.
Our model was just under 70% accurate, according to EdgeImpulse, but it performed well and was very precise at identifying both the ROCK-4SE and ROCK-5B boards.
- Click the Create Impulse activity in the menu bar.
- Add an image-processing block.
- Add a transfer learning block.
- Set image size to 96 X 96.
- Click Save Impulse.
The next stage sets the model parameters and generates a feature set from the object images:
- Click the Image Item from the menu bar.
- Set the Colour Depth to RGB.
- Click Save parameters.
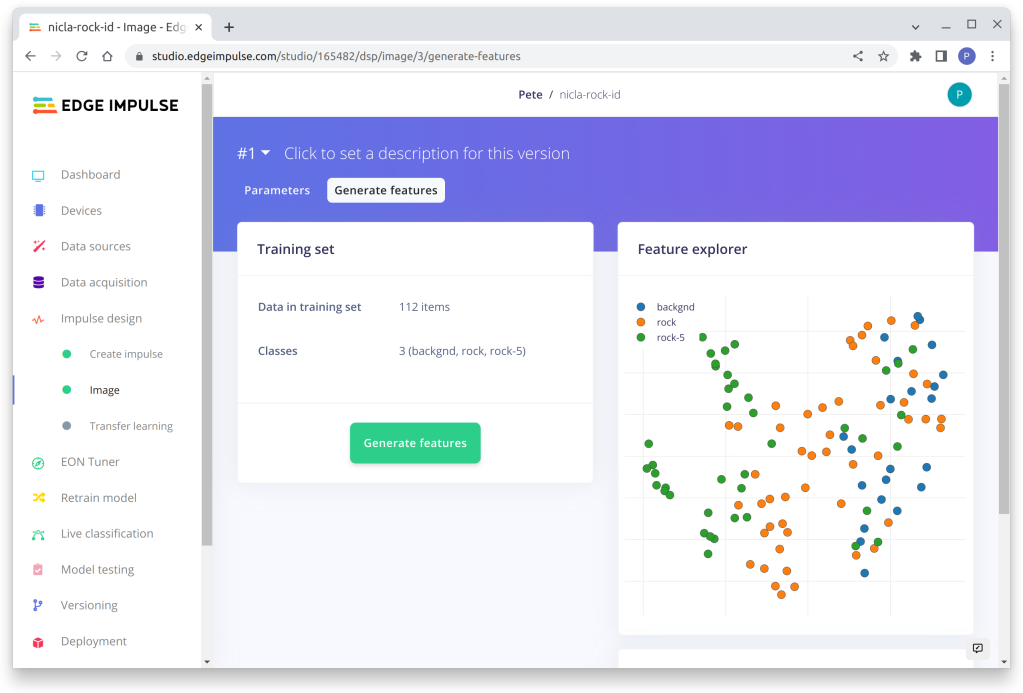
Then, select Generate Features and choose All Items – this will trigger a remote job in the EdgeImpulse cloud to generate the model features.
At this stage, you can use Feature Explorer to gauge if the features are sufficiently distinct to give good results. You are looking for distinct clusters of features with as little overlap as possible. Our model is not that well separated because the 2 ROCK boards have some similarities, but it still works well in practice.
Now we can start training our model using the captured images from our training data set.
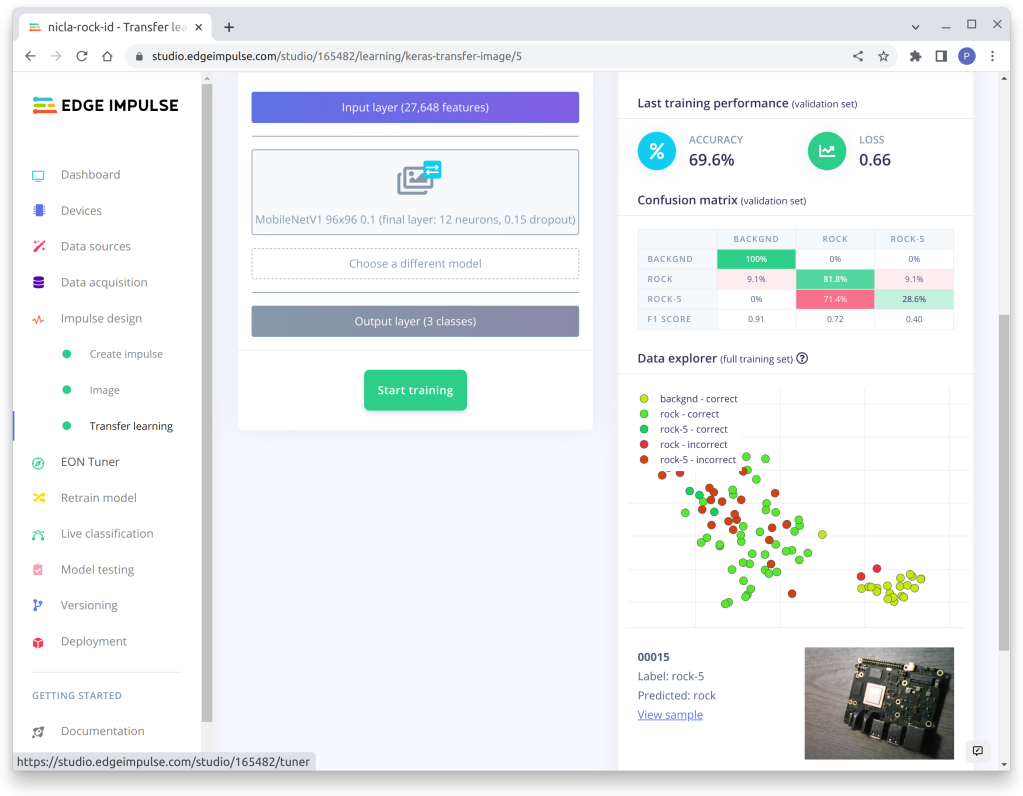
- Click Transfer learning from the menu bar.
- Set the Number of training cycles = 80.
- Select MobileNet 96 x 96 0.1model and edit the parameters.
- Set Neurons = 12 and Dropout Rate = 0.15.
- Click Start Training.
The training can take several minutes depending on the amount of data and the complexity of the features.
When it’s finished, you get the statistics about how effective your model is, and you can see how the training results are clustered in the Data Explorer view. You can click on the incorrect results and see the image that produced that result.
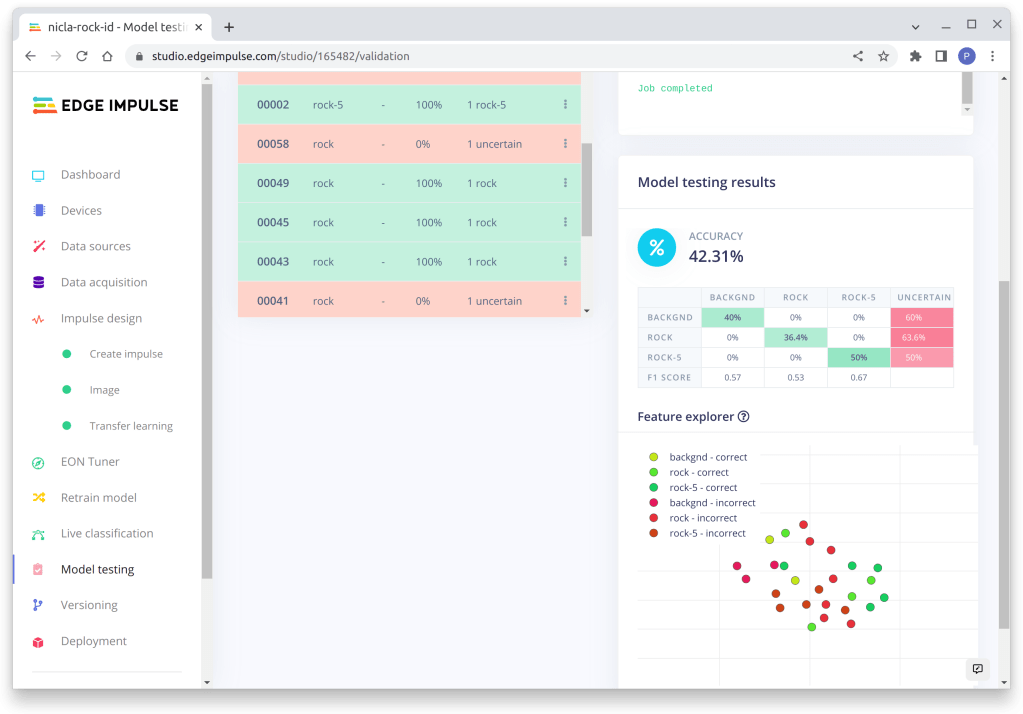
The final step in the model creation process is to test the model with a labelled test data set to see how well it performs. Some of your data will have been held back for testing purposes, or you can add more images to run the test with.
- Select Model Testing from the menu bar.
- Click Classify All.
Another remote job will start and run the test data against the model, giving you the results when it completes. Our test didn’t appear to be that accurate, but it still worked well.
Step 8: OpenMV library
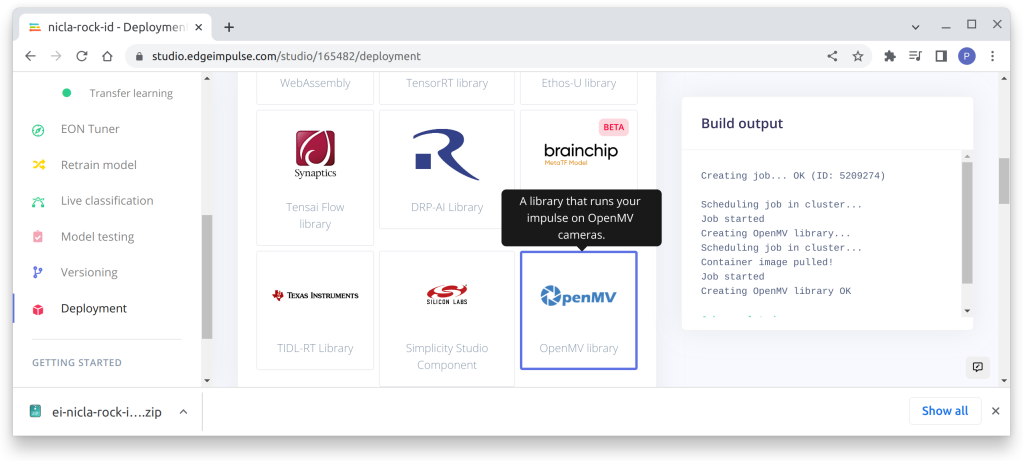
Now that we have a Machine Vision model that works, we can use EdgeImpulse to generate an OpenMV library that can be flashed to the Nicla Vision and be called from a Python script.
- Select Deployment from the menu bar
- Choose OpenMV from the library section
- Click Build
This will build the file, then open a file browser to input the download location – you will get a zip archive something like this:
ei-nicla-rock-id-openmv-v2.zip
- Save the zip file to your storage and extract it to a directory.
Step 9: Firmware
The next section is a cunning way to build the firmware for the Nicla Vision using a GitHub Workflow process which has been built by OpenMV to automate this process. This means that you don’t need the Arm toolchain installed on your host machine, as the build is done in the GitHub cloud.
You will need a GitHub account for this – they have a free tier for developers.
- Log in to your GH account and Fork Repo.
- Fork the following GH repo.
- Clone it locally to your PC:
git clone git@github.com:<your-github-account>/openmv-nicla-test.gitThe model library has 2 components included in the .zip file downloaded earlier, the TensorFlow model (trained.tflite) and a text file containing the target labels (lable.txt). We need to replace the original files which are in src/lib/libtf/models directory of the cloned repo with our own model files.
cd openmv-nicla-test/src/lib/libtf/models
rm *.tflite *.txt
cp ../ei-nicla-rock-id-openmv-v2/trained.tflite rock_detection.tflite
cp ../ei-nicla-rock-id-openmv-v2/lable.txt rock_detection.txt
Now commit the changes and push them back to GitHub.
git add .
git commit
git push
When the updates are pushed to GitHub a Workflow starts and builds the new firmware for the Nicla Vision – it takes 2 -3 mins.
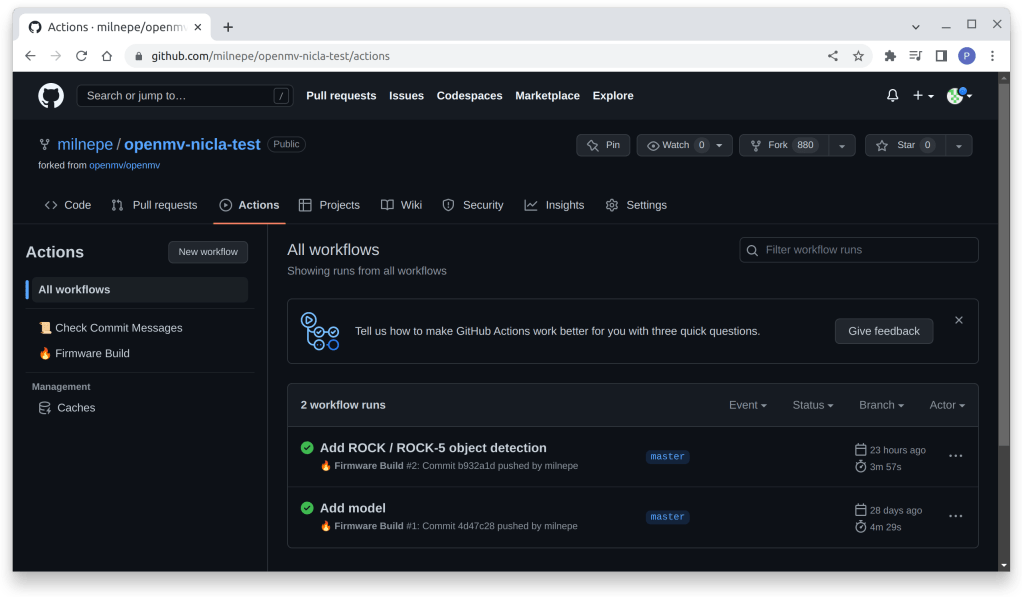
The workflow compiles the firmware and publishes it as a GitHub release.
- Click the Code tab and click download the latest Development Release.
- On the Assets page, click firmware_NICLAV.zip release.
- Save the download to your storage and extract the archive.
You now have the Nicla Vision firmware with the model built-in.
Step 10: Flash the firmware
We can now return to OpenMV and flash the new firmware to the Nicla Vision.
- Put the Nicla Vision in bootloader mode by double-clicking the reset button – the green LED will start flashing.
- Click the Connect button in the IDE – the dialogue to Load the firmware shown below will open:
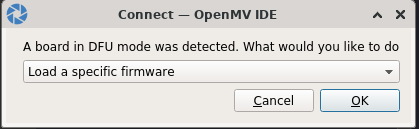
- Click OK.
- Navigate to bin file produced in the previous step and click Run.
The Nicla Vision will be flashed with the new firmware, which includes the EdgeImpulse model.
Step 11: Python script
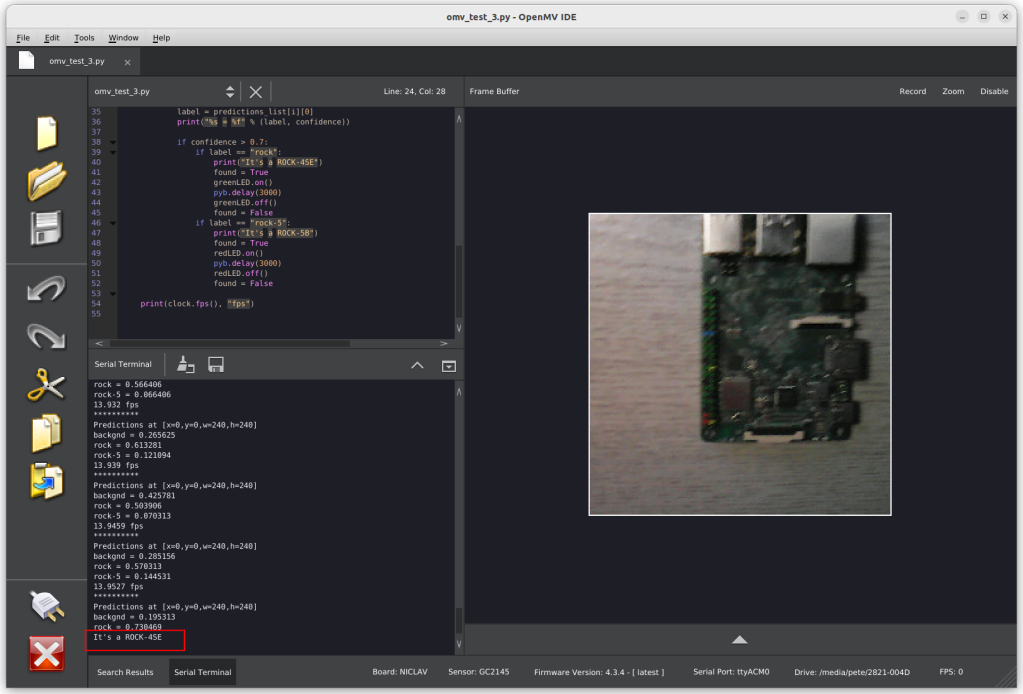
The next step is to write a Python script in OpenMV to control the Nicla camera and use the ML library to classify the image stream and try to detect our target objects.
The video stream is just a series of image frames which are passed to a TensorFlow object which classifies the frame using the model and calculates a confidence prediction. If the confidence level is high enough, the label is checked to see which one of the ROCK boards has been detected. The stream is paused while the onboard LED is lit up momentarily to indicate whether it’s a ROCK 4 or ROCK 5. The result is also printed to the output in the Serial Terminal of the IDE.
- From the menu, select File -> New File.
- Add the following Python code in the editor:
import sensor, image, time, os, tf, pyb

redLED = pyb.LED(1) # built-in red LED
greenLED = pyb.LED(2) # built-in green LED

sensor.reset()                         # Reset and initialize the sensor.
sensor.set_pixformat(sensor.RGB565)    # Set pixel format to RGB565 (or GRAYSCALE)
sensor.set_framesize(sensor.QVGA)      # Set frame size to QVGA (320x240)
sensor.set_vflip(True)
sensor.set_hmirror(True)
sensor.set_windowing((240, 240))       # Set 240x240 window.
sensor.skip_frames(time=2000)          # Let the camera adjust.

labels, net = tf.load_builtin_model('rock_detection')
found = False

def flashLED(led): # Indicate with LED when target is detected
    found = True
    led.on()
    pyb.delay(3000)
    led.off()
    found = False

clock = time.clock()

while not found:
    clock.tick()
    img = sensor.snapshot()
    for obj in tf.classify(net, img, min_scale=1.0, scale_mul=0.8, x_overlap=0.5, y_overlap=0.5):
        print("**********nPredictions at [x=%d,y=%d,w=%d,h=%d]" % obj.rect())
        img.draw_rectangle(obj.rect())
        predictions_list = list(zip(labels, obj.output()))
        for i in range(len(predictions_list)):
            confidence = predictions_list[i][1]
            label = predictions_list[i][0]
            print("%s = %f" % (label, confidence))
            if confidence > 0.8:
                if label == "rock":
                    print("It's a ROCK-4SE")
                    flashLED(greenLED)
                if label == "rock-5":
                    print("It's a ROCK-5B")
                    flashLED(redLED)

print(clock.fps(), "fps")- Save the script as py.
Step 12: Run demo
Now all the components are in place to run the Machine Vision demo. Once the camera is initialised, you can use the video frame in OpenMV to point it at the target, and if all goes well, the LED will turn on when one of the ROCK boards is detected.
- Click the Serial Terminal label at the bottom of the IDE to open the Serial Terminal.
- Click the Connect button in OpenMV.
- Click the run button and wait for the script to load and the video to start.
Here’s the output when a ROCK-4SE board is detected – it only takes a few milliseconds!
Step 13: Troubleshooting
Nicla Vision can be quite sensitive to the type of USB cable and even certain ports on the host PC. If you get issues where the device does not enumerate on the USB bus, try a different port or cable.
You can see the device connecting by opening a Terminal and running the following command:
sudo dmesg -wIf OpenMV still does not recognise your Nicla Vision, check if it is enumerated and, if necessary, re-flash the Arduino bootloader.
Never try to ERASE the flash memory – we did this, and it corrupted the bootloader. The only way to rectify it was to use an STM programmer to flash a new bootloader. See this forum for details of how to do it with an STM32F446 Nucleo board (RS Part Number 906-4624).
Summary
The Nicla Vision from the Arduino Pro range is an amazing device for industrial Machine Vision applications on the Edge. It’s tiny and very powerful for such a small package with low power requirements.
This project has shown how to set up and build an application that can recognise the difference between 2 ROCK boards, and it is very accurate under controlled conditions, with only a very basic model developed in EdgeImpulse.
We demonstrated how the image classification inference can trigger the onboard LED, but this could just as easily activate the GPIO pins linked to an industrial controller on a production line.
The possibilities are endless! And don’t forget, there is a TOF sensor, microphone, 6-axis accelerometer, WiFi and Bluetooth, I2C connector and battery connector with a monitor as well.
Ref:


Let’s invent the future together
What’s your challenge? From augmented reality to machine learning and automation, send us your questions, problems or ideas… We have the solution to help you design the world. Get in touch today.
Looking for something else? Discover our Blogs, Getting Started Guides and Projects for more inspiration!
Like what you read? Why not show your appreciation by giving some love.
From a quick tap to smashing that love button and show how much you enjoyed this project.

